
Light Types Overview
Tutorial
Beginner
+10XP
30m
(455)
Unity Technologies
From a dark, gloomy, neon-lit street in a grungy city to a glowing setting sun over an open field, you can achieve dramatic effects with the different lights within Unity. In this tutorial, you'll familiarize yourself with all the types of light available to you as each light provides a unique kind of illumination and control.
Languages available:
1. What are Light Types?
This tutorial has been verified using Unity 2019 LTS
Lights are an important aspect of any Unity project as they provide illumination to your Scene and help create dynamic or specific lighting conditions to help you achieve the look you want. From a dark, gloomy, neon-lit street in a grungy city to a glowing setting sun over an open field, you can achieve dramatic effects with the different lights within Unity (Figure 01). It's good to familiarize yourself with all the types of light available to you as each light provides a unique kind of illumination and control.
2. Adding Point Lights and Shadows
Point lights are located at a point in space and emit light in all directions equally. They’re useful for simulating lamps and other local sources of light and are often used in conjunction with particle systems.
To create a Point light in a Scene:
1. From the GameObject dropdown, select Light > Point Light. Alternatively, you can select an existing GameObject and click Add Component and add the Light component.
2. The Point light is now added to the Scene. Select it to be able to manipulate the object’s position (Figure 02).
3. With the light selected, you should be able to see adjustable settings in the Inspector window (Figure 03).
There is just one Light component that allows you to have finer control over the type of light.
- Type: This shows the current type of light being used. Possible values are Spot, Directional, Point, and Area (Baked only).
- Range: Determines how far the light emitted from the center of the object travels. This is for Point and Spot lights only.
- Color: Sets the color of the emitted light.
- Mode: This allows you to specify the Light Mode to determine if and how a light is baked. The possible modes are Realtime, Mixed, and Baked.
- Realtime is used for lights that need to change their properties during run time.
- Mixed is used for lights that can change their Transform and visual properties during run time but with strong limitations.
- Baked is used to create local ambience and doesn’t need to change during run time.
- Intensity: This value sets the brightness of the light.
- Indirect Multiplier: This value is used to vary the intensity of indirect light. Indirect light is the light that is bounced from one object to another. A value lower than 1 causes the light to get dimmer with every bounce. Higher than 1 makes the light brighter with each bounce. Keeping it at 1 means the light remains the same with every bounce.
- Shadow Type: This setting determines whether the light casts No Shadows, Hard Shadows, or Soft Shadows.
- Cookie: This setting specifies a Texture mask from which shadows are cast. For example, this would be useful for creating silhouettes, or patterned illuminations such as faking light coming through a window or getting cross-beams that cast shadows.
- Draw Halo: Use this setting to draw a spherical halo of light with a diameter equal to the Range value.
- Flare: Use this if you want a lens flare to be rendered at the light’s position. You’ll need to provide an Asset to this field to be used as the lens flare source.
- Render Mode: This setting specifies the rendering priority of the selected Light. The settings available are Auto, Important, Not Important.
- Auto is used to have the method determined at run time.
- Important always renders the light at per-pixel quality. Use this for the most noticeable lights.
- Not Important is used to set lights to render at the faster method of vertex/object light mode.
- Culling Mask: Use this setting to selectively exclude groups of objects from being affected by the light.
Let’s go over some additional light settings.
1. Set your Light Mode to Realtime.
2. Set your Light Shadow Type to either Hard Shadows or Soft Shadows.
3. You will now see additional settings underneath the Shadow Type in the Inspector window (Figure 04).
Here are the new additional properties for Shadows:
- Strength: This slider determines how dark the shadows will be from this light.
- Resolution: This setting controls the resolution of the shadows. The settings for these are Use Quality Settings, Low Resolution, Medium Resolution, High Resolution, and Very High Resolution. The higher the quality of the shadows, the better fidelity, but this comes with the higher cost of GPU time and memory usage.
- Bias: This controls the distance at which shadows are pushed away from the light. Avoid setting this value too high as you can create disconnected shadows from the GameObjects casting it.
- Normal Bias: This controls the distance at which shadow-casting surfaces are shrunk along the normal surface. Avoid setting this value too high as it can make the shadow too narrow for the GameObject casting it.
- Near Plane: This controls the near clip plane when rendering shadows. Use this setting to fix shadows that seem to have holes. Adjust the value higher until the shadow completely fills in.
3. Adding Spot Lights
Spot lights light an area over a range and angle; the light gradually falls off toward the maximum range. Unlike Point lights, which emit light in every direction, Spot lights are constrained to a given angle. These types of lights are normally used for artificial light sources such as flashlights, construction lights, and searchlights.
Let’s create a Spot light:
1. From the GameObject dropdown select Light > Point Light. Alternatively, select an existing GameObject and click Add Component and add the Light component.
2. In the Light Inspector, change the Type to Spot (Figure 03).
3. You will notice a new property becomes available, called the Spot Angle (Figure 05).
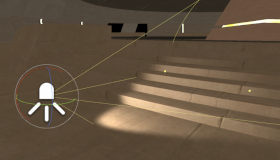
4. Set the angle to a higher or smaller value to see how it affects the spot light that was added to the screen (Figure 06).
Now we have a Spot light added to our Scene. Spot lights are great to help create artificial types of lighting, like neon lights, or construction lighting. They’re pretty versatile in their application and really help create atmosphere.
4. Adding Directional Lights
Directional lights emit even and consistent lighting across the entire Scene. These lights are often used to simulate sunlight or a light source that could exist from any distance away. All objects in the Scene are illuminated equally as the light from a Directional light does not diminish.
1. Let’s create a Directional light:
2. From GameObject dropdown, select Light > Point Light or select an existing GameObject and click Add Component to add the Light component.
3. In the light Inspector, change the Type to Direction (Figure 03).
4. You will notice a new property becomes available, called Cookie Size (Figure 07). Cookie Size lets you scale the Cookie (a Texture mask that determines the shadows being cast) yourself, while Spot lights and Point lights scale the cookie automatically based on the size of the cone or sphere of the light.
4. You’ll notice that the light doesn’t care where the GameObject exists; it only cares about the rotation. Select your Directional light and Press E to get the rotation gizmo. Rotate the Directional light and notice how the light angle updates (Figure 08).
By default, every new Unity Scene contains a Directional light. With Unity 5, the Directional light is linked to the procedural sky system (Lighting > Scene > Skybox). You can change this behavior by deleting the default Directional light and replacing it with a new one.
Directional lights evenly light the entire scene and are best used to represent a large, distant light source, such as a nearby star.
5. Adding Area Lights
Area lights are a unique lighting type that’s defined by a rectangle in space. The light is emitted in all directions uniformly across their surface area. This type of lighting doesn’t have any manual control, but the light diminishes as it travels away from the source. The way it diminishes is processor-intensive, therefore Area lights must be backed into lightmaps and are unavailable at run time.
Let’s create Area lights:
1. From the GameObject dropdown, and select Light > Point Light or select an existing GameObject and click Add Component to add the Light component.
2. In the Light Inspector, change the Type to Area (Baked only) (Figure 03).
3. You’ll notice that a few properties disappear and two new ones appear: Width and Height (Figure 09). These two options adjust the area that emits the light.
4. As previously mentioned, Area lights don’t work in run time and have to be baked (Figure 10).
5. After setting up your Area Light, open the Lighting window by going to the Window dropdown and selecting Rendering > Lighting Settings. This will open the Lighting window (Figure 11).
6. For now, leave the settings alone and click Generate Lighting to create your Baked lighting. After the lightmap bakes, the Scene will update with your Area light (Figure 12).
Area lights are soft and subtle, which make them perfect for streetlights or a bank of lights close to the player. They’re a great option when you want to simulate smaller sources of light, such as interiors of buildings.
6. Creating Emissive Materials
Emissive Materials emit light across a surface area. These types of lights contribute to bounced light in your Scene and can have their color and intensity properties modified during run time. The light emitted from emissive Materials has no range property, but the light will have a fall-off.
Let’s create an Emissive Material:
1. Create a Material in your project by right-clicking and selecting Create > Material.
2. In the Material Inspector, check Emission and set the color to whatever you wish the light to be (Figure 13). Emissive Materials can either be Baked or Realtime. If the Emissive light does not need to change during run time, it’s best to set it to Baked.
3. Assign the Material to an object in your Scene.
4. Ensure all the objects you wish to receive the Emissive glow are set to Static
(Figure 14).
5. Once that’s done, you will now have Material that emits light (Figure 15). To drive the strength of the light, simply enter a number larger than 1 in the Emission Color box.
Emissive Materials only affect static geometry in the Scene. Emissive lights are great for adding ambience or soft non-dynamic lighting. If you want Emissive lighting to work with dynamic or non-static geometry, you’ll have to use Light Probes (which will not be covered in this document).
7. Adding Ambient Light
Ambient light is a type of light that’s present all around the Scene but doesn't come from a specific source. This type of lighting can be an important addition to the overall look and brightness of the scene. It eliminates harsh shadows and brightens a Scene without requiring you to add any additional light sources.
To adjust the Ambient light settings, open the Lighting window.
1. Go to the Window dropdown and select Rendering > Lighting Settings. This will open the Lighting window (Figure 16).
The Lighting window has many settings, but for now, we’ll focus on the most pertinent ones.
Under the Environment tab, we have the following properties:
- Skybox Material: This is the Material that will appear behind everything in the Scene.
- Sun Source: When you use a procedural Skybox, this setting allows you to specify a GameObject with a Directional Light component to indicate the direction of the sun.
- Environment Lighting: These settings determine the light coming from the distant environment.
- Source: The Ambient light source. It has the following options:
- Skybox: derives the Ambient lighting from the Skybox Material.
- Gradient: allows you to choose separate colors for the Ambient light that comes from the sky, horizon, and ground.
- Color: allows you to use a single flat color for all ambient lighting in your Scene.
- Intensity Multiplier: Use this to set the brightness of the Ambient lighting. The range for this value is between 0 and 8.
- Ambient Mode: Use this to specify if the Ambient lighting should be Realtime or Baked. This option is only available when Realtime lighting and Baked lighting are enabled in the Scene.
The Lighting window has many more settings and options, but with the Ambient Lighting options detailed above, you can really adjust and customize how your scene is lit. From simulating realistic ambient lighting to simulating a distant sun on a different planet, it’s a powerful tool.
It’s important to plan for the level of sophistication of your project’s lighting. More light means bigger performance hits and longer bake times. It’s definitely something you’ll want to match to the platform you’re targeting. Even if your target consoles are high-end PCs, you’ll want to be mindful of how many lights you use to meet your performance requirements.