
Managing Projects with Multi-Scene Editing
Tutorial
Beginner
+10XP
15 mins
(277)
Unity Technologies
Unity allows you to have multiple scenes loaded simultaneously in the Unity Editor. Multi-scene editing allows you to lay out a huge game world one chunk at a time, moving everything into place, and even transfer assets from one scene to another. In this workflow, we’ll explore how we can use multi-scene editing to build a game world from modular sections.
Languages available:
1. Managing Projects with Multi-Scene Editing
Verified with Unity 2019.4
With Unity, you can edit multiple Scenes simultaneously. Unity’s Multi-Scene Editing feature allows you to lay out a huge game world one chunk at a time, moving everything into place, and even transferring assets from one Scene to another.
In this workflow, we’ll explore how to use Multi-Scene Editing to build a game world from modular sections. We’ll learn how to load, arrange, unload, and remove sections. We’ll also learn to transfer assets from Scene to Scene and create a modular world piece that you can load and arrange as many times as you’d like.
2. Creating and Editing Multiple Scenes
In this exercise, we’ll explore some of the ways to work with multiple Scenes.
1. Create a new project or load an existing one using the 3D template.
2. Create a Quad by selecting 3D Object > Quad from the GameObject drop-down. Name the Quad “GroundPiece”.
3. In the Inspector for GroundPiece, rotate it 90 degrees on the X axis.
4. Scale it 10 units in the X and Y axes (Figure 01).
5. In the Assets section of the Project view, right-click and select Create > Material. Name this material “Ground”.
6. Set Ground’s Albedo to green (or any color).
7. In the Scene view, drag the Ground Material onto GroundPiece.
8. Create a Prefabs folder inside the Assets folder, and drag GroundPiece into the Prefabs folder.
9. Save this Scene as “SceneA” (Figure 02).
At this point, we have a Scene into which we’ll add another Scene. With Multi-Scene Editing, we’ll be able to work with both Scenes at once.
3. Creating or Loading Additional Scenes for Multi-Scene Editing
1. In the Hierarchy view, right-click SceneA and select Add New Scene (Figure 03).
2. For our purposes, this new Scene will only be loaded additively as the player approaches the edge of SceneA. Delete the Main Camera and Directional Light GameObjects from the new Scene. When editing a Scene that will be loaded into another, be sure to remove the Main Camera and/or any other stock GameObjects of which there should be only one in a Scene.
3. Drag the GroundPiece from the Prefabs folder into the Hierarchy, dropping it either on the name of the new Scene, or in the blank space under it (Figure 04).
4. Move the newly placed GroundPiece 10 units in either direction in the X and/or Z axes.
5. In the Hierarchy view, right-click Untitled and select Save Scene or Save Scene As. Name this Scene “SceneB” (Figure 05).
We now have two separate open Scenes. Next, we’ll create an object in SceneA and transfer it to SceneB.
4. Transferring Assets Between Scenes
1. In the Hierarchy view, right-click SceneB and Unload or Remove the Scene so that only Scene A remains.
2. Create or import an object. Here, we have created a cylinder, named “Pipe”, to serve as a warp pipe (Figure 06).
3. In the Project view, navigate to where you saved SceneB (typically, but not necessarily, in a folder named Scenes).
4. Right-click SceneB and select Open Scene Additive.
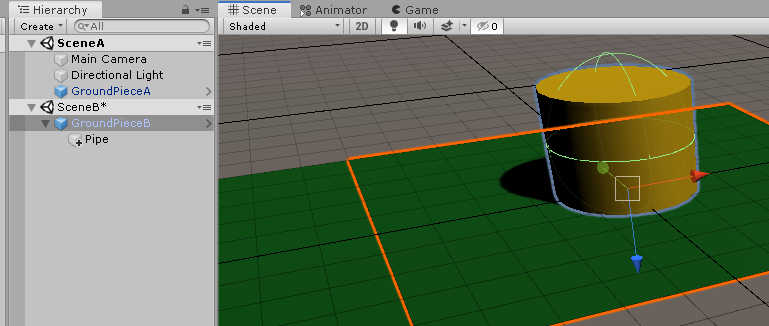
5. Drag Pipe from SceneA and drop it on the GroundPiece in SceneB (Figure 07).
6. Zero out Pipe’s X translation to move it above the piece of ground in SceneB (Figure 08).
7. In the Hierarchy view, right-click Scene A or B and select Save All (Figure 09).
8. To continue working on just SceneB, you could right-click SceneA and unload or remove it. You can also double-click SceneB or right-click it and select Set Active Scene. New GameObjects created via the drop-down are automatically placed into the currently active Scene.
5. Next Steps
This has been a brief introduction to some of the uses and benefits of multi-scene editing in service of project management. As you explore working with multiple scenes simultaneously, you’re sure to find new ways multi-scene editing can improve your workflow.