Model-View-ViewModel pattern
Tutorial
intermediate
+0XP
0 mins
6
Unity Technologies

By implementing common game programming design patterns in your Unity project, you can efficiently build and maintain a clean, organized, and readable codebase. Design patterns not only reduce refactoring and the time spent testing, but they also speed up onboarding and development processes, contributing to a solid foundation that can be used to grow your game, development team, and business.
Think of design patterns not as finished solutions you can copy and paste into your code, but as extra tools that can help you build larger, scalable applications when used correctly.
This tutorial explains how the Model-View-ViewModel pattern can be used to update GameObjects automatically when their model's properties change, thus reducing the amount of duplicate code and increasing runtime performance.
Languages available:
1. Overview
This tutorial explains the Model-View-ViewModel programming pattern and how you can use it in your Unity projects. Make sure to download the Level up your code with design patterns and SOLID sample project from the Unity Asset Store to follow along with the examples in this tutorial.
2. Introduction to the Model-View-ViewModel pattern
With Unity 6, UI Toolkit includes a runtime data binding system, which you can use to modify the MVP pattern to the Model-View-ViewModel (MVVM) pattern. Similarly to the MVP pattern, the MVVM pattern consists of three main parts:
- Model: The Model represents the data and business logic of the application. This can be any object, often taking the form of a ScriptableObject or MonoBehaviour.
- View: The View is the user interface that displays the data and interacts with the user. In UI Toolkit, this usually consists of a UXML file along with a USS style sheet.
- View Model: Much like the presenter from MVP, the View Model acts as a mediator between the Model and the View. This is commonly implemented as a MonoBehaviour script that handles the presentation of the data.
MVVM is closely related to MVC design patterns. The key difference is that MVVM adds data binding. Data binding updates the view automatically when the model's properties change. This simplifies and reduces much of the repetitive code to sync the underlying data with the user interface.
3. An example of MVVM based on the sample project
In our sample project, the demo scene uses the same health bar example from the MVP sample scene, but we’ve repurposed it to use MVVM with UI Toolkit’s runtime data binding.
Just like in the MVP example, the scene includes interactive elements to update a target’s health bar. Clicking on the target triggers the collider, which damages the target, illustrated in the health bar. Selecting the Reset button in the lower-right corner resets the target’s health.
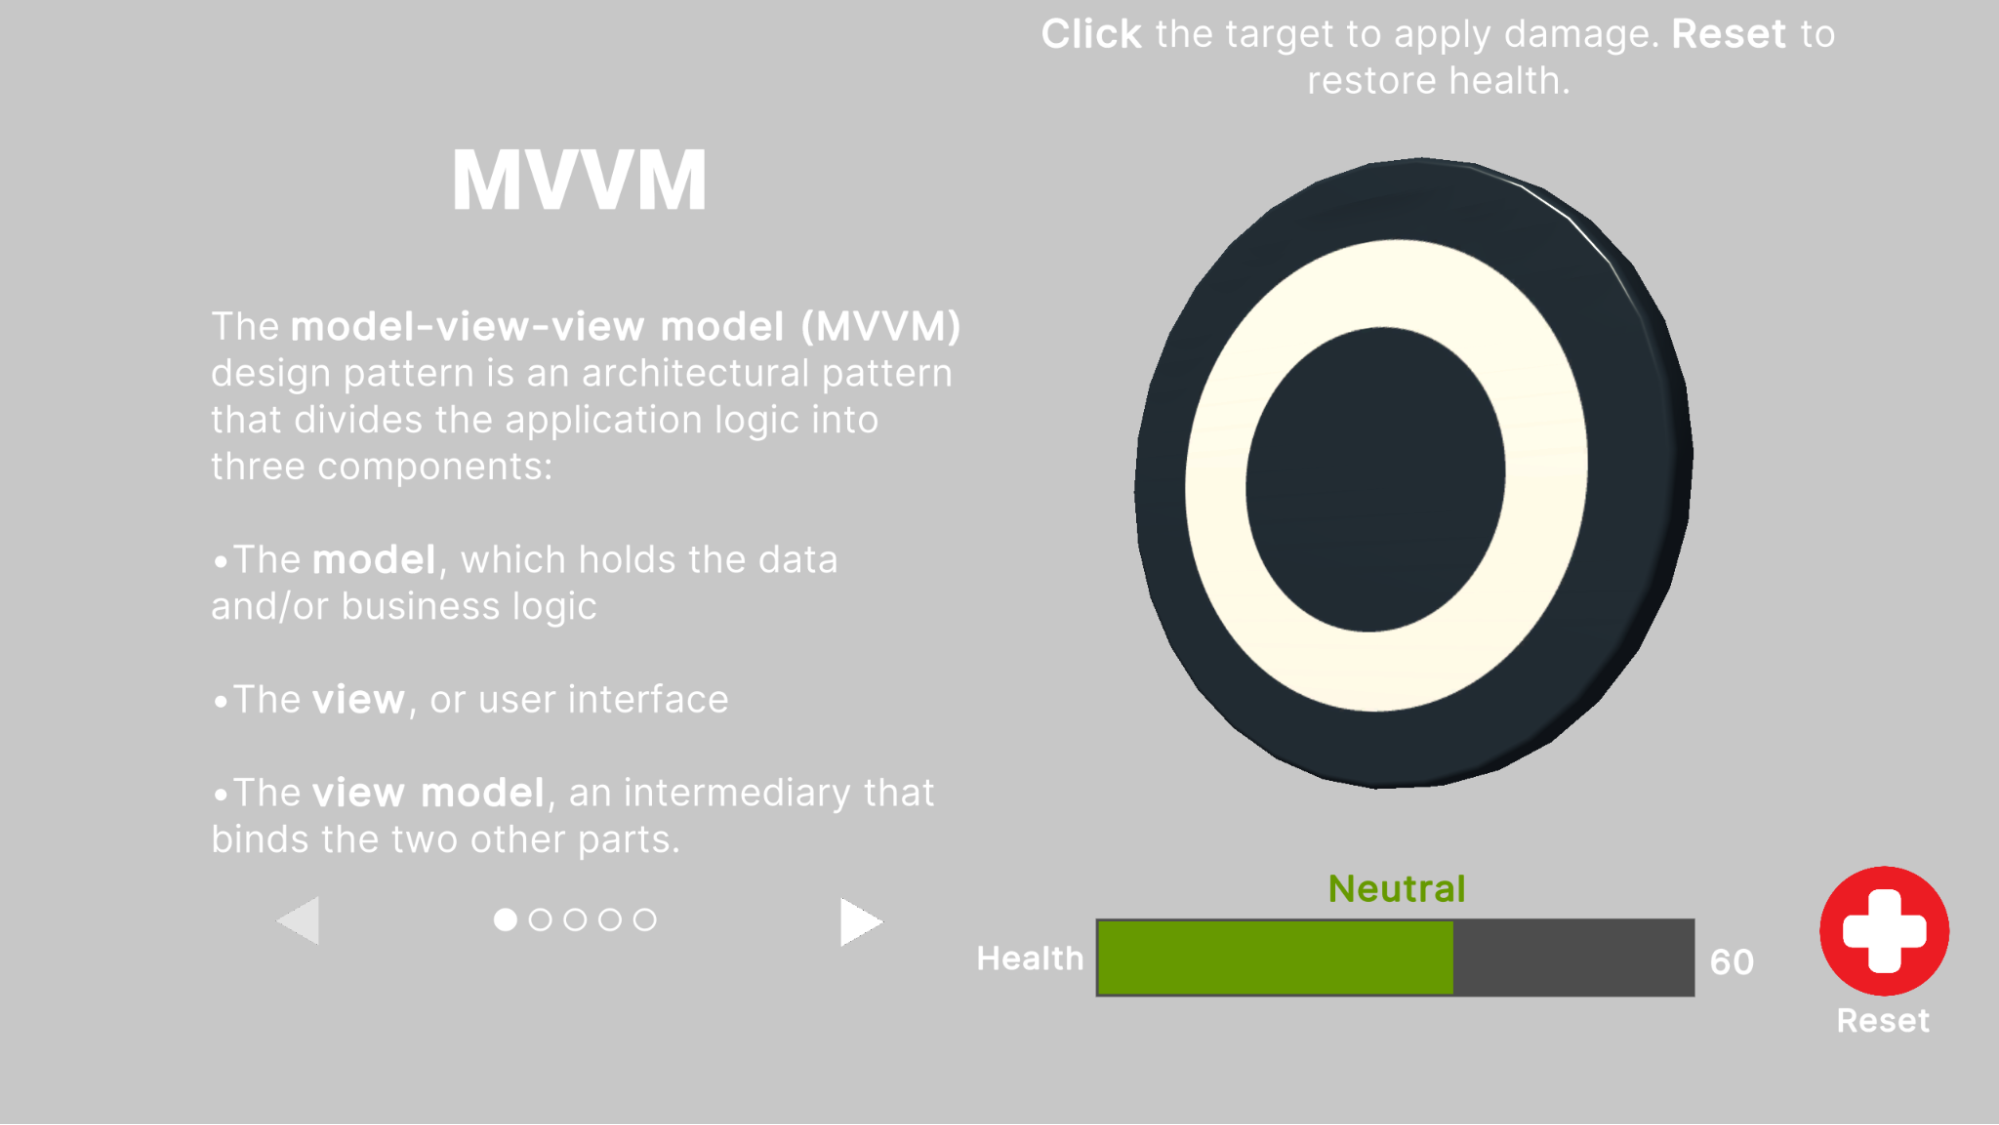
Adapting the same health bar example from the MVP sample scene illustrates the differences between the two design patterns:
- Just like in the MVP scene, The HealthModel in the MVVM scene is a ScriptableObject that contains a field for the CurrentHealth and some basic methods to increment, decrement, and reset its value. However, the MVVM pattern adds some extra data converters used for data binding.
- The HealthView remains nearly unchanged, with the same UXML and HealthBar style sheet.
- The HealthViewModel again acts as a mediator between the model and the view. However, much of the logic used to update the UI has been offloaded to UI Toolkit’s runtime data binding. The scripted component sets up the button interactivity and demonstrates how to replicate the data binding in C#.
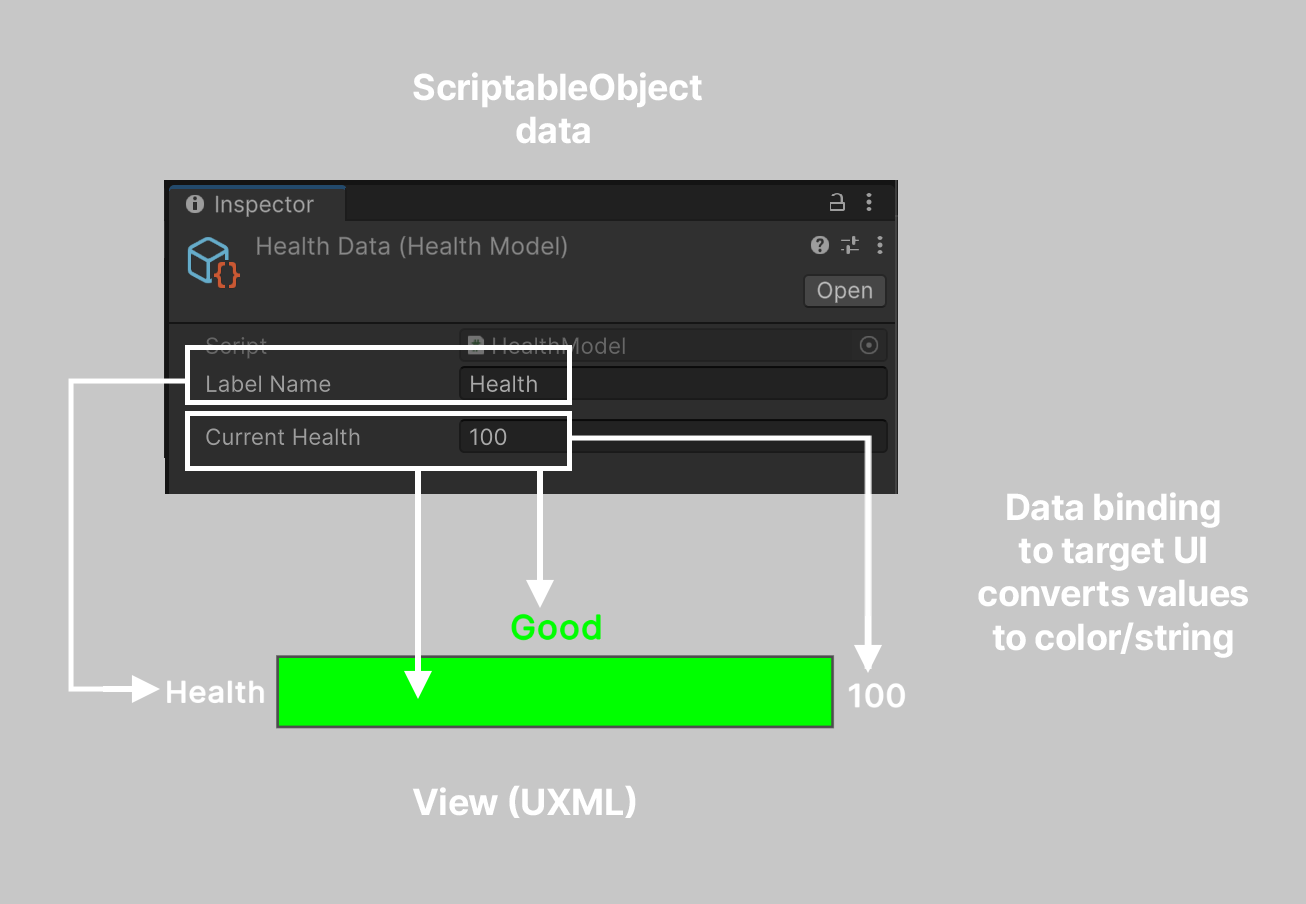
Note how the data binding between the UI and the HealthModel ScriptableObject updates:
- The Label Name binds to the UI Label on the left. Modifying the Label name box automatically updates on-screen.
- The value of the Current Health field appears on the Label to the right. As the value changes, the text updates automatically.
- A status Label’s text property indicates “Good,” “Neutral,” or “Danger” based on the CurrentHealth value. The color of this label interpolates between green and red accordingly.
- The color of the progress bar updates to match. This demonstrates how to set up data binding through the HealthViewModel script.
By leveraging data binding, the MVVM pattern simplifies synchronizing the model with the view.
4. Data binding: UI Builder
Let’s take a look at setting up a basic example of data binding using UI Builder. If the UI needs to convert data directly from a ScriptableObject, this binding often can be done without the need for a separate script.
To prepare the HealthModel, we can add a static method with the InitializeOnLoadMethod attribute. The RegisterConverters adds a ConverterGroup (named “Int to HealthBar” in this example) that can transform integer values representing health into a color (from green to red) or string representations ("Danger," "Neutral," or "Good"). These can provide visual or textual feedback.
Here is how you can implement this:
[InitializeOnLoadMethod]
public static void RegisterConverters()
{

    var converter = new ConverterGroup("Int to HealthBar");

    converter.AddConverter((ref int value) =>
        new StyleColor(Color.Lerp(Color.red, Color.green, value / (float)k_MaxHealth)));

    converter.AddConverter((ref int value) =>
    {
        float healthRatio = (float)value / (float)k_MaxHealth;
        return healthRatio switch
        {
            >= 0 and < 1.0f / 3.0f => "Danger",
            >= 1.0f / 3.0f and < 2.0f / 3.0f => "Neutral",
            _ => "Good"
        };
    });

    ConverterGroups.RegisterConverterGroup(converter);
}
Then, you can open the UXML in UI Builder and apply data binding interactively:
1. Locate the UI elements that you want to bind to the property.
Locate and open the HealthView.UXML UI document and select the health bar in the UI Builder window’s Hierarchy window. In the UI Builder window Inspector window, select Attributes in the sample project.
As you can see, in the sample project we bind the CurrentHealth to the status label and value label.
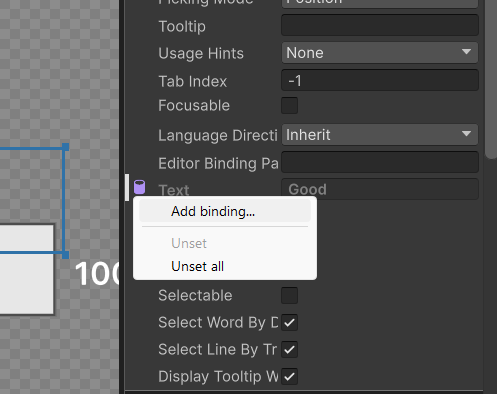
2. Right-click to choose Add binding… from the context menu (or Edit binding… if a binding already exists).
3. In the Add Binding window, select a Data Source, Data Source Path, and Binding Mode.
By doing so you will have established a connection between the UI elements and the data source. For example, in the status label, the Data Source is set to Object and the HealthData asset is selected. The Data Source Path is the CurrentHealth property. The Binding Mode is set to To Target, which means that the data binds only one-way from the source to the UI (that is, the UI changes to reflect the data, not the other way around.)
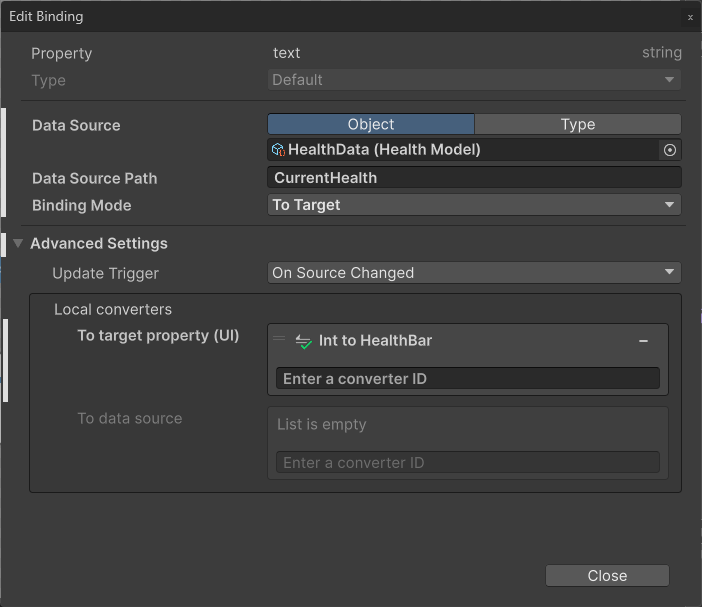
4. Use the foldout (triangle) to expand the Advanced Settings if you want to choose a specific converter from the ScriptableObject.
In our case, we can add the color converter we created earlier that maps the color of the health bar to the value of the health.
In our example, the local converter uses the Int to HealthBar ConverterGroup, created in the HealthModel ScriptableObject.
A data binding icon appears in the Inspector window once the setup is complete.

Once the data binding is in place, the user interface works without additional code.
Compare this simplified workflow with the HealthPresenter from the MVP sample scene, where the steps to update the data as it changes require more steps.
5. Select the target to damage the CurrentHealth.
The progress bar and labels update immediately to reflect the new value.
6. Open the UXML in a text editor to reveal what’s happening behind the scenes.
Each element that is set up with a data binding has a Binding block, containing all of the information set in UI Builder.
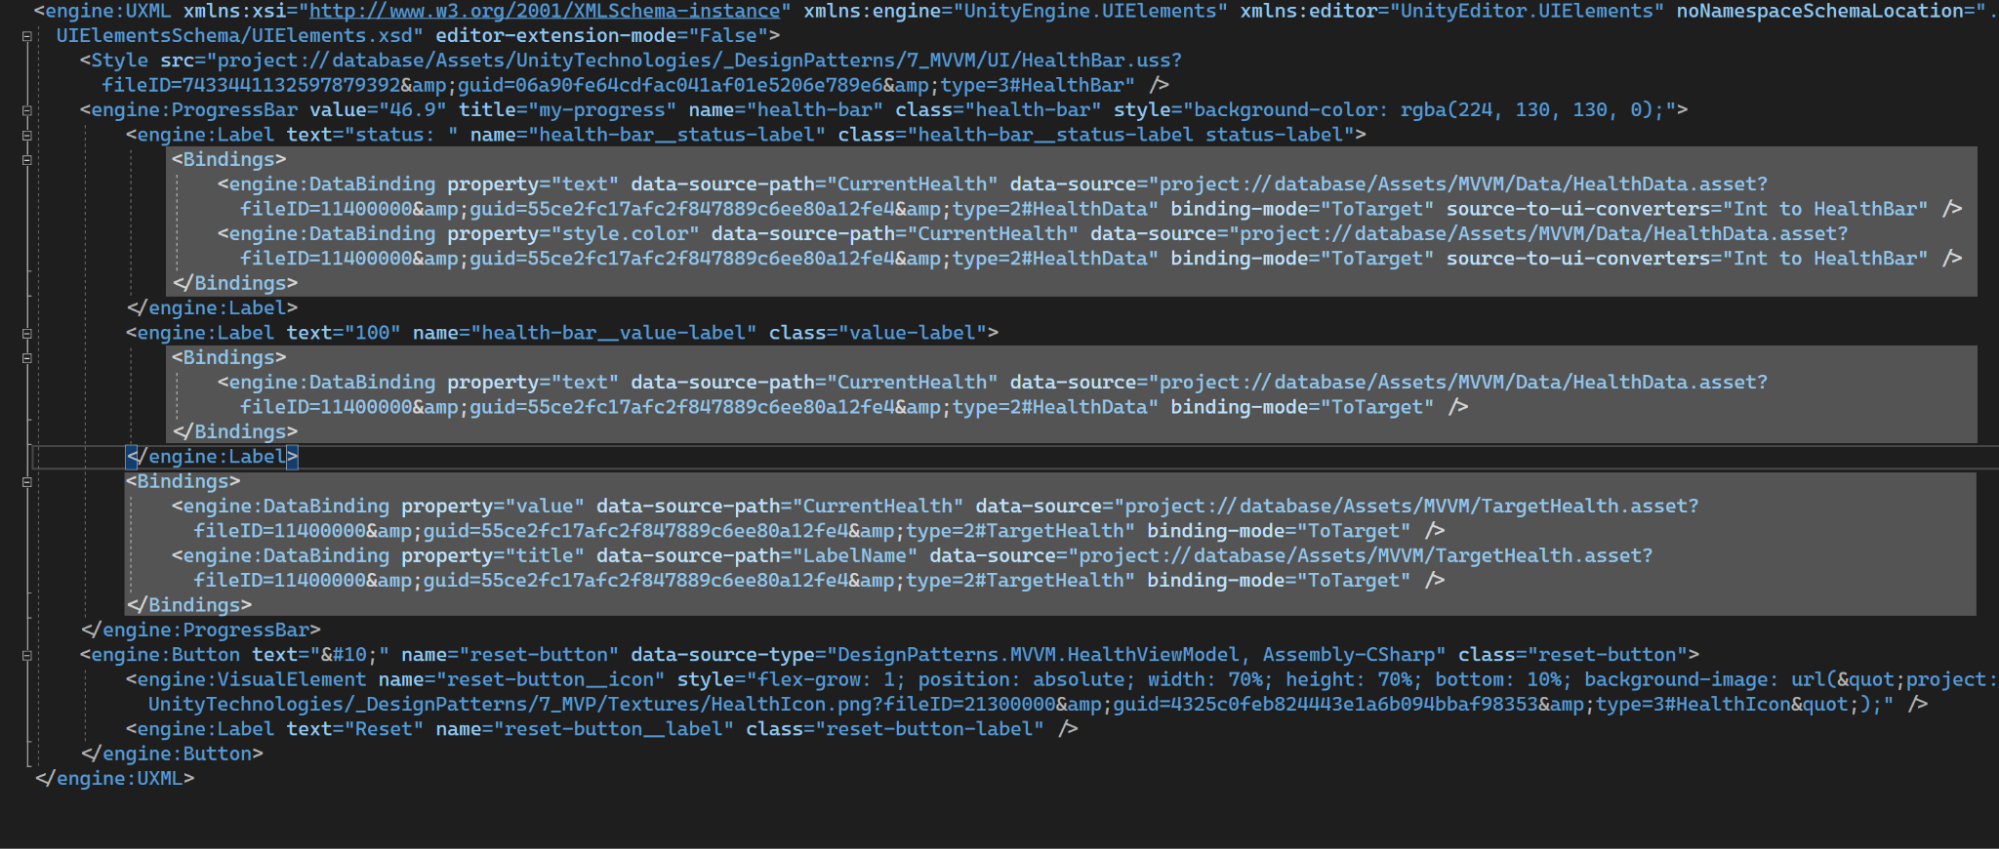
For example, the Label named health-bar__status-label above the health bar converts the CurrentHealth to the appropriate string and color; these values then bind to the text and style.color properties in the Inspector window of the UI Builder window.
5. Data binding: Scripting
In some cases, you might need to set up data binding using C# instead of the UI Builder. This is useful when certain UI elements contain internal parts or sub-elements. For example, the ProgressBar’s background and fill bar are not directly selectable in the UI Builder’s Inspector window.
The below code snippet demonstrates how to set up data binding in the HealthViewModel script:
private void SetDataBindings()
{
    var healthBar = m_Root.Q<ProgressBar>("health-bar");
    var healthBarProgress = healthBar?.Q<VisualElement>(className: "unity-progress-bar__progress");

    if (healthBarProgress != null)
    {
        healthBarProgress.dataSource = m_HealthModelAsset;

        var binding = new DataBinding
        {
            dataSourcePath = new PropertyPath(nameof(HealthModel.CurrentHealth)),

            bindingMode = BindingMode.ToTarget,
        };

        binding.sourceToUiConverters.AddConverter((ref int value) =>
            new StyleColor(Color.Lerp(Color.red, Color.green,
                (float)value / m_HealthModelAsset.MaxHealth)));

        healthBarProgress.SetBinding("style.backgroundColor", binding);
    }
}
The SetDataBindings method queries the VisualElement hierarchy in the UXML file to find the ProgressBar named “health-bar.” Then, it sets up the data binding, much like in the UI Builder.
- Next the script sets the data source. In this case, the data source is the HealthData ScriptableObject asset in the project: healthBarProgress.dataSource = m_HealthModelAsset;
- Creates a new data binding object, which contains the dataSourcePath and the binding mode.
- Defines data converters as necessary. In our above example we show how the integer value can convert into a StyleColor on the ProgressBar’s fill bar.
Then, name it “SetBinding” on the UI element, passing in the property (for example, “style.backgroundColor” for the ProgressBar’s fill color) and the binding object. Repeat this process for each element property that needs data binding.
Setting up the databinding with scripting becomes particularly important when direct binding to a ScriptableObject asset isn't possible, like when you need to create a ScriptableObject instance at runtime. In cases where a GameObject with a HealthViewModel must reference its individual health object, set up the data binding via scripting instead of the UI Builder.
Here is a comparison of the updated script using data binding compared with the previous MVP script example without it. Both use the same UXML and USS.
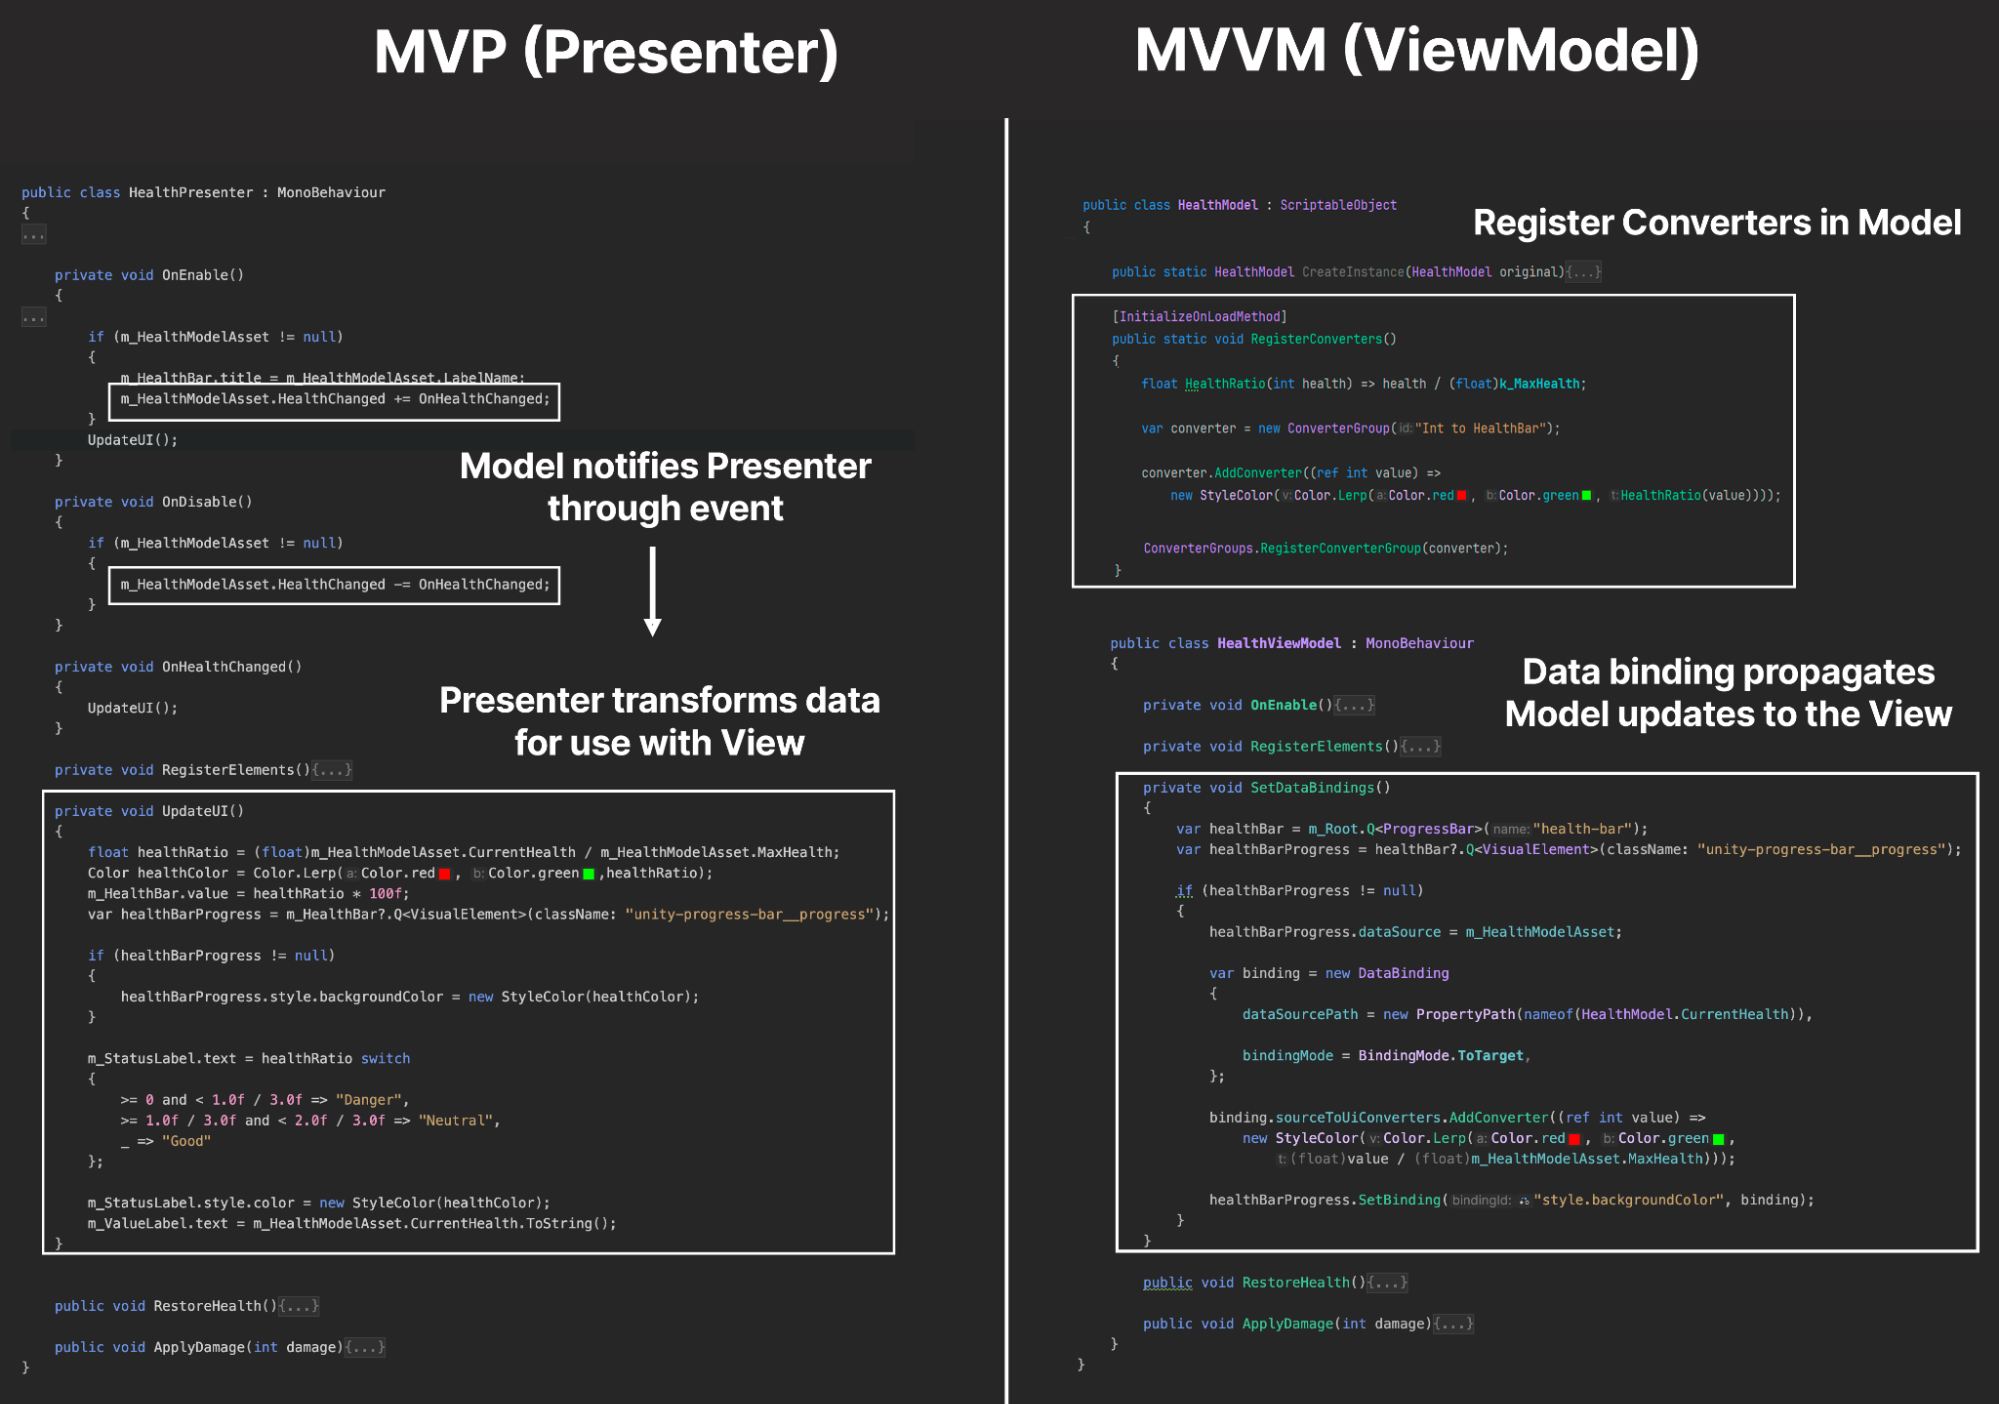
In MVP, the Presenter subscribes to events from the Model to detect state changes. When notified of a change, the Presenter processes the data into a format suitable for the View and updates the View accordingly.
When implementing the MVVM pattern, start by registering any necessary Converters in the Model. Then, establish data bindings in the ViewModel. This setup allows changes in the Model to update the View automatically through the existing bindings.
You can find a more detailed introduction to runtime data binding in the Unity manual.
6. Pros and cons of using the MVVM pattern in your projects
MVVM shares many of the benefits of MVP, such as improved testability and separation of concerns. Data binding can reduce the amount of boilerplate code needed to keep the UI in sync with the underlying data, reducing the number of events raised from the model. This leads to more concise code that’s easier to read and maintain. The MVVM pattern also improves UI consistency, with data binding reducing the risk of displaying stale or incorrect data.
However, consider the additional overhead of setting up each data binding. Setting the data source, data source path, binding mode, converters, etc., requires slightly more effort up front. You might decide that the MVVM pattern is only suitable for larger user interfaces where the benefits outweigh the additional complexity cost.
7. More resources
If you want to learn more about design programming patterns and how you can use them in your Unity projects, make sure to read the updated guide Level up your code with design patterns and SOLID and follow along with the Level up your code with design patterns and SOLID sample project on the Unity Asset Store.
Additionally, watch the Game Programming Patterns Tutorials video tutorials playlist where you can see a lot of these programming patterns in action:
- Command pattern video tutorial
- Factory pattern video tutorial
- Model-view-presenter video tutorial
- Pattern combo video tutorial
- Object pooling video tutorial
You can find all advanced Unity technical e-books and articles on the best practices hub. The e-books are also available on the Advanced best practices page in the documentation.