
MR Interaction
Tutorial
Beginner
+10XP
30 mins
(16)
Unity Technologies
This tutorial will teach you the basics of Mixed Reality interaction, specifically for the HoloLens headset.
Resources
Languages available:
1. Overview
This tutorial will teach you the basics of Mixed Reality interaction, specifically for the HoloLens headset.
To complete the tutorial, you’ll need to:
- Set up your Scene for Mixed Reality development
- Simulate HoloLens interaction in the Unity Editor
- Configure Gaze and Gesture interactions
- Configure Voice commands
- Configure Move, Scale, and Rotate commands
2. Set Up your Scene for Mixed Reality Development
Apply Mixed Reality Scene Settings.
- Open the Mixed Reality Scene Settings window (Mixed Reality Toolkit > Configure > Apply Mixed Reality Scene Settings).
- Check the boxes shown above and leave the others unchecked.
- Hit Apply.
--------------------
What are Mixed Reality Scene Settings?
Mixed Reality Scene Settings automatically set up your Scene to include the following:
- Mixed Reality Camera Prefab
- Reset Camera Position to Origin
- Add the Input Manager Prefab
- Add the Default Cursor Prefab
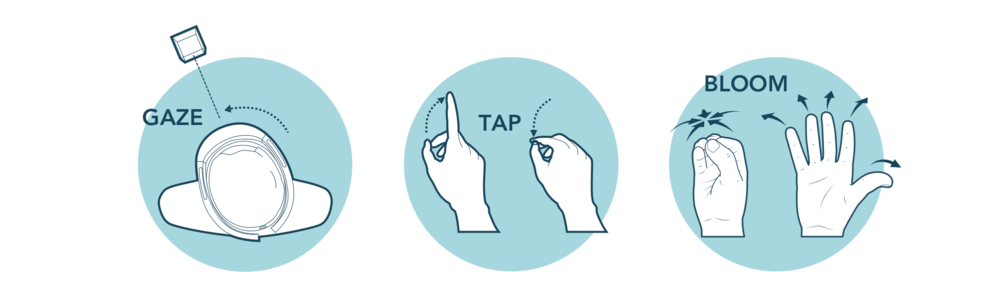
3. Simulate HoloLens Interaction in the Unity Editor
Gaze at the Cube using right click + mouse.
Use the arrow keys on your keyboard to move around.
Use the spacebar + mouse to simulate an air tap.
- In Play Mode, right-click and move your mouse to gaze around the Scene.
- Use the arrow keys to move around the Scene.
- While gazing at the Cube, hold the spacebar and use your mouse to move the virtual hand. Click to simulate an air tap.
Tip — Color Change
Changing an object’s color is a simple way to ensure the core interaction mechanic is working and can save you lots of time in your development process. The color-changing functionality is already done for you on this Cube, but you will learn how to make these changes in the next section.
4. Implement Pointer Interactions
Add a Cylinder to the Scene and position it in front of the Camera and off to one side (opposite the Cube).
Configure the OnPointerEnter event to change the Material using the Event Trigger component.
Test it out!
- Create a Cylinder GameObject (Create > 3D Object > Cylinder).
- Add the Event Trigger component to the object (Add Component > Event Trigger).
- Add a new event to the Event Trigger by clicking on Add New Event Type and selecting OnPointerEnter.
- Use the Selection window to select the Cylinder from Scene Mesh Renderer > Material.
- Set the material to Red Highlight.
--------------------
Tip — Reference a working version
Inside the Cube’s inspector, look at the Event Trigger component and note the specific events highlighted here:
What is an Event?
An Event is triggered when a certain action happens in Unity. You can think of an event like a broadcast system. When the event is triggered, it's broadcasted to all GameObjects in your Scene. Any GameObject that's "interested" in the event can add actions (change Material, start animation, turn off, play audio, etc.) to the event that get executed upon the event’s broadcast.
What is an Event Trigger component?
The Event Trigger can be used to specify functions you wish to be called for each Event System event. You can assign multiple functions to a single event and whenever the Event Trigger receives that event, it will call those functions.
5. Add a Keyword to the Voice Manager
Create an empty GameObject and name it VoiceManager.
Add a Speech Input Source component and add the “red” keyword to the keywords list.
- Create an empty GameObject (Create > Empty GameObject) and name it VoiceManager.
- Add the Speech Input Source component by hitting Add Component, searching for, and selecting Speech Input Source.
- In the Keywords drop-down hit the + button to add a new keyword — red.
- Leave the Key Shortcut to None for now.
--------------------
What is a Speech Input Source?
The Speech Input Source manages speech recognition on the HoloLens. This component is where you add keywords that will trigger an event when the system recognizes the word through the mic.
Tip — Managers
Managers are commonly used in Unity to delegate tasks and "manage" other GameObjects in your Scene. Common examples of managers include: GameManager, StateManager, VoiceManager, AudioManager, and AnimationManager.
(Note: By naming a GameObject "GameManager," you're not giving it special power. Naming is purely semantic.)
6. Create a Voice Controlled Object
Create a Capsule GameObject and name it VoiceControlledObject.
Add a Speech Input Handler component and add the “red” keyword to the keywords list.
Add a Material change to the Response event and make it turn red.
- Create a Capsule GameObject, name it VoiceCapsule, and position it so that it's in front of the Camera (viewable in the Game view).
- Add the Speech Input Handler to the GameObject by hitting Add Component, searching for the Speech Input Handler, and double-clicking to select it.
- Add the red keyword that was declared in the Speech Input Source by hitting the + button and using the drop-down to select red.
- Add a Response event by hitting the + button and dragging in the VoiceCapsule object.
- Add the Material change to the Response event by using the drop-down to select Material (MeshRenderer > Material) and selecting the red highlight Material.
--------------------
What is a Speech Input Handler?
The Speech Input Handler is used to add responses to the voice events declared in the Speech Input Source script.
7. Add the Ability to Rotate and Scale
Create another GameObject and name it RotateScaleObject. Position it in front of the Camera to illustrate rotate and scale.
Add the Bounding Box Rig to the GameObject and configure the Bounding Box Prefab.
- Create a Cylinder (Create > 3D Object > Cylinder), name it RotateScaleObject, and position it in front of the Camera and to the opposite side of the PointerCube — (-2,0,8) works nicely.
- Add the Bounding Box Rig to the Cylinder by hitting Add Component and searching for the Bounding Box Rig.
- Find the BoundingBoxBasic.prefab (Holotoolkit > UX > Prefabs > BoundingBoxes > BoundingBoxBasic.prefab) in the Project view.
- With RotateScaleObject selected, drag BoundingBoxBasic.prefab into the Bounding Box Prefab slot on the Bounding Box Rig component. It should look like this:
8. Key Takeaways
You now have a working knowledge of the core interaction techniques for the HoloLens and have successfully set up a Scene to work with those interactions.
By completing this tutorial, you've learned to:
- Simulate HoloLens interaction in the Unity Editor
- Configure Gaze interactions
- Configure Gesture interactions
- Configure Voice commands