
Nested Canvas Optimization - 2019.3
Tutorial
Beginner
+10XP
15m
(162)
Unity Technologies
As covered in previous tutorials, Unity UI components are contained within a Canvas. In previous tutorials, we’ve added elements to our UI using only one Canvas. In this tutorial, we’ll learn that Unity not only supports multiple Canvases within a Scene, but that sub canvases can have a positive impact on a project’s performance.
Languages available:
1. Nested Canvas Optimization
Verified with: 2019.4 and TextMesh Pro 2.0.1
Verified with: 2019.3 - https://learn.unity.com/tutorial/nested-canvas-optimization-2019-3
As covered in previous tutorials, Unity UI components are contained within a Canvas. In previous tutorials, we’ve added elements to our UI using only one Canvas. In this tutorial, we’ll learn that Unity not only supports multiple Canvases within a Scene, but that sub canvases can have a positive impact on a project’s performance.
2. Batching
An ordinary UI can contain many elements, all of which are redrawn for every frame. Through the batching process, the GPU decides what needs to be drawn in a given frame. Elements within a Canvas are, under most circumstances, divided into static and dynamic elements. Usually static elements are drawn together in one call to the GPU as they do not change. This means that these UIElements are generated once, stored in a cache, and quickly redrawn for each frame.
Unfortunately, dynamic UIElements must be rebatched, or essentially regenerated, for every frame. When a Canvas contains both static and dynamic elements, dynamic elements can slow down the rest of the UI even though static elements don’t need to be regenerated.
Say we want to design a clock. This timer will consist of both static elements (labels) and dynamic elements (numbers). How can we effectively implement this in Unity’s UI? This is where Nested Canvases can help.
3. Nested Canvases
A Canvas’ child objects dictate the batching process. If a child within a Canvas needs to be rebatched, the entire Canvas will be rebatched as well. Instead of combining static and dynamic elements in a single Canvas, static and dynamic elements can be split into their own Canvases. To keep the same layout and properties consistent across the two Canvases, the Canvas with the dynamic element can be nested under the main Canvas.
4. Creating the Clock
To demonstrate this, we will create an in-game UI that displays the current time. This UI will make use of the System.DateTime class.
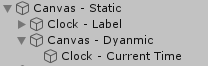
1. Right-click in the Hierarchy and navigate to UI > Text - TextMeshPro. A new Canvas with a TextMesh Pro GameObject parented to it should be created below. Name it along the lines of Canvas - Static so we can differentiate between it and the dynamic Canvas.
2. Label the TextMesh Pro object something along the lines of Current Time, and adjust the Rect Transform’s width and position to your liking.
3. Right-click in the Project View and navigate to Create > C# Script. Rename the script DisplayTime.
4. Right-click in the Hierarchy and navigate to UI > Canvas. This will create another Canvas object in your Scene.
5. Parent this Canvas to the static Canvas and rename it Canvas - Dynamic.
6. Create another Text - TextMeshPro GameObject and parent it to this new Canvas.
7. Attach the DisplayTime script to this new TextMesh Pro object.
Our two Canvases should be set up similarly in the Hierarchy panel (Figure 01).
Our UI should also now look similar to (Figure 02):
Now we can begin writing our DisplayTime script.
8. Open the DisplayTime script in your code editor of choice.
9. Make sure you include the System and TMPro namespaces at the beginning of the script.
using System;
using TMPro;
using System.Collections;
using System.Collections.Generic;
using UnityEngine;
using UnityEngine.UI;
10. Next, create variables for the system time and the time display. The system time will derive from System.DateTime, whereas the time display will be a TextMesh Pro GUI object.
public class DisplayTime : MonoBehaviour
{
    private TextMeshProUGUI timeDisplay;
    DateTime currentTime;

    void Start()
    {
        ...
    }

    void Update()
    {
       ...
    }
}
Please note that we are using a TextMesh Pro GUI object instead of the Mesh Renderer-based TextMesh Pro object.
11. Under our Start function, assign timeDisplay to the TextMesh Pro GUI component.
 void Start()
    {
        timeDisplay = GetComponent<TextMeshProUGUI>();
    }
12. Lastly, set the current time to DateTime.Now, and assign the timeDisplay TextMesh Pro object to this value.
  void Update()
    {
        currentTime = DateTime.Now;
        timeDisplay.text = currentTime.ToString("T");
    }
The “T” parameter formats the time as HH:MM:SS XM. For example, if the time was “4 o’clock,” it would be formatted as “4:00:00 PM”
The entire script is available below:
using System;
using TMPro;
using System.Collections;
using System.Collections.Generic;
using UnityEngine;
using UnityEngine.UI;

public class DisplayTime : MonoBehaviour
{
    private TextMeshProUGUI timeDisplay;
    DateTime currentTime;

    void Start()
    {
        timeDisplay = GetComponent<TextMeshProUGUI>();
    }

    void Update()
    {
        currentTime = DateTime.Now;
        timeDisplay.text = currentTime.ToString("T");
    }
}
When we enter Play mode, we should see the current time displayed in our UI (Figure 03).
13. While in Play mode, navigate to Window > Analysis > Profiler. Navigate to the UI Profiler Module. Notice how our static and dynamic Canvases are batched separately. This is exactly what we wanted to achieve (Figure 04).