Organize addressable assets into groups
Tutorial
·
intermediate
·
+10XP
·
20 mins
·
(178)
Unity Technologies
In this tutorial, you will learn how to create Addressables groups and how to assign assets to them.
By the end of this tutorial, you will be able to:
- Explain group schemas
- Create an asset group template
- Explain addressable groups
- Identify ways addressable assets can be grouped together
- Explain different methods for assigning addressable assets to groups
- Configure AssetBundles according to addressable groups
Languages available:
1. Overview
When you make an asset addressable, it always becomes part of an Addressables group. An Addressables group is the main organizational unit of the Addressables system, and it acts as a container for addressable assets. During the development of your application, you will assign addressable assets to groups and configure the ways the content will build.
You will spend the majority of your time in the Addressables Groups window, which is where you can visualize the assets and their relationships to groups.
2. What is a group schema?
All Addressables groups are composed of schemas. You can think of schema on an Addressables group as fairly similar to components on a GameObject, in the sense that you maintain a collection of them and can add/remove/configure them in the Inspector. A schema stores information about how its group will be processed during Addressables content builds.
To add and remove the schemas in the Default Local Group, follow these instructions:
1. From the Addressables Groups window, select Default Local Group (Default).
2. In the Inspector window, select the Add Schema button to view the schemas you can add to Default Local Group (Default). Add the Resources and Built In Scenes schema.
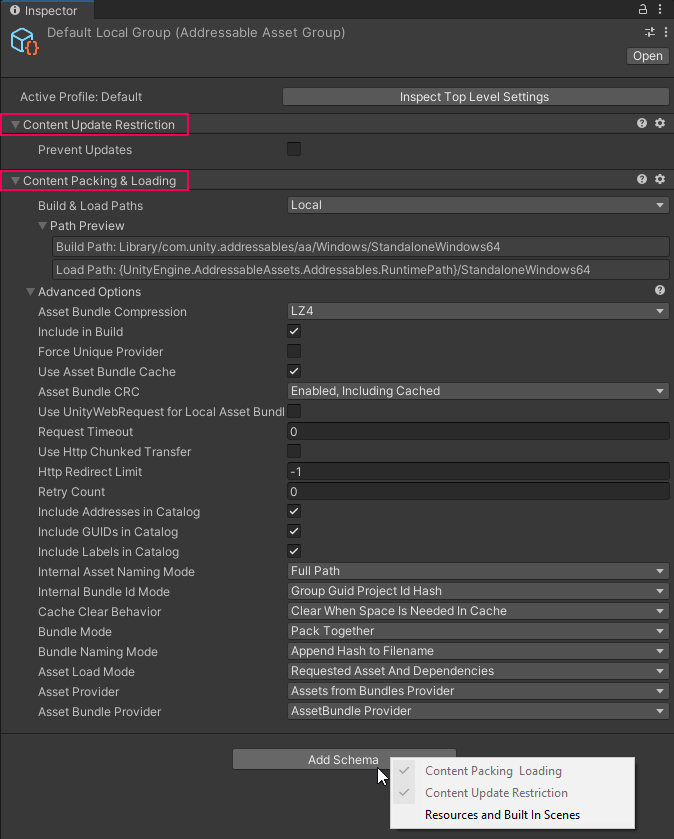
3. Right-click the More (gear) button on the Resources and Built In Scenes header. Note the options to reorder the schemas and remove that schema. Select Remove Schema and confirm.
3. What are the built-in schemas?
There are three group schemas that are packaged with the Addressables system that can be added to an Addressables group.
Content Packing & Loading
This schema is concerned with informing build scripts about how this group’s assets should be turned into Addressables content, and how the application should read the content.
The primary property of this schema is Build & Load Paths, which informs the build scripts whether the assets in the group should transform into content that is either local or remote. This setting is where the Addressables content build pipeline makes use of the active profile’s path pair variables. The Content Packing & Loading schema also has other properties. We won’t go into the details of each property, but these properties affect your build in the following categories:
- How many AssetBundles are built from a group at build time.
- How the Addressables system should make web requests when downloading remote content.
- How the Addressables system should treat remote content files after downloading to disk.
- How the data in the content catalog file is composed.
- The backend strategies that the Addressables system uses to fulfill asset loading requests for the assets in this group.
As the name implies, the schemas of the Default Local Group are configured to build local content. To change this setting so that this schema is configured to build remote content, follow these instructions:
1. In the Addressables Groups window, make sure that the active Profile is Developer, which defines the phony URL for Remote.LoadPath.
2. Make sure that the Play Mode script is set to Use Existing Build so that Play mode will try to load real build content from the phony URL.
3. Right-click Default Local Group and select Rename. Rename the group to “Default Remote Group”.
4. In the Inspector window, under Content Packing & Loading schema, select the Build & Load Paths property dropdown and select Remote. This will make sure that when the build script builds the Addressables content for this group, it will note that the addressable assets are remote and located at the phony URL. The Path Preview will show you what the values of the Remote path pair resolve to.
5. In the Groups toolbar, select New Build > Default Build Script to start the build process. If the Addressables Build Report dialog prompts you, decline its usage for now. The Build Report window will be discussed in the Advanced tutorials.
6. Make sure that the MainMenu scene is active in the Unity Editor and enter Play mode. Note that there are Console window errors and that the logo is not loaded and visible. This is intentional – since you have a real web request and a phony URL, so the Addressables system is failing to connect to download the Addressable assets.
7. Right-click Default Remote Group and select Rename. Rename the group back to “Default Local Group”.
8. In the Inspector window, under Content Packing & Loading schema, select the Build & Load Paths property dropdown and select Local. This will make sure that when the build script builds content, it will remove the phony web request and make the assets local again for the next build.
Content update restrictions
This schema is concerned with how Addressables content should be built if there are previous published versions of Addressables content. When used, it informs the Addressables system to flag if the assets in a group have changed since the last time you built content. If you are doing post-release content updates, this can help you determine how the grouping strategy should change to accommodate the updated assets. This will be explained in more detail in the Advanced Addressables tutorials.
Resources and built in scenes
This schema informs the build scripts about which types of built-in assets to display in the Built In Data group. This schema will be discussed further in future tutorials.
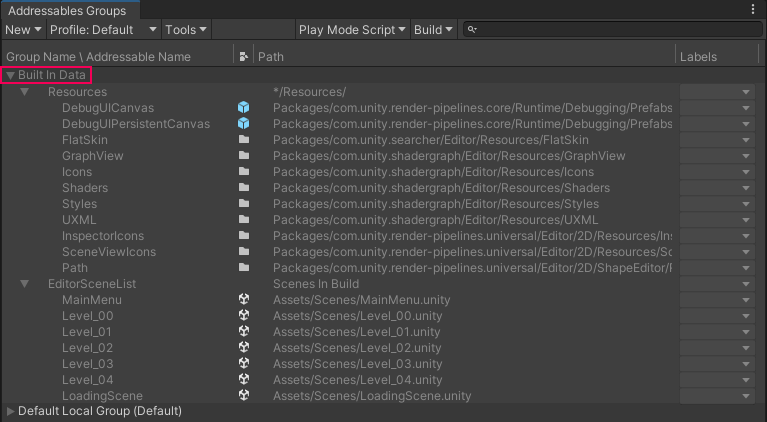
4. Asset group templates
If an Addressables group is like a GameObject, then an asset group template is like a GameObject prefab. Similar to how a prefab describes the initial shape of a GameObject such as its components and the values of their properties, an asset group template describes the initial shape that the schemas and properties of a new Addressables group takes on.
The Addressables system comes packaged with one built-in asset group template: Packed Assets.
To view the PacketAssets template, follow these instructions:
1. From the Addressables Groups window, select Tools > Inspect System Settings.
2. In the Inspector window, locate the Asset Group Templates foldout and select Packed Assets in the reorderable list. This will select the Packed Assets asset and refocus the Project window to Packed Assets.
3. Select the Packed Assets asset. In the Inspector, note the group template properties appear to be like a group’s, with schemas.
Note: PackedAssets is defined with two schemas: Content Packing & Loading and Content Update Restrictions.
5. Create an asset group template
You can create your own templates to define different types of groups that your project may require.
To make custom templates for your local and remote groups, follow these instructions:
1. From the Addressables Groups window, select the New dropdown in the toolbar. Note that there is an option labeled Packed Assets.
2. In the Project window, navigate to Assets > AddressableAssetsData > AssetGroupTemplates and duplicate the Packed Assets template. Name one “Local Packed Assets” and the other “Remote Packed Assets”.
3. Select the Local Packed Assets file. In the Inspector window, under Content Packing & Loading schema, select the Build & Load Paths property dropdown and select Local.
4. Select the Remote Packed Assets file. In the Inspector window, under Content Packing & Loading schema, select the Build & Load Paths property dropdown and select Remote.
5. From the Addressables Groups window, select Tools > Inspect System Settings.
6. In the Inspector window, locate the Asset Group Templates foldout and select the Add (+) button to make sure that Local Packed Assets and the other Remote Packed Assets are listed.
7. When your file system browser opens, navigate to Assets > AddressableAssetsData > AssetGroupTemplates to find the asset group templates and add them.
8. From the Addressables Groups window, select the New dropdown in the toolbar. Note that the option for Packed Assets is gone and in its place there are two new options: Local Packed Assets and Remote Packed Assets.
You can now easily create new groups that can be configured from the details of these templates.
6. Create a group from an asset group template
To add new Addressables groups using the new templates, follow these instructions:
1. From the Addressables Groups window, select the New dropdown in the toolbar and select Local Packed Assets. Note that it creates a group named after the template, Local Packed Assets.
2. Right-click the area where the groups are listed to reveal a context menu.
3. Select Create New Group > Remote Packed Assets. Note that a group named after the template Remote Packed Assets is created.
4. Select the two newly made groups. In the Inspector window, note that the Build & Load Paths property is different between groups. This is because the variables match the properties of the templates they were created from.
5. Right-click Local Packed Assets group and select Rename. Rename the group to “Local Scenes”.
6. Make sure that the foldout for the Default Local Group is open. Select the LoadingScene addressable scene and drag it to Local Scenes.
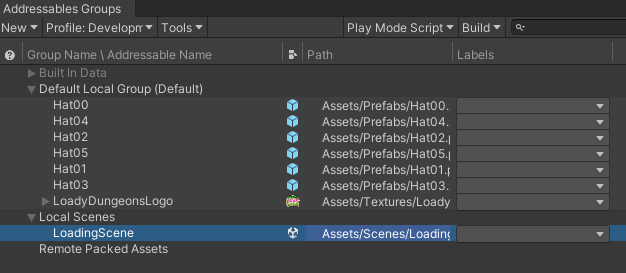
Note: If you change properties or schemas in an asset group template, those settings will only affect the groups created after the change, not the ones created before. Likewise, any changes to a group will not affect the schema it was created from.
7. How many AssetBundles are built from a group?
The Content Packing & Loading group schema was attached to the default asset group template Packed Assets, and now in Local Packed Assets and Remote Packed Assets templates as well. Recall that Content Packing & Loading informs the build scripts how they should build Addressables content.
In the Advanced section of Content Packing & Loading, there is another notable property that we will briefly discuss: Bundle Mode. Bundle Mode has three options to choose from:
- Pack Together: The group is intended to be built into one asset bundle. The only situation that breaks this assumption is if you want to enable Content Update Restrictions schema to prevent updates, an option that will be discussed further in the Advanced tutorials.
- Pack Separately: Each asset in the group is built into an AssetBundle that contains only that asset. This assumption is broken if you have created implicit asset dependencies, which will be discussed later in the Advanced course.
- Pack Together By Label: The unique combinations of labels attached to the assets in this group are what form the basis for AssetBundles in this group. We will discuss labels in the next article.
By default, the Addressables system builds with Packed Assets group template, which has its Bundle Mode defaulted to Pack Together. This means that each Addressables group will build to one AssetBundle unless Bundle Mode is configured differently.
No matter what the Bundle Mode setting your group has, you can always expect that one asset from one group will never be bundled with another asset from another group.
To see how the AssetBundles are built from groups, follow these instructions:
1. From the Addressables Groups window, select New Build > Default Build Script from the toolbar.
2. After the build is finished, check out the build content. If you are unsure where the content was built to, you can use the ProfileVariableTester.cs from the Profiles tutorial. From the main menu, select Loady Profiles > Test Profile Variable. Note the runtime variable for Local.LoadPath. This the location where the Editor will build content, which the Use Existing Build Play Mode script uses.
3. Open your file system and find the Loady Dungeons project. Use the runtime value of Local.BuildPath to find the directory. Note the bundle files that were created.
Default Local Group has become one AssetBundle with assets packed together.
LocalScenes group has become one AssetBundle, since it consists of one scene with assets packed together.
No AssetBundles are built for Remote Packed Assets because they have no assets, and an AssetBundle is built for the built-in shaders by default.
4. Right-click Remote Packed Assets group and select Rename. Rename the group “Hats”.
5. Ctrl+select (macOS: Cmd+select) to highlight all the Hat assets and drag them into the Hats group.
6. Create a new group from Remote Packed Assets template and select Rename. Rename the group to “Levels”.
7. Ctrl+select (macOS: Cmd+select) all the Level assets and drag them into the Levels group.
8. Select all the level assets and right click to select Simplify Addressable Names.
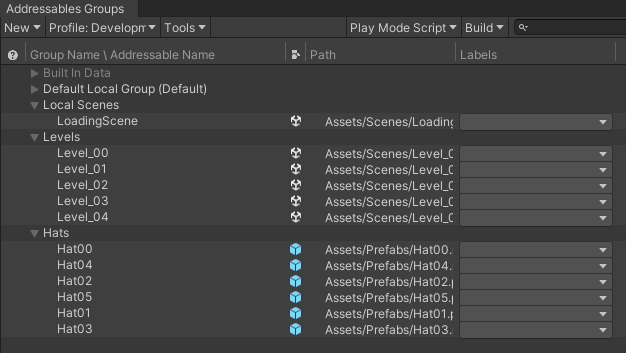
9. From the Groups window, select New Build > Default Build Script.
10. After the build is finished, find the build directory for the local content in your file system. Note the bundle files that there are three bundles, just like before. Navigate to the ServerData folder, which is where Remote.BuildPath specifies that remote content should be built to. You’ll find that there are two AssetBundle files here, one for the hats assets and another for the levels.
You now have an idea of how groups are used to help build Addressables content.
8. Next steps
In the following tutorial, you will learn how to label addressable assets so that you can fine-tune which assets are loaded.