
Playground concepts
Tutorial
Beginner
+10XP
10 mins
(143)
Unity Technologies
In this section, you’ll learn about a few fundamental concepts of Unity Playground so you can begin creating your own fun interactive experiences.
Languages available:
1. Introduction
Over the course of the previous two tutorials, you were guided through the process of creating a game from start to finish using the Unity Playground project. You saw how a simple game can be created in just a few steps using the provided assets and prebuilt interaction scripts.
In this section, you’ll learn about a few fundamental concepts of Unity Playground so you can begin creating your own fun interactive experiences. If you haven’t yet completed the first two tutorials, be sure to do so by visiting Playground: Get started on your first game.
2. Information and warnings
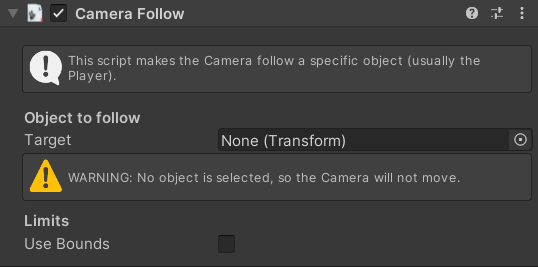
The Playground has a large selection of custom made interaction scripts for you to work with as you create your games. At the top of each of these custom scripts you will find an info box that describes what the script does. Be sure to read through these info boxes before using the script so you know what to expect.
Similarly, when you first apply a script to a GameObject, you might see one or more warning messages (like the image above). These messages will be present so long as there are parameters that need to be completed by you in some way. The warning messages will give you information about what kind of object or data needs to be filled in, so be sure to read them.
3. Collisions and triggers
Almost all of the logic scripts in the Playground use collisions to create gameplay. This means that things happen when two objects with Colliders touch each other or when an object with a Collider enters another object (which also has a Collider that is marked as Trigger).
For instance, you can have damage that happens on collisions with an enemy, win a level when touching an object, collect coins and power ups by moving into them, or open a door by smashing the character into it - provided you have the right key!
Similarly, you can trigger a line of dialogue when your character enters an area in front of another character (like in the Roguelike example scene).
When something doesn’t work as it should, ask yourself: did I add the appropriate colliders?
4. Tags
Tags allow us to divide objects into categories so that scripts can perform actions only if they touch the right objects. Without tags, there wouldn’t be a way to differentiate between objects.
As with collisions, many scripts depend on the object to be tagged with the right tag to work. If you are in doubt and your script is not doing what it should, read the Reference guide document to check if you are missing a crucial tag.
5. Import custom graphics
The Playground contains a lot of great sprites to play with, located under Assets > UnityTechnologies > Playground > Images. However, you are free to use any 2D graphics you can find (be sure to only use graphics with permission. To learn more about this subject, refer to this tutorial: Copyright for creators) or to make your own!
To use an image in the Playground, you just need to drag it into the Assets folder. The image will be imported as a sprite, and then will be ready to be used. Simply dragging the newly created sprite into the scene or the Hierarchy will create a new GameObject, and you will then be able to use it in the game.
Just remember that to look good, images that are not square need to have transparency, otherwise they will display a white background. Good formats that allow transparency are .png or .gif, while .jpg won’t include transparency. Also remember, Unity doesn’t play animated GIFs.