Post Processing Effects: Anti-Aliasing
Tutorial
Beginner
+0XP
15 mins
99
Unity Technologies

Anti-aliasing helps smooth edges and visual artifacts when rendering a Scene. It’s especially helpful with high-frequency visuals where the brightness or color changes dramatically over a small number of pixels, often seen as interference or moire patterns, and Meshes that are far away from the Camera.
Languages available:
1. Post Processing Effects: Anti-Aliasing
This tutorial has been verified using Unity 2019 LTS and Post-Processing 2.3.0
Anti-aliasing helps smooth edges and visual artifacts when rendering a Scene. It’s especially helpful with high-frequency visuals where the brightness or color changes dramatically over a small number of pixels, often seen as interference or moire patterns, and Meshes that are far away from the Camera.
Unity offers different modes of anti-aliasing, each with their own set of properties.
2. Enabling Anti-Aliasing
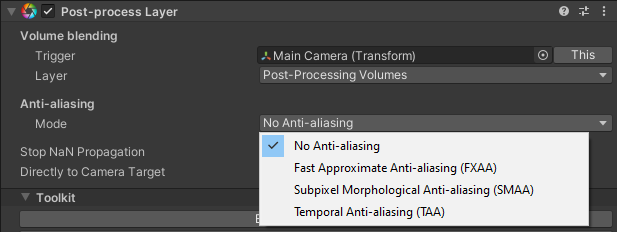
Anti-aliasing can be selected in the Camera’s Post-process Layer (Figure 01).

3. Anti-Aliasing Methods and Their Properties
The best method of Anti-Aliasing for a project depends on the target platform, the style of the project. Each has their own set of advantages, restrictions, and trade-offs.
Fast Approximate Anti-aliasing (FXAA) is the fastest anti-aliasing method, and is ideal for mobile devices and platforms that don’t support motion vectors. Motion vectors track the motion of objects from frame to frame on a per pixel basis in screen space, for use in motion blur, anti-aliasing, and other calculations.

Subpixel Morphological Anti-aliasing (SMAA) is higher quality than FXAA, but slower. It doesn't require motion vectors either, but is not compatible with mobile devices or XR. Depending on the visual style of your project, SMAA can match the quality of TAA.

Temporal Anti-aliasing (TAA) is the slowest, most high-quality anti-aliasing option, and is ideal for projects targeting desktop and console. It requires motion vectors as it accumulates frames to smooth edges at a much higher quality.

4. FXAA Properties
Fast Mode - enables an even faster, but lower quality, version of FXAA. Depending on your project, especially one with lots of objects or fast action onscreen, this may be worth the trade-off as it provides a performance boost.
Keep Alpha - Enabled, this allows for rendering against a transparent background at the cost of visual quality. Disabled, this allows Unity to use the alpha channel to store information that can improve speed and visual quality.
5. SMAA Properties
Quality (High, Medium, Low) - Settings other than High trade off visual quality to gain speed of anti-aliasing. Like FXAA’s Fast Mode, this may be worth the trade off if there is intense action or many objects on screen at once.
6. TAA Properties
Jitter Spread - determines the spread of the sampling area used in anti-aliasing. Lower settings result in sharper output with potentially more aliasing, with higher settings giving blurrier but more stable output.
Stationary Blending - controls how much of the parts of accumulated frames with no motion is blended into the final output.
Motion Blending - controls how much of the parts of accumulated frames with motion is blended into the final output.
Sharpness - sharpening is applied after anti-aliasing to recover a bit of detail lost in anti-aliasing.
7. Next Steps
In this tutorial, you learned how to apply anti-aliasing as a post-processing effect. You learned about the different methods of anti-aliasing, and the advantages and disadvantages of each. Try making a Scene with high-frequency detail in both geometry (lots of small pieces in motion) and texture (patterns such as stripes and checks in high-contrast colors), and exploring what anti-aliasing can do for the visual quality of your project.