
Post Processing Effects: Lens Distortion
Tutorial
Beginner
+0XP
15 mins
(28)
Unity Technologies
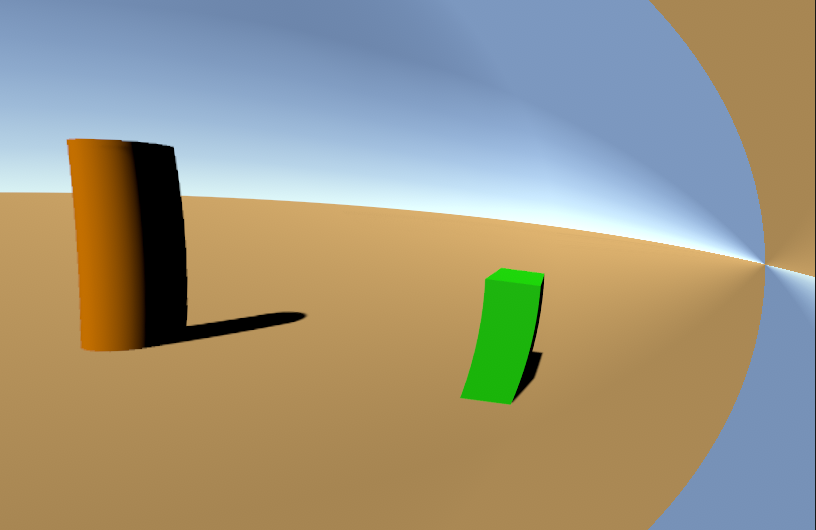
Lens Distortion can be used for simple effects like creating a fisheye lens for instant replay in skateboarding games or emulating different cinema lenses.
Languages available:
1. Post Processing Effects: Lens Distortion
This tutorial has been verified using Unity 2019 LTS and Post-Processing 2.3.0
Lens Distortion can be used for simple effects like creating a fisheye lens for instant replay in skateboarding games or emulating different cinema lenses.
2. Adding Lens Distortion
1. Select a Post-process Volume, click Add effect… in the Inspector, and select Unity > Lens Distortion (Figure 01).
3. Lens Distortion Properties
Intensity - This determines how convex (for positive values) or concave (negative) the virtual lens is. A setting of zero makes the virtual lens plano, having no effect.
X Multiplier, Y Multiplier - Intensity can be controlled by axis, ranging from 0 (no distortion at all on that axis) to 1 (full value of the Intensity setting for that axis).
Center X, Center Y - By default, the virtual lens is centered, but can be offset (Figure 03).
Scale - Determines the scale of the scene. Values greater than 1 cause the virtual lens to zoom in, while values less than 1 cause the scene to tile (Figure 04).
4. Next Steps
In this tutorial, you learned how to apply Lens Distortion to a Scene. Lens Distortion can be as subtle as adding or correcting barrel or pincushion distortion or as extreme as rendering a scene unrecognizable. Try using this effect in combination with a Physical Camera, or controlling the attributes via Script.