
Profile code to identify issues
Tutorial
foundational
+10XP
30 mins
247
Unity Technologies
In this tutorial, you’ll learn how to use the Profiler to analyze a scene and identify where optimization bottlenecks are occurring.
By the end of this tutorial, you will be able to:
- Deduce the script method that uses the most CPU time (vs. a script method that does not) by using the CPU profiler in the Profiler window
- Differentiate a loop that efficiently goes through a collection once in an Update() call from many loops that go through the same collection in an Update() call
- Recognize possible issues that might cause performance problems (e.g., too many RigidBody components, too many Colliders, too many shadows, etc.), given a scenario
- Investigate performance issues caused by poly count, texture sizes, or too many objects on the screen by using Unity's Stats window
- Identify unnecessary nested if statements
Languages available:
1. Overview
As you work toward finalizing your project and preparing it for publishing, it’s important to identify and resolve, either during or after refactoring, any bottlenecks that remain in your code. Unity’s Profiling tool is ideal for locating hard to find issues that may be driving down your frame rate. The Profiler produces a detailed report of precisely what is occurring in an application frame by frame, including what scripts are called, how memory is being allocated, how visuals are rendered on the screen, and more. You can see anything that affects your project’s performance in the Profiler.
Your project’s performance depends largely on the computer it runs on, which is why it’s important to profile your project on your specific target device, or, if your target has a range of supported hardware, such as desktop, to profile on multiple devices with different specifications. If you run this project on a new high-end gaming PC, you’re likely to get very high frame rates, while the experience might be completely different on a five-year-old laptop with onboard graphics.
To make it easier to identify common optimization issues, we created a highly unoptimized scene for you to review as you explore the Profiler for the first time. With this in mind, be aware that the numbers you see in this tutorial will likely not be exactly the same as those on your own computer. However, regardless of your frame rate, you will be able to see measurable results when you optimize the scripts.
2. Explore the scene
Let’s look at an example of a performance issue we can examine with the Profiler. As previously mentioned, we will be using a custom scene created just for this tutorial, which is found in a dedicated optimization folder in your project.
1. Locate the Optimization folder in the project, and open the Optimization scene in the Scenes folder.
2. When you first open the scene, you’ll only see a gray plane. In the Hierarchy, you’ll also see a Manager GameObject with an OptimManager script attached.
3. Press Play and observe the scene.
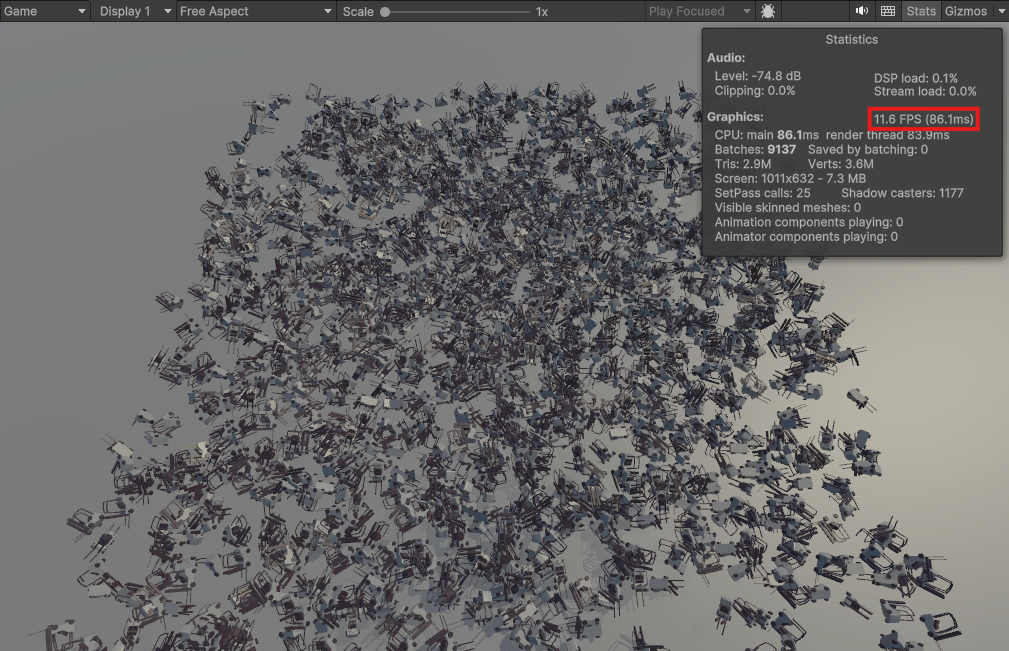
4. In Play mode, thousands of forklifts appear on the plane, all rotating and moving around within a set boundary. Open the Stats tab and make note of the current frames per second (FPS) for your computer.
5. Exit Play mode and look at the OptimManager script in the inspector. This script is responsible for the generation of the field of forklifts. Note the variable for the forklift prefab, an instance count, and the size of the boundary.
6. Select the Manager object in the Hierarchy, then in the Optim Manager component, change the instance count to 200. Reenter Play mode and observe the change to your FPS.
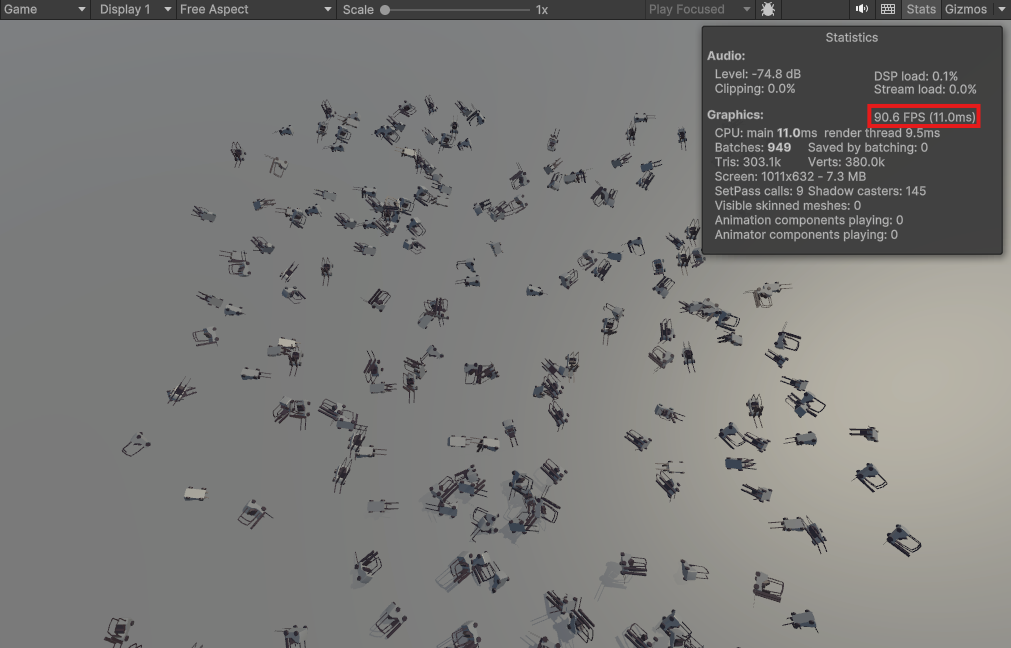
The reduction in the number of forklifts in the scene increases the overall FPS. In a situation where frame rate matters over anything else in an application, this might be a viable optimization solution. However, what if the application required both 2000 forklifts and a frame rate of 60 FPS?
With these requirements in mind, it’s important to figure out precisely where the bottleneck is occurring. Was the frame rate lower in the first example simply because there were 10 times as many meshes on the screen? Is it because they’re all moving? Is it something else? Finding the answer will tell you exactly what to address.
Profiling will give you a snapshot of everything that’s occurring and exactly how long each operation is taking, so you can make an informed decision as to how to improve your frame rate.
3. Gather profiling data
Let’s look under the hood and figure out what Unity is processing in this scene.
1. Set the Instance Count on the OptimManager back to 2000.
2. Open the Profiler by selecting Window > Analysis > Profiler.
3. Dock the Profiler window next to your Project window.
4. Currently, the Profiler is completely blank, because no data about the scene has been gathered yet. The Profiler begins working when you start Play mode. Ensure that the Profiler’s record button (the red dot) is active, and then press Play.

5. The Profiler will begin to log a color-coded chart of performance data. After a second or two, exit Play mode. You now have a detailed outline of everything occurring in the application during that time period.
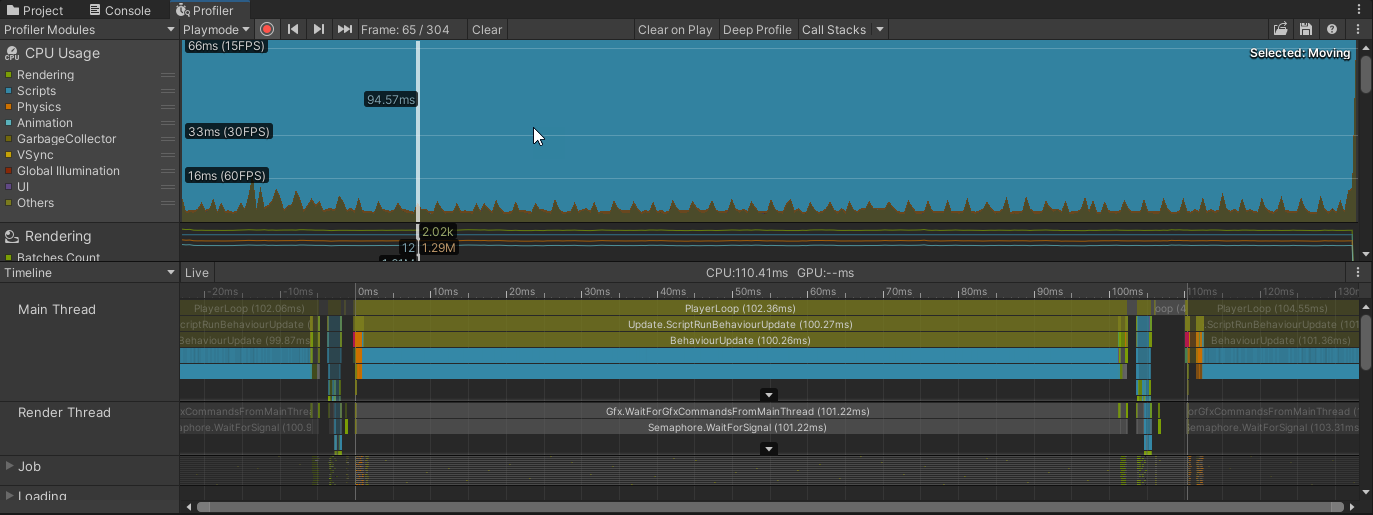
The top half of the Profiler is divided into modules, starting with CPU Usage. This will be the only module we’ll use in this tutorial.
The module contains a chart of various categories of operations and how they are making use of the CPU. On the left side of the module, there is a color key for these categories. Spikes show when one of these categories of operations, such as Rendering, takes up more time to work on a specific frame.
Notice that the blue background isn’t a background at all, but a representation of scripts running! Even from this very high level, we can tell that something is very likely going wrong with our scripts, since they’re taking up orders of magnitude more processing power than even rendering the scene itself. We will inspect the scripts shortly.
4. Establish a millisecond budget
The bottom half of the Profiler shows a visual breakdown of exactly what’s occurring in each frame. If you don’t see the bar graph visualization on the bottom half of the Profiler, select Timeline in the dropdown directly below the Profiler Module section.
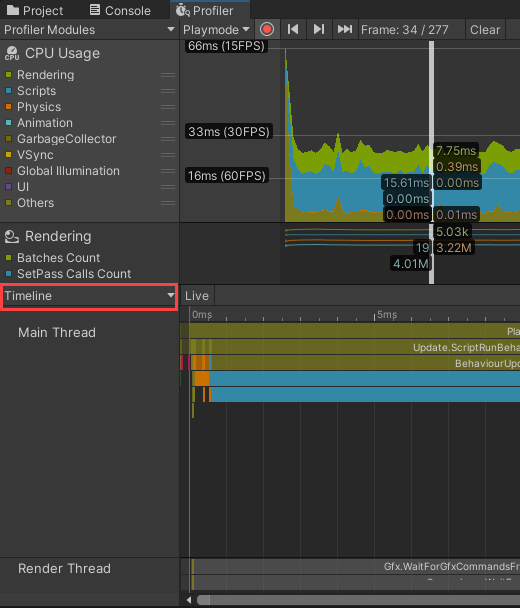
The white vertical line on the CPU Usage graph represents one frame that was played in the application. Left-click and drag this line in the CPU Usage module to see how usage changes from frame to frame. Select a frame where there’s a spike in CPU usage.
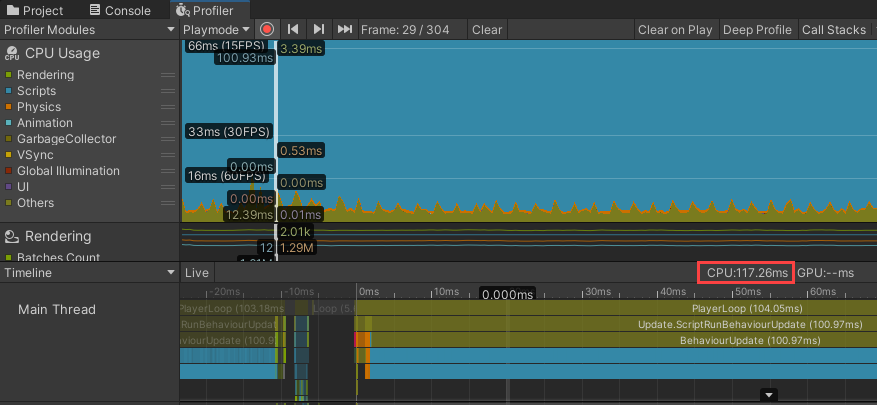
In the above example, you can see the notation CPU: 117.26ms (highlighted). This represents the total amount of time, in milliseconds, that everything in this frame took to complete.
When profiling, we want to pay specific attention to this millisecond completion rate, as it's the key to achieving the final frame rate goal. Depending on the target frame rate, you will have a specific millisecond budget per frame. The way to calculate this is:
1000 ms / target frames per second = ms budget
So, to reach a target of 60 FPS, each frame has a millisecond budget of 16. This means that the frame currently being profiled is more than seven times what it needs to be!
5. Explore the Profiler Timeline
At the top of the Profiler Timeline there are two alternating labels: PlayerLoop and EditorLoop. If you don’t see these, you may have to use your scroll wheel or trackpad to zoom in. The PlayerLoop represents everything that’s running in the game itself, whereas the EditorLoop represents everything that’s happening to run the application in the Editor. In this case, since our end user won’t be using the app in the Unity Editor, it's safe to ignore the EditorLoop and focus only on what’s happening in the PlayerLoop.
The bars listed below the PlayerLoop represent everything that’s happening in the application during that frame, in descending order by length of time. The Profiler Timeline is color coordinated to match the CPU Usage graph. The large blue bar indicates that there is a specific script-related action occurring in this frame that is taking up a large chunk of time.
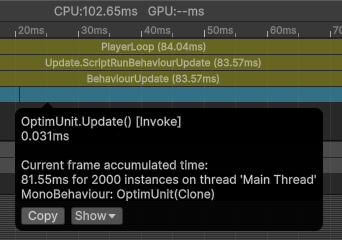
Click on the bar to see that the source of this action is the OptimUnit script, specifically its Update method. It takes 81.55 ms to complete, which by itself goes over our milliseconds budget many times over. Also note that there are 2,000 instances of this script running in this frame, which is significant because we know that we’re generating 2,000 forklifts in the OptimManager script. Somehow, these two factors must be related.
Why would the script run 2,000 times? There must be one instance for each forklift. If we select the OptimUnit Prefab on the OptimManager, we discover that the OptimUnit script is attached to the Prefab itself — which means that there are indeed 2,000 copies of this script running.
Next, we can use the Profiler to help us identify the exact lines of code that are slowing down this project.
6. Add Profiler sample methods
There’s a lot going on in the OptimUnit script Update method, so let’s get a little bit more help from the Profiler. We can profile specific sections of code by adding Profiler.BeginSample and Profiler.EndSample methods.
1. In the Optimization folder, locate the Scripts folder, and open the OptimUnit script.
The Update method is handling four discrete tasks: handling time, rotating the forklift prefab, moving the forklift prefab, and checking for the Manager’s boundary. Let’s flag these tasks for the Profiler to track.
2. Add the BeginSample and EndSample methods directly above and below the HandleTime method at the top of Update:
Profiler.BeginSample("Handling Time"); // begin profiling a piece of code with a custom label
HandleTime();
Profiler.EndSample(); // ends the current profiling sample
Notice that Profiler.BeginSample has a parameter to declare a custom tag name. This label will appear in the Profiler in the same way that “OptimUnit.Update” does.
3. Directly after the Profiler.EndSample method, add a new BeginSample for Rotating:
Profiler.BeginSample("Rotating"); // begin profiling

var t = transform;
float xRotation = currentAngularVelocity * Time.deltaTime;
float zRotation = currentAngularVelocity * Time.deltaTime;

if (transform.position.x > 0)
    xRotation *= -1;

if (transform.position.z < 0)
    zRotation *= -1;

transform.Rotate(xRotation, 0, zRotation);

Profiler.EndSample(); // end profiling4. Again, directly below the last EndSample, add a new BeginSample, this time for Moving:
Profiler.BeginSample("Moving"); // begin profiling

Move();

Profiler.EndSample(); // end profiling5. Finally, add one last BeginSample beneath your previous EndSample, this time for Boundary Check:
Profiler.BeginSample("Boundary Check"); // begin profiling

//check if we are moving away from the zone and invert velocity if this is the case
if ((transform.position.x > areaSize.x && currentVelocity.x > 0)
    || (transform.position.x < -areaSize.x && currentVelocity.x < 0))
{
    currentVelocity.x *= -1;
    PickNewVelocityChangeTime(); //we pick a new change time as we changed velocity
}

if ((transform.position.z > areaSize.z && currentVelocity.z > 0)
    || (transform.position.z < -areaSize.z && currentVelocity.z < 0))
{
    currentVelocity.z *= -1;
    PickNewVelocityChangeTime(); //we pick a new change time as we changed velocity
}

Profiler.EndSample(); // end profiling6. Save the script and return to the Editor.
7. In the Profiler, press the Clear button to clear the currently captured data.

8. Capture new data by pressing Play and letting the application run for a few seconds, then exit Play mode.
9. In the CPU Usage module of the Profiler window, select another frame with a spike on CPU Usage.
10. Let’s look at the code sections we flagged. Directly below the OptimUnit.Update bar is a new scripting bar. This bar represents all of the new sampled code. Select it and one of the new sample labels will appear.
11. Click on the Timeline dropdown and select Hierarchy.
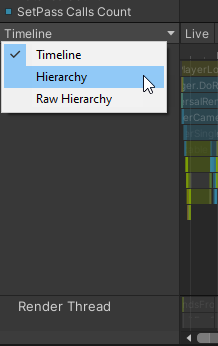
12. The frame data will change to a list view, with the labels for the four code sections automatically selected.

In this view, it becomes immediately clear in the Time ms column that the issue is in the Moving method! Now that we have the issue identified, it’s time to try and resolve it in the code.
7. Optimize the Code
1. Return to the OptimUnit script and scroll down until you find the Move method call in Update. Hold the Ctrl (Windows) or Cmd (Mac) key and left-click Move to jump down to the method itself.
void Move()
{
    Vector3 position = transform.position;

    float distanceToCenter = Vector3.Distance(Vector3.zero, position);
    float speed = 0.5f + distanceToCenter / areaSize.magnitude;

    int steps = Random.Range(1000, 2000);
    float increment = Time.deltaTime / steps;
    for (int i = 0; i < steps; ++i)
    {
        position += currentVelocity * increment * speed;
    }

    transform.position = position;
}
The Move method calculates several variables, and iterates a for loop between 1,000 and 2,000 times to calculate the new position of the forklift. Multiply that by 2,000 forklifts (2-4 million loops!), and consider that this method runs once per frame — it’s easy to see why this method is so slow. These calculations are redundant to currentVelocity, which is calculated in the Boundary Check code, so it is easy to simplify this method so it only takes care of moving the forklift.
2. Replace the body of Move with the following line:
void Move()
{
    transform.position = transform.position + currentVelocity * Time.deltaTime;
}3. Save the script and return to the Editor.
4. Clear the Profiler data and capture more data once again in Play mode.
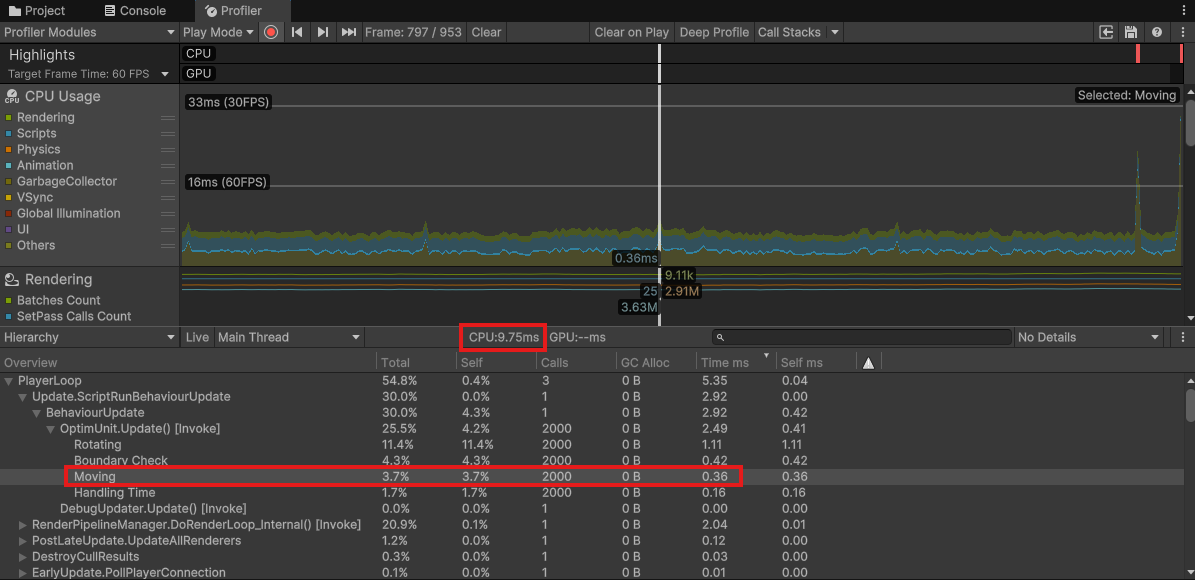
The change in the Profiler is dramatic! Previously, the Move code was taking 77.42ms to complete. After the optimization changes, it only takes 0.36. The total CPU ms have also dropped to 9.75, which is beneath the 16 ms target!
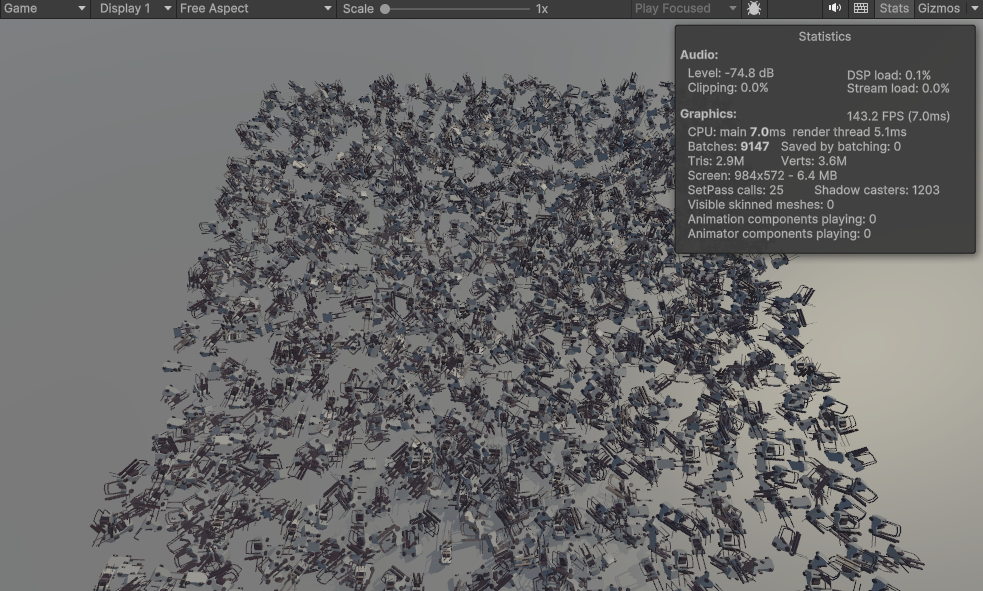
In the game view, the FPS has jumped to 143!
8. Summary
Although this was an extreme example, this sample scene illustrates how simple scripting mistakes can sometimes make a large impact on the performance of an application. In an application that’s being produced for a commercial purpose, you’ll likely find many different bottlenecks across many scripts, but the process will always remain the same. Use the Profiler to identify problem scripts, and use the Profiler Sample methods to isolate blocks of code that you suspect may be an issue. Once the specific problem code is identified, refactor it, profile again, and repeat until you’ve addressed all of the issues. You now have the tools to identify inefficient code in your own projects.