
Publishing for iOS
Tutorial
intermediate
+10XP
40m
(142)
Unity Technologies
Unity includes a built-in publishing feature that allows you to publish to various popular platforms in an easy and efficient way. You can publish the same application to multiple platforms, provided the application design takes into account each platform’s unique hardware and software requirements. In this tutorial we’ll explore publishing to iOS-based devices.
For this tutorial, you will need an Apple iOS developer account. You’ll also need to install the iOS development modules in Unity
Languages available:
1. Installing with the Unity Hub
1. Open the Unity Hub and locate your installs (Figure 01).
2. Select the three dots at the top-right corner of your working installation and select Add Modules (Figure 02).
3. Select the iOS Build Support module and click Done (Figure 03).
4. Select Next and accept the terms and conditions. Wait for the installation to finish.
2. Setting up Your Certificates on the Apple Developer Portal
There are a few steps you need to take to set up your app before you can publish from Unity. iOS apps need to have a certificate assigned to a bundle identifier, which in turn needs to be assigned to the app. In the steps below, we’ll set up this certificate and identifier.
1. Log in to your developer portal at https://developer.apple.com.
2. Select the Certificates section and then click on the + icon to create a new certificate. (Figure 04).
3. Select the Apple Distribution option and click Continue (Figure 05).
4. Use Keychain Access on your Mac to generate a certificate file. Make sure you use the same email address as your Apple ID when generating the certificate. Upload the certificate file (1) and select Continue (2) (Figure 06).
5. Download the new certificate and keep it safe (Figure 07).
6. Select Identifiers and then select the + icon next to Identifiers.
7. Select the App IDs option and then click Continue (Figure 08).
8. On the next page, select the type of app you want to create, enter a description, and create a Bundle Identifier using format com.yourdomain.yourappname. Finally, select any special capabilities your app may need to access and click Continue (Figure 09).
9. Select the Profiles section and then click the + icon to create a new profile (Figure 10).
10. Select the App Store Distribution option and then click Continue (Figure 11).
11. Select your Apple ID and click Continue (Figure 12).
13. Select the certificate that was generated earlier and click Continue (Figure 13).
13. Enter a Provisioning Profile Name and select Generate (Figure 14).
14. Review your details and then select Download to download the profile (Figure 15).
3. Publishing from Unity
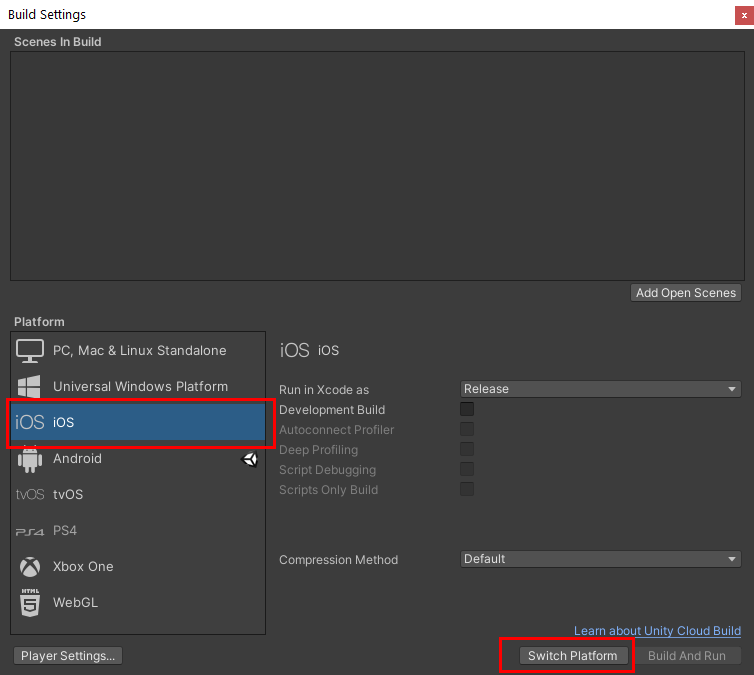
1. When you’re ready to publish your app from Unity, press Ctrl-Shift-B or go to File > Build Settings to open the Build Settings window (Figure 16).
2. Select iOS and then select Switch Platform. Wait for the process to finish (Figure 17).
3. With iOS still selected, select Player Settings to open the Player Settings window (Figure 18).
4. Make sure you have Player selected and that the iOS tab is selected. There are a lot of advanced app settings available in these sections. In this tutorial, we’ll look at the minimum settings you’ll need to adjust to publish a new app. Note that the Apple review team are quite strict on quality; for a final version, you’d probably have to set up all icons and information before they will clear it (Figure 19).
5. At the top of the screen, fill in the information under Player. You can also select the default app icons and cursor image (Figure 20).
6. Expand the Other Settings section (Figure 21).
7. Change the Bundle Identifier to the identifier you set up in Step 8 in the section “Setting up Your Certificates on the Apple Developer Portal”. Change Version to match the one you set up in Step 4 in section “Publishing from Unity” and then set the Build Number. The format you use for the number is up to you (Figure 22).
8. Change Target Device and set the Minimum SDK level you are targeting (iOS version). If you are going to upload this build to the App Store, make sure you use Device SDK (Figure 23).
9. Close the Player settings.
10. Select Build and choose a save location to create your XCode project.
4. Creating and uploading your XCode
1. Open the newly created project in XCode.
2. The project details should already be filled out as this was generated automatically when the project was built by the Unity Engine created (Figure 24).
3. Make sure that you’re signed in with the same account you used to create the certificate in Step 4 of section “Setting up Your Certificates on the Apple Developer Portal” and then set the Team to your account.
4. Create an archive file by going to Product > Archive (Figure 25).
5. Once archiving is completed, the Archive location will open. Select Distribute App to upload the archive file to Apple (Figure 26).
6. Select the distribution store you wish to submit to — in this case the iOS App Store — and select Next (Figure 27).
7. Select the Upload option and then click Next (Figure 28).
8. Work your way through the specific settings windows that follow, choosing the settings as per your requirements. Click Next until you get to the Upload screen. Review your settings and select Upload (Figure 29).
5. Next Steps
You should now have a firm understanding of the steps needed to publish a Unity application to iOS. You can use the same method to publish your own custom Reflect Viewers to the iOS App Store.