
Publishing for Oculus Quest
Tutorial
intermediate
+10XP
30 mins
Unity Technologies
In this tutorial, we’ll explore publishing to the Oculus Quest virtual reality headset.
Languages available:
1. Introduction
Unity includes a built-in publishing feature that allows you to publish to various popular platforms in an easy and efficient way. You can publish the same application to multiple platforms, provided the application design takes into account the unique hardware and software requirements of each platform. In this tutorial, we’ll explore publishing to the Oculus Quest virtual reality headset.
For this tutorial, you will need:
- The Android Build support module installed
- Updated Java SDK installed
- Android NDK and SDK installed
- A Pro license for the Unity Editor
2. Setting up Your Environment
The Oculus Quest is an Android-based device; publishing to the Quest follows the same process as publishing to any other Android-based device.
Before you can create Android apps with Unity, you need to prepare your development environment; specifically, you need an updated Java SDK, the Android SDK, and NDK of the Android version you want to publish to.
You have two options with Unity: using the JDK and NDK versions installed with the Unity Hub or installing the official versions from the respective developers and then pointing Unity to those paths. Using the hub installation is the fastest and recommended way and is the option covered in this tutorial.
Note: If you prefer to use the developer versions of the JDK, SDK, and NDK, download the latest Java SE JDK. The Android studio and alternative command line versions can be downloaded here.
3. Installing with the Unity Hub
1. Open the Unity Hub and locate your installs (Figure 01).
2. Select the three dots at the top-right corner of your working installation and select Add Modules (Figure 02).
3. Expand the Android Build Support section and select both Android SDK & NDK Tools and OpenJDK (Figure 03).
4. Click Next and accept the terms and conditions. Wait for the installation to finish.
5. In Unity, open your preferences by going to the menu bar at the top and selecting Edit > Preferences (Figure 04).
6. Select External Tools and make sure the highlighted sections are set to use the tools installed with Unity by checking the relevant boxes (Figure 05).
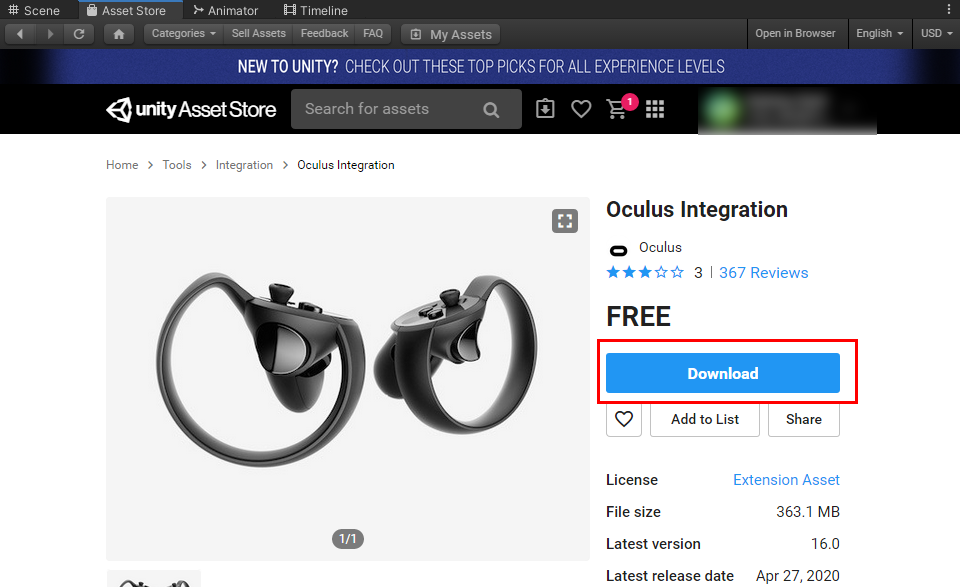
7. Go to the Asset Store and search for the Oculus Integration package (Figure 06).
8. Select Download and wait for the download to finish (Figure 07).
9. Once it’s done downloading, select Import to bring the package into your project (Figure 08).
10. Check that everything is selected in the Import window and then click Import (Figure 09). Wait for the import process to finish — this may take a while. Note that at the end of the import, you may be asked to restart Unity. If so, make sure your project is saved.
11. In Unity, go to the Oculus menu item that was created when you installed the Oculus Asset. Select Oculus > Platform > Edit Settings (Figure 10). Enter the ID that you created with your Oculus Developer account (Figure 11). If you don't have an ID, you can select Create/Find your app on https://dashboard.oculus.com and create a new application on your account.
12. The application ID will be generated when you create a new app and will look similar to Figure 12. Copy the ID and paste it into the relevant slot in Unity.
13. Fill out the Bundle Version and Bundle Identifier details for your app and connect your device to your workstation (Figure 13).
14. Go to the File menu and select Build Settings or Ctrl-Shift-B to open the Build Settings menu (Figure 14).
15. Select the Android platform, then select Switch Platform and wait for the required packages to install (Figure 15).
16. Select the Player Settings button on the bottom left (Figure 16).
17. Make sure you have Player selected and you’re working in the Android tab (Figure 17).
18. Enter your Company Name, Product (application) Name, and the Version number of the build (Figure 18).
4. Working with Settings
Settings are separated into expandable sections:
- Icon: This section allows you to set the icon of your app when you publish
- Resolution and Presentations: This section allows you to set the resolution of your game as well as behavior when a device is rotated between landscape and portrait orientations.
- Splash Image: This section gives you access to all of the options that control the splash image of your app.
- Other Settings: This section allows you to set the identification, performance, and graphic hardware settings of your application.
- Publishing Settings: In this section, you can set values and requirements specific to the chosen publishing platforms.
- XR Settings: If you are building virtual or augmented reality applications, this section allows you to activate Unity’s built-in technologies for your application.
The number of settings can be overwhelming and can become complicated. Below, we’ll go through the typical minimum settings you’ll need before publishing an Android app.
1. Leave all the settings for Icon, Resolution and Presentation, and Splash Image on the default values.
2. Expand the Other settings section.
3. Currently, Vulkan graphics cause some problems with some VR technologies. Remove it by selecting Vulcan and selecting the - option.
4. Change the Package Name by using a format of com.YourCompanyName.YourAppName (Figure 19).
5. Set the minimum API level you will be targeting. Generally for AR and VR, you want to use Kitkat (Level 19) or higher. Set the Target API level to Automatic (highest installed). This will look at the highest Android NDK on your system and create a package for that API level (Figure 20).
6. Expand the XR Settings panel and select the Virtual Reality Supported checkbox (Figure 21).
7. Next, you need to add the specific SDK you want to use. Click on the + sign to the right of the SDK list and add Oculus from the list (Figure 22).
8. Close the Player settings.
9. Select the Texture Compression drop-down and change it to ASTC. This is the setting recommended by Oculus and Unity (Figure 23).
The final step before publishing is to add a Scene to the Build Settings. This will be the Scene that will open when the application runs.
10. Select Add Open Scene to add the current open Scene to the application build (Figure 24).
11. Select your device from the drop-down menu next to Run Device. You may need to select refresh if your device is not shown. Check that your device is connected before refreshing (Figure 25).
12 Select Build to create the .apk file or select Build and Run to push the application build to your connected device.
Uploading your .apk file to the application marketplace and setting up a store page is beyond the scope of this tutorial. Please consult resources from the official publishers regarding this process.
5. Next Steps
You now have a publishing environment set up to create Oculus Quest applications. You can run Reflect and open projects using your Oculus Quest device.