Record user actions with Analytics events
Tutorial
·
Beginner
·
+10XP
·
30 mins
·
(173)
Unity Technologies

In this tutorial, you’ll learn how to use standard and custom events to record user actions and view the data of those actions on the Unity Dashboard.
Languages available:
1. Overview
The Analytics package collects data about events, which are notifications triggered by user actions within your games. Standard events, including launching the game or watching an ad, are generated automatically by the Analytics package. Custom events, such as the player completing a level, must be implemented in code. Custom events are great for answering specific questions about your game and seeing how a design decision plays out.
Important: You must define custom events and their parameters before sending them from your game because Analytics validates every event as it is received. Any events that don’t meet the definition in your Event Manager will be rejected, which ensures that your dataset isn’t polluted with rogue events.
In this tutorial, you’ll prepare a simple scene so you can start sending events, and you’ll configure your own custom event.
2. Initialize the Analytics SDK
The Analytics Software Development Kit (SDK) needs to be initialized before your app will send any events to the Dashboard.
Follow these instructions to add a script to initialize the Analytics SDK when your scene loads:
1. Open the project you previously linked to the Analytics Dashboard.
2. Create a new scene or use an existing one.
3. Create an empty GameObject that will act as a container for your analytics script. (Right-click in the Hierarchy window and select Create Empty.)
4. Rename the GameObject to “UGS_Analytics”.
5. Create a new script and add it to the UGS_Analytics GameObject created in the previous step.
6. Open the script and replace the contents with the following:
using System.Collections;
using System.Collections.Generic;
using UnityEngine;
using Unity.Services.Analytics;
using Unity.Services.Core;
using Unity.Services.Core.Analytics;


public class UGS_Analytics : MonoBehaviour
{
    async void Start()
    {
        try
        {
            await UnityServices.InitializeAsync();
            GiveConsent(); //Get user consent according to various legislations
        }
        catch (ConsentCheckException e)
        {
            Debug.Log(e.ToString());
        }
    }

    public void GiveConsent()
    {
        // Call if consent has been given by the user
        AnalyticsService.Instance.StartDataCollection();
        Debug.Log($"Consent has been provided. The SDK is now collecting data!");
    }

}
This script will use an asynchronous task to attempt to initialize the Analytics SDK and wait for a response.
Important: You might need to seek player consent before recording Analytics events. The Analytics SDK documentation contains more information on Data Privacy and Consent.
You’re now ready to run the game and send your first Analytics events.
For more information on using Analytics in code, check out the Analytics documentation and Unity Gaming Services Sample Project.
3. Enable Debug event reporting
By default, the Analytics SDK doesn’t log information about Analytics Events in the Editor Console, to ensure that it runs as efficiently as possible. However, you might want to enable logging for extra visibility while you experiment.
Follow these instructions to view the debug messages for every event sent in the Editor’s console:
1. In the Unity Editor, go to Edit > Project Settings > Player Settings > Player.
2. Locate the Script Compilation section and select Scripting Define Symbols.
3. Add the keyword “UNITY_ANALYTICS_EVENT_LOGS”.
4. Select Apply.

Note: It’s advisable to remove logging before you build your app for release.
4. Send a standard Analytics event
Some standard events like gameStarted and clientDevice are automatically sent just by installing and initializing the SDK then running your game. Even though your app doesn’t do anything yet, you can generate these events.
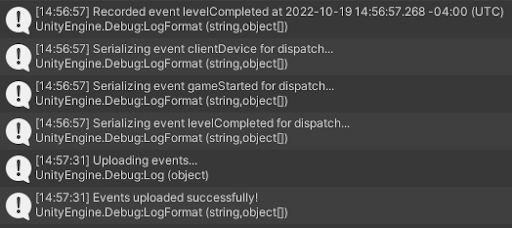
Enter Play mode in the Unity Editor. Since you have enabled debugging in the previous step, you will see some console log messages.

Standard events provide information to help you to determine the number of players in your game, session counts, duration, retention, demographics, and device information. For a complete list of standard events, consult the Events list in the Unity Manual.
5. Validate your events
To see how these events appear in Analytics, return to the Unity Dashboard and select your project. Go to Analytics > Event Browser.
Note: It can take up to 15 minutes before events appear in the Event Browser.
If your events don't appear here, make sure that you have consented to collecting analytics for the device you are using.
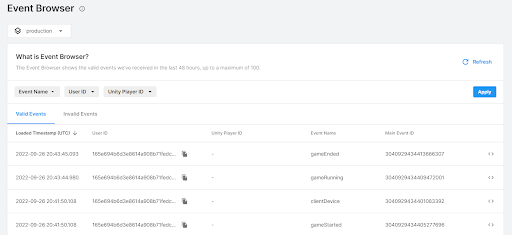
The Event Browser provides a quick way to check that your events are recorded and passing validation. If for any reason your events fail validation, you’ll be able to see the precise reasons on the Invalid Events tab. We will cover debugging and handling invalid events in the next tutorial.
For more information about the Event Browser, consult the Event Browser page of the Unity Manual.
6. Create a custom event
While standard events provide you with some important basic information, we recommend using custom events to further understand how players experience your game.
Custom events record specific player actions that you identify in your game. A custom event should describe a meaningful player action in the game and reveal details of the action and player state at that time.
In the following steps, you’ll create a custom event named levelCompleted. When a player completes a certain level of your game, this event will capture their progress.
Follow these instructions to create a custom event:
1. Go to Unity dashboard.unity.com, then go to Analytics > Event Manager.
2. Select Add New > Custom Event.

3. For this demonstration, rename the custom event “levelCompleted”.
4. Enter a description of the event for future reference.
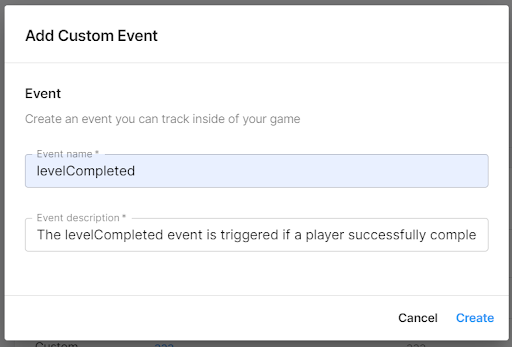
Alt text: The Add Custom Event window with the levelCompleted Event name and Event description field filled in.
Image file: Add_Custom_Event.png
7. Create a custom parameter
Parameters are attached to events to reveal details of the action and player state at that time the event occurs.
Next, you’ll add the levelName parameter to the levelCompleted event to record which level is completed. From that information, you can see if there are particular levels that users are struggling with.
You can also create your own parameters in this levelCompleted event to provide more context about the player’s state at that time, such as timeOnLevel, coinBalance, powerLevel, levelDuration, and bulletsFired.
Tip: It’s better to record occasional, richly detailed, meaningful events than a stream of sparse events.
Follow these instructions to add a levelName parameter to your custom event:
1. In the Dashboard, go to Analytics > Event Manager.
2. Select Add New > Custom Parameter.

3. Create a new parameter named levelName and add a description.
4. For the Parameter type, select String.
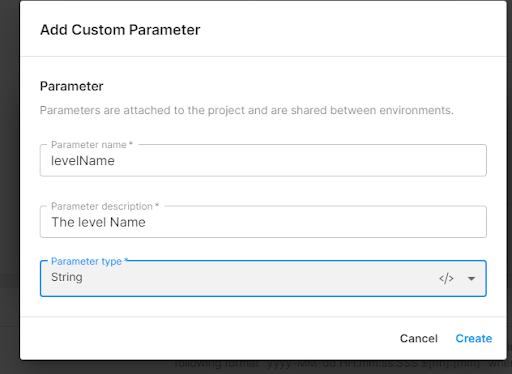
Important: You cannot change a parameter’s data type once it has started to receive data. Be sure to choose the parameter type most appropriate to the data you are sending. Parameters may have String, Integer, Float, or Boolean data types.
Note: You can reach out to our support team to request a change to the parameter data type.
8. Assign a custom parameter to a custom event
Creating a custom parameter and assigning it to a custom event are separate steps. You must assign the parameter to a custom event so that the event will pass validation.
Follow these instructions to assign your custom parameter to your custom event:
1. On the Dashboard, go to Analytics > Event Manager and select the levelCompleted custom event that you created previously. Select its name to open the view panel, then select Assign Parameter.

2. Select levelName from the list of existing parameters.
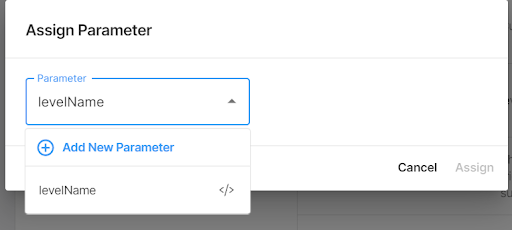
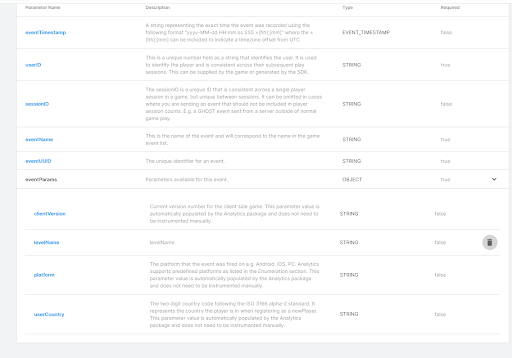
Once you have assigned your parameter, your event Schema will include your custom event in the eventParams list.
9. Send a custom event
To start sending in the newly created custom event with its respective parameters, you must update the script added to the UGS_Analytics GameObject.
To demonstrate the levelCompleted event with the levelName parameter, you’ll update your script to call the custom event when you load the scene. For now, a random level will be registered on each load to mimic the user playing different levels.
Follow these instructions to update and test the script:
1. Open the script attached to the UGS_Analytics GameObject.
2. Update the script to match the following script:
using System.Collections;
using System.Collections.Generic;
using UnityEngine;
using Unity.Services.Analytics;
using Unity.Services.Core;
using Unity.Services.Core.Analytics;

public class UGS_Analytics : MonoBehaviour
{
    async void Start()
    {
        try
        {
            await UnityServices.InitializeAsync();
            GiveConsent(); // Get user consent according to various legislations
            LevelCompletedCustomEvent();
        }
        catch (ConsentCheckException e)
        {
            Debug.Log(e.ToString());
        }
    }

    private void LevelCompletedCustomEvent()
    {
        int currentLevel = Random.Range(1, 4); // Gets a random number from 1-3

        // Define Custom Parameters
        Dictionary<string, object> parameters = new Dictionary<string, object>()
        {
            { "levelName", "level" + currentLevel.ToString()}
        };

        // The ‘levelCompleted’ event will get cached locally
        //and sent during the next scheduled upload, within 1 minute
        AnalyticsService.Instance.CustomData("levelCompleted", parameters);

        // You can call Events.Flush() to send the event immediately
        AnalyticsService.Instance.Flush();
    }

    public void GiveConsent()
    {
	// Call if consent has been given by the user
        AnalyticsService.Instance.StartDataCollection();
        Debug.Log($"Consent has been provided. The SDK is now collecting data!");
    }
}
3. Observe the console logs and see your events uploaded to the servers.
4. On the Dashboard, go to the Event browser to see those events listed.
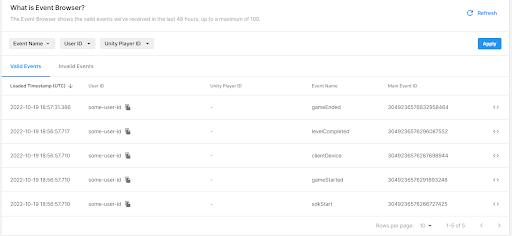
5. Expand the event by selecting the <> button and see the value passed for the levelName parameter.
For more information about recording custom events, consult the Record Custom Events page of the Unity Manual.
10. Next steps
You have created your own custom event that now appears on your Unity Dashboard. Next, you’ll learn more about how to access, manage, and visualize this data on the Unity Dashboard and set up your own data reports.