
Recording Tracks with Timeline - 2019.3
Tutorial
Beginner
+10XP
20 mins
(41)
Unity Technologies
In this tutorial, we’ll install and use the Unity Recorder package to record tracks with the Timeline. This tutorial assumes that you already have a Director, and a Timeline attached to at least one GameObject.
Languages available:
1. Recording Tracks with Timeline
Verified with: 2019.4, Unity Recorder Package preview.1 - 2.4.0-preview.1, Timeline Package 1.2.17
In this tutorial, we’ll install and use the Unity Recorder package to record tracks with the Timeline. This tutorial assumes that you already have a Director and a Timeline attached to at least one GameObject.
2. Installing the Unity Recorder Package
The Unity Recorder Package is available via Package Manager.
1. Select Package Manager from the Window drop-down (Figure 01).
2. In the Package Manager window, select Advanced > Show Preview Packages (Figure 02).
3. Click to select Unity Recorder in the left column, and click Install in the lower right corner (Figure 03).
4. Close the Package Manager window.
3. Recorder Track
If you have a Timeline created and are looking to output frames from Unity from your Timeline sequence, you can use the Recorder Track to control the output of the project (Figure 04).
This will create a new Recorder Track for your Timeline sequence.
It’s recommended that you add the Recorder Track at the top level of your Timeline Hierarchy (your “master” Timeline).
4. Recorder Clip
Once you’ve added the Recorder Track, you must select Add Recorder Clip, which defines the time range from which you’ll output frames (Figure 05).
5. Adjusting time range
The Recorder Clip behaves like most other clips on Timeline—you can move and adjust the length of the clip as desired. It’s not necessary to output a Timeline sequence in its entirety. For example, you can configure the Recorder track so it outputs only the section marked Beat_040 (Figure 06).
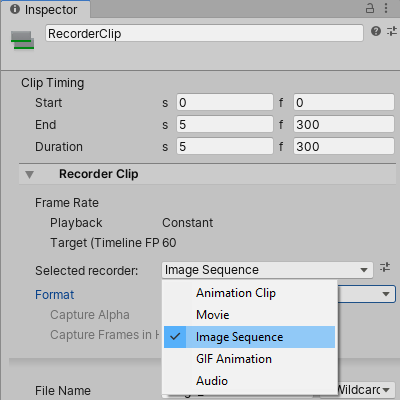
6. Configuring Recorder Clip
Once added, you can click the Recorder Clip to select it and customize the output type of the Animation Clip.
For outputting movie sequences, the two main options are:
- Movie
- Image Sequence
It’s recommended that you use Image Sequence, as it provides greater ability to customize the encoding settings (using an external tool like Adobe Premiere or DaVinci Resolve) afterwards (Figure 07).
For projects like ADAM episodes 2 and 3 and Baymax Dreams, the following settings were used:
- Selected Recorder: Image Sequence
- Format: PNG
- Capture: Game View
- Output Resolution: 4K - 2160p
The resulting frames were then brought into video editing software and encoded to 1080p final resolution video. Outputting 4K frames from Unity and downsampling to 1080p for final output gives you additional anti-aliasing and higher quality video.
7. Quick output for preview / dailies
If you’re just testing the output of Recorder (for example, for dailies or to test a sequence), you may consider switching to a lower resolution (720p, for example) and to JPG instead of PNG.
Recorder outputs JPG files significantly faster than PNG, and if you use a lower resolution (like 720p), Recorder can typically output frames at near real-time rates, allowing for quick iteration and testing of sequences.