Scatter Objects with Polybrush
Tutorial
Beginner
+10XP
15 mins
(32)
Unity Technologies

In this tutorial, you will learn how to use Polybrush to Scatter Objects.
Languages available:
1. Scatter Objects with Polybrush
This tutorial has been verified using Unity 2019.4.14f1 LTS and Polybrush 1.0.2
Polybrush enables you to scatter objects in your Scene with a click of a button. This speeds up placing objects, such as rocks or trees, in your Scene. Polybrush also provides you with customizable brushes that allow you to adjust how objects are scattered in your world.
1. In your Unity project, open the Package Manager by navigating to Window > Package Manager.
2. Find Polybrush and install it (Figure 01).
Once the package has been installed, close the Package Manager window and navigate to Tools > Polybrush > Polybrush Window. This opens the Polybrush tool in a new dockable window (Figure 02).
2. Scatter Object Tool
To access the tool to scatter objects in your Scene, click the fourth button in the top toolbar to open the Scatter brush (Figure 03).
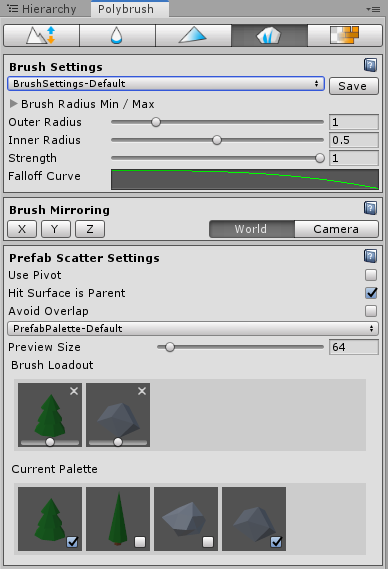
The Scatter brush allows you to adjust the brush settings. To begin painting your Meshes, you need to drag your Prefabs to the Current Palette section at the bottom of the tool (Figure 04)
To begin scattering your objects:
1. Select the object in the Scene onto which you wish to paint your Prefabs.
2. Select the Prefabs you wish to use. This will load them into your current Brush Loadout (Figure 05).
3. The Prefabs in the Brush Loadout now have sliders below their icons. This adjusts the weight of the Prefab when painting. You can adjust these or leave them at their default weights.
4. Go back to the Scene and left-click to begin scattering your Prefabs to the selected Mesh. The brush will automatically orient the Prefabs to align to the surface you’re painting (Figure 06).
The Scatter brush has a few additional settings:
- Brush Mirroring: Allows you to mirror the placement of any Prefab by the X, Y, and Z coordinates.
- World/Center: A toggle button to set the orientation to World or Camera.
- Use Pivot: If unchecked, the Prefabs will be placed directly on top of the Mesh. If checked, the Prefabs will be placed using their pivot points.
- Hit Surface is Parent: If this remains unchecked, the prefabs will not be parented to the Mesh being painted on. If checked, the Prefabs will automatically be parented to the Mesh.
- Avoid Overlap: If unchecked, Polybrush will not attempt to avoid overlapping the Prefabs. If checked, Polybrush will attempt to avoid placing Prefabs where they might overlap with others.
- PrefabPalette-Default: Save and load sets of Prefabs for future use.
- Preview Size: This slider adjusts the preview size of the Prefabs in the Brush Loadout and Current Palette sections.
3. Conclusion
Using the Scatter brush tool allows you to quickly create detailed environments for your scenes.