
Shader Graph: Tiling and Offset
Tutorial
Beginner
+10XP
15m
(140)
Unity Technologies
There will be times when you want to manipulate the UVs, tiling or offset of your Textures, normals or results of a gradient. This is when the Tiling and Offset node becomes useful. In this tutorial you will learn how to use the Tiling and Offset node.
Languages available:
1. Creating the Shader Graph
This tutorial was verified using Unity 2019.4.f1 LTS and Shader Graph 7.3.1.
There will be times when you want to manipulate the UVs, tiling or offset of your Textures, normals or results of a gradient. This is when the Tiling and Offset node becomes useful.
To begin, let's create a Shader to use as an example.
- Right-click in your project and select Create > Shader > PBR Graph.
- Name the new Shader “SampleGraph”
- Double-click the new Shader Graph.
- In the new window that opens, right-click and select Create Node.
- Type in “Tiling and Offset” and click the result that matches.
You will now have a Tiling and Offset node sitting in your graph (Figure 01).
This node will tile and offset the value of the UVs for your textures. This node is often used for detail maps, scrolling textures, or affecting and customizing how the UVs are manipulated. This node has three inputs and a single output.
Note: The numbers are the vector size of the output and inputs, it helps determine how large of a vector you will need, from a single value (1) to a vector of (4) parameters.
Inputs:
- UV(2): Defaults with a UV channel but you can set the UV coordinates of how much of the texture is rendered.
- Tiling(2): Takes a Vector 2 to determine the amount of tiling to apply.
- Offset(2): Takes a Vector 2 to determine the amount of offset to apply.
Outputs:
- Out(2): This outputs the UV values in the form of a Vector 2.
Let’s make use of this Tiling and Offset node.
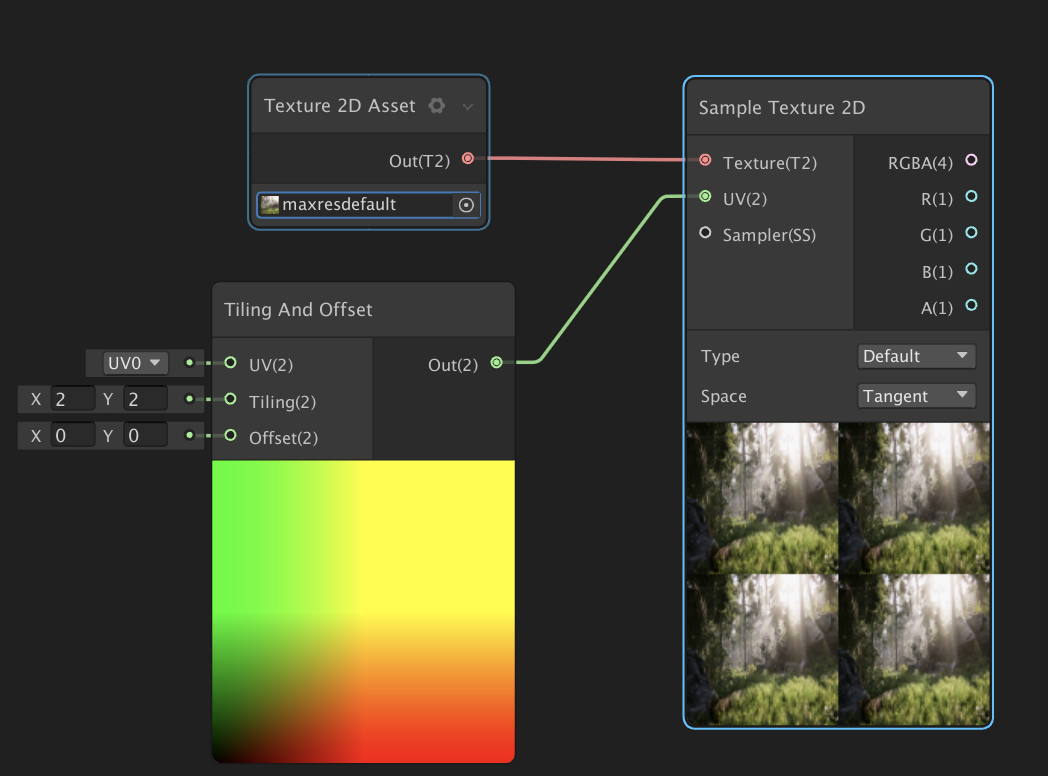
- Create a Texture 2D Asset node and assign a texture.
- Create a Sample Texture 2D node and hook the Texture 2D Asset to its Texture input.
- Change the X and Y values of both to 2.
- Drag the Out pin of the Tiling and Offset node and plug it into the UV input of the Sample Texture 2D node.
In the preview, you should see the texture tiled four times (Figure 02).
Now let’s hook our texture to the final node.
- Click and hold the circle next to RGBA(4) and drag it to connect it to the Albedo input pin on the PBR Master node (Figure 03).
This will connect our Tiling and Offset node to the final node of the Shader Graph to be rendered out. The PBR Master node has a small preview at the bottom to show you the final result.
2. Finishing the SampleGraph
To complete the Shader, save your asset:
1. In the top left corner of your PBRGraph, click the Save Asset button (Figure 04).
2. Create a new Material in your Project window by right-clicking and selecting Create > Material.
3. In the Material window, select the Shader dropdown and select the Shader you created (Figure 05).
4. Apply the Material to an object in your Scene (Figure 06).
3. Conclusion
The Tiling and Offset node becomes very useful when you’re modifying Textures or creating Shaders that rely on images. The node is not only useful for textures but can be used in conjunction with anything that has a UV input.