
Shadergraph: PBR Material
Tutorial
intermediate
+10XP
15m
Unity Technologies
The PBR Master node allows you to create Physically Based Rendering (PBR) Materials through Shaders. You can use the PBR Master node in either Metallic or Specular workflow modes by selecting from the workflow drop-down. The PBR Master node compiles the Vertex and Fragment Shader for rendering in your project.
Languages available:
1. Creating the Shader Graph
To begin, create a Shader to use as an example:
1. Right-click in your project and select Create > Shader > PBR Graph.
2. Name the new Shader SampleGraph.
3. In the window that opens, right-click and select Create Node.
4. Type the term PBR and click the result that matches. Usually, when creating a PBR Graph, a PBR Master node will already be visible.
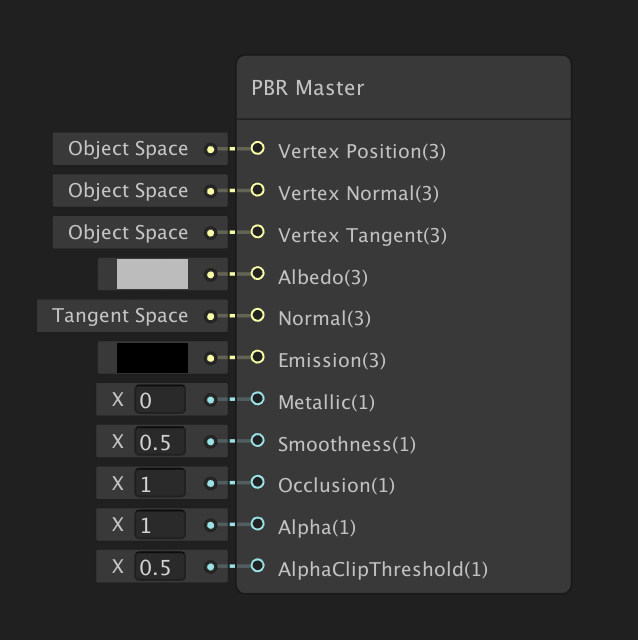
You now have a PBR Master node sitting in your graph (Figure 01).
The PBR Master node has 12 inputs and is the final node in the graph that renders out your Shader. Anything that does not route into this node will not be rendered.
The PBR Master node will have a preview of the Shader at the bottom. The preview will reflect any changes you make within the Shader Graph.
The different inputs are:
- Vertex Position: Vector 3 that defines the absolute object-space vertex position of the Shader.
- Vertex Normal: Vector 3 that defines the absolute object-space vertex normals of the Shader. This value is used by the renderer to determine the reflection of lighting or shading models.
- Vertex Tangent: Vector 3 that defines the absolute object-space vertex tangent of the Shader. A tangent is a unit-length vector that follows a Mesh surface along its horizontal (U) Texture direction. Tangents are most commonly used in bump-mapped Shaders.
- Albedo: Vector 3 that defines the Material’s Albedo value. This expects a range between 0 and 1.
- Normal: Vector 3 that defines the Material’s normal value. This expects normals in tangent space. If your normals are not in tangent space, use the Transform node to convert to tangent space.
- Emission: Vector 3 that defines the Material’s emission color value. This expects positive values.
- Metallic: Vector 1 that defines the Material’s metallic value where 0 is non-metallic and 1 is metallic. This is only available in the Metallic workflow mode.
- Specular: Vector 3 that defines the Material’s specular color value. This expects a range between 0 and 1. This is only available in the Specular workflow mode.
- Smoothness: Vector 1 that defines the Material’s smoothness value. This expects a range between 0 and 1.
- Occlusion: Vector 1 that defines the Material’s ambient occlusion value. This expects a range between 0 and 1.
- Alpha: Vector 1 that defines the Material’s alpha color. This is used for transparency and/or alpha clipping. This expects a range between 0 and 1.
- AlphaClipThreshold: Any fragments with an alpha below the supplied value will be discarded. This requires a node connection and expects a range between 0 and 1.
The PBR Master node has Material options that are accessed by clicking the cog icon at the top right corner of the node (Figure 02).
The Material options are:
- Precision: This specifies the precision data mode typically for optimization purposes. This has three options: Inherit, Float, and Half.
- Workflow: This determines what workflow mode will be used for the Material. This has two options, Metallic and Specular.
- Surface: This defines if the Material is transparent. This has two options: Opaque and Transparent.
- Blend: This defines the blend mode of the transparent Material. You have four options with this setting: Alpha, Premultiply, Additive, and Multiply.
- Two Sided: This toggles if the front and back faces of the Mesh are rendered.
2. Next Steps
You will become quickly familiar with the PBR Master node as you work in Shader Graph, especially if you will be working in the PBR workflow. The options are endless, so explore and experiment with what Materials and Shaders you can create.