
Starting Timeline Through a C# Script - 2019.3
Tutorial
Beginner
+10XP
15 mins
(149)
Unity Technologies
In this tutorial, we’ll start a Timeline using a Playable Director through a C# script.
Languages available:
1. Starting Timeline Through a C# Script
Verified in 2019.4
In this tutorial, we’ll start a Timeline using a Playable Director through a C# script. Starting a Timeline via script gives much greater control as to which Timeline is played and when. This is especially useful for cutscenes and interactive movies.
When controlling a Playable Director via script, callback functions can be invoked when the Playable Director is started and stopped. A common use is to disable player input and prevent NPC/enemy actions and movement when a cutscene is started, and to resume the game state after the Timeline has stopped.
Our script will also execute a callback function when the Timeline is started, and another when it’s stopped.
1. Create a new GameObject by selecting Create Empty from the GameObject drop-down. Name it Director.
2. Open the Timeline window by selecting Sequencing > Timeline from the Window drop-down.
3. With Director selected, click Create to attach a Playable Director component and create a Timeline Asset (Figure 01).
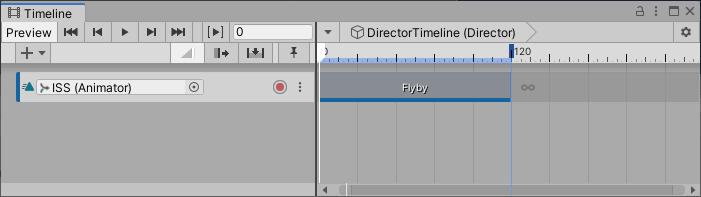
4. Add and configure your desired animation tracks (Figure 02).
5. Add a new Script component to Director, named TimelinePlayer, and open it in your script editor.
6. Add the UnityEngine.Playables namespace:
using UnityEngine.Playables; 7. Inside the class definition, we’ll create references to the Playable Director and our control panel:
private PlayableDirector director;
public GameObject controlPanel;
8. Change Start to Awake, and delete the Update method.
9. Inside Awake, we’ll set our Playable Director reference and register the callback functions, to be invoked when the Director is started and stopped:
director = GetComponent<PlayableDirector>();
director.played += Director_Played;
director.stopped += Director_Stopped;
Director_Played and Director_Stopped, defined in the next two steps, are functions of return type void, whose only parameter is of type PlayableDirector.
10. Director_Played will hide the UI panel used to start the Timeline once the Timeline has started playing.
private void Director_Played(PlayableDirector obj)
{
    controlPanel.SetActive(false);
}
11. Director_Stopped will show the UI panel after the Timeline has stopped.
private void Director_Stopped(PlayableDirector obj)
{
    controlPanel.SetActive(true);
}
12. Finally, we’re ready to define the function that starts the Timeline:
public void StartTimeline()
{
    director.Play();
}
13. The full script should look as follows:
using System.Collections;
using System.Collections.Generic;
using UnityEngine;
using UnityEngine.Playables;

public class TimelinePlayer : MonoBehaviour
{
    private PlayableDirector director;
    public GameObject controlPanel;

    private void Awake()
    {
        director = GetComponent<PlayableDirector>();
        director.played += Director_Played;
        director.stopped += Director_Stopped;
    }

    private void Director_Stopped(PlayableDirector obj)
    {
        controlPanel.SetActive(true);
    }

    private void Director_Played(PlayableDirector obj)
    {
        controlPanel.SetActive(false);
    }

    public void StartTimeline()
    {
        director.Play();
    }
}
14. Save changes and return to the Unity Editor.
15. Create a UI button by selecting UI > Button from the GameObject drop-down.
16. Click the + sign to add an OnClick event. Drag Director into the Object slot, and select TimelinePlayer > StartTimeline() (Figure 03).
17. Select Director in the Hierarchy view. In the Timeline Player component of the Inspector, drag the button, or its parent canvas, into the slot labeled Control Panel (Figure 04).
18. Enter Play Mode and click the button to start the Timeline. While the Timeline is stopped, the button remains visible (Figure 05). While the Timeline is playing, it’s hidden (Figure 06). After the Timeline finishes playing, the button becomes visible once again.
19. Exit Play Mode.
2. Conclusion
Timeline, an already versatile and powerful system, is further enhanced with scripting.