
TextMesh Pro: Localization
Tutorial
advanced
+10XP
30m
(127)
Unity Technologies
To ensure your content is accessible to a large audience, it’s essential to translate and localize text. TextMesh Pro makes this traditionally laborious task just a bit easier. In this tutorial you will learn how to do this task
Languages available:
1. Best Organizational Practices
This tutorial has been verified using Unity 2019.4 LTS and TextMeshPro v2.1.1
To ensure your content is accessible to a large audience, it’s essential to translate and localize text. TextMesh Pro makes this traditionally laborious task just a bit easier.
With several thousand languages spoken across the world, it’s both impractical and inefficient for your project to contain Font Assets for each one. This is why it’s a good practice to group and create Font Assets based on shared character sets.
The following is a list of some of the most commonly used character sets and their corresponding languages :
- Latin (ASCII): English, Spanish, German, French, etc.
- Cyrillic: Russian, Greek, etc.
- East Asian: Chinese, Japanese, etc.
- Middle Eastern: Arabic, Farsi, etc.
Theoretically, for an English language project to support Spanish, German, and French, only one Font Asset with Latin characters will be needed to handle the bulk of localization work.
2. Importing International Character Sets
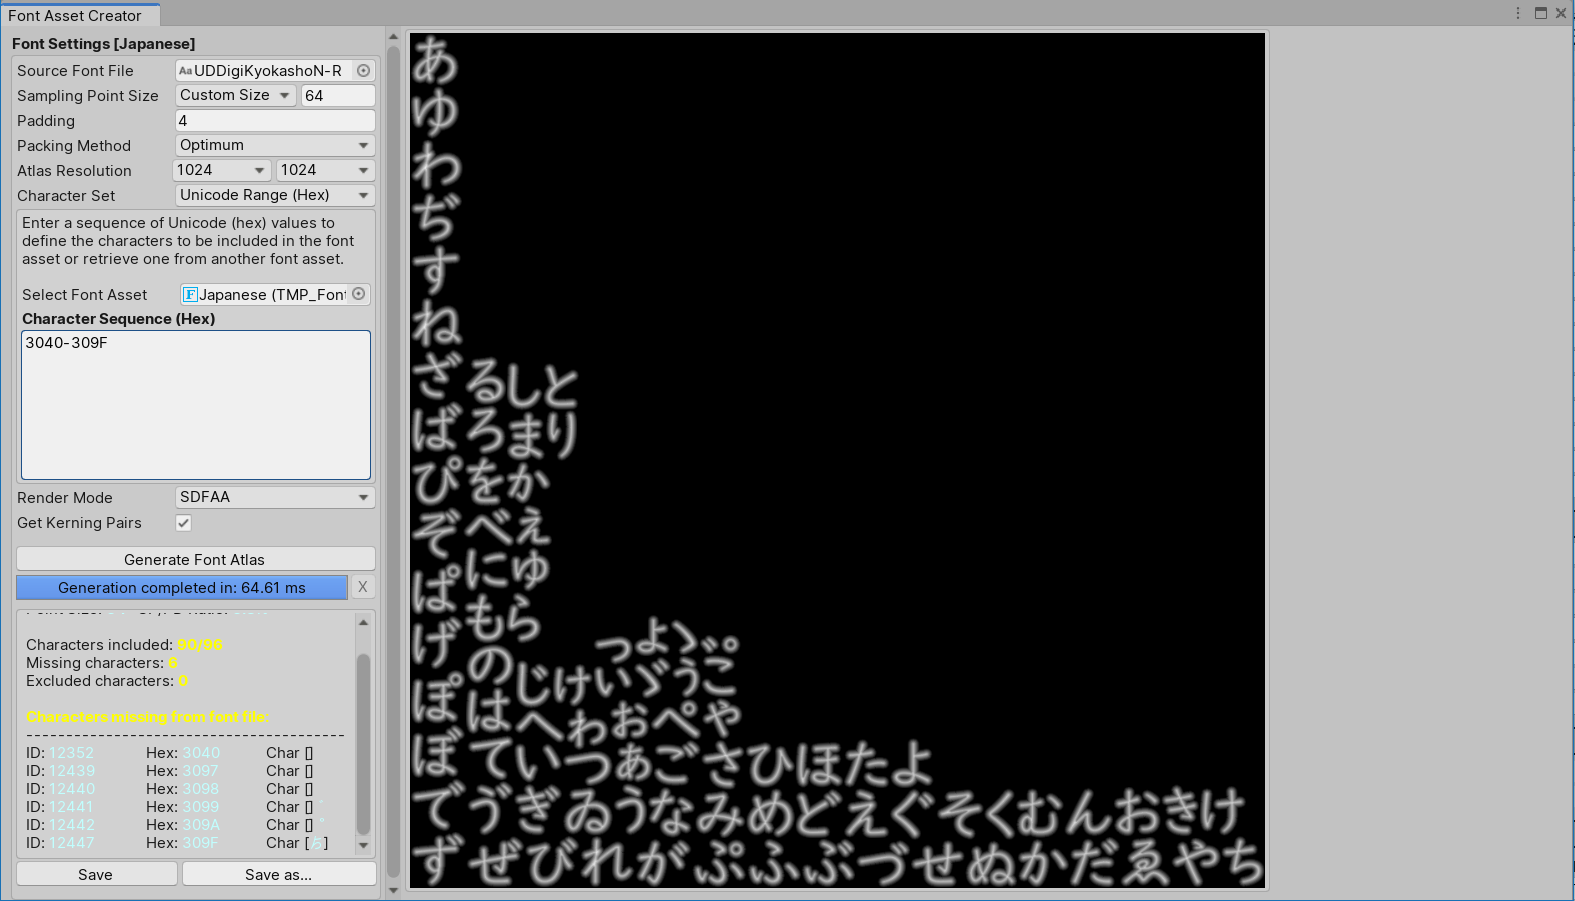
International character sets are best imported using the Font Asset Creator. While you should import your desired character set from a file, we will cover how to do so via unicode, the international standard for representing digital text.
This site provides a list of all unicode ranges for various languages.
We will refer to the site for the following example:
- Import an international font of your choosing into your project’s Assets > Font directory.
- Navigate to Window > TextMeshPro > Font Asset Creator. (Figure 01)
3. Select your imported font for the Source Font File.
4. Set the Character Set property to Unicode Range (Hex).
5. In the text field, type the numerical range of unicode values you wish to include, separated by a “-” (Figure 02).
6. Press Generate Font Asset, then Save as… to finish creating the Font Asset.
3. Dynamic Fallbacks
In this example, we have imported most of the Katakana character sets used in Japanese; however, there are two more character sets that are components of the language, Hiragana and Kanji (Chinese characters used in written Japanese).
There are close to 2,000 Kanji used in Japanese, so it’s impractical to create a Font Asset to accommodate the whole set (nor are all 2,000 characters used by most native speakers).
Here is where a Dynamic Fallback can help. With it, we can extend our existing Japanese character set with only the Kanji we need.
1. To start, navigate to the Font Asset you created in the previous step and view it in the Inspector.
2. Under Generation Settings, ensure that Atlas Population Mode is set to Static (Figure 03).
3. Now re-open the Font Asset Creator to create a new Font Asset. This time, however, we want to populate it using only the characters from an existing text file. To do this, set the Character Set to Characters from File, then select the appropriate file from your project (Figure 04).
4. Generate and save the Asset.
5. In the Inspector, navigate to Generation Settings and set Atlas Population Mode to Dynamic (Figure 05).
Now we must configure the relationship between our two Font Assets. An outline depicting how TextMesh Pro defines the relationship between these Font Assets would look like this:
Regional Font (i.e., English)
→ International Font (i.e., Japanese)
→ Dynamic Fallback (i.e., Japanese Kanji)
Let’s begin by defining our international Font Asset as a fallback to our regional (or primary) Font Asset.
1. Navigate to your regional Font Asset under the Project Tab and view it in the Inspector.
2. Under the Fallback Font Assets section, click the + button to add a new Font Asset to the Fallback List, then click the radio button to add the international Font Asset we created (Figure 06).
3. Lastly, we must do the same for our international Font Asset so that it can be extended with our dynamic Font Asset containing additional characters (Figure 07).
To demonstrate that our fallbacks are working, let’s try to display a simple sentence: “Tomorrow is Tuesday.”
In Japanese, this would be: 明日は火曜日です
Copy and paste the following into your Text(TMP) Text Input box:
Tomorrow is Tuesday.
明日は火曜日です
Currently, our extended Font Asset does not contain the characters for “Tomorrow” (明) or “Tuesday” (火曜). However, since our extended Font Asset is set to Dynamic and references the source font file, the characters should render correctly when typed into a TextMesh Pro component (Figure 08).
4. Global Fallback Fonts
With this knowledge, we can now implement a global fallback font: a Font Asset with fallbacks containing a set of characters from many languages. A global fallback font should be used for projects where specific words from multiple languages must be displayed at the same time. For instance, a language select screen relies on this concept to display the name of multiple languages for a project shipped in a regional language (i.e., an English title game with full language support for Japanese and Arabic).
Unlike our previous example, this setup would rely on static fallbacks instead of dynamic fallbacks, as we want to maintain a small build and minimize the amount of memory being used by text during runtime.
5. Unity Localization Services
While we have learned how to prepare our projects for localization using TextMesh Pro, we have not yet learned how to perform automatic translation or implement events to handle localization. I2 Localization, available in the Unity Asset Store, is a widely used comprehensive localization package compatible with TextMesh Pro. While we will not delve into this package in this workflow, it is a valuable tool to learn and integrate into your localization pipeline. More about I2 Localization can be found on its Asset Store page.