
TextMesh Pro: Working with Material Presets
Tutorial
Beginner
+10XP
20m
(126)
Unity Technologies
Much like other GameObjects, text created with TextMesh Pro can have multiple Materials applied to it. These Materials are powered behind the scenes by a Shader and determine the look of your text in ways that ordinary font weights can’t.
Languages available:
1. TextMesh Pro: Working with Material Presets
This tutorial has been verified using Unity 2019.4 LTS and TextMeshPro v2.1.1
Much like other GameObjects, text created with TextMesh Pro can have multiple Materials applied to it. These Materials are powered behind the scenes by a Shader and determine the look of your text in ways that ordinary font weights can’t.
In this tutorial, we will apply a new Material preset to a Font Asset.
2. Material Presets
Materials allow for different variations of the same Font Asset without requiring modifications to the existing font atlas.
A Material should be assigned to every new Font Asset with the naming convention [Font Name]_[Type]. We can navigate to the Material in the project Hierarchy, or navigate to our Font Asset’s Material via the following steps:
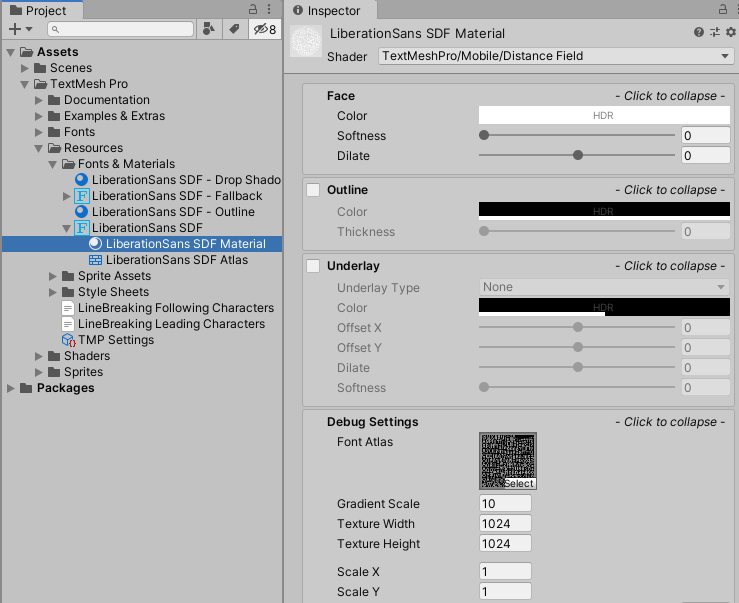
1. Click the Font Asset and navigate to Atlas & Material, then double-click on Material (Figure 01).
Notice how, by default, this Material uses the TextMeshPro/Mobile/Distance Field, which is a lightweight Shader for use in mobile environments or other scenarios where optimization is key.
We will work with the Shader for desktop and console applications to explore the available options.
Change the Shader to TextMeshPro/Distance Field. This is the Shader we will work with (Figure 02).
The Shader has five main components:
Face: Defines the color of the font and whether a Texture is applied to its face
Outline: Applies a similar treatment to the font’s outlines and edges
Underlay: Applies a drop shadow to the font
Lighting: Allows the font to interact with light
Glow: Provides an outer or inner glow to the font
2. Duplicate the selected Material and rename it something unique. This is the version we will modify if we need to revert to our default Material. Alternatively, navigate to the Material within the Inspector, right-click on the cog (⚙), and select Create Material Preset.
3. Click on the Font Asset in either the project Hierarchy or Inspector, click the three dot icon in the upper right of the Inspector, and switch to Debug (Figure 03).
4. Now that the Material slot is not grayed out, you can drag and drop our new unique Material into the Material slot.
3. Applying Meteorologist-Style Effects to Weather Conditions
For a challenge, try creating several Material presets to represent current weather conditions — much like those on a meteorologist forecast.
4. Conclusion
We have learned how to change the Shader used by the Material on our Font Asset. We also have learned how to create a Material Preset so we can experiment without changing our default Material. By altering the shader components on our new Material Preset we can easily create new and unique styles and effects for use in our projects.