The Cinemachine Brain
Tutorial
Beginner
+10XP
15 mins
193
Unity Technologies

Cinemachine works a lot like a technical director in a multi-camera show, controlling and directing cameras in a Unity project. At the center of it all is the Cinemachine Brain, which controls multiple virtual cameras. In this tutorial, you'll add and configure the Cinemachine Brain for your project.
Languages available:
1. What is the Cinemachine Brain?
This tutorial has been verified using Unity 2019 LTS and Cinemachine v2.3.4.
Cinemachine works a lot like a technical director in a multi-camera show, controlling and directing cameras in a Unity project. But instead of having multiple Standard Main Cameras in a scene, Cinemachine works with virtual cameras — or vcams — and a Cinemachine Brain on the Main Camera. Before you can work with Cinemachine, you must download and import it from the Package Manager.
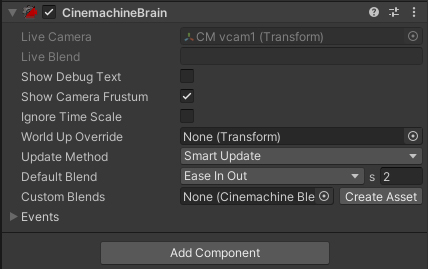
Cinemachine controls the Unity camera through the Cinemachine Brain component (Figure 01), which is added automatically to the Main Camera the first time you create a Cinemachine camera. You work with virtual cameras either by animating them, blending them, using their procedural animation functionality, or any combination of the above. The Cinemachine Brain takes all the animation and applies it to the Main Camera.

The Cinemachine Brain has the following parameters and options:
Show Debug Text: Shows which Cinemachine virtual camera is currently controlling the main Unity camera. If the camera’s blending between multiple Cinemachine cameras, they’re all listed with their contributions to the overall blend.
Show Camera Frustum: Shows which part of the scene is visible to the camera
Ignore Time Scale: Makes Cinemachine respond in real time, even if the game’s running in fast or slow motion, or is paused.
World Up Override: Specifies a transform whose Y-axis will serve as the “up” vector in the world by dragging in any object and rotating it. Left empty, the Y-axis of the world is used. This can be useful to help cameras maintain proper orientation and prevent gimbal lock (the loss of one degree of freedom of rotation) in extreme situations. This is useful for games or situations where the camera is mostly looking up or down.
Update Method: This selects when to update the camera position and orientation. This is important if you’re getting stuttering or any other non-smooth behavior due to objects being animated in fixed update or late update mode, or combinations of the two.
Default Blend: This selects the shape of the transition curve when blending between Cinemachine cameras and how long the transition should take. A two-second blend using the Ease In Out curve shape is the default. Each curve type adds a different feel to the camera’s behavior and can add subtle detail to your world. For example, a linear blend could enhance the believability of robot-controlled cameras in a sci-fi game.
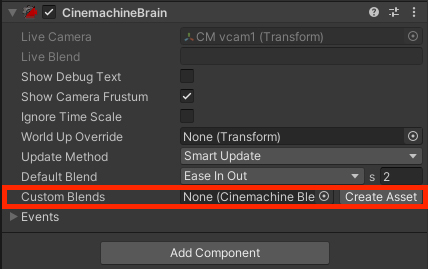
Custom Blends: Custom blends are also possible and are stored in Cinemachine Blend Settings files. Click Create Asset (Figure 02) to create a settings file in which to store custom blends.

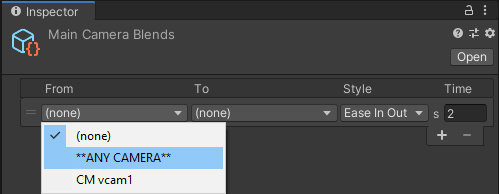
A custom blend specifies which (or any) camera to transition from and to, the shape of the curve that describes the smoothness or sharpness of the blend, and the duration in seconds. (Figure 03)

Note that you can specify blends between any two cameras and that wildcards are also supported with the option **ANY CAMERA**. This lets you define a single custom blend in/out of any camera. Because the custom blends are defined by a file, it’s possible to switch them based on level or character or any other factor, giving an incredible degree of control.
The available curve styles are:
- Cut: This is just as it sounds. There’s no transition time, but instead control is handed over instantly from one camera to another.
- Ease In Out (default): This transition begins and ends smoothly.
- Ease In: Controls transitions out of the From camera in a linear (mechanical) fashion and eases into the To camera gently
- Ease Out: Controls eases out of the From camera gently and transitions linearly to the To camera
- Hard In: Controls eases out of the From camera gently and transitions hard into the To camera
- Hard Out: Controls transitions hard out of the From camera and eases into the To camera gently
- Linear: Controls transitions linearly between the From and To cameras
- Custom: This allows you to create your own custom curve.
There are two events that the Cinemachine Brain handles:
- Camera cut: This event is fired any time a virtual camera takes control with no blend. As in videography, Unity cuts to that virtual camera.
- Camera activated: This event is fired any time a camera is activated. It’s fired when you cut to a camera and also on the first frame when a camera is included in a blend.
2. Conclusion
The Cinemachine Brain is simple, but powerful, and mastering it is key to intelligent camera control with Cinemachine.