
The PiXYZ Studio Interface
Tutorial
Beginner
+10XP
30m
(33)
Unity Technologies
The PiXYZ Studio has a simple, intuitive, and clean interface layout which makes it quite easy to navigate through the tools you may need to use while preparing your project files for use in Unity. In this tutorial you will learn about PiXYZ Studio's interface and how to navigate it.
Languages available:
1. PiXYZ Studio 설치
이 튜토리얼은 Unity 2022.2 그리고 Pixyz 2022.1.14 버전을 기반으로 작성되었습니다.
Unity 홈페이지에서 Pixyz 구독 또는 Pixyz 홈페이지에서 Request a trail 버튼을 눌러서 Pixyz 체험판을 신청합니다.
이 후 입력한 이메일 함에서 "Welcome to Pixyz" 이메일을 확인합니다. 해당 이메일에서 Pixyz 홈페이지의 이메일 및 비밀번호를 확인할 수 있습니다.
Pixyz 홈페이지의 우측 상단 Sign-In 버튼을 클릭 후 해당 이메일 및 비밀번호를 입력하여 로그인합니다.
이 후 Pixyz Download에서 Pixyz Studio의 최신버전을 다운로드 후 설치합니다.
2. PiXYZ Studio 인터페이스
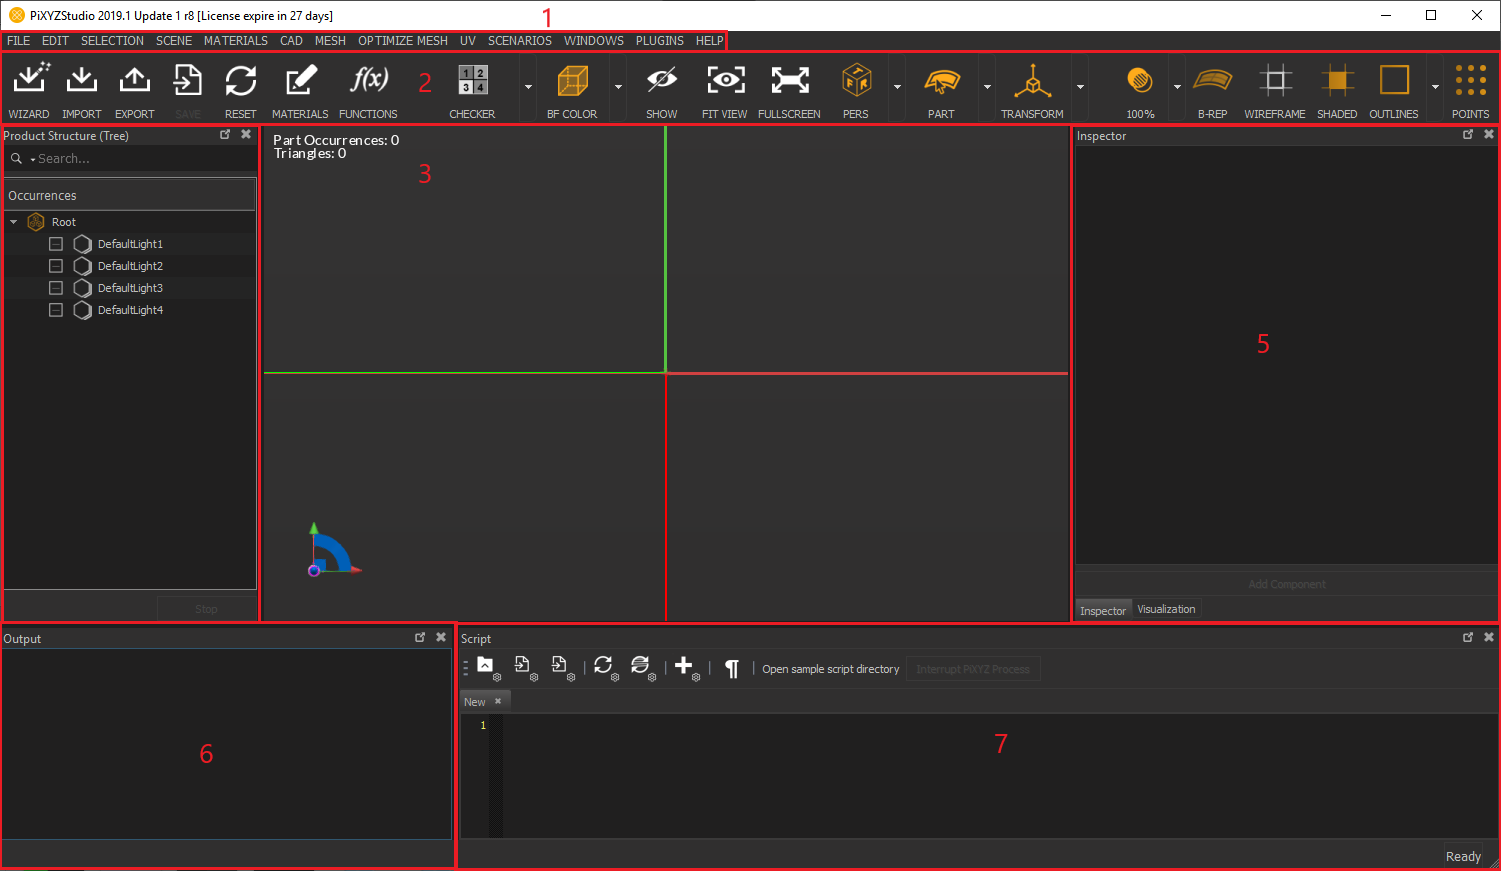
PiXYZ Studio has a simple, intuitive user interface that allows for easy navigation through the tools you need to prepare and optimize your models for real-time use in other applications. (Figure 01)
The user interface includes the following:
- Menu Bar: Houses all the available tools within PiXYZ Studio
- Main Toolbar: Contains shortcuts to commonly used tools
- Product Structure (Tree) - Variants & PMI: Contains the Scene’s hierarchy of objects
- Viewport: An interactive rendering window for the loaded model
- Inspector - Visualization - Tools: The Inspector shows information about the selected occurrences, The Visualization panel is a list of the scenes main display settings, The Tools panel is a list of tools that lets the user interact, modify or manipulate the scene objects
- Log Output: A history of all actions performed on the object within the scene
- Scripting Editor: A Python editor for creating scripts to use within PiXYZ Studio
- Undo/Redo History:
The entire user interface is customizable. You can adjust the position and size of each window and clip them on every corner of the interface. This allows you to set up and organize your own ideal workspace.
3. Menu Bar
The Menu Bar is where you can find most of the interface’s tools. They are categorized by what they do. If you can’t find a tool in the UI, you can easily find it within the Menu Bar. (Figure 02)
4. Main Toolbar
Located just below the Menu Bar, the Toolbar contains shortcuts to PiXYZ Studio’s main functions. The Toolbar is broken into three sections, each of which deals with general operation. (Figure 03)
The left section of the Toolbar deals primarily with general file and project operations.
(Figure 04)
The buttons, left to right, are:
- Wizard: This imports a file into the current project using the PiXYZ Import Wizard.
- Import: This imports a file into the current project. Supported file types include CATIA, 3DXML, NX and FBX..
- Export: Exports the current project to a specific format
- Save: Saves the current project
- Reset: Resets the project, discarding any unsaved changes
- Materials: This shows the Materials editor window
- Functions: This creates a new function
The middle section of the toolbar mostly deals with the camera and perspective being used in the project. (Figure 05)
The buttons and their operations, from left to right:
- Checker: This shows the Checker Material on all parts of the model
- Rendering Mode: Select from a dropdown of how we will display backfaces
- Show: Shows any hidden parts of the model.
- Fit View: Fits the main camera to the selected parts in the project.
- Fullscreen: Puts the viewer into fullscreen mode.
- View Cube: Drop-down list used to set the camera-view to predefined orthographic views and to set the camera type (perspective or orthographic).
- Selection Mode: Allows you to select an individual part. It has a dropdown to change the behavior to Connected Mesh, Patch, or Polygons.
- Transform: Toggles the Transform gizmo on a selected occurrence. Its dropdown allows you to move the pivot of the selected object.
The Scene Override Material button has a submenu, giving you additional options and control over the shader and material. (Figure 06)
The Checker submenu has the following options:
- Checker: Displays all objects with UVs in a checker texture. Objects with no UVs are displayed in a flat purplish color,
- UV Channel #: Changes the UV Channel the Checker Material is applied to.
- Clay: Shows a clay Material on all parts of the model.
- Specular: Shows a specular Material on all parts of the model.
- Zebra: Shows a zebra Material on all parts of the model.
- Color By Part: Allows you to color a selected part of the model.
The middle section of the Toolbar has two sub-menus for Rendering Mode and View Cube. (Figure 07)
Rendering Mode includes the following additional options:
- BF Color: Enables the data preparation classic rendering mode, which renders the back-facing triangles with a flat pink Material.
- BF Culling: Enables backface culling rendering to provide more performance. Backface culling will not render the backfaces of the model (faces not visible to the camera) in transparency.
- 2-Sided: Enables two-sided rendering for Material Shaders applied to the Mesh.
View Cube has the following additional options:
- Top: Puts the main camera into a top orthographic view.
- Bottom: Puts the main camera into a bottom orthographic view.
- Aft (Back): Puts the main camera into a back orthographic view.
- Front: Puts the main camera into a front orthographic view.
- Right: Puts the main camera into a right orthographic view.
- Left: Puts the main camera into a left orthographic view.
- Perspective: Puts the main camera into a perspective view.
The right section of the Toolbar mostly deals with how the mesh is rendered inside the Viewer. (Figure 08)
The buttons and their operations, broken down from left to right:
- Transparency: This controls the opacity of the model.
- Show B-Rep: This toggles the display of any parametric/mathematical surfaces, such as BREP and Nurbs.
- Show Wireframe: Toggles the wireframe of the object inside the viewer
- Show Shaded: Toggles the shading of the object inside the viewer
- Show Outlines: Toggles the outlines of the object in the viewer
- Show Points: Toggles the visibility of points on the object in the viewer
The right section of the Toolbar has two submenus for Opacity and Outlines. (Figure 09)
The Transparency submenu contains four levels of opacity: 100%, 75%, 50% and 25%.
Show Outlines has the following two options:
- Patches: Enables the viewing of patches borders.
- Lines: Enables the viewing of outlines.
5. Product Structure
To the left of the Viewer is the Product Structure. The Product Structure tab is a complete and accurate representation of the CAD file hierarchy or tree. PiXYZ preserves your CAD model organization, naming and all assemblies, parts, nodes, and instances. All these are listed here and are easily accessible through the Viewer or the search engine built into PiXYZ Studio. You are also able to re-organize the structure by drag and dropping, copy, paste, duplicate, create, hide or show nodes. (Figure 11)
When you select a Part in the Viewer, the highest node of the hierarchy in the Product Structure, where the Part exists, is highlighted. The surface of the part is also highlighted the same color to show the selection in the viewer. The selected part’s position in the tree can be shown through the Find In Tree function in the contextual menu by right-clicking the selected part in the Viewer.
You can also identify and retrieve a specific element by name by simply using the search function, which is case sensitive. Multi-selection is available by holding CTRL while selecting elements in the Product Structure tab.
6. Variants and PMI
The Variants section will allow you to create and display variants of your scene. You can save different versions of the occurrences position, visibility and materials
The PMI (Product and manufacturing information) section is where you can find any PMI that is included in some CAD files. When a PMI is imported a folder will become created here so you can use the PMI.
7. The Viewer
The Viewer is located in the middle of the PiXYZ Studio user interface. The Viewer’s main job is rendering the model to the screen and allowing the user to manipulate the camera or model directly. Additionally, this window shows information regarding the loaded model, such as the occurrences of its parts and the number of triangles or polygons it contains. (Figure 10)
Standard navigation for the Viewer:
- ALT Key + Left-click: Rotate camera
- ALT Key + Middle-click: Pan camera
- ALT Key + Right-click or Mouse wheel: Zoom camera
Catia-like navigation for the Viewer:
- Center-click + Left-click: Rotate camera
- Center-click + Middle-click: Pan camera
- Center-click + Right-click or Mouse wheel: Zoom camera
Camera rotation center for the Viewer:
- Mouse Middle-click: Changes the rotation center (camera pivot point) and automatically centers the camera view on the selected pixel. The click needs to be executed on an occurrence (part present in the viewport).
Single-click selection controls for the Viewer:
- Mouse Left-click: Select / replace occurrences
- CTRL Key + Mouse Left-click: Add / remove from the current selection
- SHIFT Key + Mouse Left-click: Remove from the current selection
Area selection controls for the Viewer:
- Mouse Left-click + Selection area: Selects occurrences visible only from the camera view and crossed by the selection rectangle
- CTRL Key + SHIFT Key + Mouse Left-click + Selection area: Adds to the current selection occurrences visible only from the camera view and crossed by the selection rectangle.
- SHIFT Key + Mouse Left-click + Selection area: Remove from the current selection only occurrences visible from the camera view and crossed by the selection rectangle.
- Mouse Right-click + Selection area: Select all occurrences from the scene crossed by the selection rectangle ("in-depth" selection).
- CTRL Key + SHIFT Key + Mouse Right-click + Selection area: Add to the current selection all occurrences from the scene crossed by the selection rectangle ("in-depth" selection).
SHIFT Key + Mouse Right-click + Selection area: Remove from the current selection all occurrences from the scene crossed by the selection rectangle ("in-depth" selection).
8. Inspector
The Inspector Tab is to the right side of the Viewer. This tab displays all available information regarding the selected element(s). In some cases, selecting several elements will cause some fields not to be filled. (Figure 12)
From this window, you can also:
- Show/hide selected element(s) by checking / unchecking the Visible box in the Occurrence section.
- Show/hide all occurrences of the selected element(s) by checking / unchecking the Visible box in the Element section.
- Attach a Material to a mesh. Pressing this button opens up the Material Selector window.
9. Visualization Panel
PiXYZ Studio offers tools to help you visualize the model you’ve loaded into the Viewer.
(Figure 13)
There are two categories in the Visualization panel:
- Settings: Here the user can control the X-ray (opacity) of the model. You can toggle Ambient Occlusion, TrackBall, Grid, CATIA Navigation and the Constraint Up Axis. The user can also control the Background gradient and the Camera Field Of View.
- Lighting And Environment: Here the user can adjust the Exposure, Blur and Rotation of the Environment Map. You can also toggle the Environment Map on or off and even show it as a background.
10. Tool Panel
The Tools panel is a list of tools to help the user interact, modify or manipulate the scene objects. The panel has four sections:
- Selection Tool: This tool will allow the user to select occurrences in the scene using a bounding box and then move and scale them.
- Cutting Plane: This allows you to visualize inside the model. Enable and select a cutting axis, then slide the translation cursor to move the cutting plane. It also offers additional visualization parameters to further control this.
- Exploded View: This spreads all the model parts outward, according to a defined axis. This tool allows you to visualize all the components inside the selected model.
UV Projection Tool: This tool will allow the user to create UVs on an occurrence.
11. Log Output
The Output tab contains all the commands and script executions performed on a project since its initialization. The stack of actions includes timestamps, action type and the value changes or how long the action took to complete. (Figure 14)
12. Script Editor
PiXYZ Studio lets you create your own scripts for custom requirements. From the Script Editor, you can write and execute Python scripts. (Figure 15)
All available Python scripting functions are accessible from the documentation; the only functions that aren’t available are the import and export functions. This tool even allows you to convert manual actions from the Modifiers Tab into a Python script. This script is shown in the Script Editor.
13. History
This panel contains a list of your Undo and Redo history. It lists all the actions executed in the interface that the user can undo (Ctrl+Z) or redo (Ctrl+Y).
14. Conclusion
The PiXYZ Studio interface gives users access to the tools necessary to prepare CAD data for real-time use. The entire interface is customizable to fit users’ needs and optimize workflows.