
Get started with John Lemon’s Haunted Jaunt
Tutorial
Beginner
+10XP
30 mins
8354
Unity Technologies

Welcome to the John Lemon’s Haunted Jaunt: 3D Beginner Project! As you complete the tutorials in this learning project, you’ll make your own version of a 3D stealth game and develop your understanding of the principles behind each step. In this project, you’ll learn how to make a stealth game with this step-by-step guide for users completely new to Unity.
In this first tutorial, you’ll:
- Set up a Unity project to work on the game
- Create a Prefab for your player character
- Begin to animate the character
- Make sure your character reacts to physics
Languages available:
1. Overview
Welcome to the John Lemon’s Haunted Jaunt: 3D Beginner Project! As you complete the tutorials in this learning project, you’ll make your own version of a 3D stealth game and develop your understanding of the principles behind each step. In this project, you’ll learn how to make a stealth game with this step-by-step guide for users completely new to Unity.
In this first tutorial, you’ll:
- Set up a Unity project to work on the game
- Create a Prefab for your player character
- Begin to animate the character
- Make sure your character reacts to physics
By the end of this tutorial, you’ll be ready to write your first script to control John Lemon’s movement.
2. Before you begin
New to Unity?
This learning experience assumes that you are already familiar with the Unity Editor. If you’re new to Unity, the Unity Essentials learning pathway has been designed to help you get set up and ready to create in the Unity Editor.
Update the Unity Hub
Before you begin to set up your Unity project, consider updating your Unity Hub to the latest release. If you are using an older version of the Hub, there may be differences between the guidance provided and your experience.
Review the Unity Editor basics
If you need to refresh your memory of the Unity Editor basics, you can take a moment to review Explore the Unity Editor at any time.
Set up your Unity project
To set up your Unity project:
1. Install Unity 2020.3, if you haven’t already done so.
2. Create a new Unity project using one of the Core Templates (2D or 3D). It doesn’t matter which Core Template you select; the package that you import will override the default Template settings.
3. Go to the 3D Beginner: Tutorial Resources in the Unity Asset Store
3. Save the Scene
In the previous tutorial, you explored the layout of the Unity Editor. You also discovered that a Scene is formed of GameObjects which have components to specify how they work in a game.
Now it’s time to add GameObjects to your own Scene!
When a new Project is created, Unity automatically creates an empty Scene called "Untitled".

Go to File > Save or press Ctrl/Cmd + S, then select where you want to save the file. There is already a folder called Scenes, so let’s save this Scene in that folder as "MainScene".
You will see this creates a Scene Asset called MainScene in the Project window.
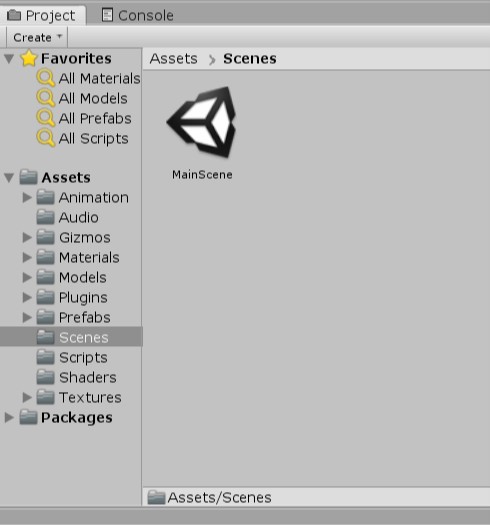
Now you have a Scene to work in. We will use this Scene for the rest of the tutorials. Remember to press Ctrl/Cmd + S regularly to save your changes!
4. Add a Character Model
In the previous tutorial, you imported all the Assets that you will need to make this game. The first Asset you will be using is a 3D model.
Most things that you see in a 3D game are models, including characters, the environment and props. These are usually created outside of Unity, and are then imported and given functionality to make a game. To use these models, you need to add them as GameObjects (this is called creating an instance of the model).
Let’s add John Lemon, the player character:
1. In the Project window, go to the Assets > Models > Characters folder and find the model called JohnLemon.
2. Drag the model from the Project window into the Scene view. This enables you to choose exactly where you want to place the model. (You can also drag models into the Hierarchy to create GameObjects at the default position.)
3. With your cursor over the Scene view, press F to focus.
You should now see the player’s character in the scene! You can also find information about the GameObject you just instantiated in the Inspector. Currently it has two components:
- A Transform component, which means it has a location and size in the Scene
An Animator component, which means that it can be animated
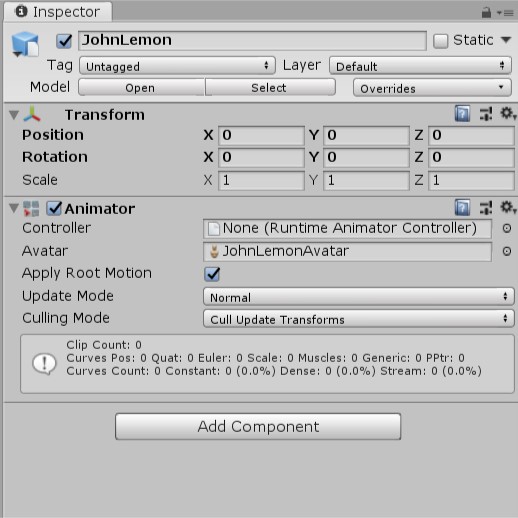
But there’s more to this character than just those features — for example, you can see the player character in the Scene view, but neither of these components account for that.
4. In the Hierarchy window, find the JohnLemon GameObject.

There is an arrow next to the name of the GameObject — this means that a GameObject has children.
5. Click on the arrow to expand JohnLemon and see its children.
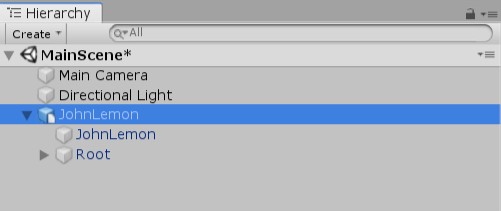
This GameObject has two children: another GameObject called JohnLemon and one called Root. Select the child GameObject called JohnLemon.
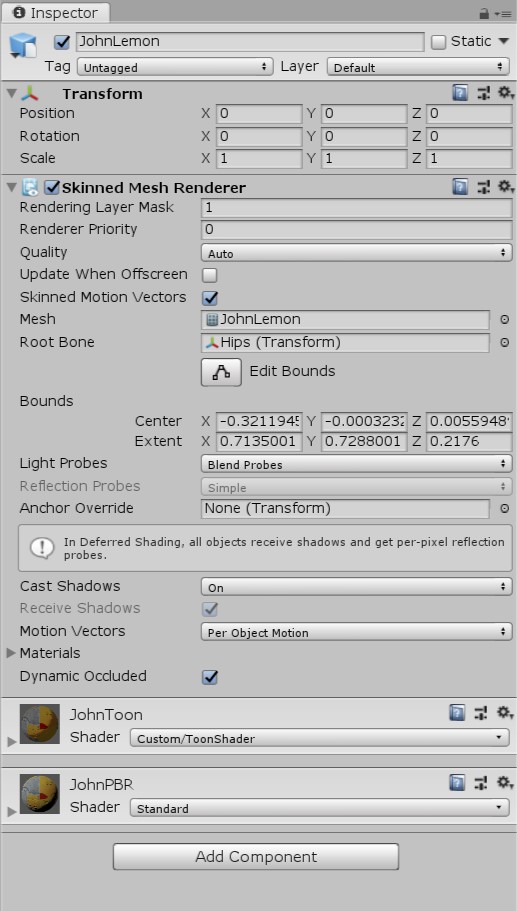
This GameObject has a component called a Skinned Mesh Renderer. This is what enables you to see the character.
Models are made up of a mesh of triangles, and a Mesh Renderer "renders" that mesh so you can see it. A Skinned Mesh Renderer is a special type of Mesh Renderer that allows the mesh to change shape based on the positions and rotations of all of a model’s bones. These bones are child GameObjects of the model — JohnLemon’s bones are all children of the Root GameObject
6. In the Hierarchy, select the Root GameObject. Hold Alt (Windows) or Option (macOS) and click the arrow to the left of its name to expand all its child GameObjects.
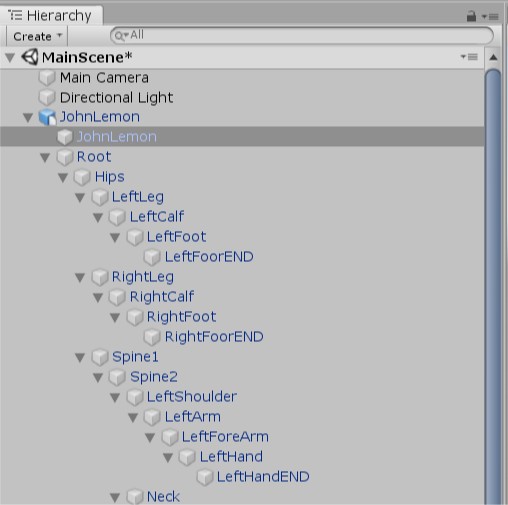
Each of these GameObjects represents a part of JohnLemon’s body.
7. Click the Play button in the toolbar to enter Play Mode.

8. In the Hierarchy, select the GameObject called LeftForeArm. In its Transform component, find the Rotation field and set the Y value to 90.
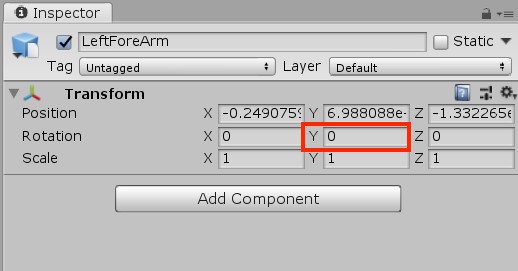
In the Scene view, you should see that JohnLemon’s left arm has bent 90 degrees. This is essentially how you will animate JohnLemon: the Animator component on the character’s parent GameObject will change the rotation of all the bone GameObject Transform components, and these changes will happen together to animate the character.
9. Exit Play Mode by pressing the Play button again. Note that any changes made while you’re in Play Mode are not saved when you exit.
10. Collapse all the GameObjects again by holding Alt (Windows) or Option (macOS) and clicking on the arrow next to the JohnLemon parent GameObject.
Before you get too far into creating the character, let’s have a look at Prefabs and how they can help you create your game.
5. What are Prefabs?
Prefabs are a special type of Asset that represent a GameObject or collection of GameObjects with components that are already set up. They’re like a blueprint which you can use to easily make instances of the same thing. Each instance of a Prefab is linked to the Prefab Asset, so changing the Asset will change all versions of the Prefab in all Scenes.
The first use for this system in your Project will be to make the character a Prefab. This means that if you go on to make multiple levels for the game, you won’t need to remake JohnLemon for every level — you can just instantiate a new Prefab.
Prefabs can be identified in the Hierarchy window by their blue name and icon:

But hold on a second! The JohnLemon GameObject has a blue name and a blue cube icon, but there is a small white piece of paper over the cube. Is the JohnLemon GameObject already a Prefab?
It’s something close: in Unity, models work like read-only Prefabs. They’re blueprints for creating instances of that model, but the blueprint itself cannot be changed.
6. Turn the Character into a Prefab
You need to be able to change things on this Prefab, so let’s make a new one that you can adjust:
1. Drag the GameObject from the Hierarchy into the Assets > Prefabs folder in the Project window. A dialogue box will appear asking if you want to make an Original Prefab or a Prefab Variant — select Original Prefab.
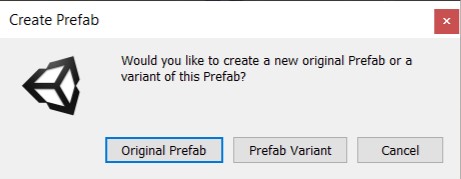
Dragging a GameObject in this way makes it a Prefab regardless of the folder it is dragged into. To keep Projects tidy, it’s helpful to save all the Prefabs in the Prefabs folder.
2. Now the JohnLemon Prefab has been created, any changes you make to that Prefab will be reflected on the instance of the JohnLemon Prefab in the Scene. In order to make changes to a Prefab, you will need to open the Prefab for editing in Prefab Mode. Before you do that, save the Scene by pressing Ctrl + S (Windows) or Cmd + S (macOS).
Now you can open the JohnLemon Prefab!

3. In the Inspector window, click the Open Prefab button.
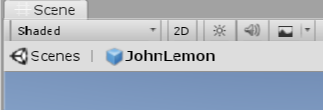
Unity Editor is now in Prefab Mode. This mode takes you out of the Scene you were editing before, and puts you in a temporary Scene with just the Prefab. The Scene view has changed slightly: at the top there is a new bar which says Scenes | JohnLemon on the left and has a checkbox labeled Auto Save on the right.

Scenes | JohnLemon is the breadcrumb for the Prefab currently being edited in Prefab Mode. In this case, you are only editing the JohnLemon Prefab and going back from here would take you back to the Scene you were editing.
4. Disable the Auto Save checkbox (enabling this will slow you down). A Save button will appear so you can manually save any changes that you make to the Prefab.
5. The Hierarchy window also has a new bar at the top.

On the left is an arrow which will take you back along the breadcrumb. If you clicked the arrow now, it would take you back to MainScene.
Throughout this 3D Beginner Project you’ll edit Prefabs, and most of the time you’ll do this by entering Prefab Mode. Getting used to switching between editing GameObjects in the Scene and editing Prefabs is core to using Unity.
Now you’re ready to make your first changes to the JohnLemon Prefab by animating it.
7. Animate your character
Your player character is going to have two different animations in this game: a walking animation for when the player moves it and an idle animation for when they do not.
Select the JohnLemon GameObject and take a look at its Animator component in the Inspector. The first property is called Controller. This takes a reference to a type of Asset called an Animator Controller, which you’re going to use to get JohnLemon moving.
Animator Controllers contain a state machine which determines what animation the Animator component should be setting for its hierarchy at any given time. This animation is based on animation clips which have been set up on the Animator Controller.
8. Create the Animator Controller
First, let’s make an Animator Controller:
1. In the Project Window, find the Assets > Animation > Animators folder. Right click on it and select Create > Animator Controller.
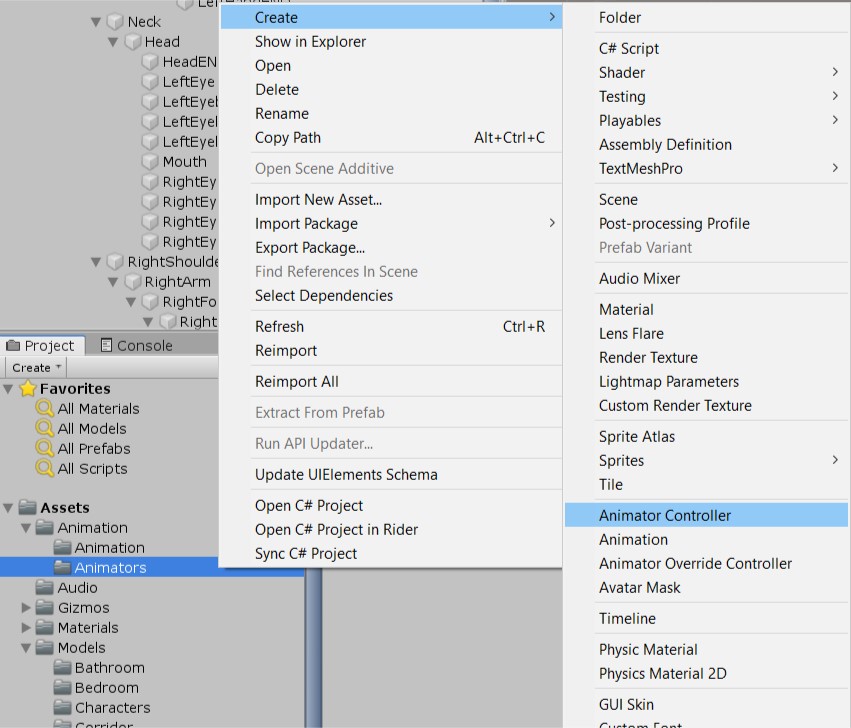
2. Name the Animator Controller "JohnLemon", then double click on it to open it for editing in the Animator window.
The Animator window has two main sections:
- A panel for editing Animator Layers and Animator Parameters on the left
- An area which displays the state machine itself on the right
3. Click the Parameters tab on the top left of the Animator window.
The Animator Controller’s state machine makes decisions based on the current values of its Animator Parameters. These Animator Parameters have values set by script. You will need one parameter for every independent variable which can affect the animation that the character is playing.
JohnLemon is going to have two animations: an idle animation for when it is not moving and a walking animation for when it is. So there are two states it could be in: walking or not walking.
There are four types of parameter:
- A float parameter has the value of a floating point variable (a number with a decimal place).
- An int parameter has the value of an integer (a number without a decimal place).
- A bool parameter has the value of a boolean (which can be either true or false).
- A trigger parameter is a special type of parameter which doesn’t hold a value — this causes a change from one animation to another.
In this case, you know that the character is either walking or stationary, so a bool parameter makes the most sense.
4. Click the + button and select Bool from the drop-down menu to create a new Bool Animator Parameter.

5. Name the new Animator Parameter "IsWalking". It’s important to get the spelling and capitalisation exactly right — you’ll understand why in the next tutorial when you write your first script.
To the right of the name of the IsWalking parameter is a disabled checkbox.

This is the default value for the parameter. Without player input your character is going to be stationary, so IsWalking should be false. This means you don’t need to change anything here.
9. Set Up the Animations
You now have a way of determining which animation to play, but there are no animations ready yet — let’s set them up.
1. In the Project window, go to the Assets > Animation > Animation window.
Currently the animations have icons showing what they look like. However, in this case it will be easier if you can see the Assets in a list view. Find the slider at the bottom right of the Project window, and drag it all the way to the left.

2. You should see five models, two of which start with John@. This naming convention lets you know that these are animations for JohnLemon.
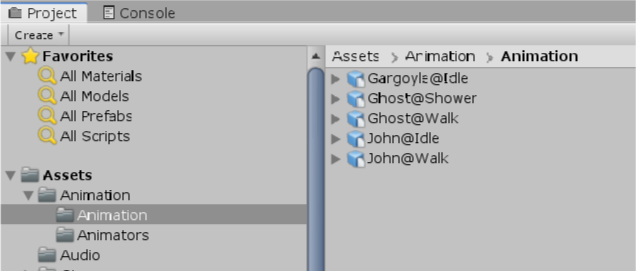
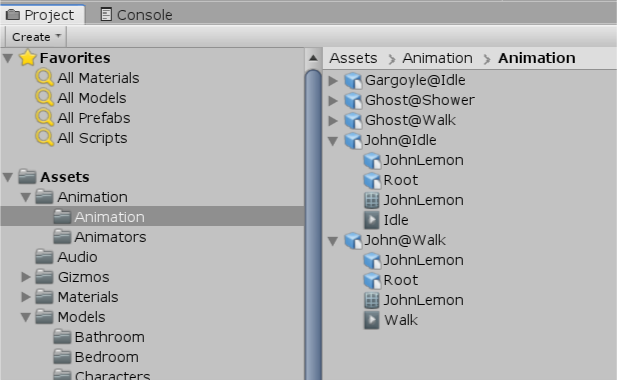
Expand both John@Idle and John@Walk, so you can see their sub-Assets.
The sub-Assets show the immediate children of the parent GameObject (remember, models get instantiated as GameObjects), the meshes and the animations. For these models, the animations are Idle and Walk respectively.
3. In order to use those animations in your Animator Controller, drag them from the Project window to the Animator window. Start with Idle.
4. Animations exist in an Animator Controller in Animator States. When you dragged in the Idle and Walk animations, the Animator Controller created two states containing them and named them after the animations.
An Animator State is part of the state machine that an Animator Controller contains. The state machine contains logic which determines which state is the current state. The current state then determines the animation that is being played.
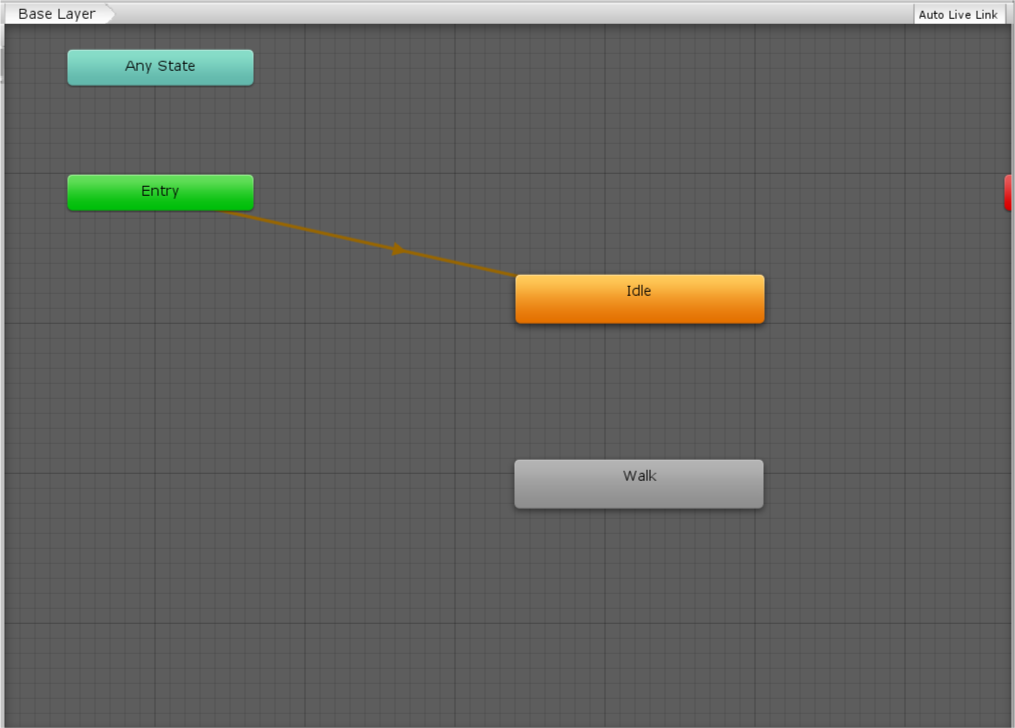
The default state is displayed in orange. In this case, the default state is Idle because you dragged it in first. The default state can be changed by right clicking on a state and selecting Set As Layer Default State.
Your state machine now has two states in it, but no logic to define which state should play. Currently, the state machine will start in the default state and never change, so JohnLemon will always be idle. In order to add some logic, you need to make Animator Transitions.
10. Create Animator Transitions
To make the Animator Transitions:
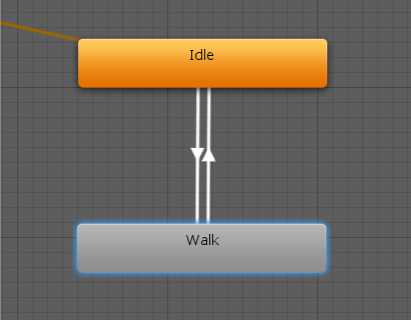
1. Right click on the Idle state and select Make Transition. This starts a transition that follows the mouse cursor.
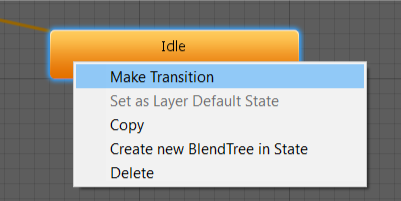
To finish creating the transition, click on the Walk state.
2. Your character needs to be able to change back to idle from walking, so repeat this process to create a transition from Walk to Idle.
The state machine should look like this:
3. The state machine now has a way of transitioning between the two animations, but it doesn’t yet know when to transition. Remember creating the IsWalking parameter? This is what you will use to determine whether the state machine should change animation or stay on the same one.
Select the transition from Idle to Walk by clicking on the connecting line.
4. In the Inspector, look at the settings for this transition. The first thing you need to change is the Has Exit Time checkbox.
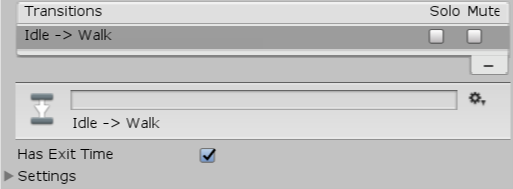
If Has Exit Time is true (the checkbox is enabled) then after a certain amount of time has passed the transition will automatically be taken and the state machine will play the next state. In this game it’s important to control when the transition is taken, so disable the Has Exit Time checkbox.
Further down the Inspector window, there will now be a warning saying "Transition needs at least one condition or an Exit Time to be valid, otherwise it will be ignored." Because you just disabled the Has Exit Time checkbox, there is currently no reason to ever take this transition. You need to provide one by adding a Condition.
11. Add Conditions to your Transition
To add Conditions to your transition:
1. Click the + button beneath the (currently empty) Conditions list.
2. The transition from Idle to Walk is required when the character is walking — that is, when IsWalking is true.

The default Condition created is actually just what you need here: if IsWalking is true, JohnLemon should transition from Idle to Walk. You don’t need to change anything!
Next, you need to set up the transition from Walk to Idle. This transition has similar requirements.
3. Select the transition from Walk to Idle in the Animator window. Disable the Has Exit Time checkbox — as before, you don’t want the state to change after a certain amount of time, just when you want it to.
4. Now that the Has Exit Time checkbox is disabled, you need to create another Condition.
This Condition should also check IsWalking, but this time the value should be set as false. If the character is not walking then it should transition from Walk to Idle.
The Animator Controller is now finished!
12. Assign the Animator Controller to the JohnLemon Prefab
You still need to tell the JohnLemon Prefab that this is the Animator Controller it should use:
1. In the Project window, to go Assets > Animation > Animators and find the JohnLemon Animator Controller.
2. Select the JohnLemon GameObject in the Hierarchy, then drag the Animator Controller to the Controller property of its Animator component in the Inspector. This is a very important step; without it, JohnLemon won’t be able to move.
3. Click the Save button at the top right of the Scene window (you may need to select the Scene tab to do this).
Now every instance of the JohnLemon Prefab has been updated to include your changes.
13. Make your Character React to Physics
Your character is going to be navigating around a haunted house with different rooms and corridors to explore. As he’s not a ghost, it’s important to make sure that he can’t walk through walls!
In order to do this, you’re going to make sure that the JohnLemon Prefab reacts to physics:
1. Open the JohnLemon Prefab for editing in Prefab Mode. In the Inspector, you’ll find two components: a Transform and an Animator. In order to react to physics your character needs two more components: a Rigidbody and a Collider.
A Rigidbody component marks a GameObject as something that is part of the physics system that can move. Since you definitely want your character to be able to move and we want them to bump into walls (therefore to be part of the physics system), the JohnLemon GameObject needs a Rigidbody component.
2. Click the Add Component button.

3. In the search bar that appears, type “Rigidbody” and select this from the options that appear.
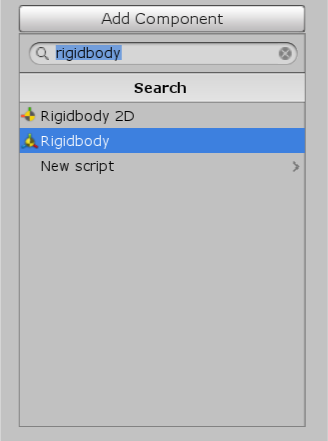
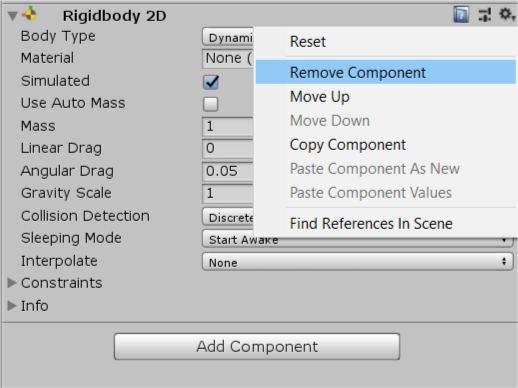
This is a 3D Project, so make sure that you click on Rigidbody and not Rigidbody 2D. If you accidentally add a component you can remove it using the component context menu — the cog in the component’s upper right corner.
4. Save your work on the JohnLemon Prefab so far, to ensure that nothing gets lost.
5. Now you have given the JohnLemon Prefab a Rigidbody component, it will react to physics effects such as gravity. Let’s enter Play Mode and see that in action. Return to the MainScene by clicking on Scenes at the top of the Scene view, then press the Play button on the toolbar.
Hmmm, that’s not quite right: the character falls a short distance then stops. Press the Play button again to exit Play Mode.
This is being cased by the Animator. The third property on the Animator component is Apply Root Motion, which is currently enabled.
14. What is Root Motion?
Animations are used to move and rotate all the GameObjects within a particular hierarchy. Most of these movements and rotations are done relative to their parents, however the parent GameObject of the hierarchy has no parent and therefore their movement is not relative. This parent GameObject can also be called the Root, and its movement is therefore called Root Motion.
Important Note! The GameObject called Root in the JohnLemon Prefab’s hierarchy refers to the root of its skeleton, and is not the actual root GameObject. The root GameObject is whichever GameObject the Animator component is on — in this case, the GameObject called JohnLemon.
Apply Root Motion is enabled on your Animator component, so any movement of the root in the animation will be applied every frame. Since the Animator is playing Idle there is no movement, so the Animator will apply no movement. So why does the JohnLemon GameObject move at all? This is due to the Update Mode of the Animator.
15. What is the Update loop?
Games work in a similar way to films and television: an image is displayed on a screen and this image changes many times per second giving the illusion of movement. We call these images frames; the process of drawing these frames to the screen is called rendering. For films and television the next image to show on screen is often predefined, but in games the next image can vary wildly because the user has influence over what happens next. Each image needs to be worked out based on the user input — and since this variation can happen every split second, the programming that works out what to display also works at this speed. This is called the Update loop.
Each time a frame is displayed, a number of things happen in order. All you need to know for now is that custom components have their Update method called, and a new image is rendered to the screen. These Updates vary in length, depending on the complexity of the computations and rendering. However, there is another separate loop that runs all the physics operations. This loop doesn’t vary how often it updates, and is therefore called the FixedUpdate.
An Animator component can change when it performs its Update. By default it performs this in line with rendering. This means that the Animator is moving the character in Update and the Rigidbody is simultaneously moving the character in Fixed Update. This is what’s causing your problem, and it can easily be fixed!
16. Fix John Lemon's Movement
First let’s get back to editing the Prefab:
1. In the Inspector window, click the Prefab Open button.

2. Go to the Animator component. In the Update Mode property drop-down, select Animate Physics.
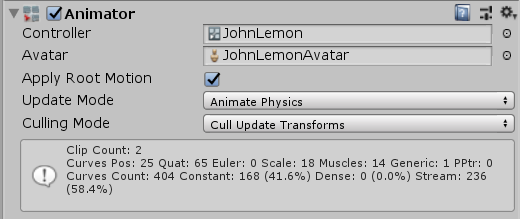
This change will cause the Animator to move the character in time with physics. Now there should be no competition between update loops to move the character, and it will react to physics as it should.
3. You’ve already seen that the animations don’t have any vertical root motion, but this won’t stop JohnLemon from moving vertically after colliding with something. There are a couple of ways that this can be stopped.
The most obvious option is to disable Use Gravity on the Rigidbody component:
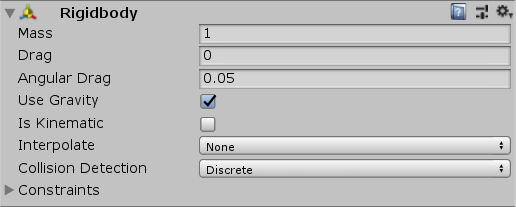
This would stop the character from falling, but it isn’t exactly what you need. If you disable Use Gravity then the character could still fall if a collision pushed it down — or float away if a collision pushed it upward. You definitely don’t want this to happen, so instead you need to constrain the movement of the character using physics.
4. Find the RigidBody component and click the arrow to expand the Constraints property.
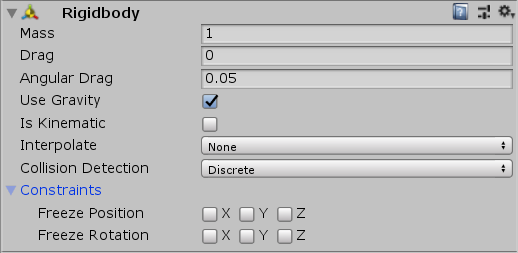
These Constraint properties restrict the directions in which the Rigidbody can move.
Let’s explore Unity’s coordinate system to understand exactly how they work.
17. Coordinates in Unity
Positions and directions in Unity work in 3D coordinates represented by x, y and z — together these make a vector. You’ll find out more about vectors in the next tutorial. A Scene has a global definition of these directions that you can see in the top right of the Scene window.
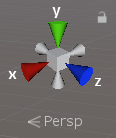
The colored arrows represent the positive direction of each axis, with the grey arrow opposite representing the negative direction:
- x-axis is red
- y-axis is green
- z-axis is blue
18. Positions and Rotation
GameObjects without parents in the scene all have positions relative to the scene’s origin (0, 0, 0). GameObjects with parents all have positions relative to their parent. However, since GameObjects can be rotated, a child’s relative (or local) position will be in their parent’s rotated coordinates. It is these local coordinates (or axes) that the Rigidbody Constraints refer to.
Let’s have a look at the local axes of the JohnLemon GameObject:
1. Select the JohnLemon GameObject, and then look at the Scene view.
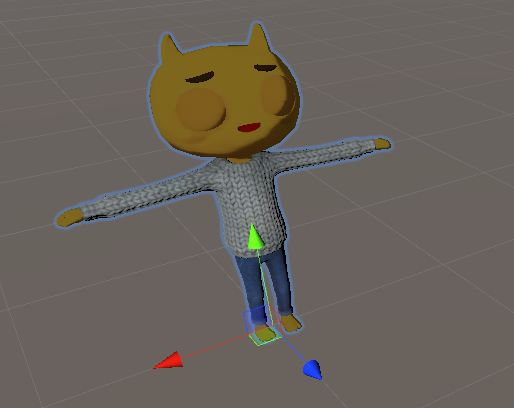
You will see that:
- the x-axis (red) is pointing to the character’s right
- the y-axis (green) is pointing upward
- the z-axis (blue) is pointing forward
2. So what constraints should your character have?
Your character needs to be able to move forward and from side to side, so there’s no need to constrain its x or z position. However, it’s important that it doesn’t move up and down; to stop that, enable the Freeze Position Y checkbox.
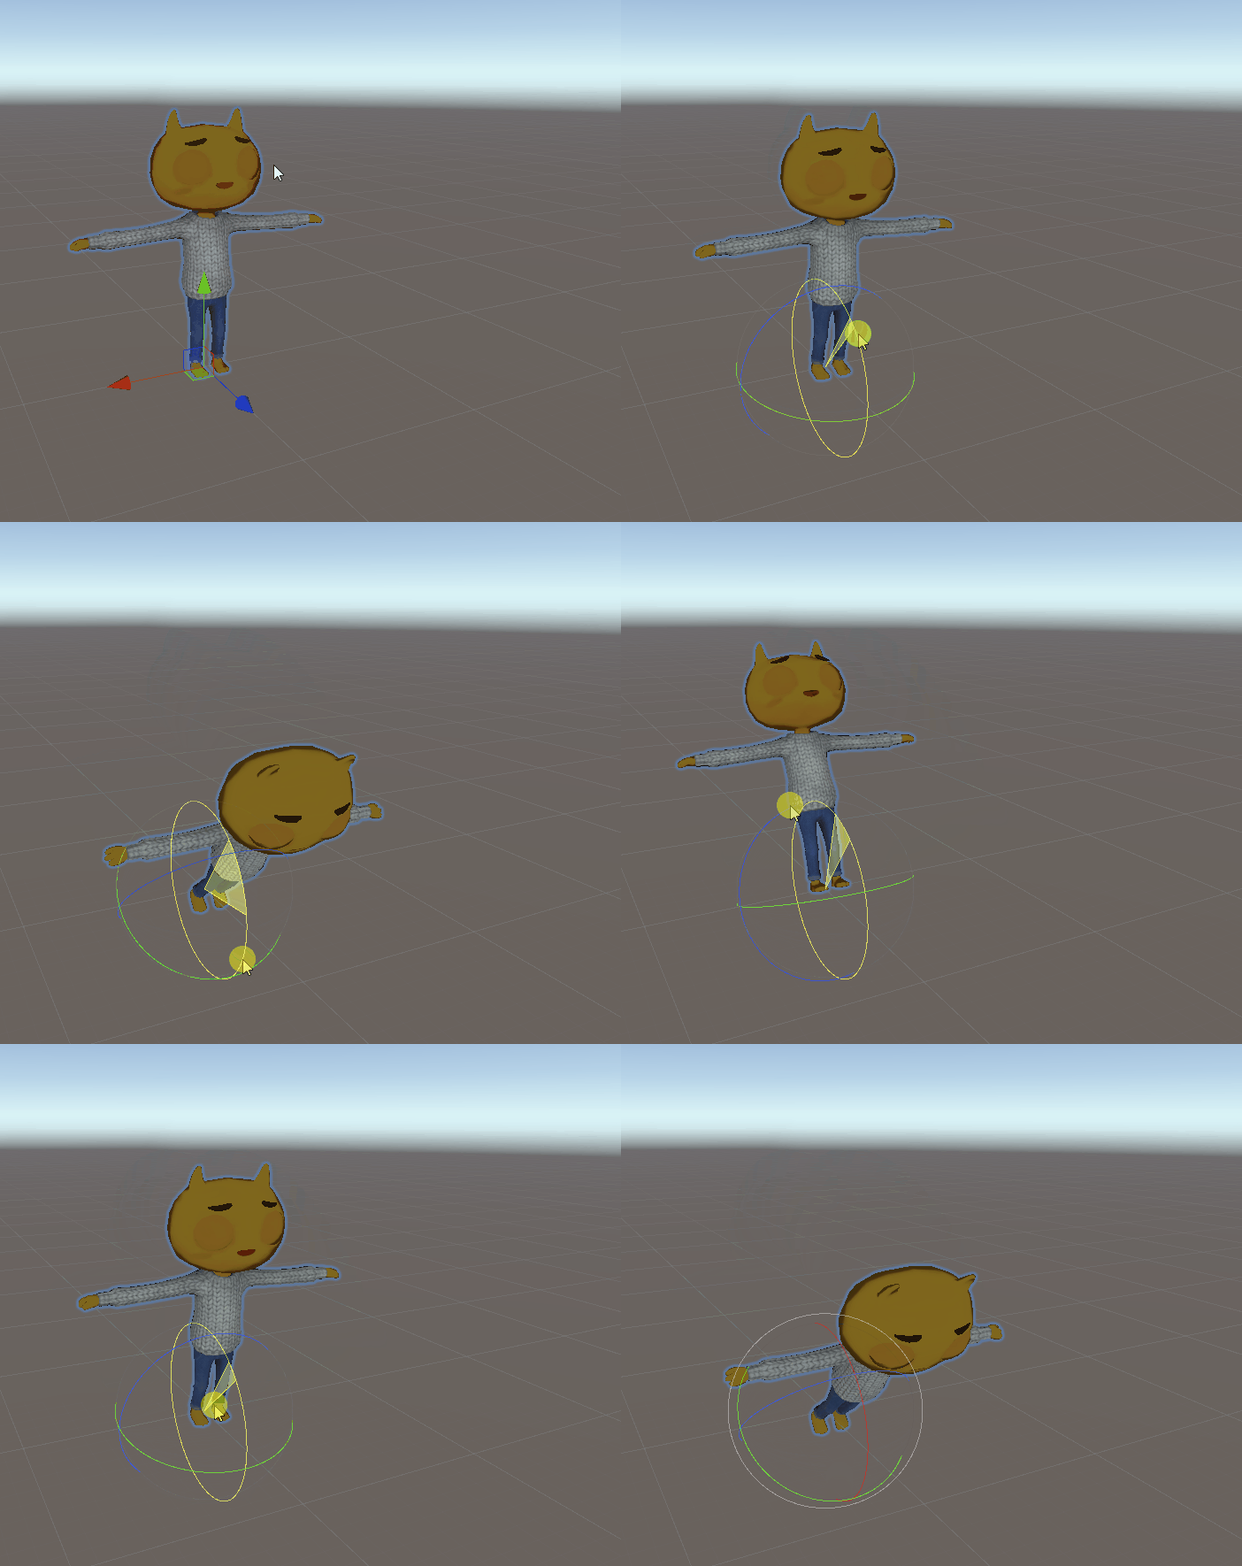
3. Rotation refers to a rotation around a specific axis. For example, if the character were rotated around its x-axis then it would look like it was lying down on its front or back:
If it were rotated around its z-axis, it would look like it was lying down on its side:
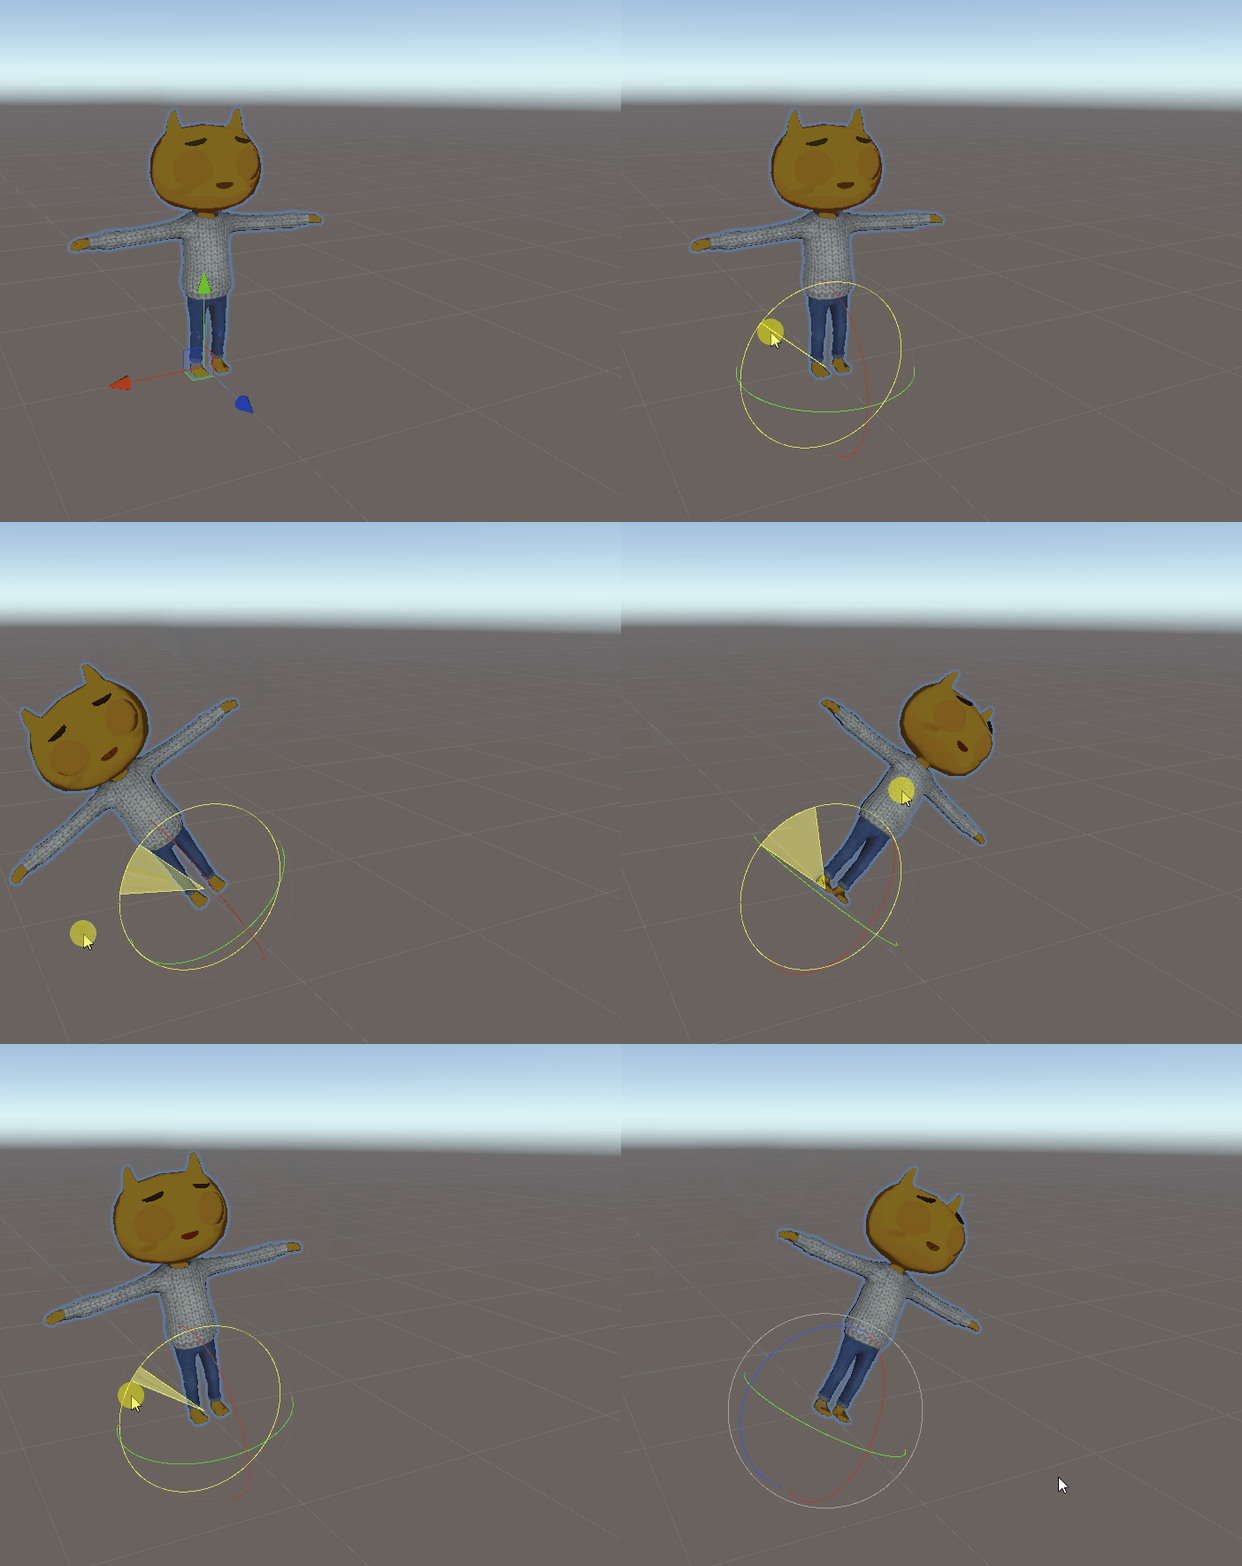
JohnLemon shouldn’t move in either of these ways, so enable the Freeze Rotation X and Z checkboxes. JohnLemon does need to turn around, so keep the Freeze Rotation Y checkbox enabled.
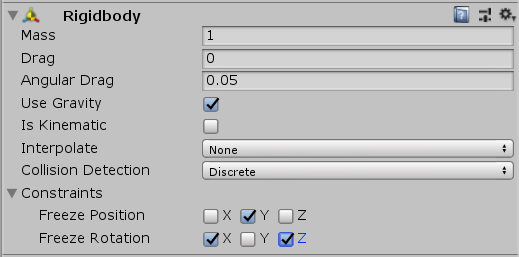
The Rigidbody component is now set up, and your character will react to the physics system. However, it doesn’t really have any physical presence in the Scene yet — nothing can bump into it and it can’t bump into anything else. In order for it to have a physical presence in the scene, it needs a Collider.
19. Add a Collider to John Lemon
A Collider is a general term that covers a number of different components. Colliders define the shape of an object for the purpose of physical collisions, allowing your character to hit things and be hit. There are Collider components of many different shapes, but the simplest one that best fits JohnLemon is the Capsule Collider.
1. Click the Add Component button in the Inspector window, and search for Capsule Collider. Select the Capsule Collider option, making sure not to click on Capsule Collider 2D.
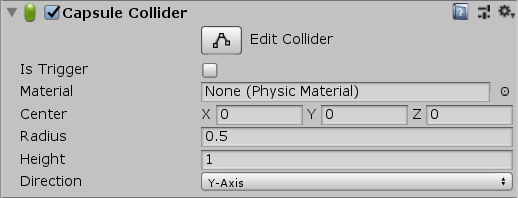
2. Currently the Capsule Collider doesn’t really cover the model, so collisions in the game won’t work properly — you need to resize and reposition the Capsule Collider so that it approximates JohnLemon’s shape.
Change the Capsule Collider’s Height property to 1.4 and the Center property to (0, 0.7, 0).
These changes mean that the middle of the collider is half its height from the ground, and since JohnLemon is approximately 1.4 meters tall the shape covers him quite well.
3. It’s still a little wide though — change the Capsule Collider’s Radius property to 0.4.
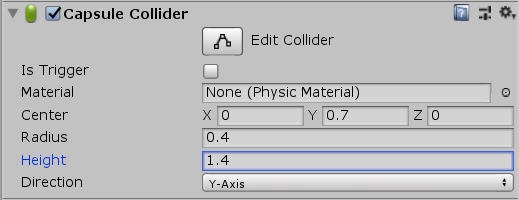
The Capsule looks about the right shape now!
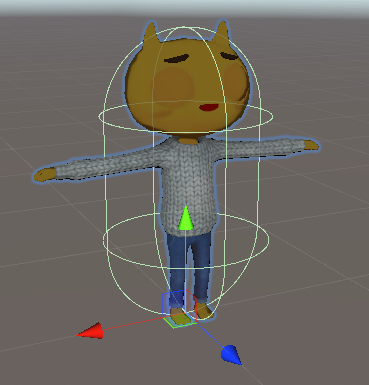
Now you have a character that will react to physics just as you need it to, bumping into walls but not falling over.
20. Summary
In this tutorial you started to work on the character for your game. You scratched the surface of the power of Prefabs and created a simple set of rules that govern how JohnLemon will behave. In the next tutorial, you’ll explore the final piece of the character puzzle by writing your first script!