
There’s a Robot on Your Table
Tutorial
Beginner
+10XP
60 mins
(78)
Unity Technologies
In this tutorial, you will:
- Install the Vuforia SDK for building AR applications
- Set up marker detection with an image target
- Create a simple AR app that will show a 3D robot model through your smartphone camera when you point it at a special "target" that you'll print out.
For this project, you will need an Android device running 4.4 or above, or an iOS device running 9 or above.
Resources
Languages available:
1. Unity AR Libraries, SDKs and APIs
2. Install the Vuforia SDK
Let's get the Vuforia SDK working in a new Unity project. If you already downloaded the Vuforia SDK as part of Unity installation, you may be able to skip some or all of these steps.
- In Unity, create a new 3D Unity project
- Select Edit > Project Settings > Player
- In the XR Settings roll-out menu, click on Vuforia Augmented Reality. This will download the correct version of the SDK for your Unity editor.
4. Install the SDK. You may be prompted to close the editor if it is open, or you may need to restart Unity for the changes to take effect.
NOTE: In some versions of Unity, the Vuforia SDK installer mechanism seems to be broken. If that is the case for you, please re-install Unity, and select Vuforia support in the Unity installer modules. We apologize for any inconvenience.
5. Open your project in Unity and check the Vuforia Augmented Reality Box. A License Agreement dialog will appear.
3. Add a Vuforia AR Camera to the Scene
In Unity, select GameObject > Vuforia > AR Camera. You will be prompted to install some additional assets, this will happen once per project.
Now, delete the MainCamera object.
4. Create an Image Target
Next, you'll add an image of the robot to a Vuforia database. This image will be the marker that the application is looking for to make the robot appear.
- You will need to create a free Vuforia developer account on the Vuforia developer portal: https://developer.vuforia.com/vui/auth/register
- Once registered, create a new developer key on their website by going to Develop > License Manager > Get Development Key. Name it “ARLesson”.
- Download the zip file available from the additional resources tab, which contains the assets you will need. After you unzip it, import it as a custom package to your Unity project.
- Back on the Vuforia website, go to Develop > Target Manager > Add Database. Name it “VuforiaLesson_ImageTargets”.
- Once the database is created, click on it and add a new target. Choose Single Image, browse for the ImageTargetRobot.jpg file, and set a width of 0.07 meters. Name it “Robot”.
- Click on Download Database, then Download for Unity Editor. Import the resulting unitypackage file to your Unity project.
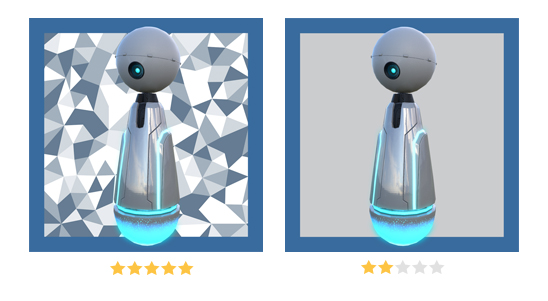
Here’s a tip! Vuforia benefits from having lots of trackable features which means zones of contrast in the target image. After the upload, each image will get a rating, like below.
7. Go back to the Vuforia website and navigate to the License Manager page. Click on "ARLesson" and copy the license key.
8. In Unity, find the VuforiaConfiguration asset in your project and paste the license key into the "App License Key" field.
5. Add the Targets to the Scene
Finally, you'll connect the image target to the Unity prefab that you want the app to show in augmented reality space, in this case a 3d robot model prefab.
- In your Unity project, create an image target object by selecting: GameObject > Vuforia > Image
- Configure the target to use the "VuforiaLesson_ImageTargets" database and then the "Robot" Image Target.
3. Add the RobotAnimated prefab as a child of the image target. Make sure its local scale is 1.
4. Add the scene to the build in Build Settings and build to your device (make sure that your build target and other configurations match your device - revisit the project work in week 1 for more information).
5. Print out a physical copy of the ImageTargetRobot.jpg. When you run your application, the 3D robot should appear when you point your smartphone camera at the image. Hello, Robot!