
Unity Editor Tips and Tricks
Tutorial
Beginner
+10XP
30 mins
56
Unity Technologies
In this tutorial, you’ll learn some useful tips to speed up and streamline your development workflow in the Unity Editor.
Languages available:
1. Overview
In this video, Unity creators share some of their best tips and tricks to help you develop your confidence in the Editor.
2. Scene view navigation tools
When working in the Unity Editor, it’s essential to know how to position GameObjects efficiently. On the leftmost side of the Scene view, you’ll find the Tools overlay. For each of these tools, a gizmo will appear around the selected GameObject, allowing you to manipulate it along specific axes. Alternatively, you can switch between the six tools using the corresponding hotkeys:
- View tool (Q): Use this tool to pan around the Scene view. A good way to think about it is like controlling a drone camera — it allows you to move freely and examine your GameObjects from any angle or distance.
- Move tool (W): This tool lets you move GameObjects along each axis. At the center of the Move gizmo, you’ll find three small squares that let you drag the GameObject within a single plane — meaning you can move along two axes at once while the third remains fixed.
- Rotate tool (E): By clicking and dragging any of the three colored circles on the Rotate gizmo, this tool allows you to rotate the selected GameObject around the corresponding axis. You can also use the outermost circle to rotate the GameObject around the Z-axis from the Scene view perspective.
- Scale tool (R): This tool allows you to resize a GameObject evenly on all axes by dragging the cube at the center of the Scale gizmo. You can also scale individual axes.
- Rect tool (T): This tool is used for positioning 2D elements, such as sprites or UI components. It combines the Move, Scale, and Rotate tools into a single gizmo, making it especially useful for 2D workflows.
- Transform tool (Y): This tool combines the Move, Rotate, and Scale tools. Its gizmo provides handles for movement and rotation.
Note: If you look at your keyboard, you’ll notice that the hotkeys for each tool are arranged in the same order as the tools appear in the Tools overlay — they’re placed next to each other along the top left of the letter keys — this layout is intentional to make switching between tools quicker and more intuitive during development.
3. Scene view navigation techniques
Effective use of the Transform and Scene Navigation tools is an essential skill in Unity, which allows you to position, scale, and view your GameObjects efficiently in 3D space. With these tools and some practice, you can develop habits to get the results you want quickly and easily. For further guidance, check out the Scene view navigation documentation.
Basic navigation methods
- Pan: With the View tool selected from the Tools overlay, click and drag inside the Scene window to move your viewpoint.
- Zoom: Hold Alt (macOS: Option), right-click inside the Scene view, and drag to zoom in or out.
- Orbit: Hold Alt (macOS: Option), left-click inside the Scene view, and drag to orbit around the current pivot point — this method is not available in 2D view.
Tip: You can also hold down Shift to increase the rate of movement and zooming.
- Focus (Frame Select): When a GameObject is selected, press F while your cursor is in the Scene view to focus on that GameObject.
Note: If your cursor isn’t inside the Scene view, the Focus command will not work.
Flythrough mode
A more complex navigation method is using Flythrough mode — similar to flying around in first person, which is common in many games. To do this, click and hold the right mouse button and use the following keyboard shortcuts:
- Use WASD to move the view left/right/forward/backward.
- Use Q and E to move the view up and down.
- Select and hold Shift to move faster.
Note: Flythrough mode is not available in 2D mode. Instead, use the View tool while using the arrow keys to move left/right/up/down.
4. Change your Play mode tint color
By default, the entire Editor becomes slightly darker when you enter Play mode. However, by default this change is subtle and can be hard to notice. And if you're unaware that you're in Play mode, you might accidentally make changes that won't be saved.
To prevent this and avoid losing work, you’ll adjust the Play mode tint to make it more obvious when Play mode is active.
Choose the new playmode tint color
1. From the main menu, select Edit > Preferences (macOS: Unity > Settings…).
2. In the leftmost menu, select Colors, then, under the General section, change the Playmode tint color to have a subtle color instead of gray.

Fine tune your color choice
1. Enter Play mode to test the new tint.
The color should be very noticeable, but still allow you to read the text in the other Editor windows.
2. If the color needs further adjustments, return to the Preferences (Settings…) window and edit it.
Important: Remember to exit Play mode before continuing to make more changes; if you don’t, your changes will be lost.
5. Disable reloading domain when entering Play mode
When you enter Play mode in Unity, you might notice a short delay before the Game view loads, along with a small dialog. This delay happens because Unity is reloading the domain and the scene from zero.
The domain is a dedicated section of memory for your project’s compiled code and current application state (like variable values, static counters, and object references). By default, Unity reloads the domain and scene when entering Play mode so the game starts fresh — just like it would in a new build. For a more detailed explanation on this matter, check out the Details of disabling domain and scene reload documentation.
While this reset helps testing accuracy, it also slows down testing, especially if you frequently switch between Edit and Play mode. For faster playtesting, you can turn off domain and/or scene reloading. To change this setting, follow these instructions:
1. In the main menu, go to Edit > Project Settings.
2. In the Project Settings window, in the leftmost panel, select the Editor section.
3. Scroll to the bottom and find the Enter Play Mode Settings section.
4. Open the When entering Play Mode dropdown and select one of the following options:
- Reload Domain only: Resets the domain to the base state (variables, static data, etc.) but keeps the current scene.
- Reload Scene only: Keeps the current domain as it is (variables, static data, etc.) but reloads the scene from scratch.
- Do not reload Domain or Scene: Keeps both the scene and domain state exactly as they were when entering Play mode last time.

For small projects that don’t rely on saved domain data or major scene changes, we recommend using the Do not reload Domain or Scene option to speed up testing significantly. Check out the Enter Play mode with domain reload disabled documentation to learn how to manually reset your game state in code if needed.
6. Inspector window’s hidden features
The Inspector window has some useful hidden features that can speed up your development workflow. Below, you’ll learn two of them. If you’d like to explore more, check out the full Inspector window documentation.
Lock Inspector (Inspector Lock button)
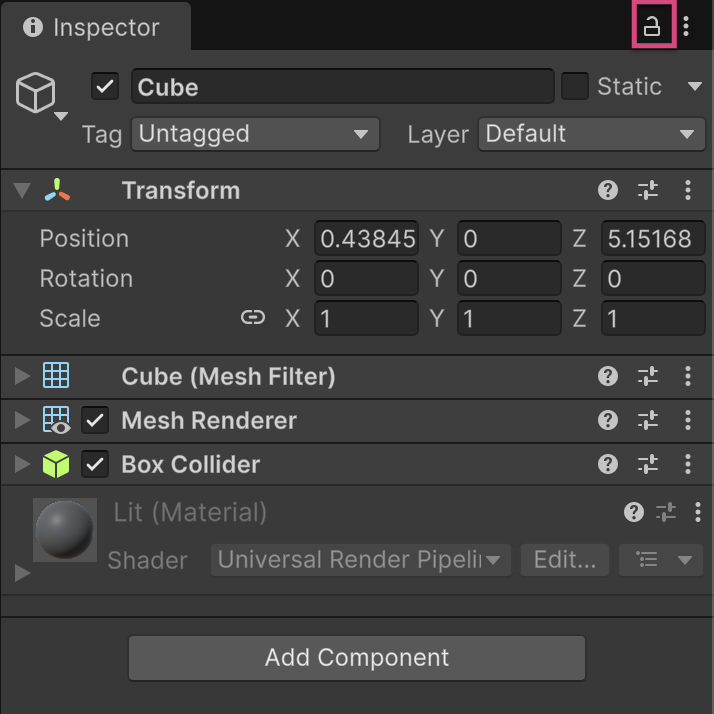
When you need to compare settings between multiple GameObjects, or edit a single GameObject while referencing others, you can lock the Inspector window on a specific GameObject or asset. This ensures the Inspector window doesn’t change even if you select something else. To lock the Inspector window, follow these instructions:
1. Select the desired GameObject in the Scene view/Hierarchy window or an asset from the Project window.
2. In the upper-right of the Inspector window, select the Unlocked button. can now freely select, move, or modify other GameObjects in the Editor without changing the Inspector window’s focus.
Copy/paste component’s values between GameObjects
Sometimes you might want multiple GameObjects to share identical component settings, or duplicate a component’s setup within the same GameObject. Instead of adding a new component and adjusting each value manually, you can copy and paste the component’s values.
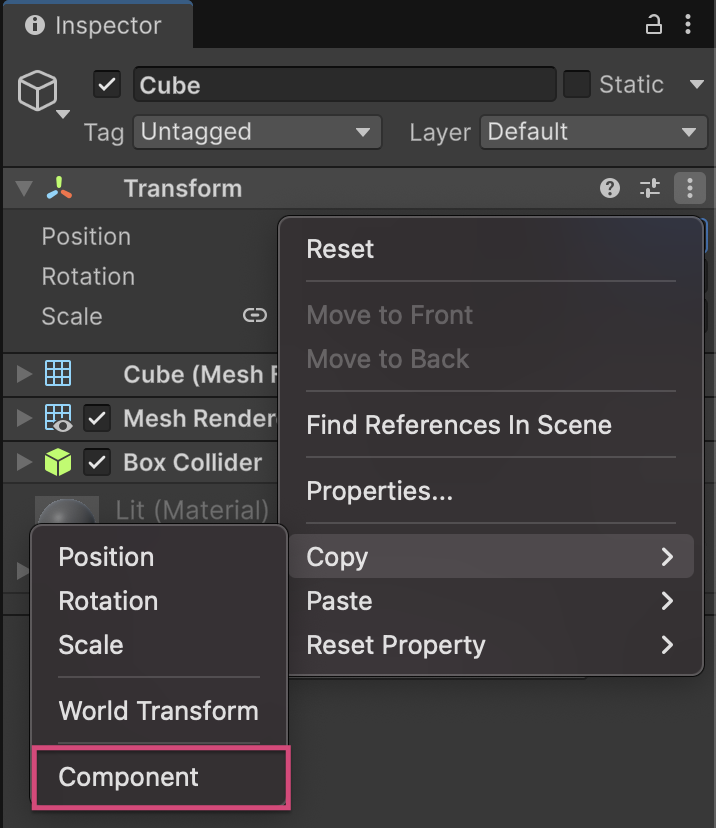
1. Copy a component’s values:
- Select the GameObject with the component you want to copy.
- In the Inspector window, open the More menu (⋮) in the upper-right of the component.
- Select Copy Component.
2. Paste the copied component as a new one:
- Select the target GameObject.
- In the Inspector window, open the More menu (⋮) of any component on this GameObject.
- Select Paste Component As New.
The copied component will be added with the same values as the original.
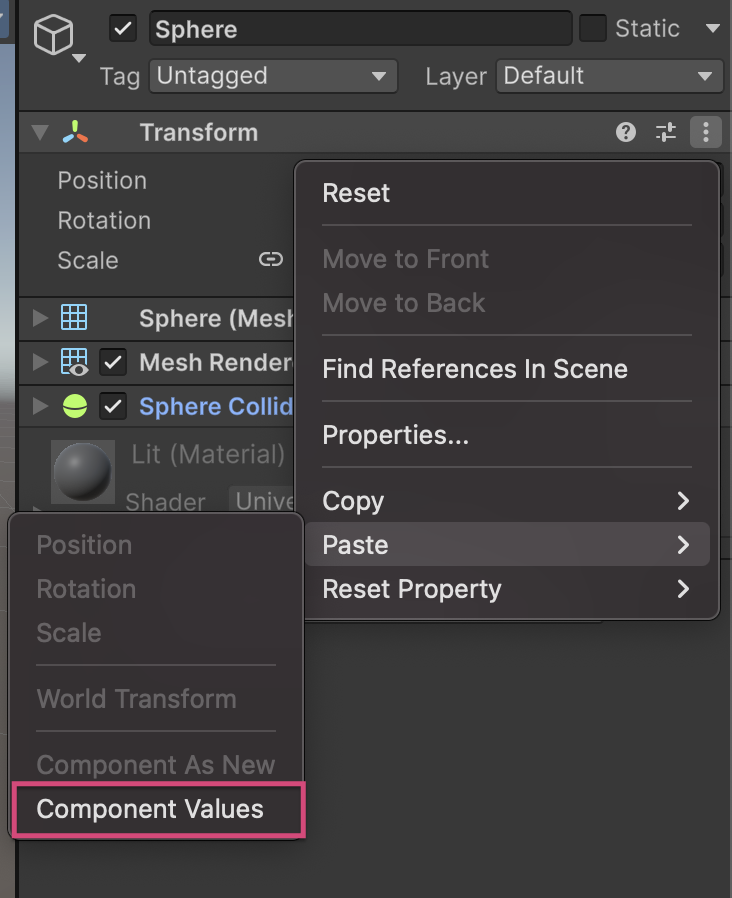
3. Paste only the values into an existing component of the same type:
- Select the target GameObject.
- In the Inspector window, open the More menu (⋮) of the same type component on this GameObject.
- Select Paste Component Values.
The component will now match the original’s settings.
7. The Hierarchy window’s hidden features
The Hierarchy window has some useful hidden features that can speed up your development workflow. Below, you’ll learn two of them. If you’d like to explore more, check out the full Hierarchy window documentation.
Search by Type in the Inspector window
Sometimes you might want to quickly locate all GameObjects with a specific component in your scene — for example, every Collider, Light, or Volume component. Instead of manually scanning through long lists, you can use Unity’s Search by Type filter:
1. In the Hierarchy window, open the Search dropdown in the search bar.
2. From the dropdown menu, select Type.
3. Enter the name of the component you want to find, then press Enter to filter the results.
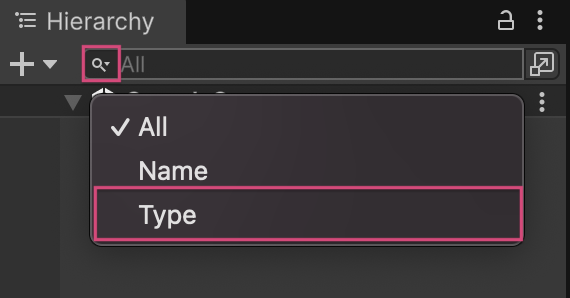
You can also use this method to find assets in the Project window:
1. In the Project window, open the Search by Type dropdown.
A dropdown will open with all the available types of assets you can have in your project (such as Material, Scene, Shader, etc).
2. From the Search by Type dropdown, select the desired type and you’ll get all the assets of this type inside your project.
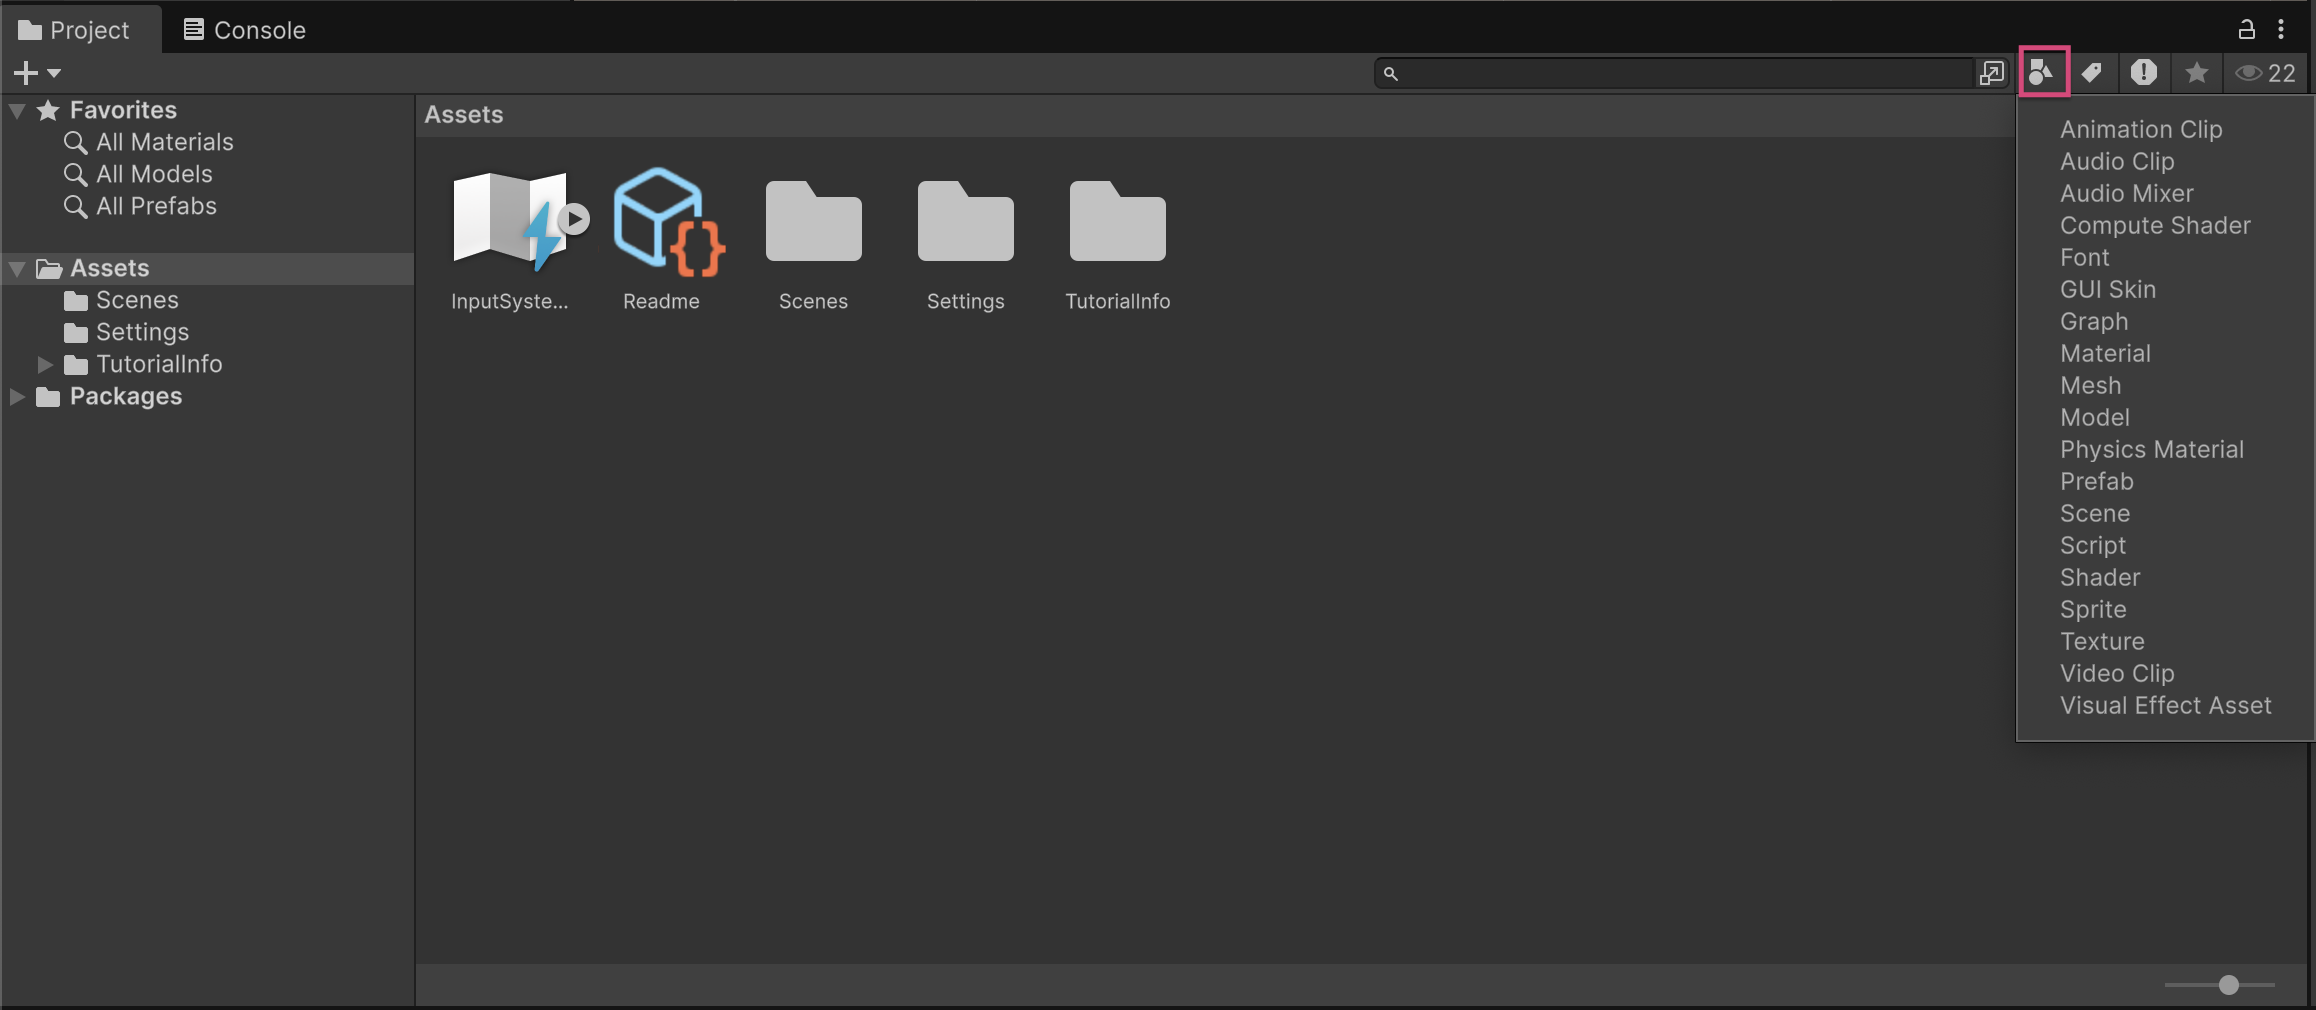
Hierarchy Lock or Hide features
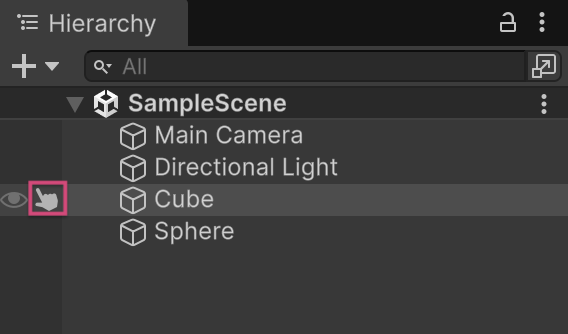
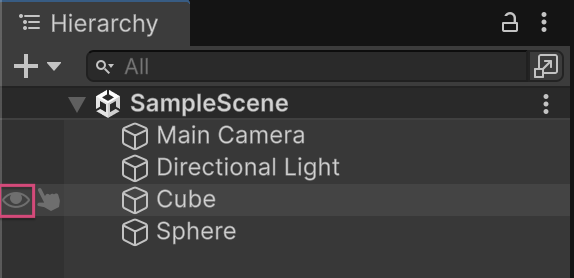
Sometimes you might want to prevent a GameObject from being selected or temporarily hide it in the Scene view. The Pickable and Visible buttons in the Hierarchy window make this easy.
The Pickable button
When this button is disabled, the object can no longer be selected or moved in the Scene view. This is useful when you want to protect an object’s position or values from accidental changes.To lock a GameObject, follow these instructions:
1. In the Hierarchy window, find the GameObject you want to lock.
2. On the far left of its name, select the Pickable button.
The Viewable button
When this button is disabled, the GameObject is not visible anymore in the Scene view. This is useful when you need to declutter the Scene view and focus on specific elements. To hide a GameObject, follow these instructions:
1. In the Hierarchy window, find the GameObject you want to hide.
2. On the far left of its name, select the Visible button.
8. Next steps
Congratulations!
You’ve just learned some useful tips and tricks that can speed up your workflow and make your Unity development be more efficient. These tips are just the start. We recommend checking out the Unity Manual and participating in the Unity Forums to keep building your skills and discovering new best practices.