
Using Rule Tiles
Tutorial
Beginner
+10XP
20m
(423)
Unity Technologies
Rule Tiles are scriptable tiles written in C#, which are smart enough to use the appropriate adjacent tiles, and handle tile animation, boundaries, and collisions on the fly.
In this tutorial, you will set rules on a tile and experiment with the properties and settings of a Rule Tile.
Resources
Languages available:
1. Working with Rule Tiles
This tutorial has been verified using Unity 2019.4.14f1 and 2D Tilemap Editor 1.0.0.
The Rule Tile Asset is an efficient and adaptive way to paint tiles into a Scene. Usually, when using a Tilemap, painting tiles is relatively fast. But it can also be repetitive and cumbersome, especially if you need to make changes to tiles. Rule Tiles, by comparison, can match and adapt to surrounding tiles, offering a quick, convenient way to add or modify tiles. For instance, when painting a Rule Tile on your Scene next to existing tiles, the existing tiles will update automatically. A Rule Tile can also be set to handle animating tiles, boundaries, and collisions on the fly, which helps speed up the creation process.
For this tutorial, we will be using the 2D-extras package, available for download. Additional Sprite tiles used in this tutorial were downloaded from the 2D Game Kit sample Assets.
2. Creating a Rule Tile
To create a Rule Tile:
1. From the top menu drop-down, select: Assets > Create > Tiles > Rule Tile (Figure 01).
2. Select New Rule Tile to see its properties in the Inspector window (Figure 02).
Rule Tile properties include:
- Default Sprite: It’s recommended that you set the default Sprite to one of the tiles that the Rule Tile will affect.
- Default Game Object: This can remain blank, as the Rule Tiles will be designated later.
- Default Collider: This specifies the tiles’ physics interactions.
Tiling Rules: This is where you can add as many rules as there are tiles in the tileset. If there is a tile image for which you don’t wish to create a rule, simply exclude it.
3. Setting up Your Scene
To set up your Scene to use Rule Tiles, you’ll need to add a Tilemap to your Scene:
1. From the top drop-down menu, select: GameObject > 2D Object > Tilemap. This will place a grid in your Scene where we can paint tiles from the Tile Palette window.
2. Open up the Tile Palette window by selecting Window > 2D > Tile Palette from the top drop-down menu.
3. Next, create a new tile palette. From the Animated Tiles drop-down, select Create New Palette (Figure 03).
4. Rename the new palette for your Rule Tile Asset and select Create (Figure 04). When prompted, save the new palette to a folder you’ve created called MyPalettes.
5. Next, navigate to New Rule Tile in the Assets folder and drag and drop the Rule Tile Asset into the Tile Palette window (Figure 05).
6. Select New Rule Tile again in the Assets window to view its properties in the Inspector window. Select Default Sprite (Figure 06).
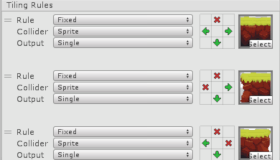
7. Next, add multiple tiling rules by selecting the + button to add individual tiles to your list. Add each Tile Sprite you would like to use to define your rule. Here, we’ve added eight different Sprites with the green border and all four corners designated (Figure 07).
8. Next, in the grids, set the rules themselves. A red X designates a hard edge, while a green arrow means the tile is continuous (Figure 08).
9. Now you can now paint the tiles in your Scene and they will adapt to your rules (Figure 09).
Each tile you add has additional properties:
- Rule: This determines the rule’s type. Options are Fixed (the default behavior), Mirrored (across the X or Y axis), or Rotated. Mirroring and rotation refer to the 3x3 grid’s configuration, detailed later in this section.
Depending on your project’s art, it may be better to define unique rules rather than using mirroring or rotation.
- Game Object: Leave this on the default setting.
- Collider: Change the Collider for a specific tile to override the default Collider.
- Output: This determines how the tile is placed into the Scene. You can select from Single, Random, or Animation. Single will use the selected tile. Random will choose between a defined set of tiles. Animation will play an animation of specified tiles.
- 3x3 Grid: Clicking on a grid square this will place an arrow. Click again and the arrow becomes an x. Click once more to clear the grid space. An arrow signifies that the tile is continuing from the direction the arrow is pointing. An x means the tile stops or has an edge at this point. Clicking the center of the grid cycles through the options for the rule type.
- Tile Selection: This allows you to select a specific tile.
4. Adding Animation to a Rule Tile
1. When you set the Tiling Rule’s output to Animation, you will have additional options pertaining to the specific Rule Tile (Figure 11).
Speed: This determines the animation play speed.
- Select the Rule Tile that’s set to output Animation.
- Double the speed by changing the 1 to 2.
Size: This is the number of tiles that exist in the Sprite Sheet. You’ll need to place the tiles in the correct order to play them in the right sequence.
- Select the Rule Tile that’s set to output Animation.
- Set Size to 5, or the number of tiles in the animation.
- Drag and drop your tiles into the rows, or select the circular browse button to choose your Assets.
- Make sure you place the Sprites in the right order, with the top being the start of the animation and the bottom being the end of the animation.
5. Conclusion
Once set up and structured for your 2D game, Rule Tiles can be very helpful, especially due to their adaptive capabilities that allow tiles to be painted rapidly in a Scene. This offers flexibility when iterating your level designs, as it allows you to try out different tilesets, without the need for manual repainting.