
Volume Overrides: Visual Environment
Tutorial
intermediate
+10XP
20 mins
(27)
Unity Technologies
The Visual Environment component allows you to override a Volume’s settings for the sky (including sky type and whether its ambience is static or dynamic) and fog. In this workflow, we’ll create and confgure a Visual Environment Override.
Languages available:
1. Volume Overrides: Visual Environment
This tutorial has been verified using Unity 2019.4.12f1 LTS
Unity’s Visual Environment component allows you to override a Volume’s settings for the sky (including sky type and whether its ambience is static or dynamic) and fog. In this tutorial, we’ll create and configure a Visual Environment Override.
If you create a project using the HDRP template, all Scenes will start with a Visual Environment Override attached to a GameObject named Render Settings. If you’ve created your Volume manually — for example when adapting an existing project to use the HDRP — you will need to add the Visual Environment Override manually.
Each setting in the Visual Environment has a corresponding Override. For example, if you choose a Gradient Sky in your Visual Environment, you’ll also need to add a Gradient Sky Override to your Volume
2. Disabling or Removing Existing Overrides
The default Visual Environment comes preconfigured. If you’d like to remove the preconfigured Override, or you change your mind about an Override you’ve added, you can either uncheck the box next to the name of the Override or right-click the name of the Override and select Remove (Figure 01). You might want to just uncheck the Override’s box, rather than deleting it altogether, when you’re trying out different options.
3. Creating and Configuring a Volume and Visual Environment Manually
1. Create an empty GameObject by selecting Create Empty from the GameObject drop-down. Name this object; we’ll use Render Settings.
2. In the Inspector, attach a new Volume component.
3. Set the Mode dropdown to Global if you’d like to apply these settings across the entire Scene. If you’d like to confine this Volume to a certain section of the Scene,
set the dropdown to Local and attach a Box Collider component. The size and position of the Collider determines the area affected by this Volume’s settings.
4. Click the button labeled New to create a new Volume Profile (Figure 02).
5. In the bottom of the Volume Inspector, click Add Override (Figure 03).
6. Click Visual Environment then select Visual Environment Override (Figure 04).
7. Enable the Type checkbox under Sky to override the Sky setting for the Volume (Figure 05).
8. In the Sky drop-down, select Procedural Sky (Figure 06).
9. Click Add Override at the bottom of the Inspector. Select Sky > Physically Based Sky
(Figures 07-08).
10. In the Sky section of Visual Environment, check the box next to Ambient Mode and select Static from the drop-down (Figure 09).
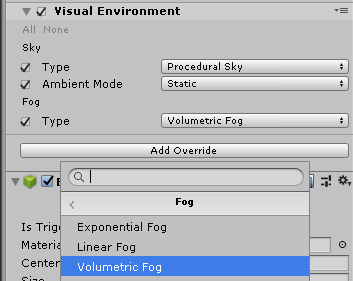
11. Add a Volumetric Fog Override by clicking Add Override and selecting
Fog (Figure 10).
12. In order to make it volumetric expand Fog and click the Enable checkbox then go to the very bottom and check the box called Volumetric Fog (Figure 11).
4. Conclusion
The Visual Environment gives you the power to customize your Volumes, whether they encompass an entire Scene or are restricted to a certain Collider space. Try experimenting with different combinations of settings, and you’re sure to find the right configuration.