
Working with Animation Rigging
Tutorial
Beginner
+10XP
25m
(672)
Unity Technologies
Animation and rigging is a specialized craft in the development process. Creating animation rigs is a time consuming process and sometimes it takes several people to create a rig that meets all of the needs of a project. With Unity’s Animation Rigging tools, the amount of time and manpower is reduced because of the flexibility and robustness of these tools.
Languages available:
1. Introduction
Verified with: 2019.4 and Animation Rigging Package 0.2.7-preview
Animation rigging is a specialized craft in the 3D modeling process. Creating animation rigs can be time consuming, and sometimes requires the work of several people to produce a rig that meets all of a project’s needs.. With Unity’s Animation Rigging tools, the amount of time and manpower is reduced significantly.
2. Animation Rigging Overview
To begin, install the Animation Rigging package from the Package Manager. The Animation Rigging Package is available for Unity 2019.1 and above. (These tools are still in preview and may change as updates are added.)
The Animation Rigging package provides a library of rig constraints that you can use to create procedural motion at runtime. This is commonly known as “runtime rigging.” The constraints are set up in groups called rigs, which are assembled in the Rig Builder component that is assigned to the Asset’s Animator Root. This allows users to do powerful things with animated skeletons during gameplay, such as world interactions. The Animation Rigging tools can help create higher quality rigs using procedurally controlled bones that can help with twist correction for shoulders and wrists on Skinned Mesh characters. Physics-based constraints can be used for dynamic secondary motion on character rigs.
3. Setting up the Rig Builder
- To begin, add the Rig Builder component to the GameObject with the Animator component. Typically, this is the topmost Transform in the rig hierarchy.
- Next, create a new child GameObject and add the Rig component.
- Finally, assign the Rig to the Rig Layers list in the Rig Builder component on the Animator root (Figure 03).
At this point, you will have created the most basic rig. The next steps would be to add constraints to get the desired behavior. To make setting up constraints easier, it’s recommended that you set up Bone Renderers and Rig Effectors.
4. Bone Renderer
For working with rigs in the Unity Editor, it helps to see and interact with the skeleton in the Scene view. We now have the Bone Renderer component (Figure 04), which allows you to add a list of Transforms and display them in a variety of visual styles.
It often helps to organize parts of the skeleton using multiple Bone Renderer components. For example, a character can have multiple Bone Renderer components for its body, fingers, and twist bones that each have their own display styles. This helps facilitate different artist workflows, such as rig setup, keyframing, or gameplay debugging.
5. Rig Effectors
Similar to bones, Rig Effectors allow a user to add Gizmos to Transforms for visualization and selection. These can be added to any Transform in the same hierarchy as the Rig Builder or Rig component. Effectors are not visible in the Game view. A special Scene view overlay has been added to manage and customize Effectors in the Rig hierarchy (Figure 05).
The look of the Effectors can also be customized. The Effector size, shape, color, offset position, and offset rotation can be modified. The shape can be any Mesh asset available in the project. Multiple Effectors can be created, deleted, and edited at once.
6. Working with Rig Constraints
Rig Constraints are the building blocks used to assemble rigs and produce procedural motion at runtime. They’re designed to be modular and general purpose so that they can be combined in many different ways to solve the needs of your animation game designs during runtime.
Here is the list of Rig Constraints that are being released with the package (Figure 06).
7. Setting up a Two Bone IK Constraint
The Two Bone IK Constraint is used in most character rigs to allow a character’s limbs to be driven by inverse kinematics. This allows the position and rotation of the character limb to be solved for, based on the position and movement of the IK target. In the following example, we will set up the Two Bone IK Constraint for a character’s arm.
1. First, reset the character to Bind Pose. This can make the rigging process a little easier. To do this, click on Animation Rigging in the Menu Bar and choose Restore Bind Pose (Figure 07). Make sure the character is selected when using Restore Bind Pose.
2. Next, add a child GameObject below the character GameObject called “CharacterRig”.
3. Add a child GameObject below CharacterRig called “Right Arm IK”.
4. Add two child GameObjects below Right Arm IK:
- Name the first “RH IK Target”.
- Name the second “RH IK Hint” (Figure 08).
5. Add the Rig Builder component to the Animator root GameObject (in this example it’s called Ninja) (Figure 09)
- Notice that the Rig Layers List is empty. This is where we will add our rigs.
6. Select the CharacterRig GameObject and add a Rig Component (Figure 10).
- This will serve as a global rig that will allow users to turn the entire rig on and off.
7. Select the Right Arm IK and add a Two Bone IK Constraint component (Figure 11).
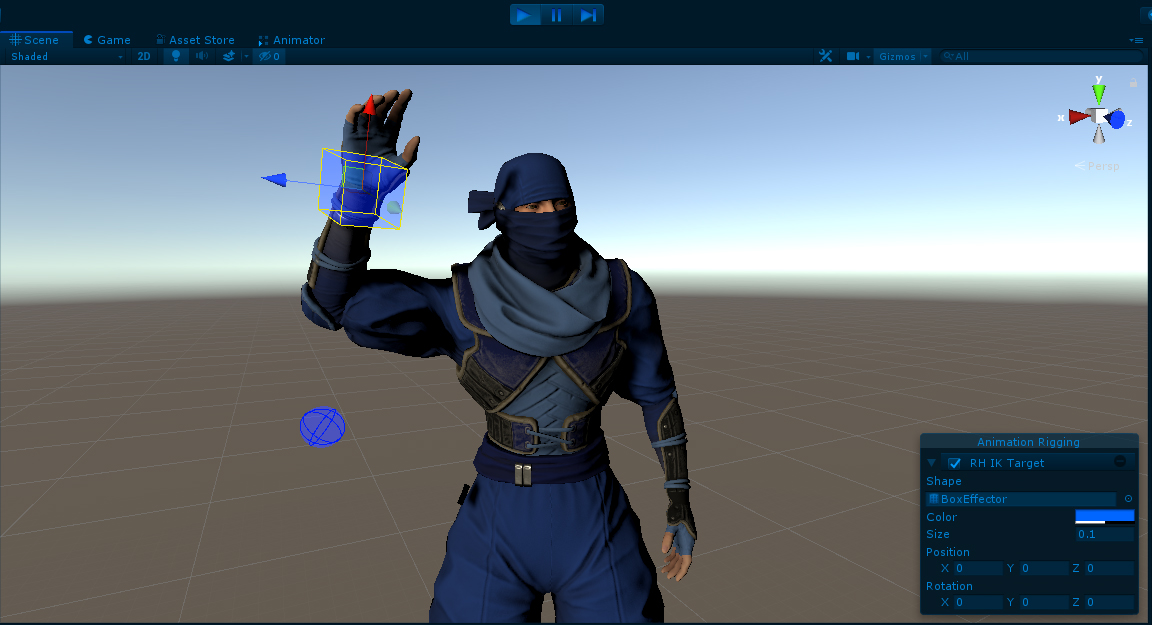
8. Select the RH IK Target and add a Box Effector.
- Change the Color and Size parameters to fit your style and needs (Figure 12).
9. Notice the Box Effector is not aligned with the hand. Select the Box Effector in the Hierarchy and while holding down CRTL (COMMAND for Mac), select the right hand.
- The right hand GameObject is a child in the character’s skeleton.
10. With the Box Effector and right hand selected, click on Animation Rigging in the menu bar and choose Align Transform. The Box Effector should now be aligned to the right hand. If it’s not, make sure the Box Effector is selected first and then the right hand.
11. Select RH IK Hint and add a Ball Effector. This Effector will control the swivel angle of the elbow.
12. Select RH IK Hint and RightElbow and click Animation Rigging > Align Transform.
13. Move the Ball Effector away from the elbow as shown (Figure 14).
14. Select the RightArm IK GameObject and apply the corresponding bones to the Two Bone IK Constraint component (Figure 15).
- Dragging and dropping GameObjects from the Hierarchy to the proper parameter slot is the easiest method.
15. Select the character animator root GameObject (Ninja) and add the Character Rig GameObject to the Rig Layers list (Figure 16).
16. Press Play and move or rotate the RH IK Target and RH IK Hint GameObjects while in the Scene view to test the constraint (Figure 17).
8. Conclusion
Unity’s Animation Rigging is a powerful set of tools that allow you to create real-time rigs in Unity. While this toolset is commonly used on characters, it can be used on any GameObject that has a skeleton and animations. Try creating real-time rigs for objects like machines.