
Working with Interactive Objects
Tutorial
intermediate
+10XP
50m
(12)
Unity Technologies
Now that the assets for the Sustainable Farming Experience have been placed in the scene we will use the Zoe plugin to get everything prepared for interactivity.
Languages available:
1. Converting Game Objects with Zoe
In order to be able to interact with objects in the experience you need to convert them into interactive objects or ‘IOs’.
Select each seed, right-click on it and select: Zoe > Convert into Interactive Object.
You will get the following structure:
Do the same for the following elements:
- Shovel
- Soil_heap
- Soil_flat
- Watering can
- Box_lid
- Diagram
- CornPlant
- BeanPlant
- SquashPlant
- Texts
2. Creating targets for the seeds
We are now going to set the different locations where the user will plant the seeds. These locations are called ‘Targets’. When the user drops them in the right location they will automatically snap in position.
Let’s create our first Target for the corn. Drag the ‘CircleStroke’ sprite provided with the tutorial inside the scene. Rotate it 90° on its X axis so it’s parallel to the ground. Place it below the corn plant (we recommend showing Phase 1 of each plant for this step to better see where to place the targets). Finally rename it into CornTarget.
Now convert it into an Interactive Object as done previously.
Select the CornTarget (IO), and inside the Inspector window remove the ‘Box Collider’ component:
Important: by default Zoe generates this collider for IOs so they react to physics. However here we will be dropping the seeds inside the target so we don’t need any collision to happen.
Now duplicate the CornTarget (IO) to create a Bean target. Rename both the sprite and the (IO). Then duplicate it to create four of them. Repeat these steps to create six Squash Targets. Rename everything properly.
Place them as follows, around the corn (make sure the squash targets are tilted following the slope of the soil heap) :
3. Setting up Drag&Drop targets
For snapping seeds into the targets we are going to use Zoe's Drag&Drop system.
First we need to enable the Drag&Drop feature on the seeds. Select each seed (IO) and under the Interactive Object Setup check ‘Enable Drag and Drop’.
This is where you set the possible targets for this IO. Add as many rows as needed depending on the seed (corn:1, beans:4 and squash: 6) and select on the drop-down the right targets.
Then set the requirements below for the drop to be validated:
We recommend a distance of 0.5 and 1m so the user is more comfortable dropping the seeds.
Note: keep in mind the Drag&Drop system works only when the user is grabbing the seed and they release it within the distance that you set here (it does not work when throwing an object).
4. Placing the instances of the plants
Now that we have all our targets placed we can duplicate the plants as many times as needed and place them on top of the targets.
Select the BeanPlant (IO) and duplicate it. Place the new instance on top of one of the bean targets. Rotate the plants to have a similar result as seen in the image below so that the final phase goes nicely around the corn:
Repeat until you have four bean plants around the corn, each on top of a bean target.
Now do the same with the SquashPlant (IO) in order to have six of them. This is how they should look:
5. Placing the crops
Take the Corn, Beans and Squash prefabs provided with the tutorial and add them to your Hierarchy.
Convert each one into an Interactive Object. Then create as many crops of each as you want to place them on the different plants. We recommend grouping them inside an empty game object that you can name 'Crops', like this:
Now keep only Phase 3 of plants active, and even activate only each plant at a time while placing the crops as it is easier to work with only the corresponding plant visible. We suggest to have six squashes, each at the tip of every squash plant like this:
3-4 beans hanging next to the bean flowers:
And 3-4 corn crops growing out of the leaves:
Rotate crops if necessary to best match the way they grow from the plant.
6. Enabling manipulation of objects
Manipulation is possible when objects have been converted into Interactive Objects (IO) with Zoe.
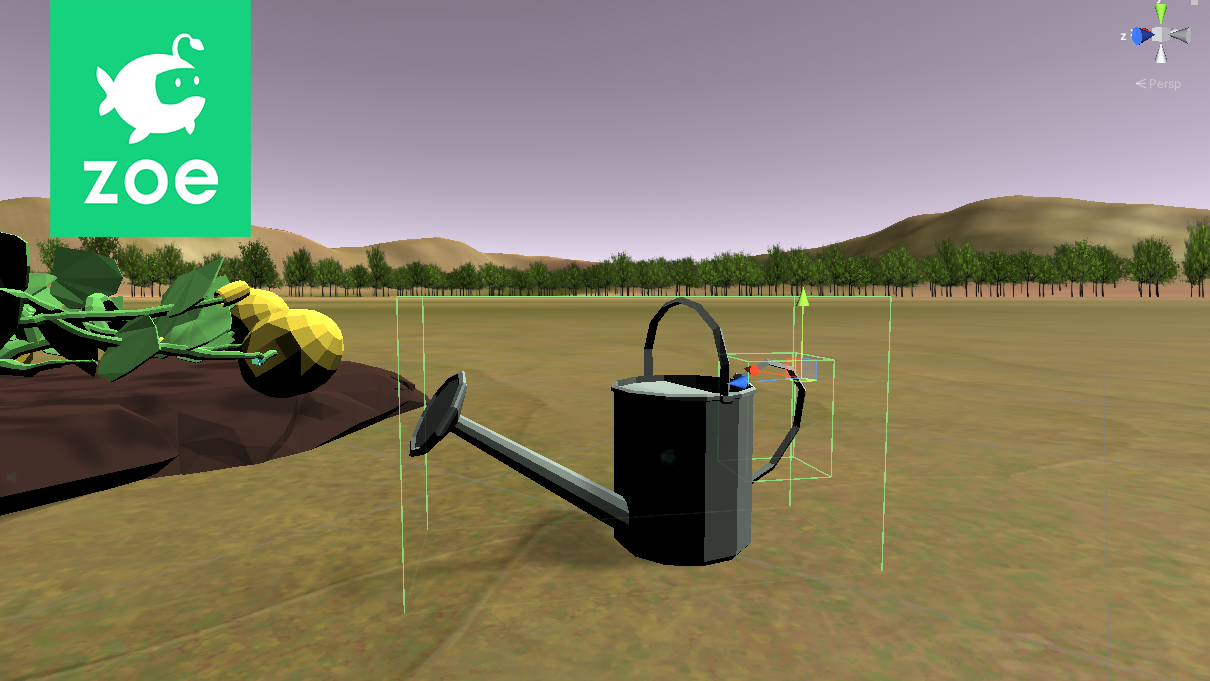
Let’s enable the manipulation of the Watering Can. Select the WateringCan(IO), and in the Inspector under Interactive Object Setup check ‘Enable Manipulation’ and set the options as follows:
This means the user will be able to manipulate the object if it is at two meters (or less) from him/her. The object will go towards the user’s hands at a speed of 10m/sec (this is the minimum we recommend using) and it will snap into a specific position.
To personalise how every object is snapped into the user’s hands (enabling the ‘Snap’ feature), you have under each Interactive Object, two objects called ‘Snap Left’ and ‘Snap Right’.
You need to place them in the part you want the object to be grabbed from by the user. For the WateringCan(IO) this is how they should be placed:
Now press the 'Play' button in the top middle of Unity’s interface. Put your headset on, move around with the joystick and test grabbing the watering can. Adjust positions if needed.
Note: while testing you may have noticed that when you hover over an Interactive Object with manipulation enabled, the ray coming from the controllers changes to blue.
This is a feedback for the user and it uses the ‘Hand Hover’ collider inside every (IO). You can also change the position and size of this collider to indicate interactivity only when hovering a sub-part of an object, for example a handle. But we recommend keeping the collider big enough so the user notices they can interact with it.
Now enable also the manipulation on the Box Lid, the shovel, the seeds and the crops. Enabling the 'snap' is not always needed, if you consider it necessary for a given object just make sure to move and rotate the 'Snap Right' and 'Snap Left' so that when the object comes into the user’s hands it will be grabbed properly*.
*we don’t recommend enabling the ‘Snap’ for the seeds as they are already quite small.
7. Enabling the effect of gravity on objects
Another aspect that you need to handle is to set if an object is subject to gravity or not.
In general objects that can be manipulated should be subject to gravity. Just like you enabled manipulation on the WateringCan(IO), enable also ‘Affected by gravity’:
Do this for the following objects:
- Shovel(IO)
- BoxLid(IO)
- All the seeds IOs.
When enabling gravity you also need to make sure that objects have colliders properly scaled and placed so collisions look real. Physic collisions happen between colliders with the following setup:
If ‘Is Trigger’ is false (not checked) this collider will react to physic collisions. Prefabs with unique shapes are provided already with their own collider for physics.
It is the case of the following elements:
- Soil_heap
- Soil_flat
- Shovel
For these, make sure you remove the Box Collider at the root of the (IO) that is automatically generated.
For the other objects you can change the automatic collider scale and position if you consider necessary.