
Working with LiveSync and the PiXYZ Plugin
Tutorial
Beginner
+10XP
40 mins
(12)
Unity Technologies
Keeping projects up-to-date with the latest version of imported models is made easy by the PiXYZ plugin leveraging Unity's ability to detect changes in asset files in realtime. In this tutorial you will learn how to work with LiveSync and the PiXYZ Plugin.
Languages available:
1. Working with Live Sync and PiXYZ Plugin
Live Sync lets you keep your Unity project up-to-date by monitoring changes made to files imported with PiXYZ Plugin. This feature is intended for small to medium sized objects, and works with any file that PiXYZ can import. Disabled by default, Live Sync must be enabled in Preferences. Once enabled in Preferences, Live Sync can be enabled or disabled per model at any time.
Live Sync only works for Prefabs. A Prefab in Unity is a GameObject or collection of GameObjects that can be set up and saved in the Unity Editor and instantiated (spawned into the scene) at runtime. You can either create a Prefab from a model at the time of import, or after import by dragging it from the Hierarchy view into a folder in the Project view. Both methods are explained later in this workflow. You will not be able to use Live Sync for an imported model without creating a Prefab.
If you change the import settings from the defaults when importing a file, it’s recommended that you create or use an Import Settings preset. An Import Settings preset is a file that stores model import settings. You might make one preset per program, for example, to store a program’s working scale (whether 1 unit represents a centimeter or meter, etc.) and Z-up settings. It can be created once and used for as many models as you wish. If you don’t specify a preset when you import the file, you can still assign one to the created Prefab after import. If no import settings preset is associated with the imported file, resynchronizing will revert its import settings to the defaults. This is most obvious when you have a non-default setting for Scale or Z-up.
If you sync a model without an assigned import settings preset, and it reverts to the defaults, you can still assign a preset and resynchronize to restore the proper import settings.
2. Enabling Live Sync in Preferences
1. From the Edit dropdown, select Preferences (Figure 01).
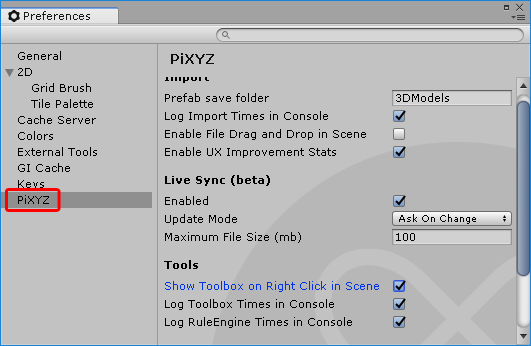
2. In the left pane of the Preferences window, click PiXYZ (Figure 02).
3. In the Live Sync section, check the box marked Enabled.
4. If you set the Update Mode to Ask on Change, PiXYZ Live Sync will offer to update the changed model in the project as the change in the imported model is detected. Otherwise, you’ll need to use the Sync button over the Prefab, which appears when the imported model has been changed. This process is explained later in this workflow.
5. The last entry of the Live Sync section allows the user to set the Maximum File Size (100MB by default). A file larger than the Maximum File Size will not be monitored for changes, regardless of the selected Update Mode. Set this number according to your project’s needs.
6. Close the Preferences window.
3. Creating an Import Settings Preset
There are two ways to create an Import Settings Preset: manually or from the current import settings when importing a model. Creating one from the current import settings is covered in the next section. To create one manually:
1. Right-click a blank area in the Project view and select Create > PiXYZ > Import Settings (Figure 03).
2. Type the desired name and hit Enter. If you want to rename your preset, click to select it in the Project view if it isn’t already. Press F2, or right-click the preset and select Rename. Type the new name and press Enter.
3. With the preset highlighted in the Project view, set the options accordingly in the Inspector. Import settings are:
Post-Processing Settings
PiXYZ can create a Prefab from the imported model, and — using Live Sync — update the Prefab when changes are made to the imported model outside of Unity. Additionally a Rule Set can be applied to the imported model. A Rule Set can be used to automatically stage or optimize your imported model. For more information about the Rule Engine and Rule Sets, see the PiXYZ Plugin Manual.
4. Post-Enabling Live Sync for a model upon importSettings
The easiest way to use Live Sync with a model is to enable it upon import.
1. From the PiXYZ dropdown, select Import Model (Figure 04).
2. Select your model and click Open.
3. Change settings as desired and create or select an existing preset:
a. If you haven’t already, you may wish to create a preset from these settings by clicking Create (Figure 05).
The preset is named automatically, but can be renamed using the method from the previous section.
b. If you’ve already created a preset and wish to use it here, click the small circle next to Preset and choose your preset. You can also drag the preset from the Project view into the slot to the left of the circle.
4. At the bottom of the Import Model window is a section labeled Post-Processing.
(Figure 06).
5. Check both Create Prefab and Use Live Sync.
6. Click Import.
5. Enabling Live Sync for a model upon import
If you’ve already imported a model into your Scene and want to use Live Sync with it, do the following. (If your object is already a Prefab, skip to step 3.)
1. If you don’t already have a folder for Prefabs, create one in the Project view by dragging your imported model from the Hierarchy view into the desired folder in the Project view.
2. In the Project view, navigate to the folder containing your Prefab.
3. Click the button labeled ‘...’ (Figure 07).
4. In the Live Sync Settings window, check Live Sync.
5. If you want to assign an Import Settings preset to your model after import, drag it into the slot marked Preset, or click the circle next to the Preset slot and select your desired Import Settings preset.
6. Updating an imported model using Live Sync
1. Create (or load) a model in your content creation program of choice and save or export.
2. Import the model in Unity with PiXYZ Plugin, creating a Prefab and enabling Live Sync. In the Project view, navigate to the Prefab (Figure 08).
3. Make a change to the scene or project and re-export it using the same filename.
4. Return to the Unity Editor.
5. If Live Sync’s Update Mode is set to Ask on Change, you’ll be asked if you want to update the imported model in the project, or ignore changes (Figure 09).
6. If you click Ignore, or don’t have Update Mode set to Ask on Change, you’ll see that the green check over the Prefab’s icon has been replaced by a Sync button (Figure 10).
7. Click the Sync button.
8. PiXYZ will re-import the model, and update the Scene accordingly.
7. Conclusion
Live Sync is an easy way to keep your Scene updated without having to manually re-import new versions of assets. Using it can save countless minutes and prevent you from having to break focus from setting up your Scenes.