
Working with Unity and Helix Core Perforce
Tutorial
Beginner
+5XP
30m
(309)
Unity Technologies
In this section, we will demonstrate how to get set up with the Helix Core Perforce system. Helix Core Perforce is a commercial version control system for handling large-scale development environments. We will explore the HelixTeamHub Dashboard, set up a server using the command line interface, use the P4V Helix Visual Client application, and integrate our Perforce server with Unity.
Languages available:
1. Getting Set Up with Perforce Helix Core
In order to work with the Perforce Helix Core version control platform, you will first need to sign up and register for a Helix TeamHub server plan. Next, you will need to download and install 2 packages; Helix Core (P4D), and Helix Command-Line Client (P4). Accept all of the default settings during the installation process. In an upcoming step, you will also need to download and install the P4V Helix Visual Client application.
For additional reference, refer to the Perforce help documentation by visiting the Helix Core Server Administrator Guide, as well as Using Perforce with Unity3D.
1. Navigate to the Helix TeamHub Dashboard in a web browser, and sign in to your account. Here in the dashboard you are able to create and manage projects, add collaborators, and administer additional settings. To create a new project in the dashboard and later on add collaborators, first navigate to the My Projects field, and then select the Create a project link.
2. Fill in the fields, giving your New Project a Name, a Short name, and a Description. Select Git from the Type dropdown. Selecting a checkbox next to the Create Wiki option is optional. (If selected, it will add a second repository to your dashboard). Lastly, Select the Create project button.
We will now proceed to set up and establish a server connection.
3. Download, install, and launch the P4V Helix Visual Client Application. When first opened, the Open Connection window prompts you to enter information. In the Server field, enter: localhost:1666. To the right of the User field, select the New button.
4. Enter in your credentials and then select the Save button.
5. To the right of the Workspace field, select the New button.
6. Enter the name of your Workspace. Here, the example workspace is named “main.” Select the Browse button to the right of the Workspace root field, to navigate to and select your Perforce root folder, which will be the same folder that you established in step 3. Next, select the OK button.
7. Ensure that the fields are all entered in correctly, and then select the OK button.
8. Since we are finished using the P4V setup assistant, select the Cancel button, and then confirm by again selecting Yes to proceed to cancel out of the assistant.
You are now able to add and organize additional folders inside the Perforce root folder in your file browser. Either copy an existing project over to the Perforce root folder, or create a new project using the Unity Hub. Ensure that the project’s location resides within the main workspace folder inside the Perforce root folder.
9. To create a new project, open the Unity Hub, select the New button, and select a template from the list of available templates. Name your project by typing a name in the Project Name field. Establish the folder location by selecting the icon to the right of the Location field, and then choosing the Perforce root folder location. Lastly, select the Create button.
10. Switch back to the P4V application, and select the Refresh button to refresh the folder changes.
11. Open up your project in Unity. Select from the top menu dropdown:
Edit > Project Settings. Select Version Control from the left column. Next select the Mode field, and then select Perforce from the dropdown menu.
12. Enter your credentials by adding your Username and Perforce Password. Enter “main” in the Workspace field. Type: “localhost:1666” in the Server field, and then select the Connect button.
You should see a confirmation message indicating that your project is now Connected.
2. Saving and Tracking Changes with Perforce and Unity
In the same manner that we previously submitted changes with Unity Collaborate, we will use a similar practice when working with the Perforce Version Control. We can use both the Unity Editor and the P4V app to upload and track version changes to the Perforce depot (or repository).
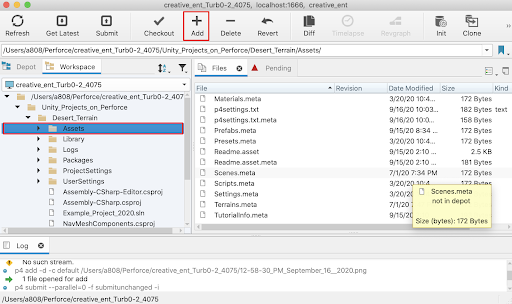
1. Let’s now upload the Assets folder to the Perforce Server. In the P4V app, select the Assets folder in the Workspace view, and then select the +Add button to add them to the depot.
2. You can select to add files to a new changelist. A changelist is a Helix Core unit of data containing a list of files, their version numbers, the changes made to the files, and a description of the changes made. Add a new changelist by selecting the field labelled “default”, and then selecting New from the dropdown menu. Here we will leave the changelist selection as default, and then select OK. A popup dialogue will appear, asking you to either check or uncheck the list of files you want to add. Ensure that you wish to include the files, and then select Continue.
3. Now that the Asset folder with its containing files has been added to the Changelist, select the Submit button at the top of the P4V window.
4. Write a clear and contextually accurate comment for your teammates in the changelist description field and then select the Submit button.
The Assets folder and its containing files will now save to the Perforce Server.
5. Switch to the Unity Editor and continue working on your Scene. When you or your team makes a change to the project or Scene, you are able to submit the changes either from the P4V app, or directly from Unity. In our example Scene, a modification has been made to the Scene, and it has been saved as a new Scene version. The new Unity Scene file’s icon will show a red + next to it, indicating that it has been newly created, and not yet submitted to the Perforce Server. Select the file in the Project window by right-clicking, and then select Version Control > Submit to save it to the Perforce Server.
6. Write a clear description message for your teammates in the Description field, and select the Submit button in the Version Control Changeset popup window.
7. The changes will now need to be updated in the P4V app, as well as in your team member’s Unity Editor window. To refresh your Workspace in P4V, select the Get Latest button.
There are many additional features with the Perforce Version Control system that will help enable you and your team to work together productively. You and your teammates are able to simultaneously collaborate on the shared Unity project, while tracking and updating any changes. If your project requires additional Perforce integration with the Visual Studio IDE, download and install the Helix Plugin for Visual Studio.
3. Next Steps
Now that you have successfully set up the Helix Core Perforce version control system, you and your teammates will have the freedom to work both collaboratively and autonomously with your Unity projects. You will have the flexibility and control over managing complex projects, as well as having the additional tools to collaborate with your team.