
Working with the Unity Recorder
Tutorial
Beginner
+10XP
30m
(338)
Unity Technologies
The Unity Recorder is an Editor-only tool that allows you to record images or video of your project. In this tutorial, you'll use the Unity Recorder to record video and images.
Languages available:
1. Working with the Unity Recorder
This tutorial has been verified using Unity 2019.4.12f1 and Unity Recorder version 2.4.0-preview.1 - https://learn.unity.com/tutorial/working-with-the-unity-recorder?uv=2019.3
The Unity Recorder is an Editor-only tool that allows you to record images or video of your project. It can be used to record trailers for your game, instructional videos for non-game projects, or for filmmaking. Before you can work with the Unity Recorder, be sure to install it using the Package Manager.
2. Installing the Unity Recorder Package
1. Select Package Manager from the Window dropdown.
2. Click the Advanced dropdown and enable Show preview packages (Figure 01).
3. Select the Unity Recorder Package in the left column, and click Install in the lower right corner (Figure 02).
3. Launching the Unity Recorder
The Unity Recorder is launched via the Window dropdown by selecting General > Recorder > Recorder Window. (Figure 03)
To record your project, you must have at least one Recorder set up. A Recorder can record animation data in .anim format, or video of your project in action as either a movie file, an image sequence, or an animated GIF. Click Add New Recorders to add a new Recorder. If you wish to rename the Recorder, click on its name. If you wish to duplicate or delete the Recorder, right-click the Recorder’s name and choose accordingly.
4. Recorder Options
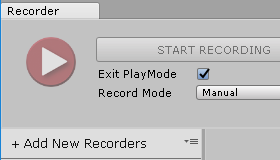
The Unity Recorder automatically starts Play Mode when you click START RECORDING. If Exit PlayMode is enabled, the Unity Recorder will automatically exit Play Mode when recording is stopped or completed. There are four options for Recording Mode (Figure 04). They’re explained below.
Manual: Start recording by clicking START RECORDING. To end, click STOP RECORDING.
Single Frame: Captures a single frame, specified by frame number, dependent on your target frame rate. For example, to capture an image of your project two seconds into running, with a target frame rate of 24, you’d enter 48.
Frame Interval: Captures a specified range of frames. Similar to Single Frame, the values for the Start and End frames are frame-rate dependent. To capture seconds three and four of a 24 fps animation, you’d enter 72 and 96 for Start and End, respectively.
Time Interval (sec): Similar to Frame Interval, this option lets you specify a Start and End time to record a range, but in seconds rather than frame numbers.
Frame rate can either be Constant or Variable. A Constant frame rate is almost always the best choice, though a Variable frame rate allows you to capture scenes that are too resource-intensive to record smoothly at the desired frame rate.
Cap is only available when your playback frame rate is set to Constant. When Cap is enabled, the frame rate at which your project runs is limited to your specified target frame rate. Disabling Cap allows your project to run and capture faster than real time without affecting the playback speed of the recording. This can save time in situations that don’t rely on real-time user input, such as playing back recorded user interaction for a game trailer or program tutorial video, or recording preprogrammed titles or motion graphics for video.
5. Adding a Recorder
Click on Add New Recorders (Figure 05) and select your type.
Click on the name of the Recorder in the list to rename it, or right-click to duplicate or delete. If you want to use the same recorder settings across multiple projects, you can click the button to the right of Add New Recorders to save, load, or clear your recorder list.
6. Recording to MP4 Video
To record a video, add a Movie Recorder. Set your Recorder and Movie options (Figure 06), and click Start Recording. Movie Recorder options are explained below.
MP4 is the default movie format, but the open-source web media format (WebM) is also an option. For more information on WebM, visit the project website. There are several wildcards available for the filename that will be replaced automatically when the movie is saved
(Figure 07).
For example, <Take> in the filename will be replaced with the take number, which can be manually changed and increments automatically with each subsequent start of the Unity Recorder. Unity will replace an existing recording with the same name without confirmation, so it’s recommended to either give your movie a unique name or use dynamic wildcards, such as Take and Time in the filename. By default, the path for your recording is relative to your project’s location, but Unity Recorder will store your recording anywhere you specify.
By default, the Unity Recorder captures the Game View, and the resolution can either match the Game View window or be set to a preset or custom value. Other options include another targeted camera, or even a 360-degree view, which could be useful for capturing HDR environments for film and animation purposes. Audio capture is optional, and enabled by default. Movie quality is set to High by default, but can also be Low or Medium.
7. Recording to an Image Sequence
To record an Image Sequence, add an Image Sequence Recorder (Figure 08).
You should change the format from the default JPEG to PNG for anything more important than a basic preview. PNG is lossless, more suitable for print and video, and a truer representation of how your project appears in action. EXR is also an option, and is useful for recording high dynamic range (HDR) 360-degree views of environments and/or lighting conditions. Options for the Image Sequence Recorder are mostly identical to those in the Movie Recorder window, with two exceptions. Recording audio is not an option, and the image quality is set by your output format.
The Unity Recorder eliminates the need for video capture hardware to record your project for promotional or instructional purposes, and turns Unity into a practically limitless virtual filmmaking toolset.