修改粒子系统的重力、颜色、大小和生命周期
Tutorial
Beginner
+0XP
40 mins
60
Unity Technologies
使用Unity粒子系统可生成大量视觉特效。您可以创建并配置惊艳的动态视觉效果,例如火焰、雾、爆炸、烟雾、火花等。粒子系统特效包括粒子或Sprites,通过从发射源喷出或移动而呈现发射的状态。其发射动作可配置为以设定的时间间隔生成(出现)粒子并重复进行(循环)。此外,它们还可配置为在指定生命周期内动态变化。了解如何使用粒子系统实现独特的创意,并提高场景内的视觉效果质量。
Languages available:
1. 开始设置
首先,我们将通过示例资产中的“Construction Set”进行演示,这些资产已经预先加载到Unity的Universal Render Pipeline (URP)项目的开场场景中。您可以使用粒子系统,但需要采用2D、3D、HDRP或URP项目模板。建议您使用自己保存的项目进行练习,或者可以从Unity Hub创建新的URP项目并按教程操作。我们首先创建新的粒子效果,然后进一步更改属性。
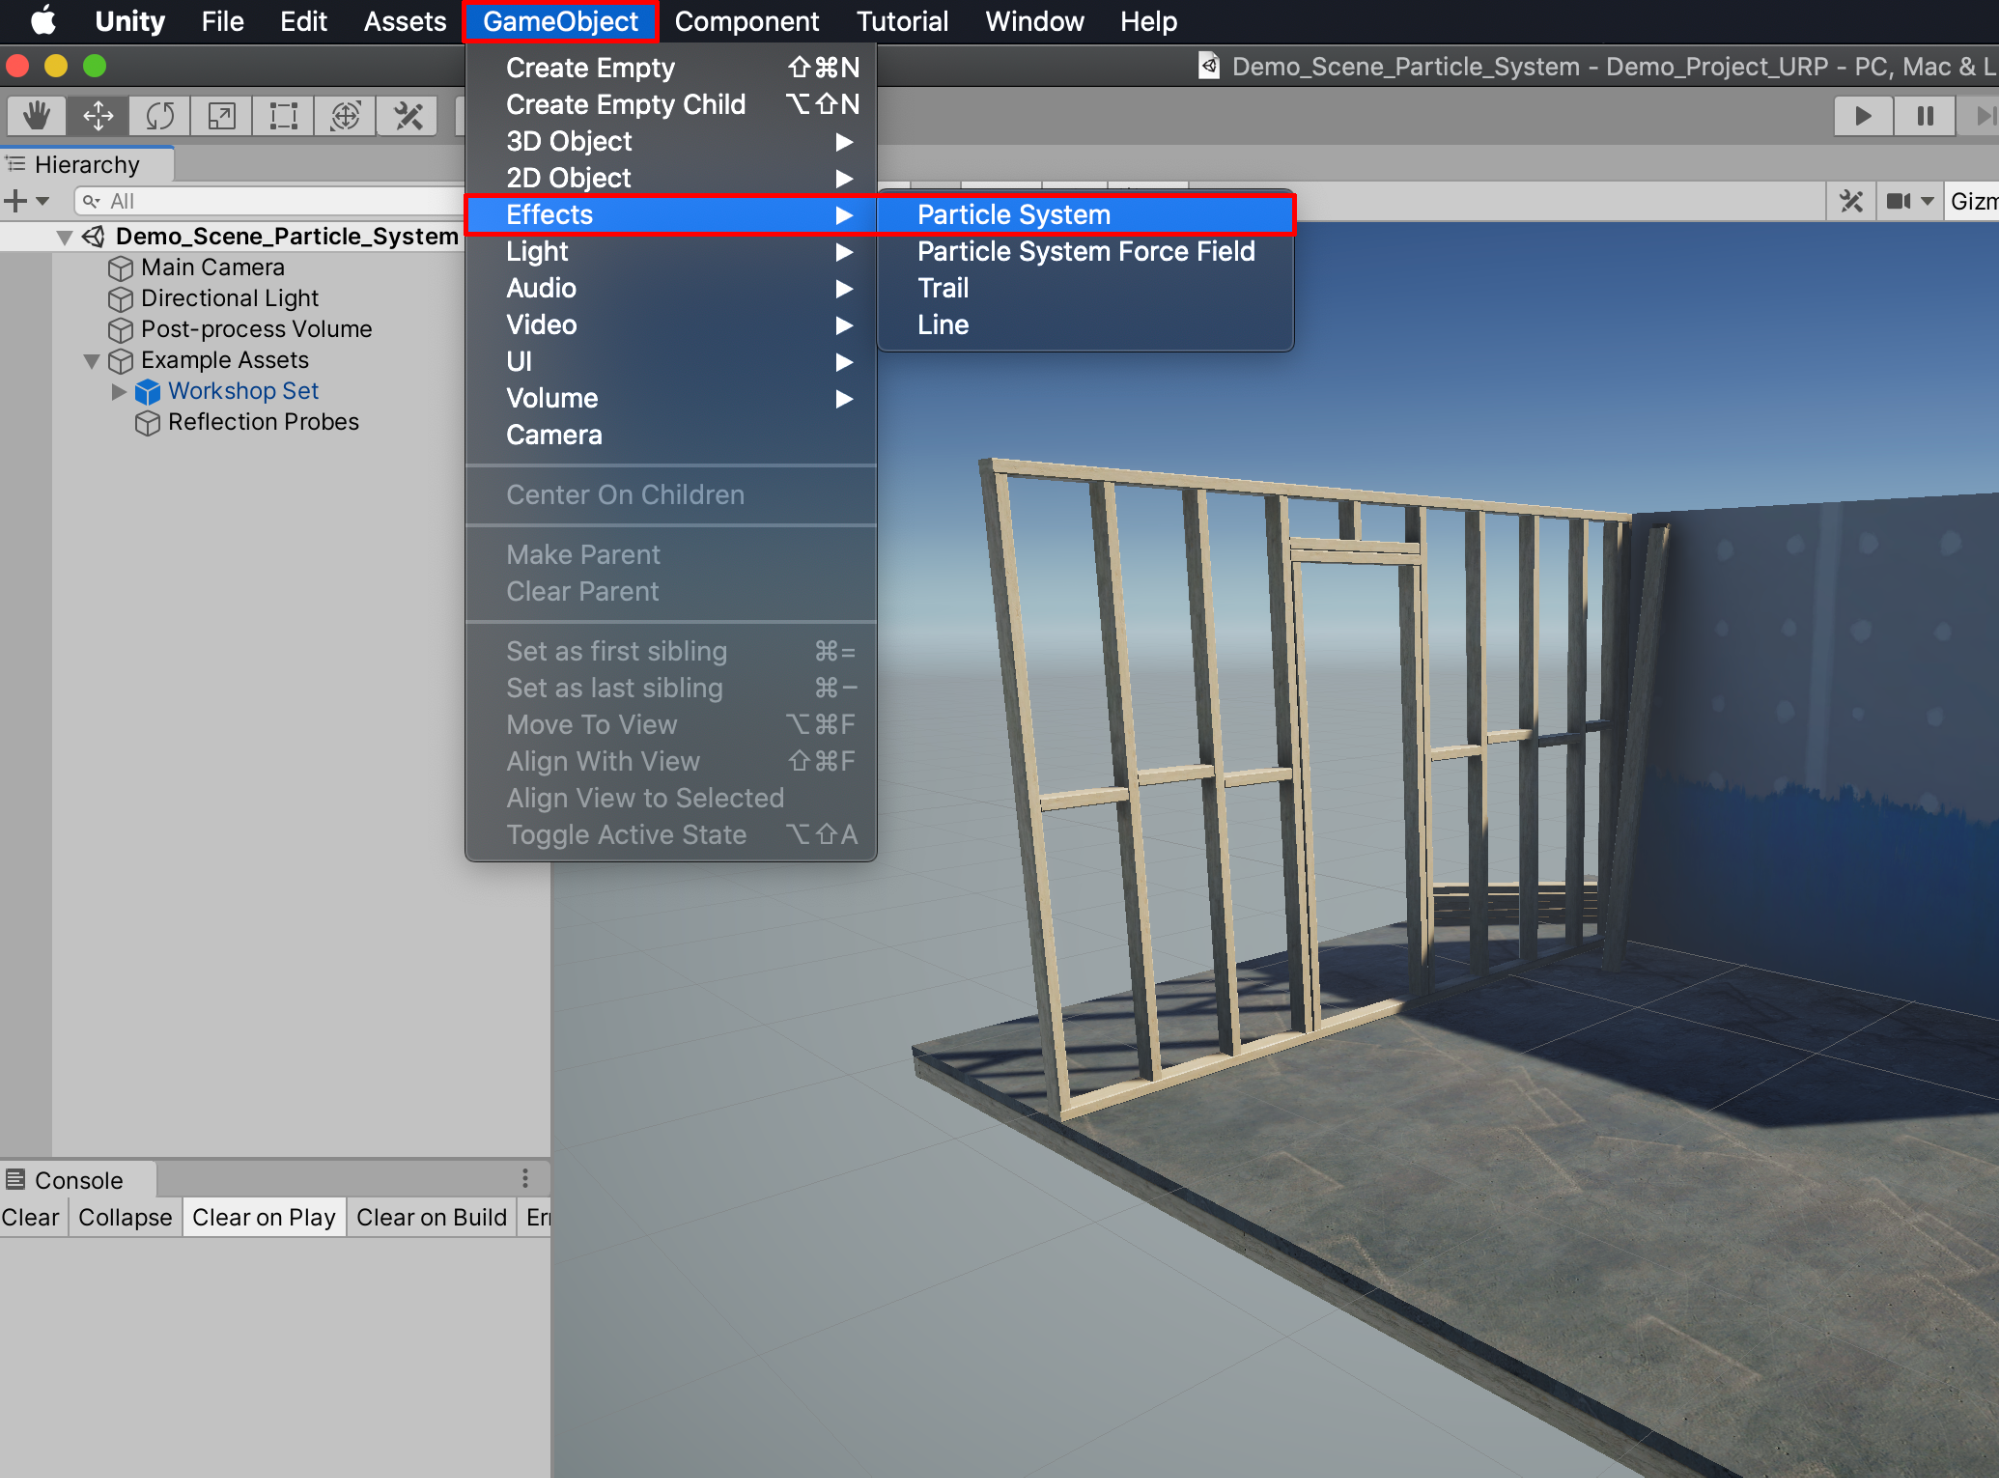
1.导航至您希望在场景中放置粒子系统的视图位置,然后从顶部下拉菜单中选择“GameObject”>“Effects”>“Particle System”。
新建的粒子系统将作为GameObject出现在“Hierarchy”窗口中,并在场景中显示其动画。只有在Hierarchy中选中GameObject时,才会在“Scene”窗口中显示其动画属性。将会分别选中粒子本身并以橙色轮廓标识。“Scene”窗口右下角会显示新的“Particle Effect”窗口,您可以暂停、重启或停止动画。
2.在“Hierarchy”中选中Particle System GameObject后,请在“Particle Effect”窗口中选择“Pause”按钮,以暂时冻结动画。
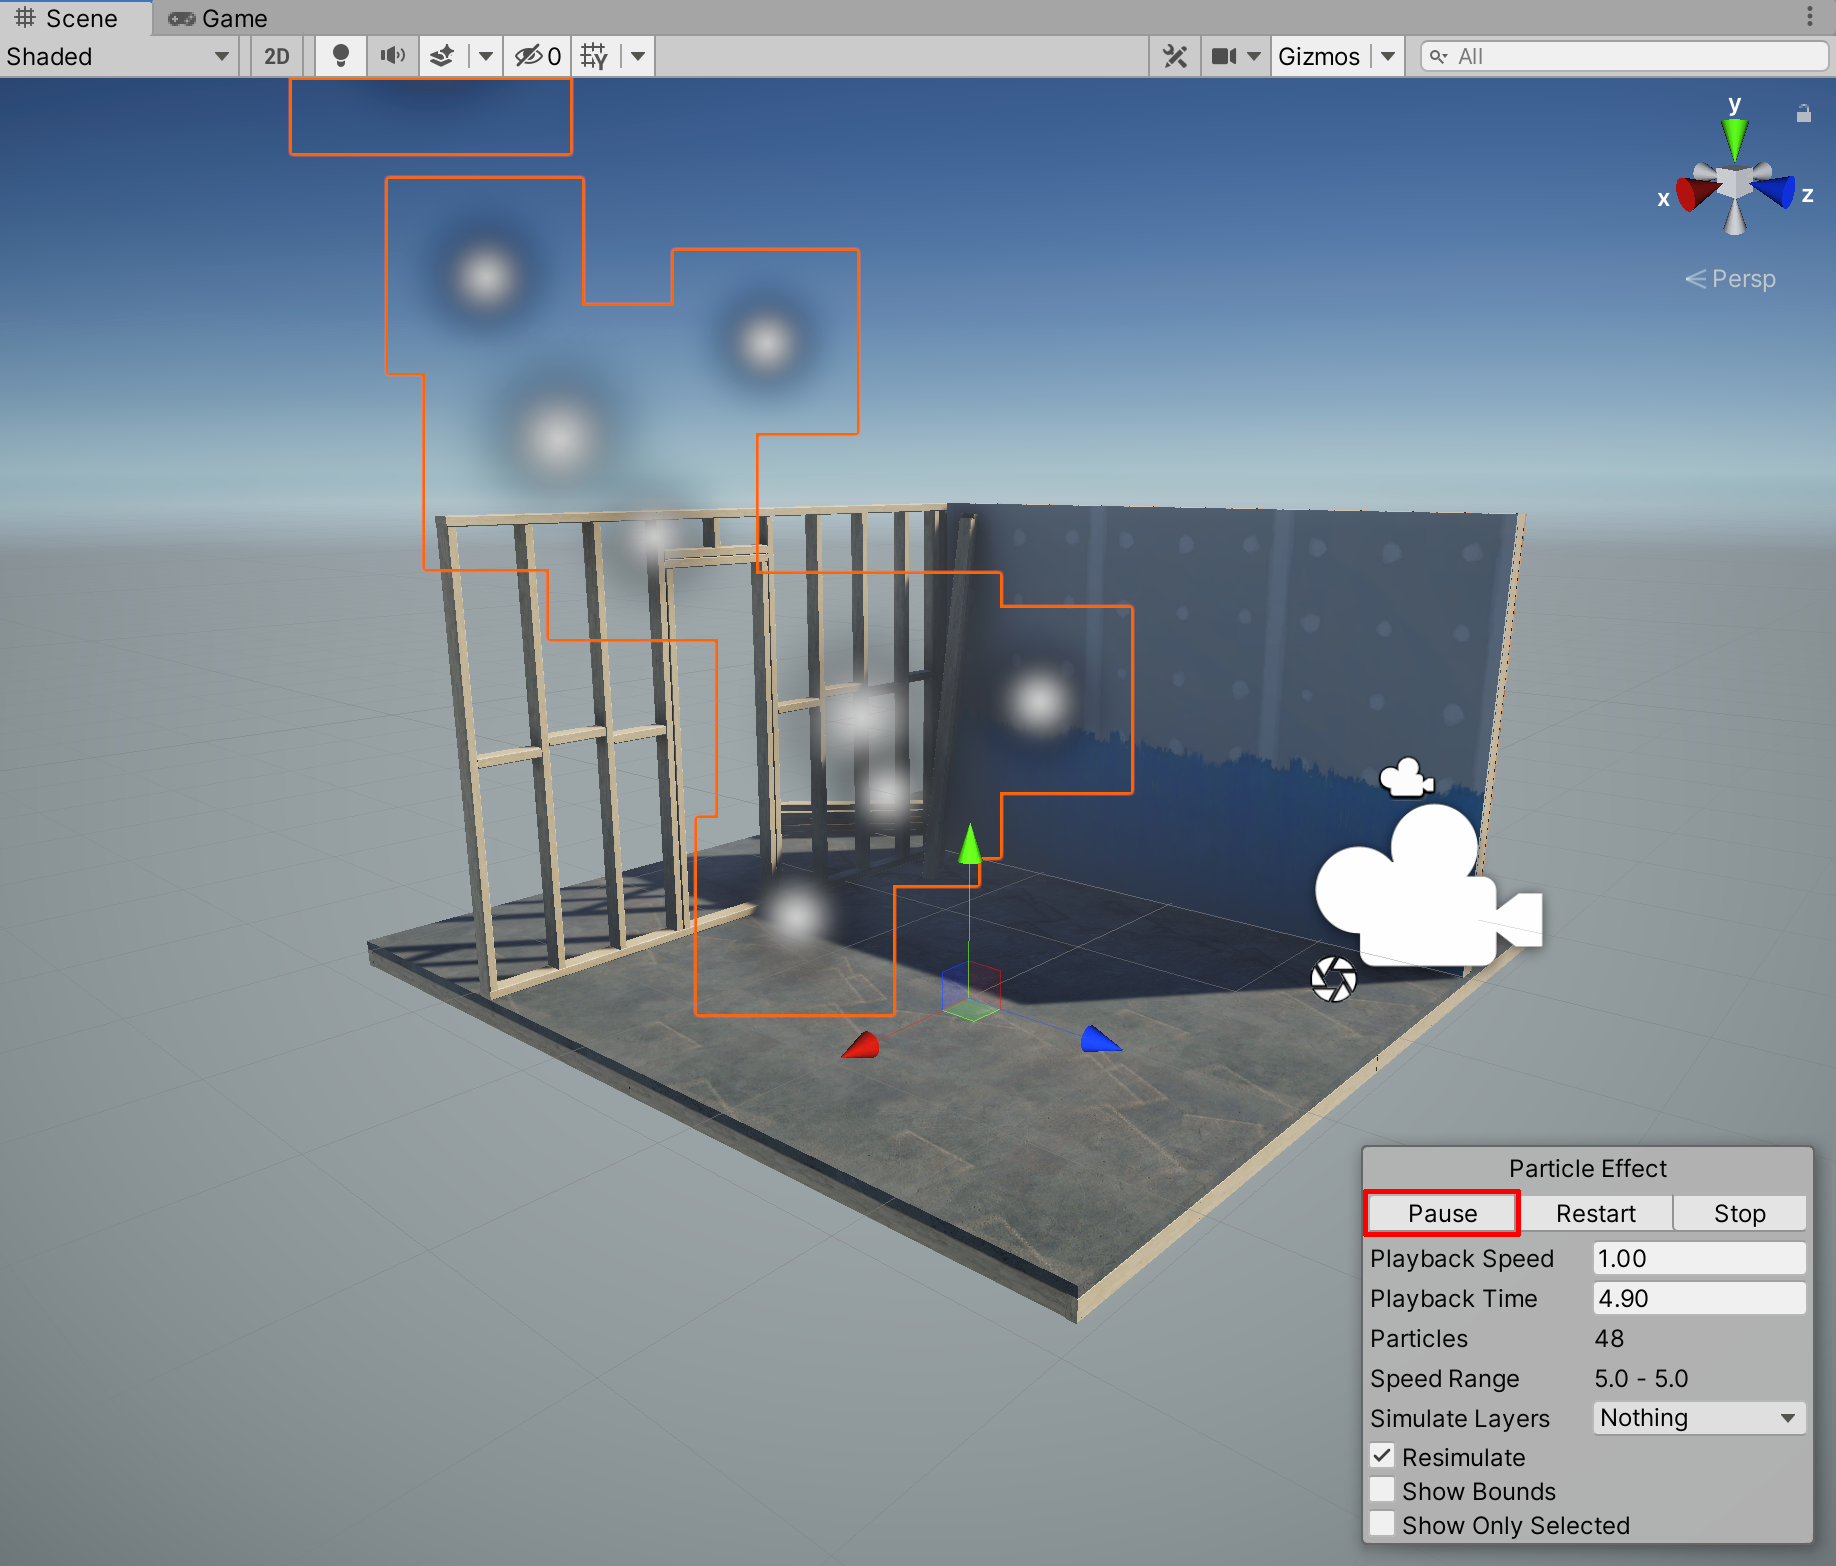
3.再次选择相同按钮(现在已经变成“Play”按钮)恢复动画。运行 5 秒钟后,您会注意到粒子数量已经达到上限 50,而且不再增加。默认情况下,每个粒子在消失前的生命周期都设为 5 秒。因此 5 秒后,粒子出现和消失的速度一致。我们将在后续步骤中调整生命周期,但现在请选择“Restart”按钮重置运行时间。粒子计数器重新归零,重启动画。
2. 更改各粒子存活的生命周期
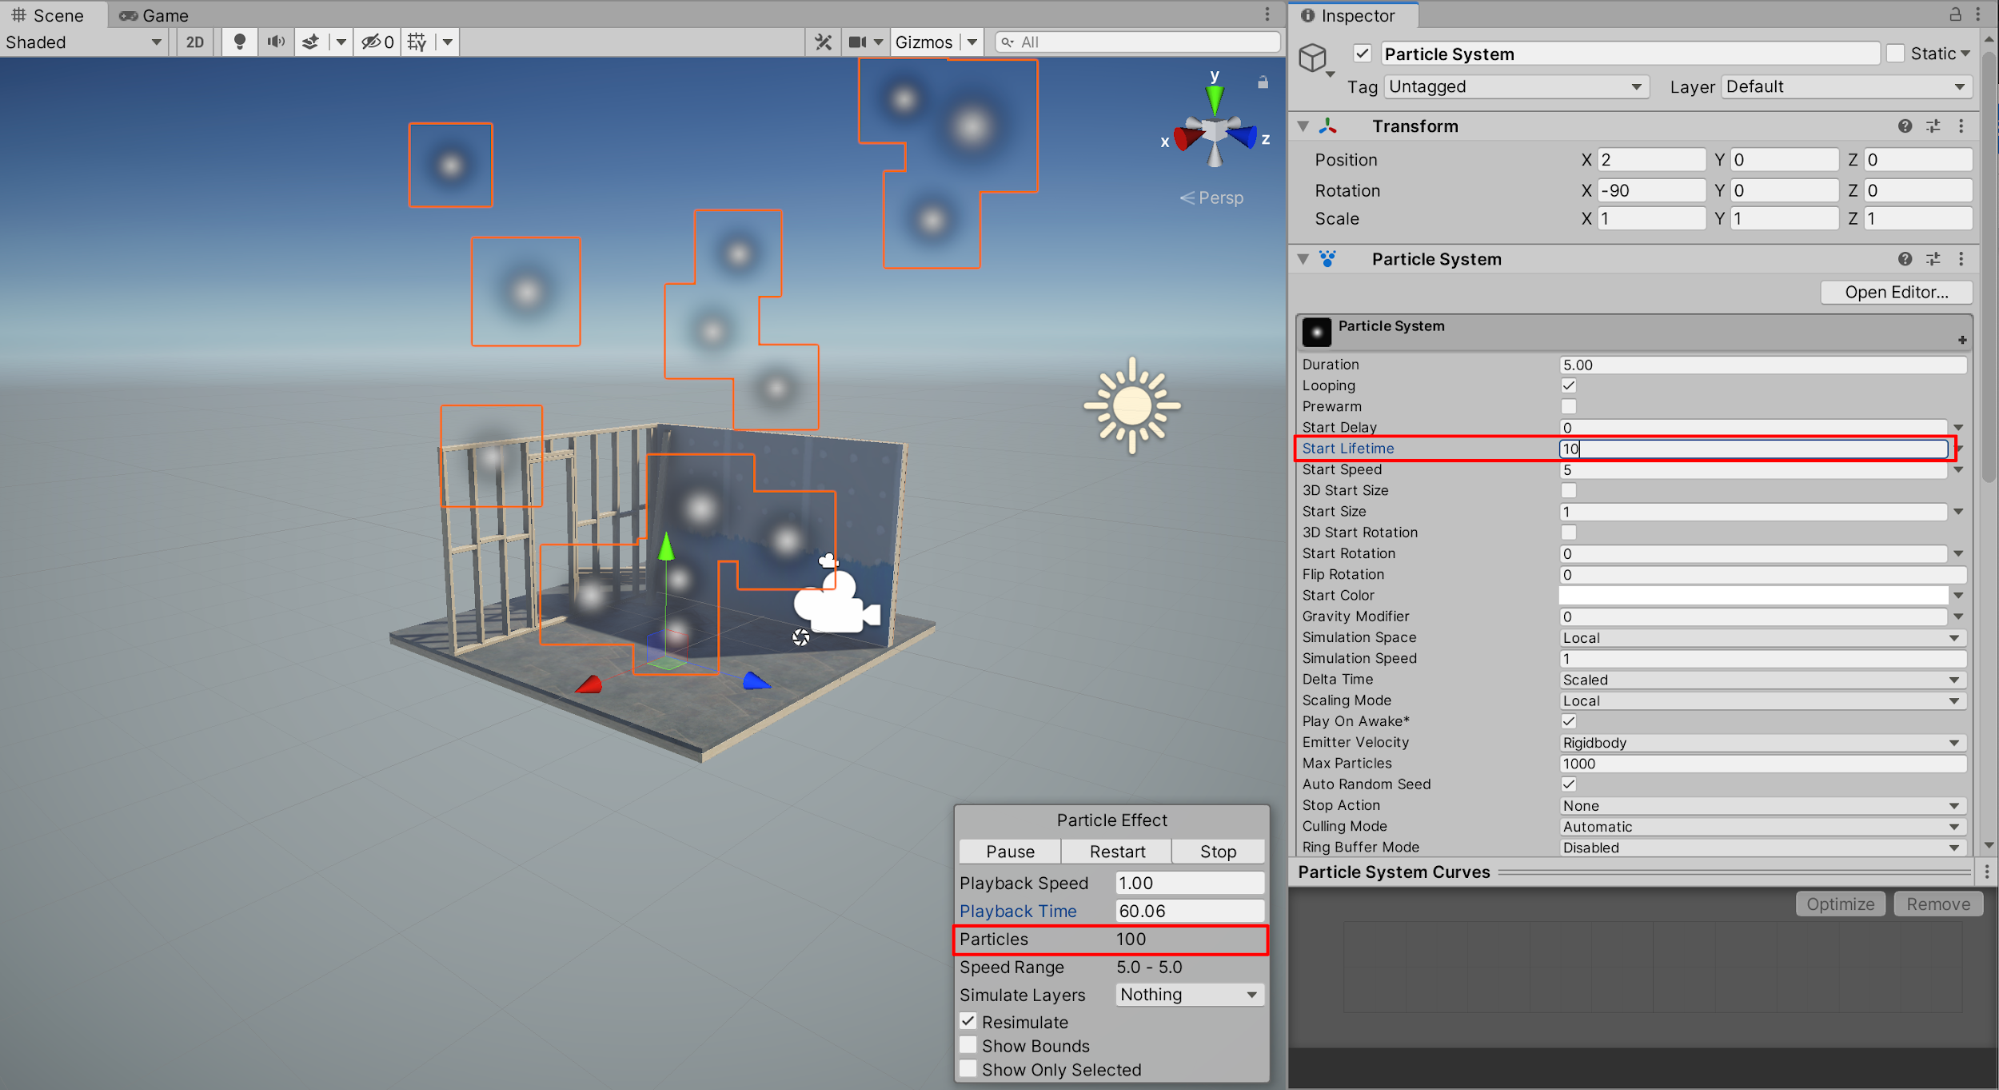
现在修改每个粒子存活的生命周期。在“Inspector”窗口中增加“Start Lifetime”属性时,不仅可延长粒子存活时间,场景内填充的粒子总数也会增加。
1.在“Inspector”窗口中,将粒子系统的“Start Lifetime”属性更改为10。请注意,场景中的粒子数量将会翻倍,达到100。
3. 使用Gravity Modifier
粒子系统的重力默认设置为0。这就表示,粒子在向上运动过程中不会受到“Physics Manager”中定义的项目重力设置影响。可以对粒子系统轻松施加项目重力影响。但请注意,本教程中并未介绍如何修改项目的整体物理设置。相反,我们只需在粒子系统属性中调整Gravity Modifier即可。
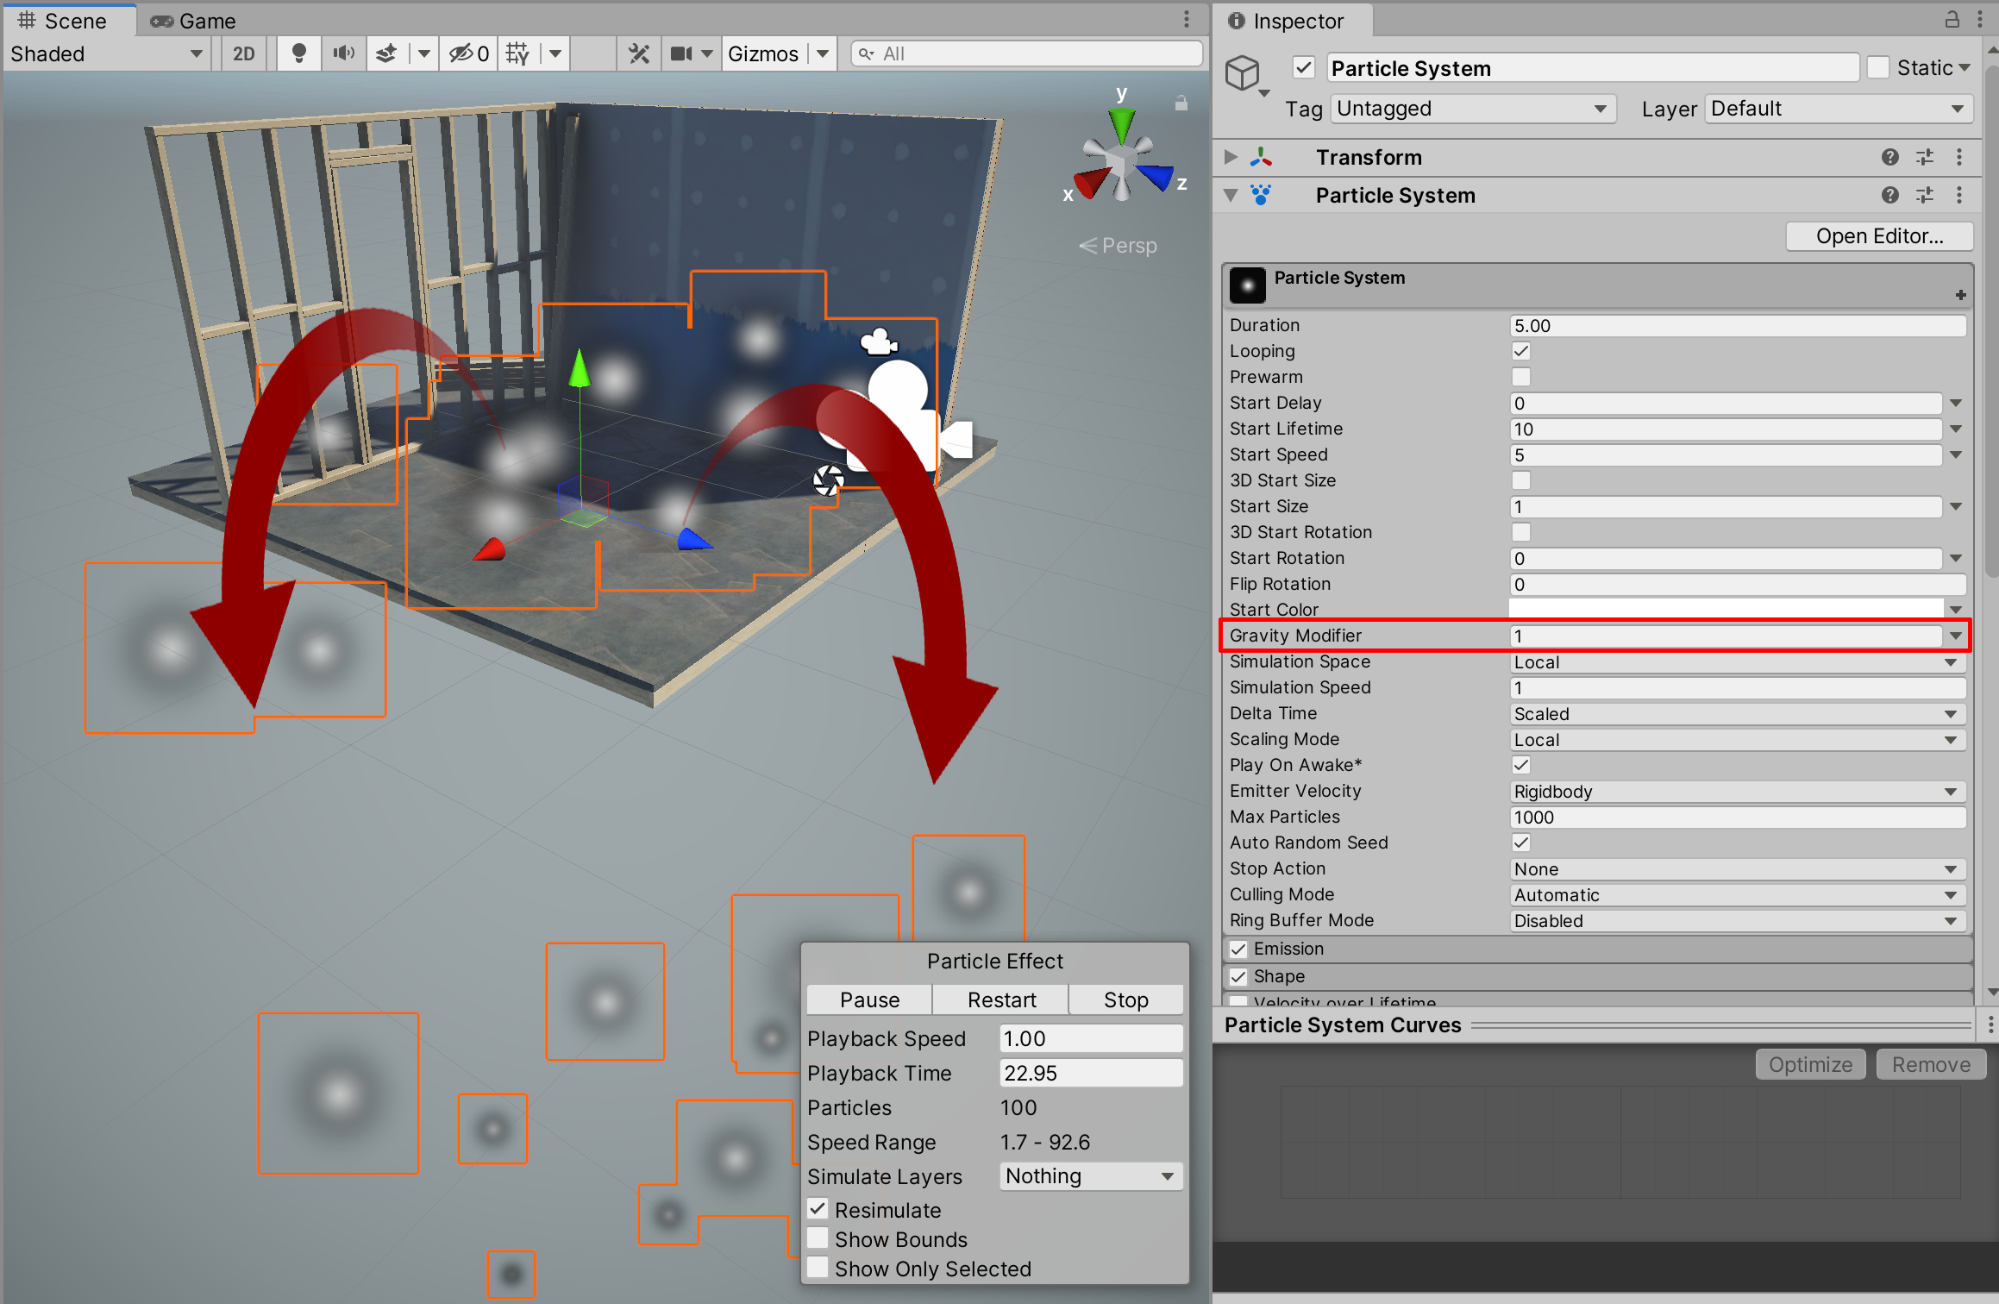
1.在“Inspector”窗口中,将“Gravity Modifier”设置为1。您将看到,粒子现在首先向上运动,然后迅速减缓上行速度,开始下落。
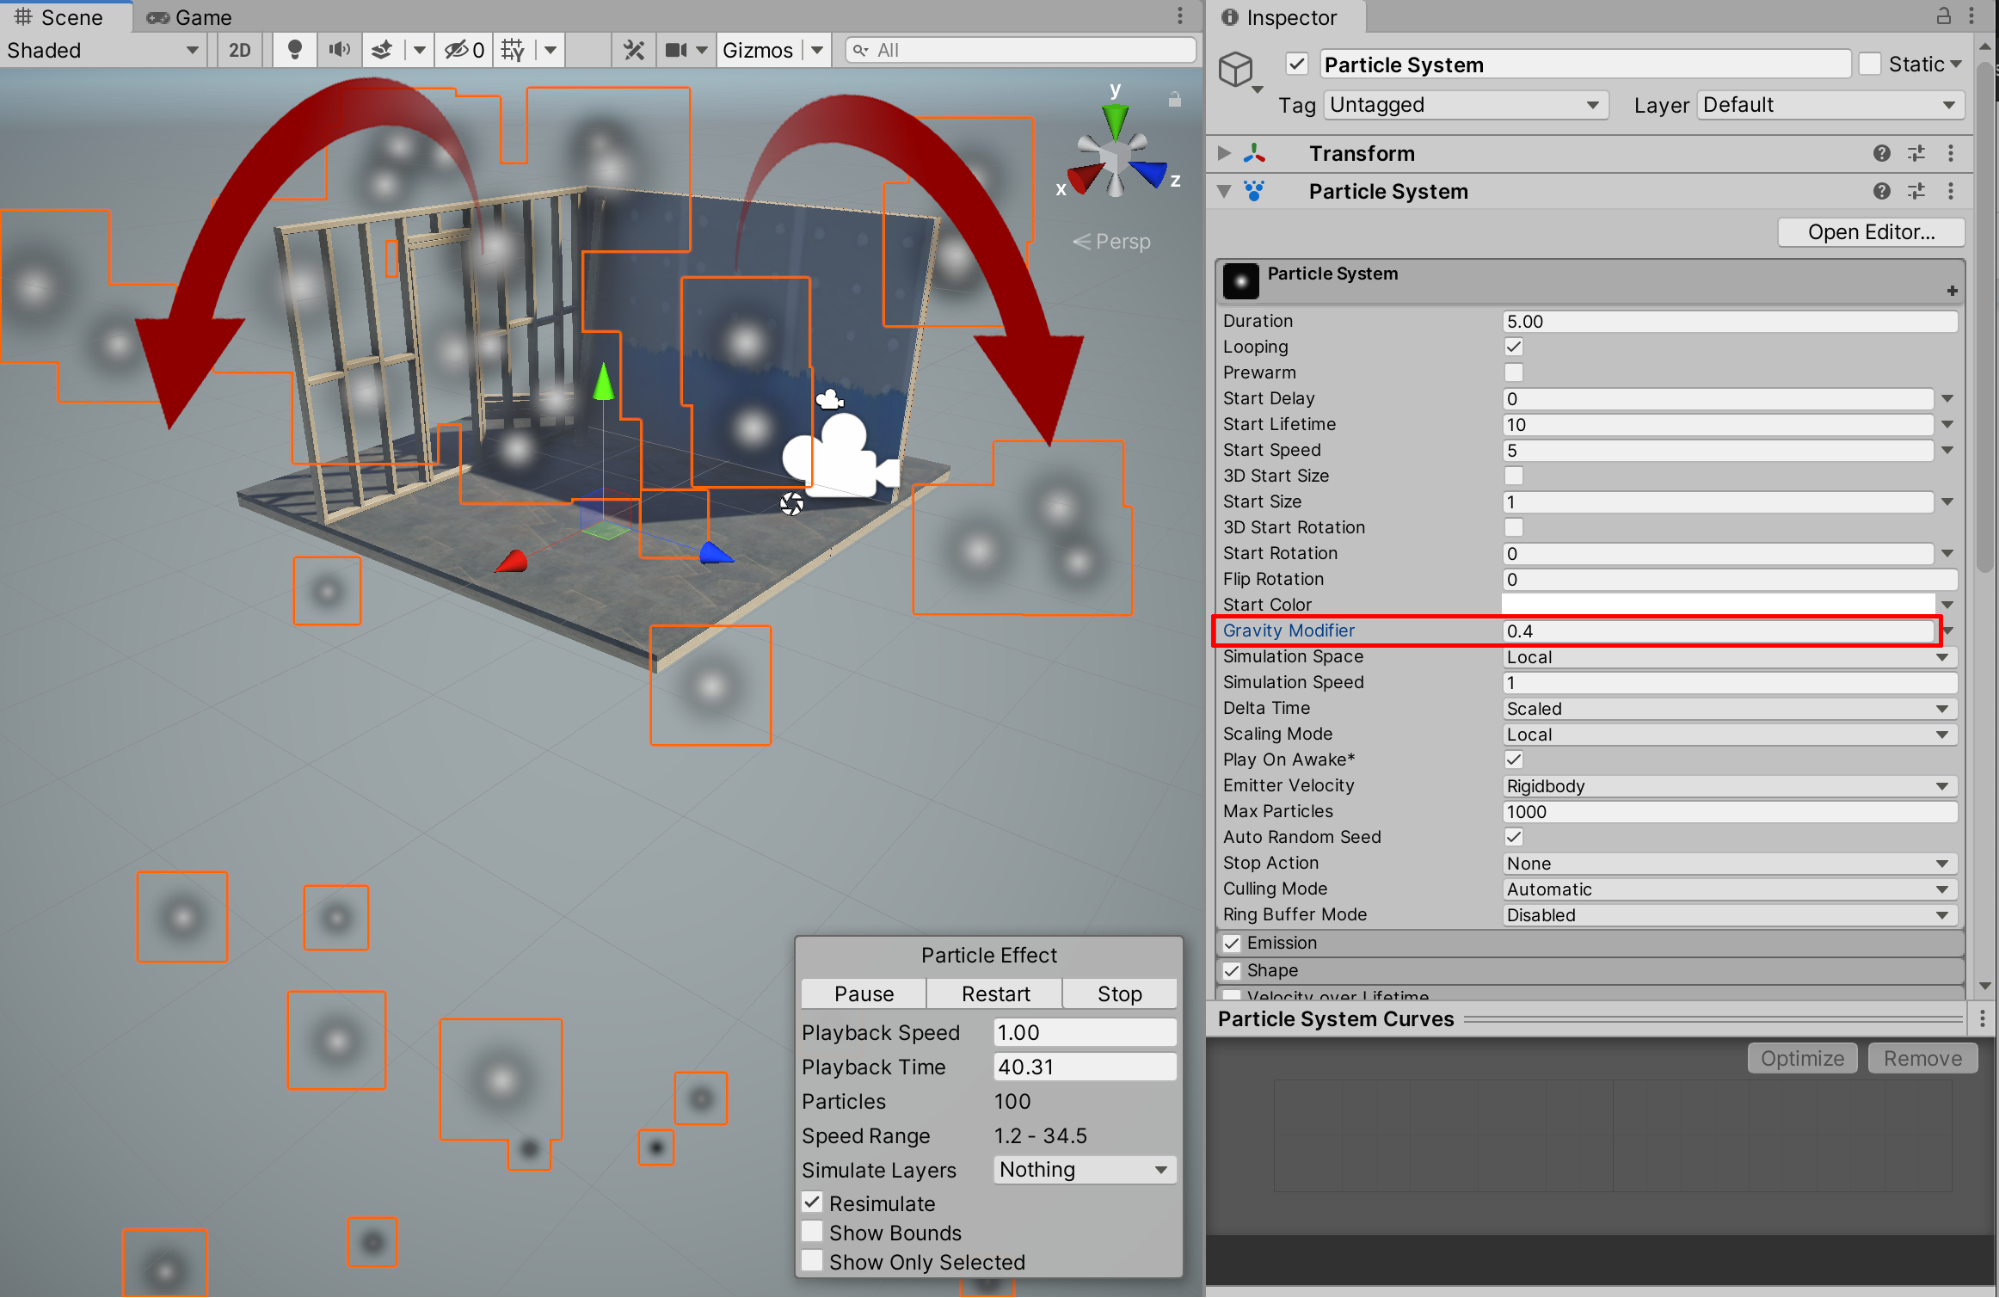
2.降低“Gravity Modifier”值时,我们可以将粒子的初始速度调整提高。在Inspctor中将“Gravity Modifier”设置为4,可让粒子系统呈现喷泉效果。
4. 修改Velocity over Lifetime
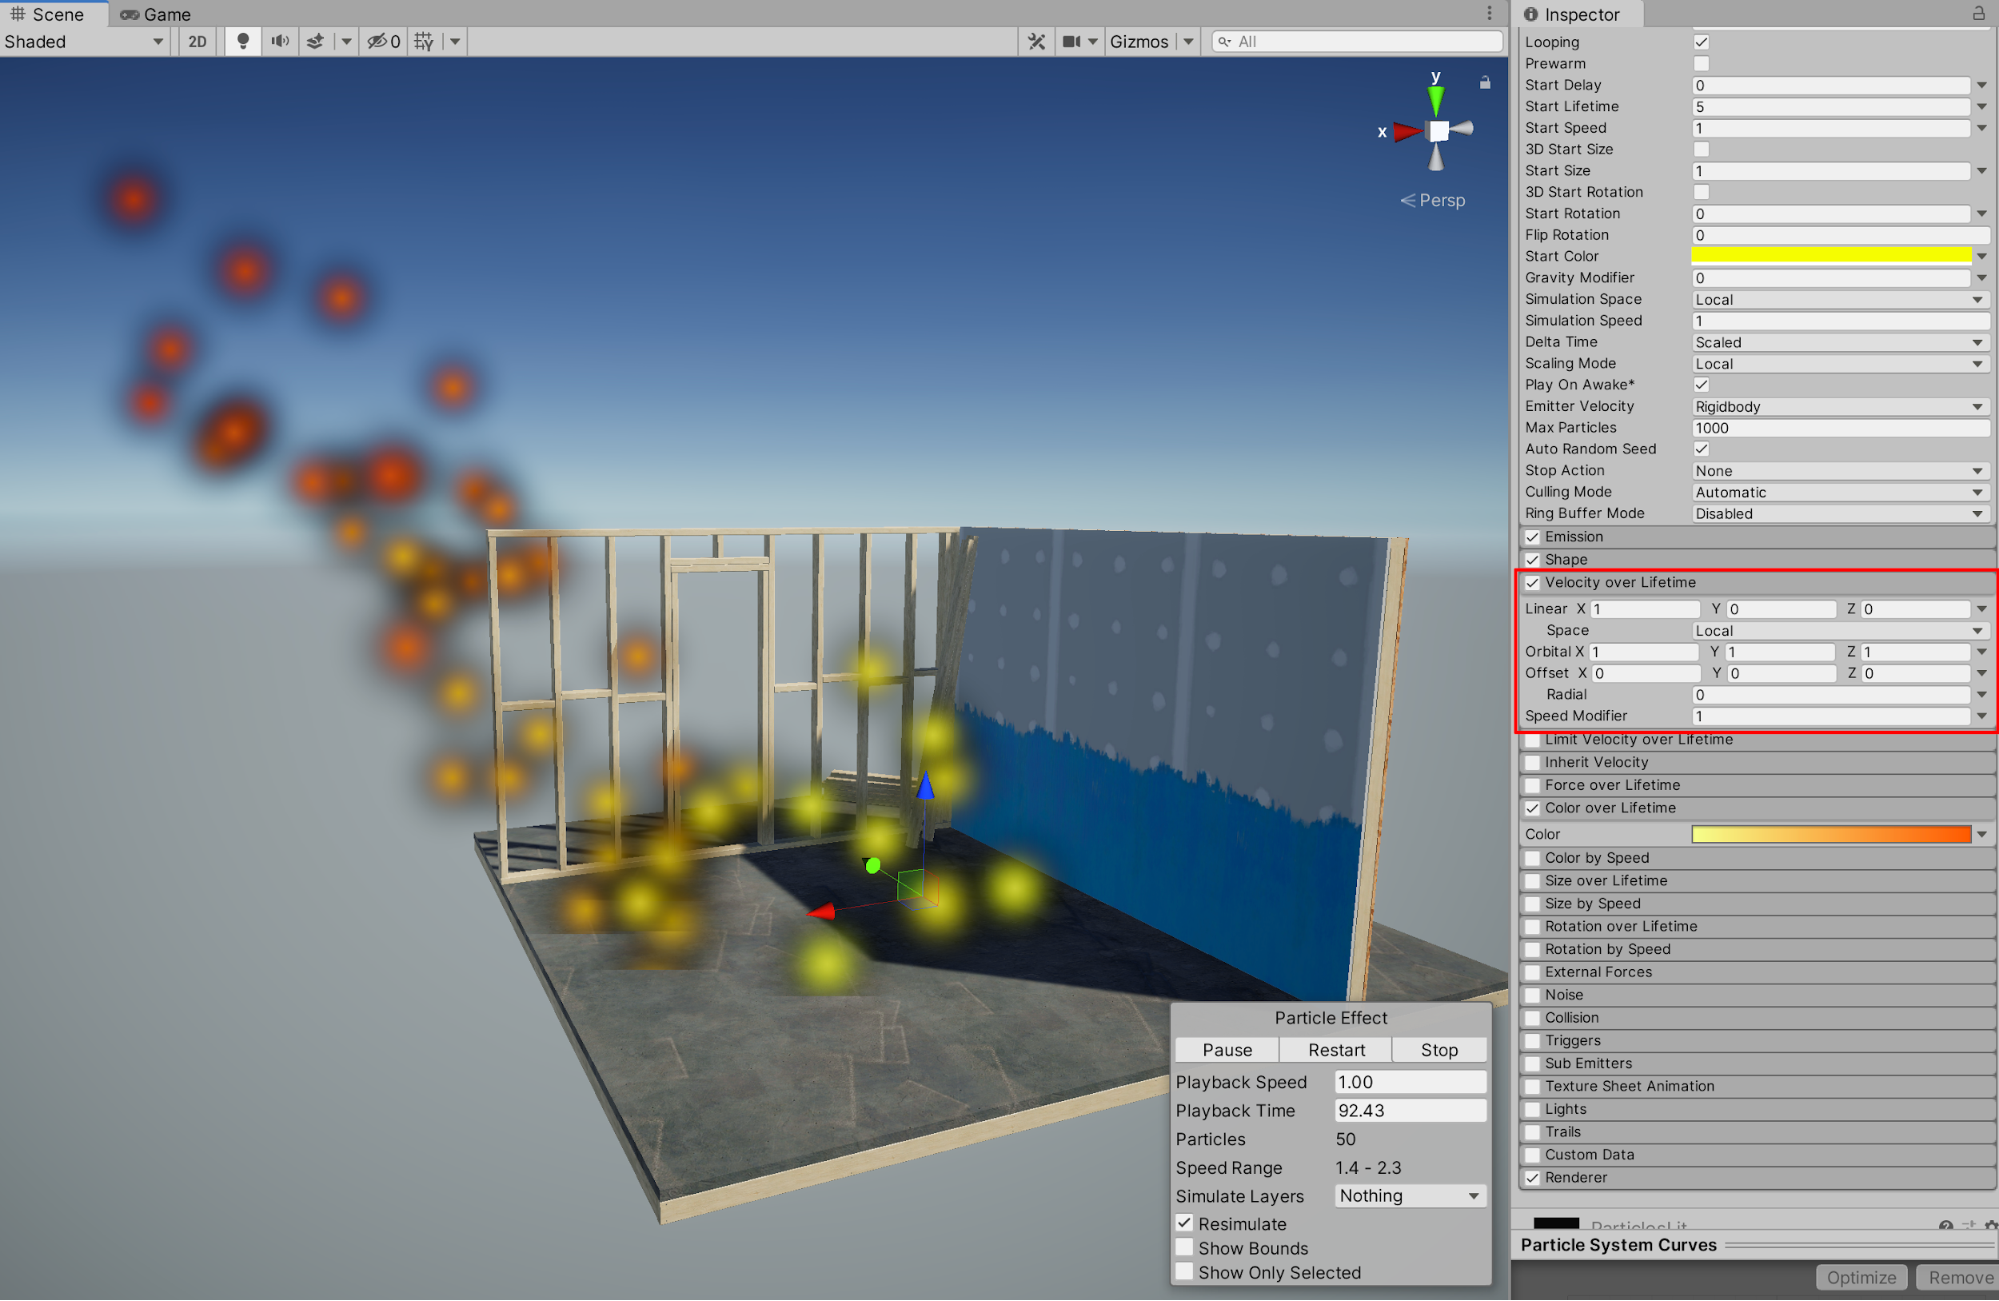
我们还可启用“Velocity over Lifetime”属性,以便全面控制粒子速度,包括速度,甚至是运动方向。您可以调整粒子的整体速度,例如,线性或旋转速度。
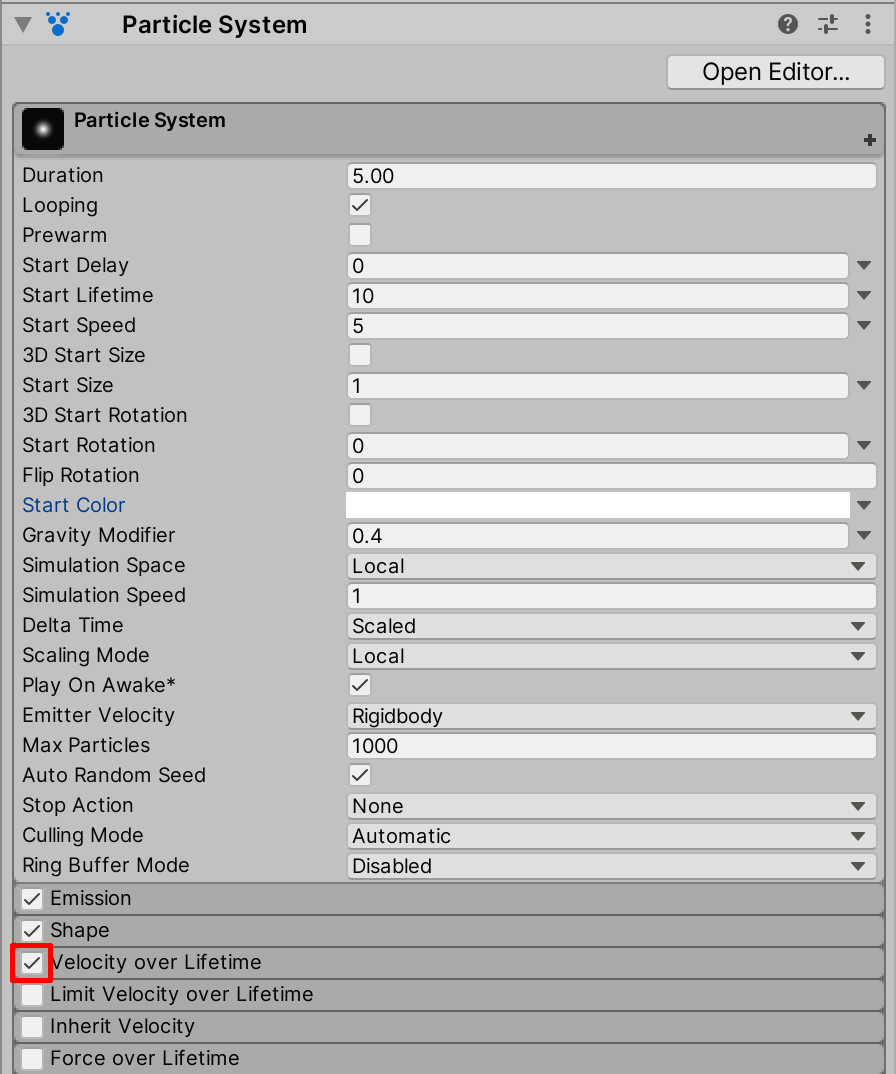
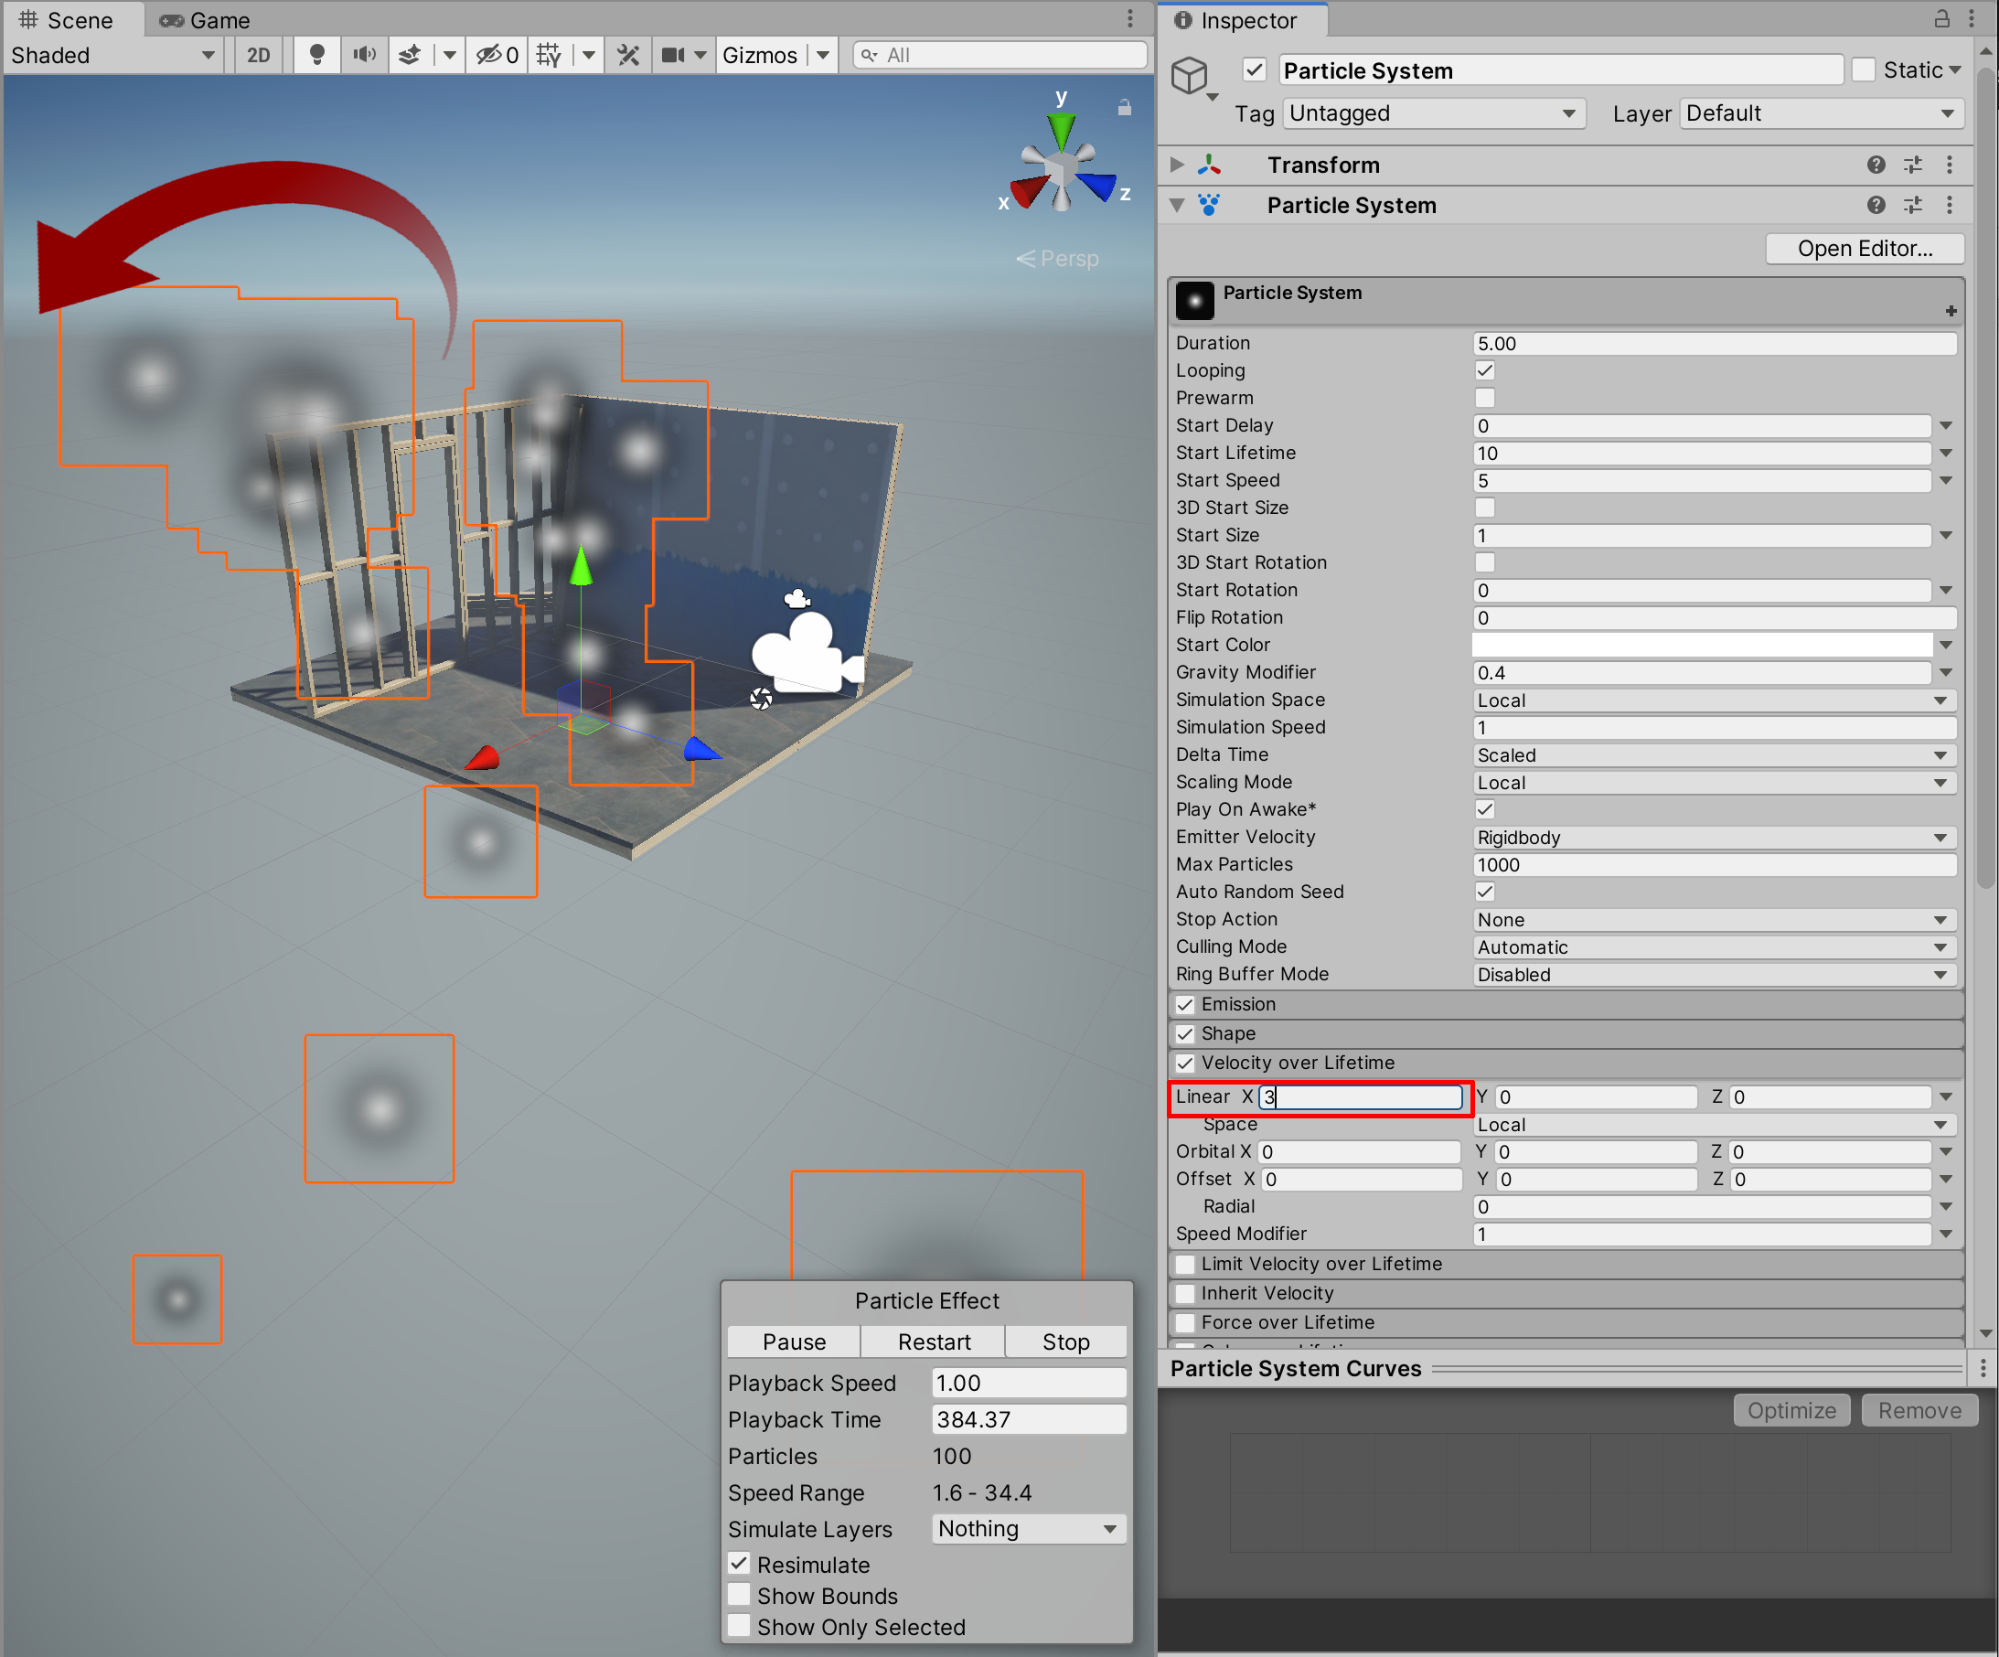
1.在“Inspector”窗口中,首选勾选复选框以启用“Velocity over Lifetime”,然后选择“Velocity over Lifetime”字段本身以扩展其属性。
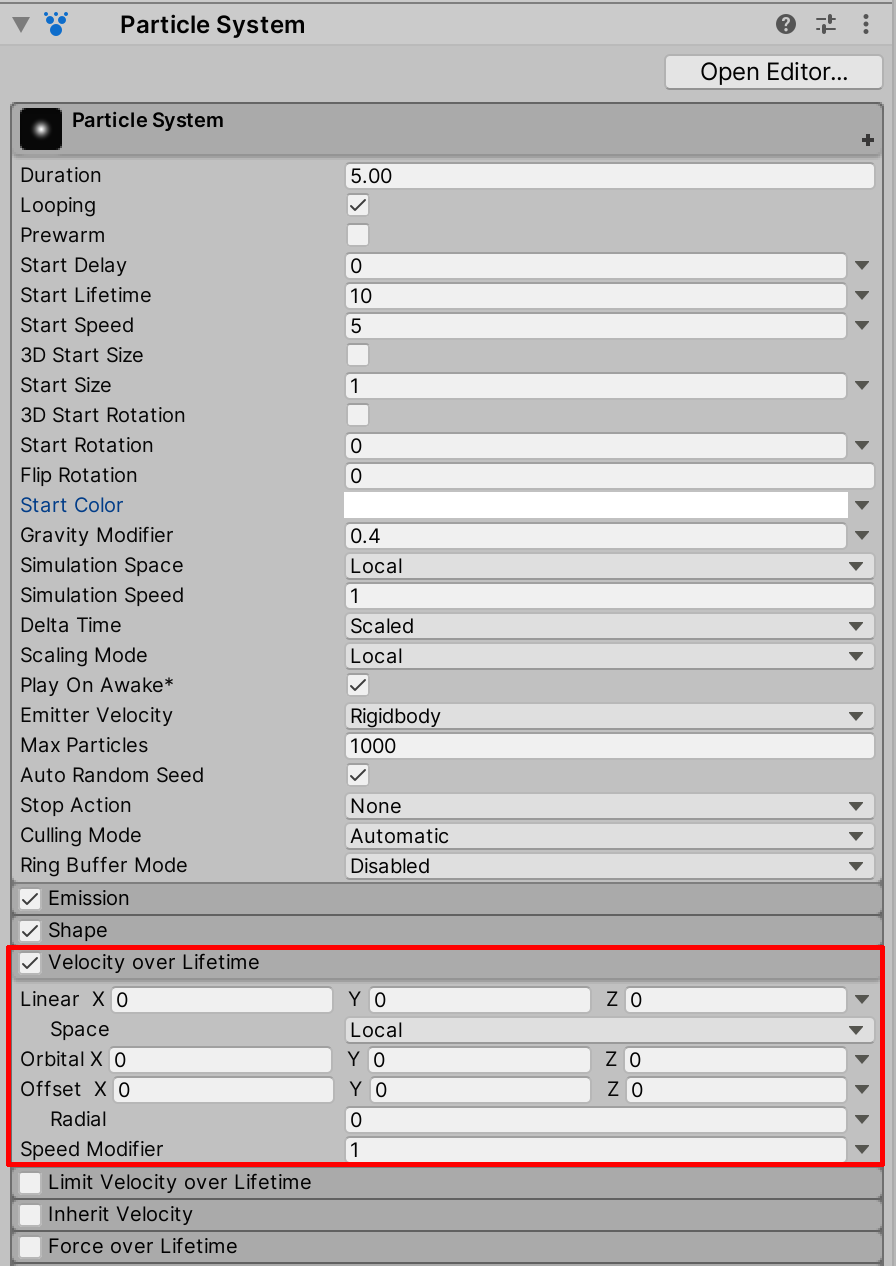
2.要更改粒子在X方向上的方向速度,请在“Velocity over Lifetime”属性中将“Linear X”字段值设为3,从而呈现大风吹过的效果。
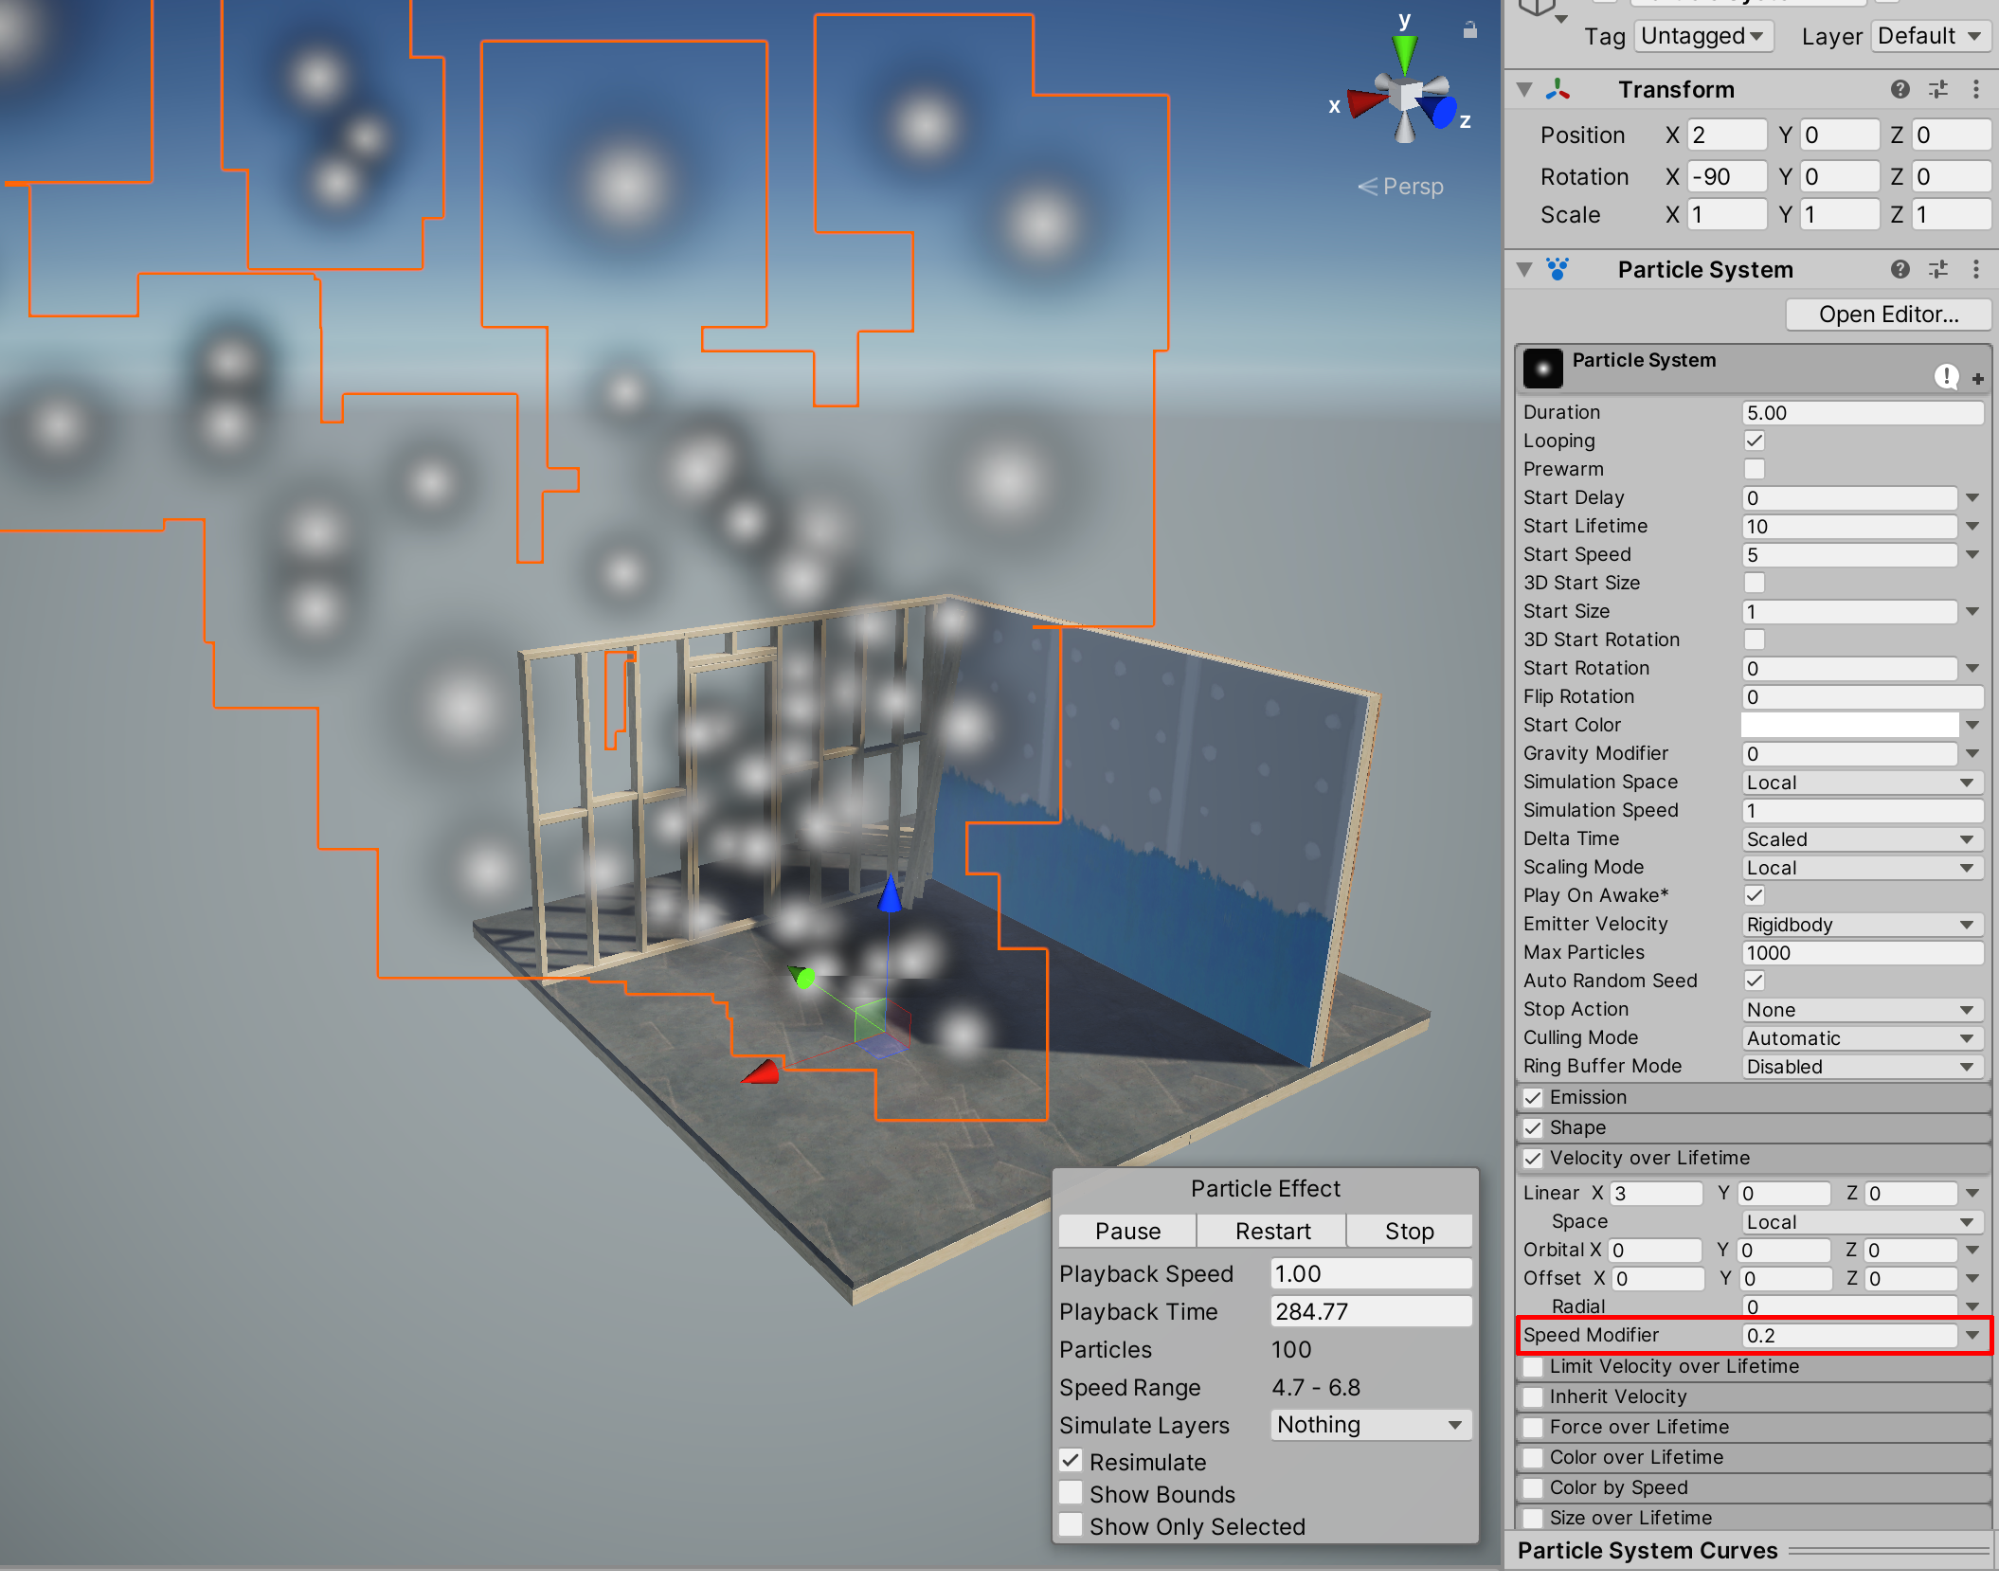
3.现在将“Gravity Modifier”值恢复为0,以去除重力效果。
4.要降低速度,请将“Speed Modifier”值降为2。
5. 创建烟雾效果 - 调整颜色
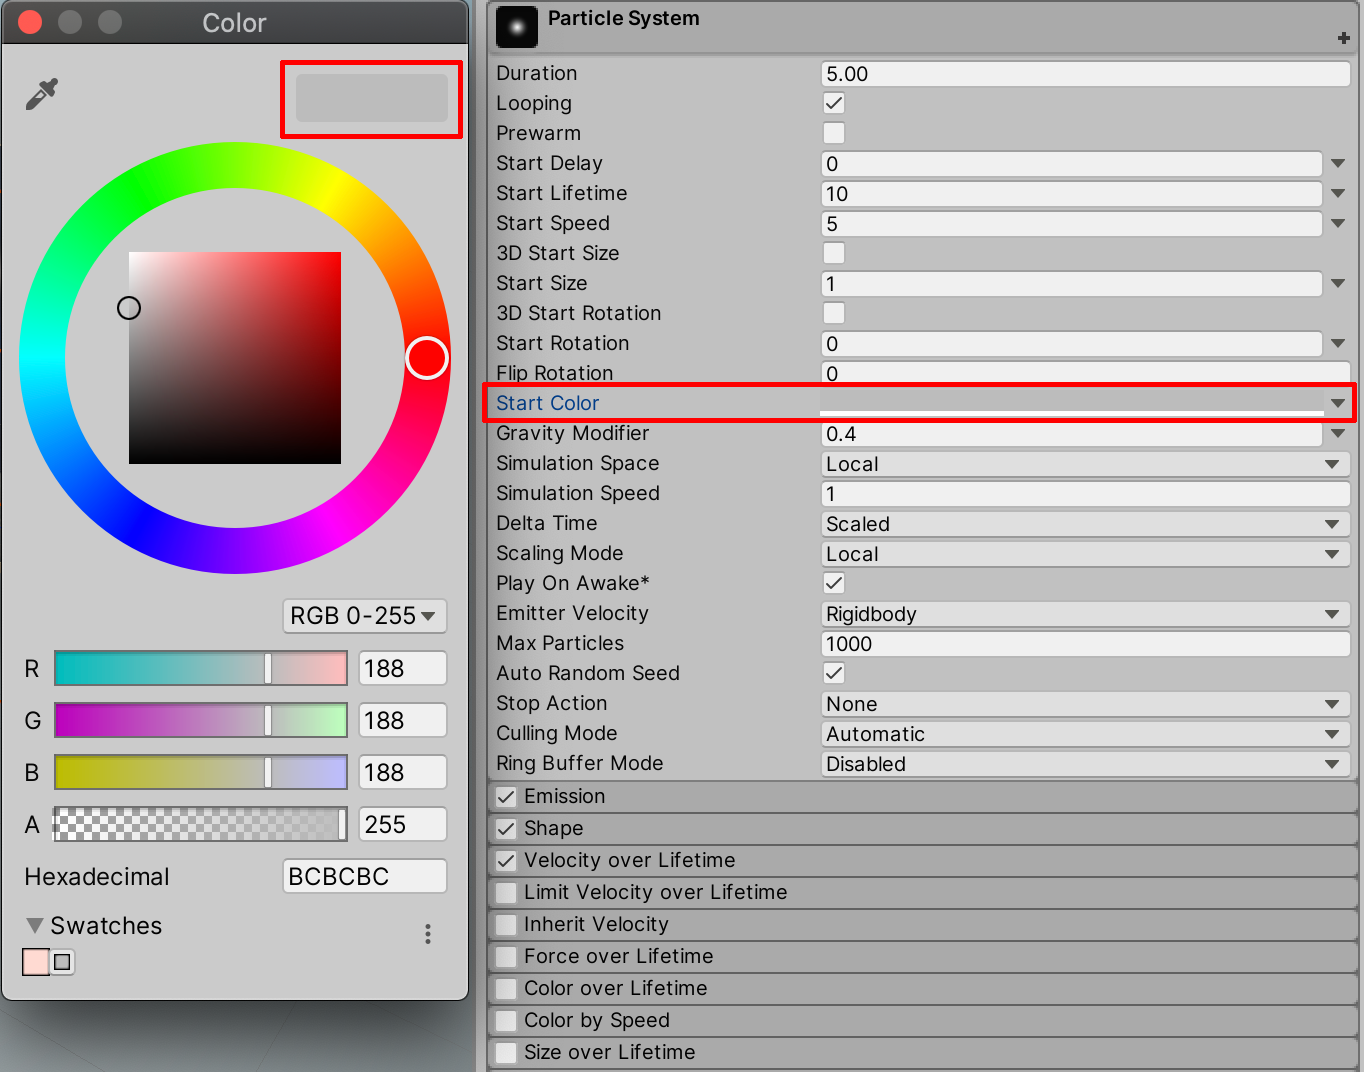
我们可以调整粒子颜色,从而呈现您预期的视觉模拟效果。例如,将颜色更改为灰白色可更好地呈现烟雾效果。首先大致确定烟雾效果的颜色。
1.在“Inspector”中选择“Start Color”字段。 首先用色轮或取色吸管工具选择适合的颜色。这里选择浅灰色。
6. 优化烟雾效果
我们将进一步调整,在粒子系统中营造出最接近烟雾的效果。现在已将颜色设置为浅灰色,我们将对粒子的“Start Lifetime”、“Start Speed”和“Start Size”进行其他调整。
1.将“Start Lifetime”值减至5,从而将场景中的粒子总数减为原始数量50。将“Start Speed”降低到1。将“Start Size”提高到10,从而提高烟雾粒子大小。将“Speed Modifier”调整为4。
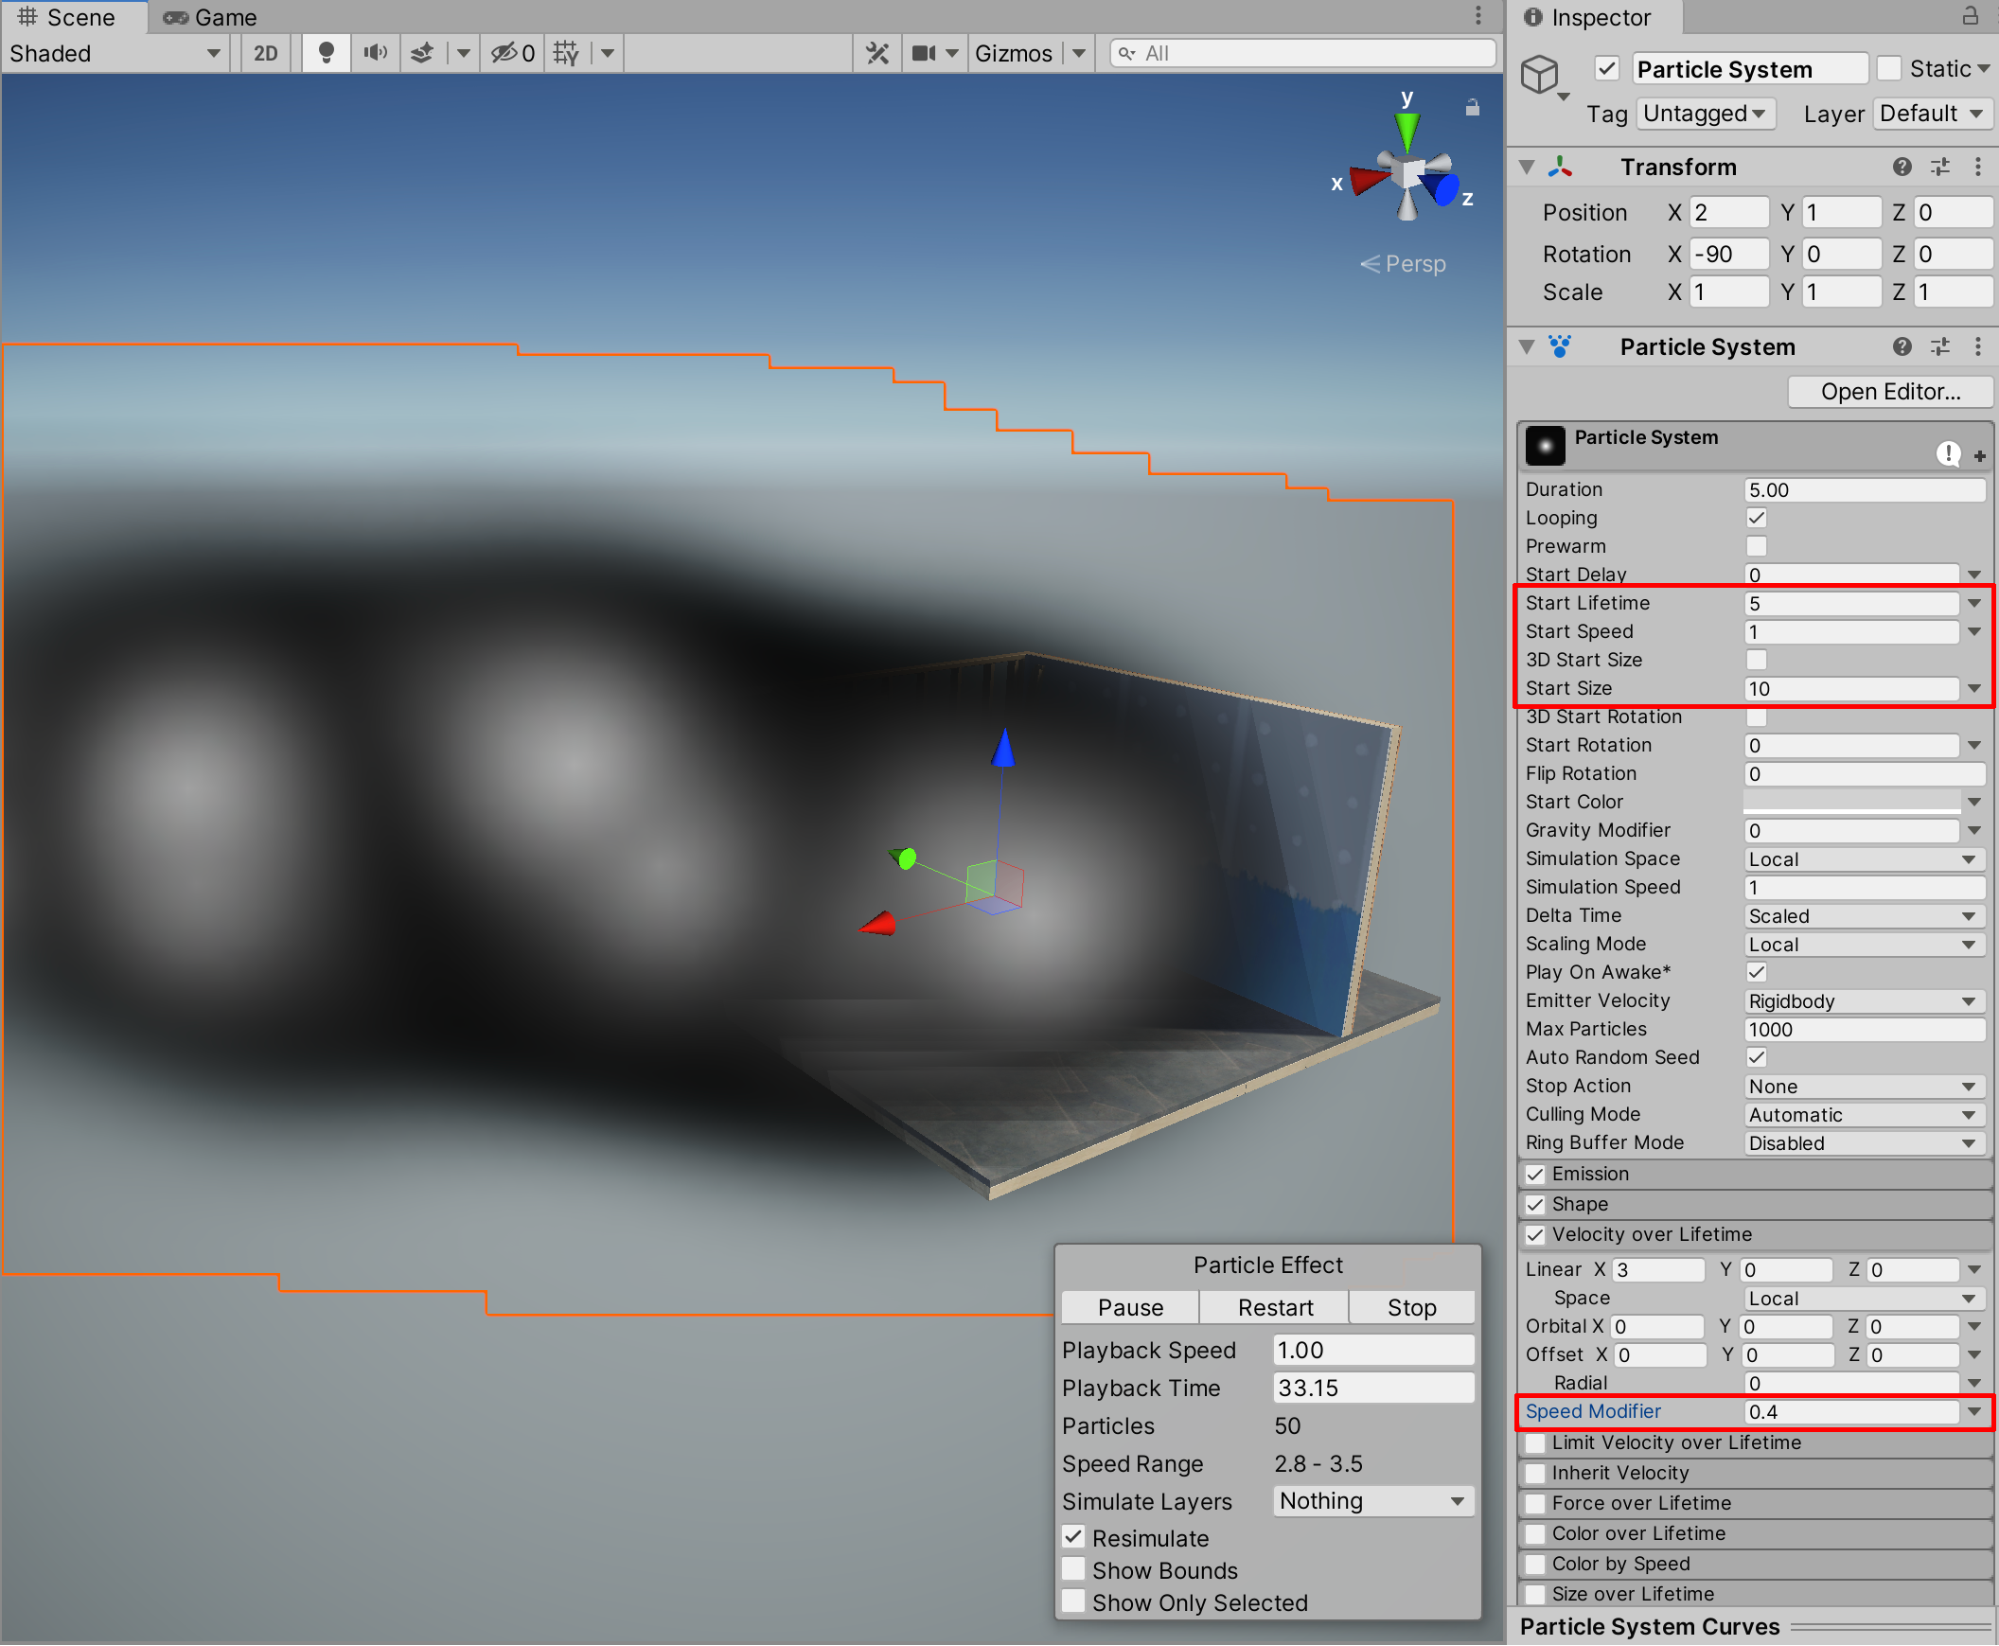
对粒子系统进行试验,最终微调自定义烟雾效果。您可能希望通过调整“Start Size”与“Start Lifetime”之间的平衡组合来增强或降低烟雾浓度。您可能还想让烟雾呈现出向上或者随风飘动的效果。同时修改“Velocity over Lifetime”和“Gravity Modifier”即可实现。尝试输入自己的值,了解对粒子的影响。
7. 创建火花效果:调整Color over Lifetime
与通过创建和调整粒子系统颜色、大小和速度来获得近似烟雾的效果类似,我们可以创建另一个粒子系统GameObject,然后微调属性以创建并模拟新的火花效果。
1.现在将我们新创建的烟雾粒子系统效果保存到场景中。为了避免该烟雾效果在我们新建其他粒子系统效果时遮挡视线,我们在“Inspector”窗口中将其取消选中,使烟雾暂时隐藏起来。接下来,转到顶部下拉菜单并依次选择“GameObject”>“Effects”>“Particle System”以新建粒子系统效果。
2.我们现在可以修改颜色,以呈现燃烧的火花。在“Hierarchy”窗口中选择新建的粒子系统 GameObjec,在“Inspector”的粒子系统属性中选择“Start Color”字段,然后从色轮中选择黄色。
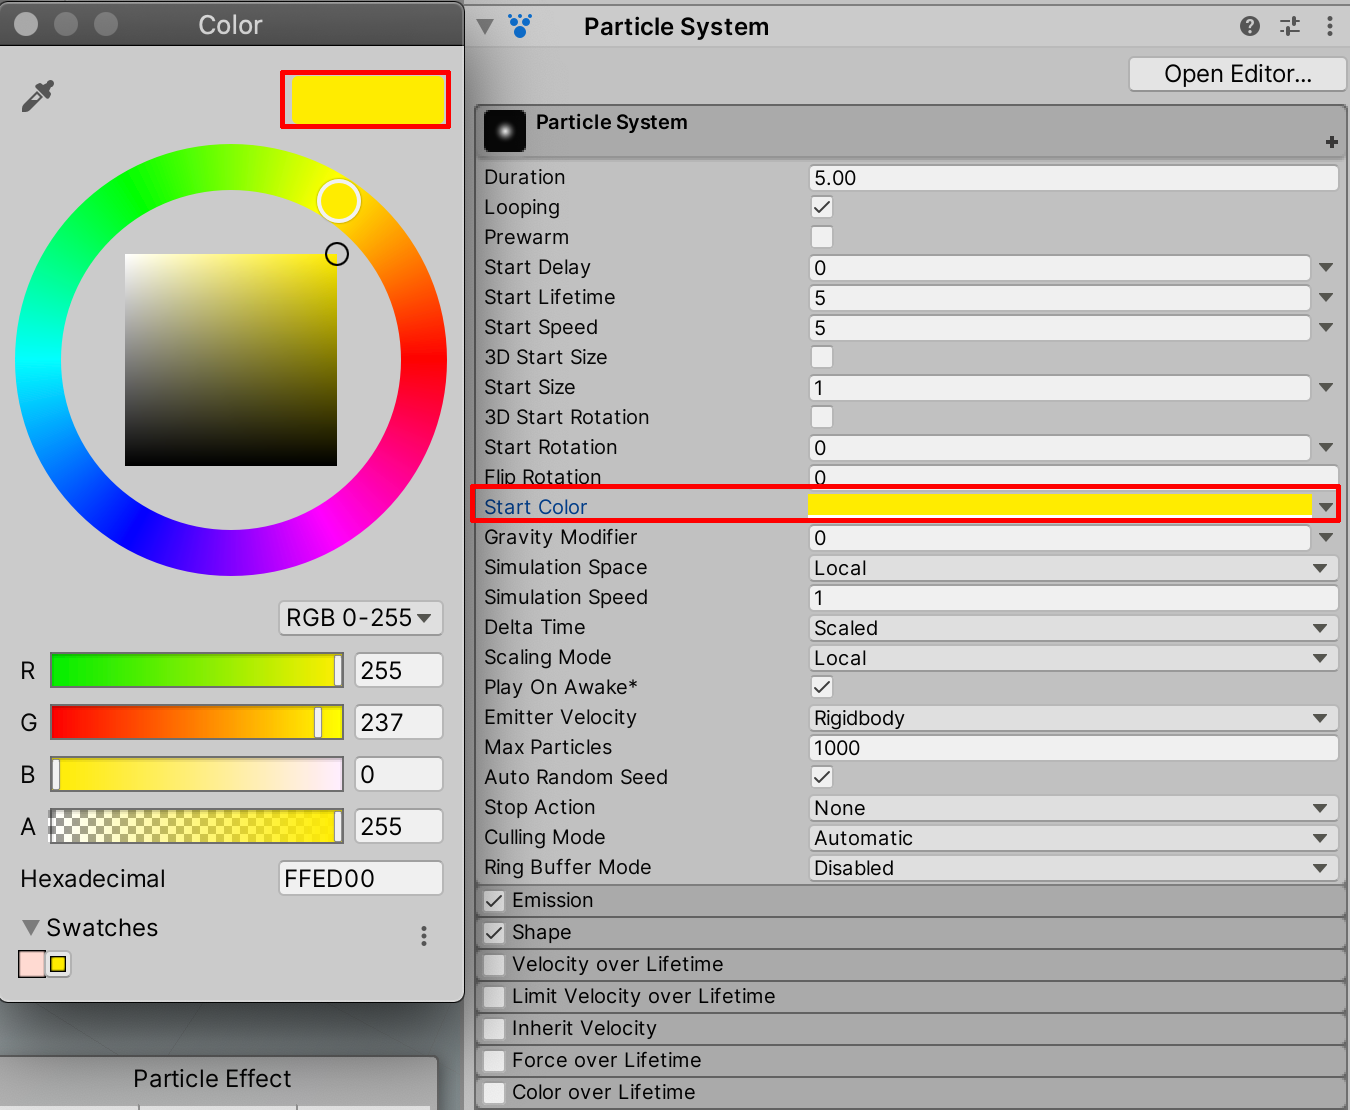
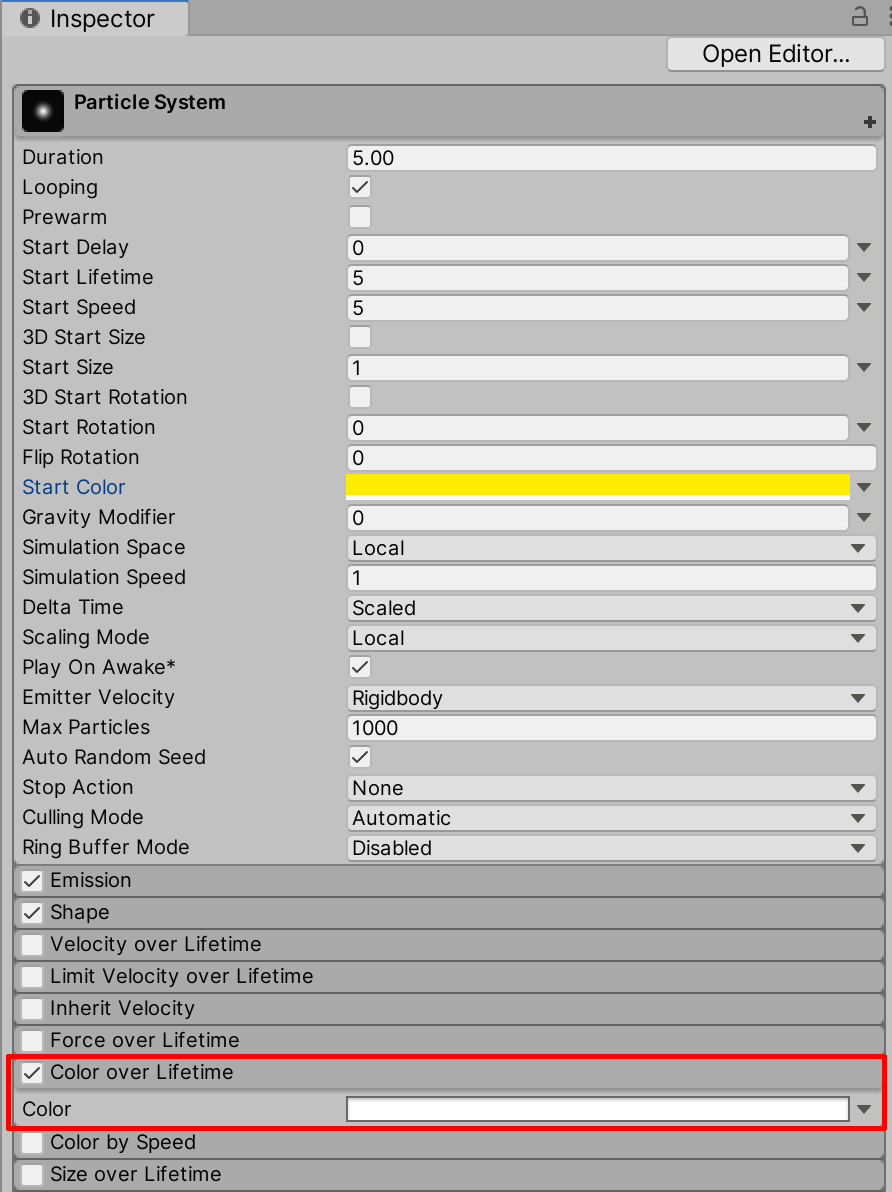
3.我们还可以将颜色设置为随着粒子生命周期而不断变化。为实现这一目标,首先请勾选“Color over Lifetime”复选框,然后选择“Color over Lifetime”字段并展开选择。最后,选择白色字段以打开“Gradient Editor”窗口。
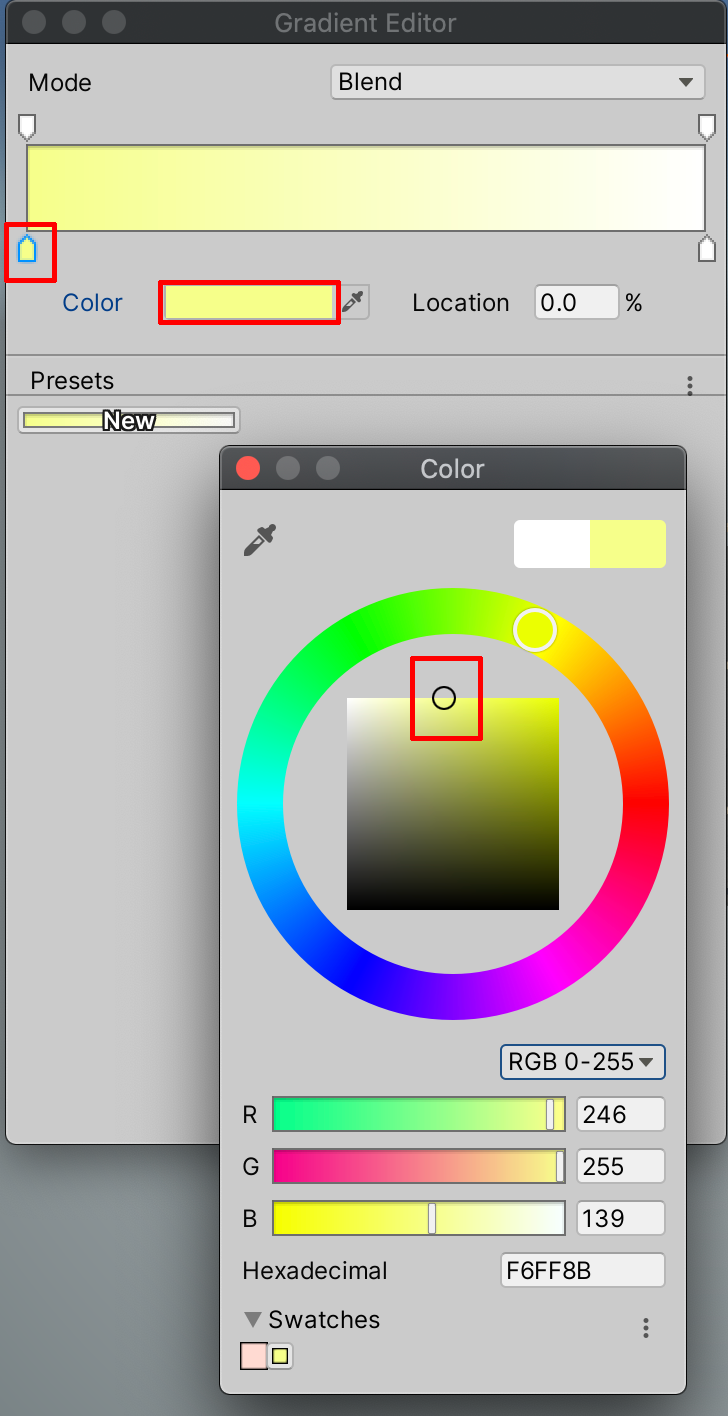
4.在“Gradient Editor”窗口中,选择左下方的颜色标记光标,选择第一个渐变颜色。接下来,请在“Color”字段中选择颜色,最后使用色轮选择颜色。
5.接下来,选中右下方的颜色标记光标,选择第二种渐变颜色,然后再从色轮中选择颜色。
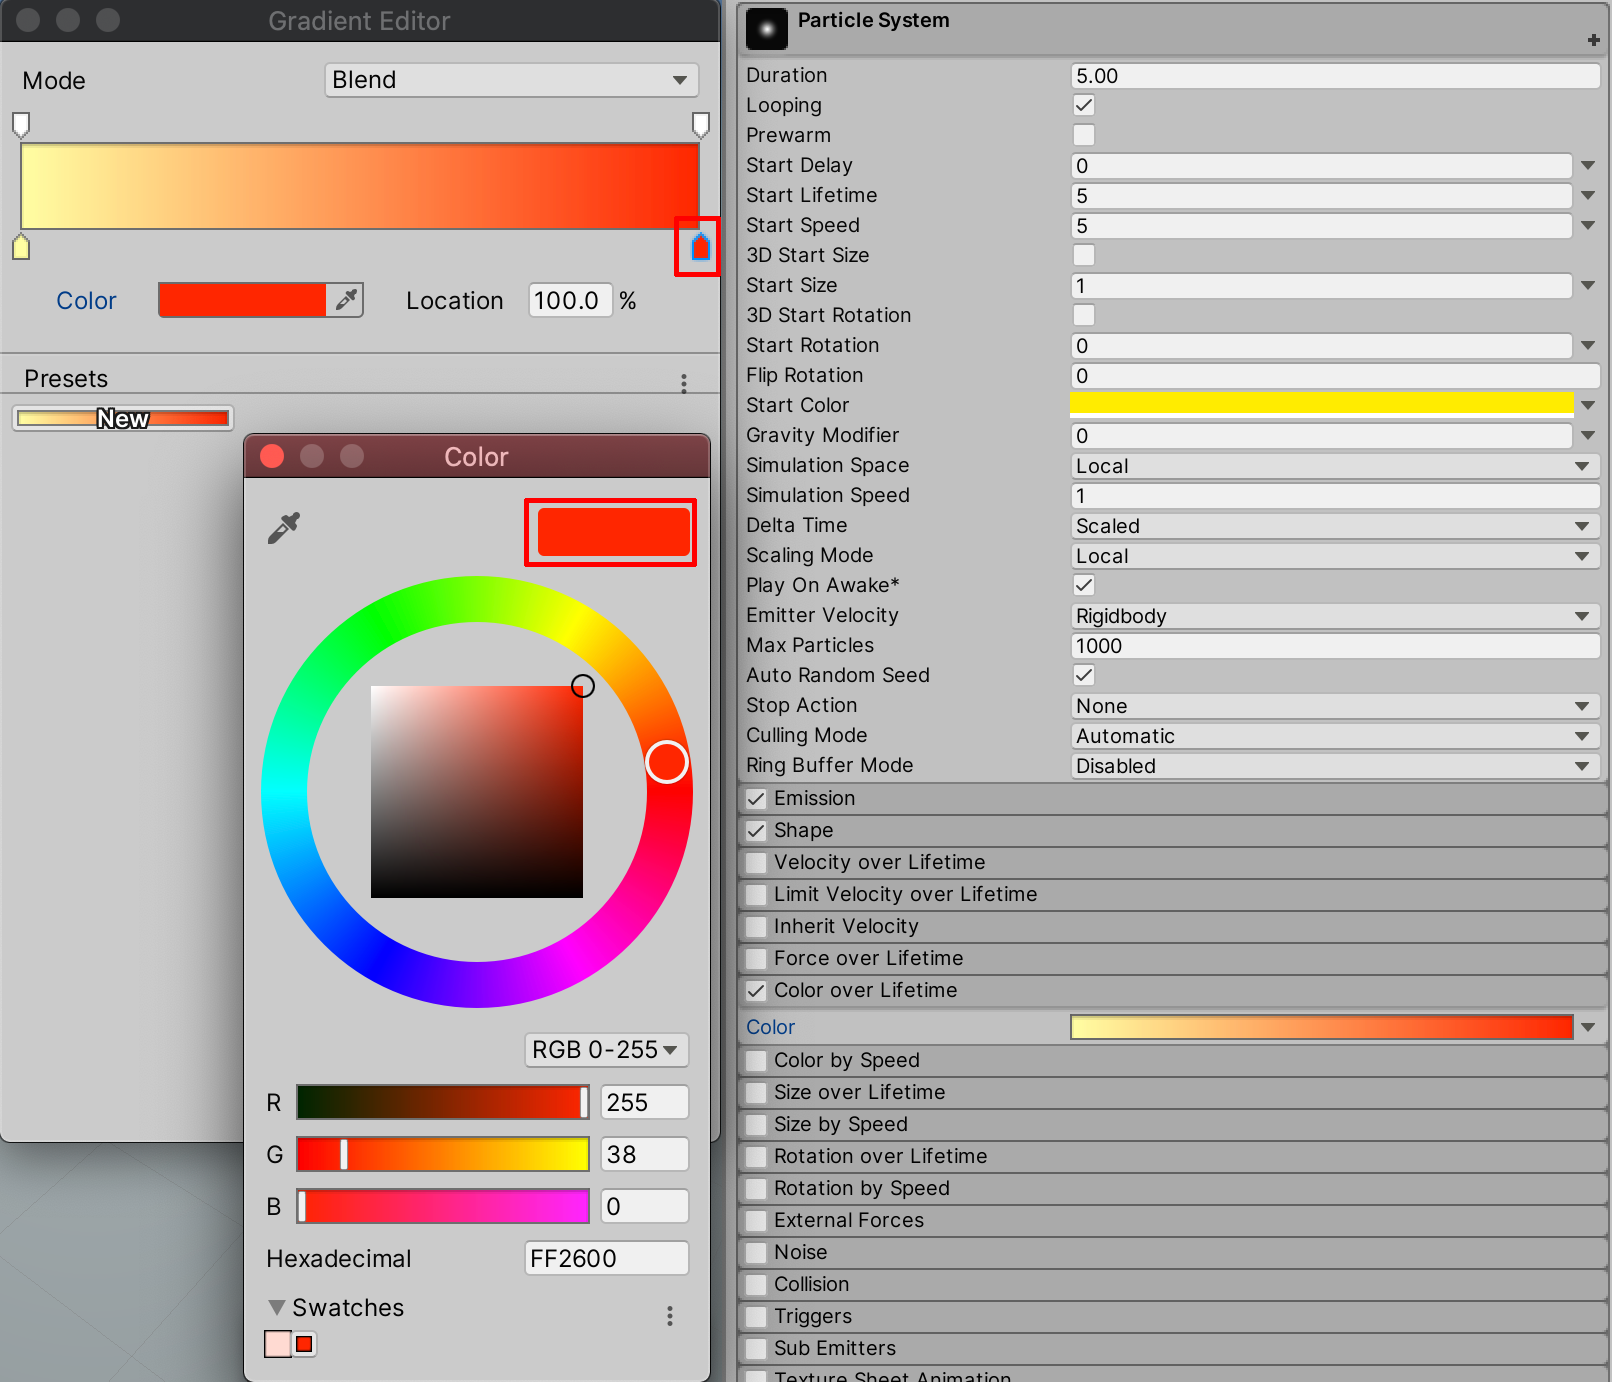
粒子在生命周期刚开始时显示第一个选择的黄色,然后渐渐过渡到从“Gradient Editor”中选择的第二种红色。但根据您的“Scene”视图,颜色变化可能不太明显。这可能是由于场景中的某些功能妨碍我们察觉细微的变化。现在我们可通过“Lighting”窗口中的某个默认设置,调整gizmo编辑器,从而控制粒子轮廓来解决此问题。
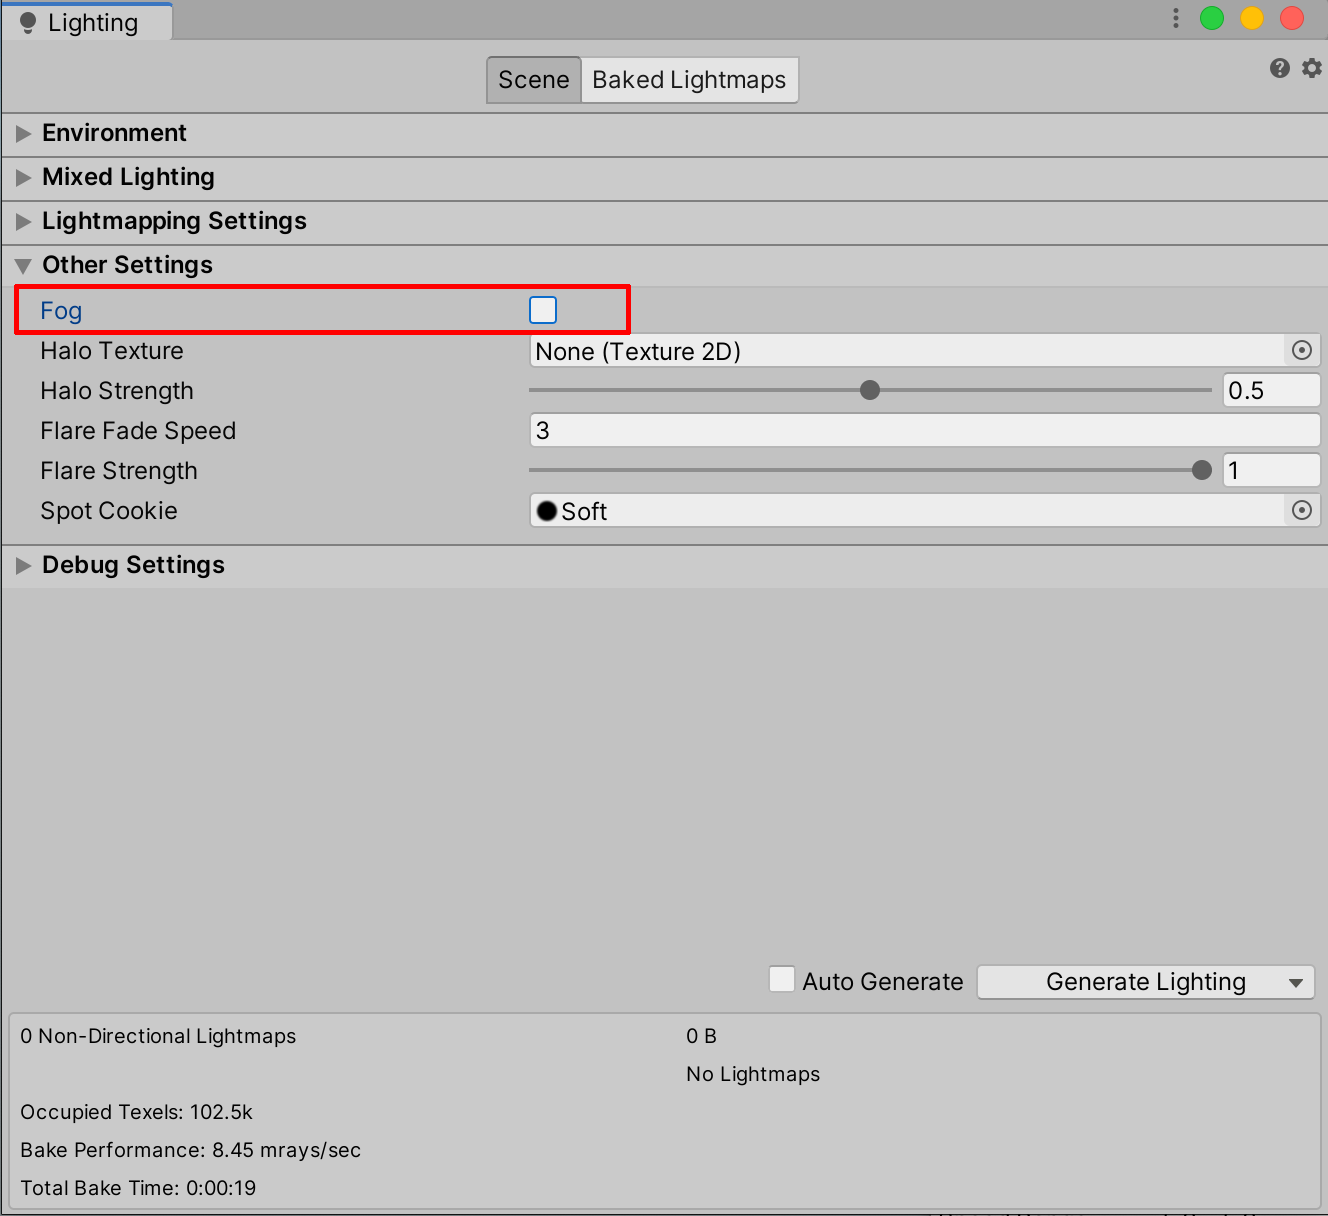
6.如果您在Unity的Universal Render Pipeline (URP)中处理新项目,系统已默认启用“Fog”。首先打开“Lighting Settings”窗口,关闭“Fog”设置。从顶部下拉菜单中选择:
“Window”>“Rendering”>“Lighting Settings”,然后取消选中“Fog”旁边的复选框。
7.接下来,为了能够更清楚地看到我们的粒子,我们可能希望关闭选择轮廓gizmo。在“Scene”窗口顶部,选择Gizmos按钮以打开下拉菜单,然后取消选中“Selection Outline”旁边的复选框,关闭各个粒子的橙色轮廓。
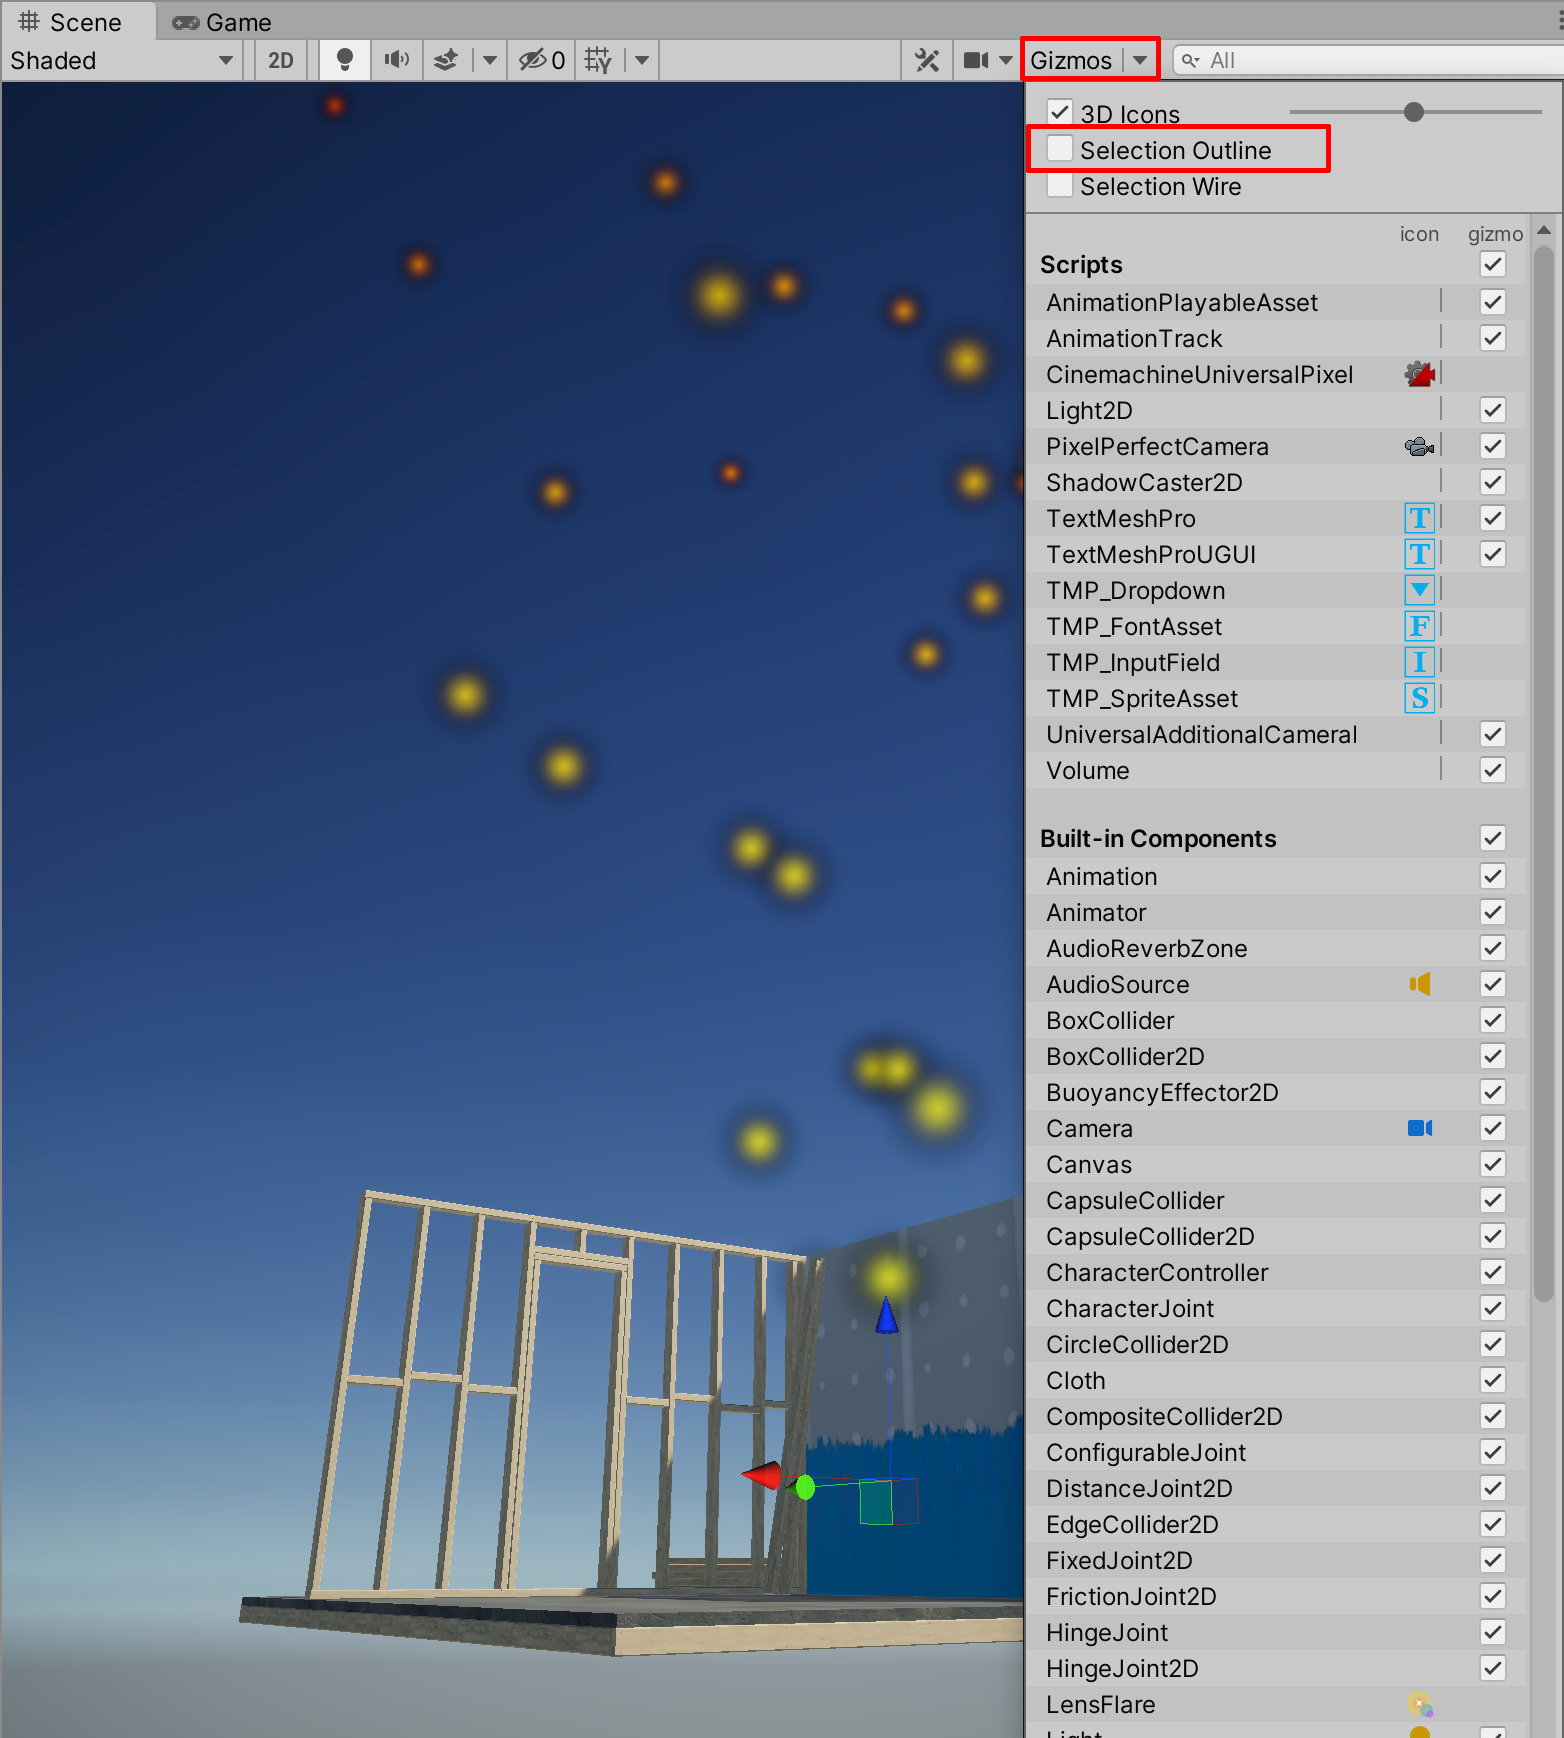
现在查看粒子系统时,您就能更轻松地看到粒子随着时间的变化,尤其是“Color over Lifetime”渐变效果。
8. 优化火花效果
现在进一步调整粒子系统以优化火花效果。我们将对速率、大小和速度进行其他调整,大致模拟真实火花效果。
1.在“Inspector”中将“Start Speed”值降低为1。
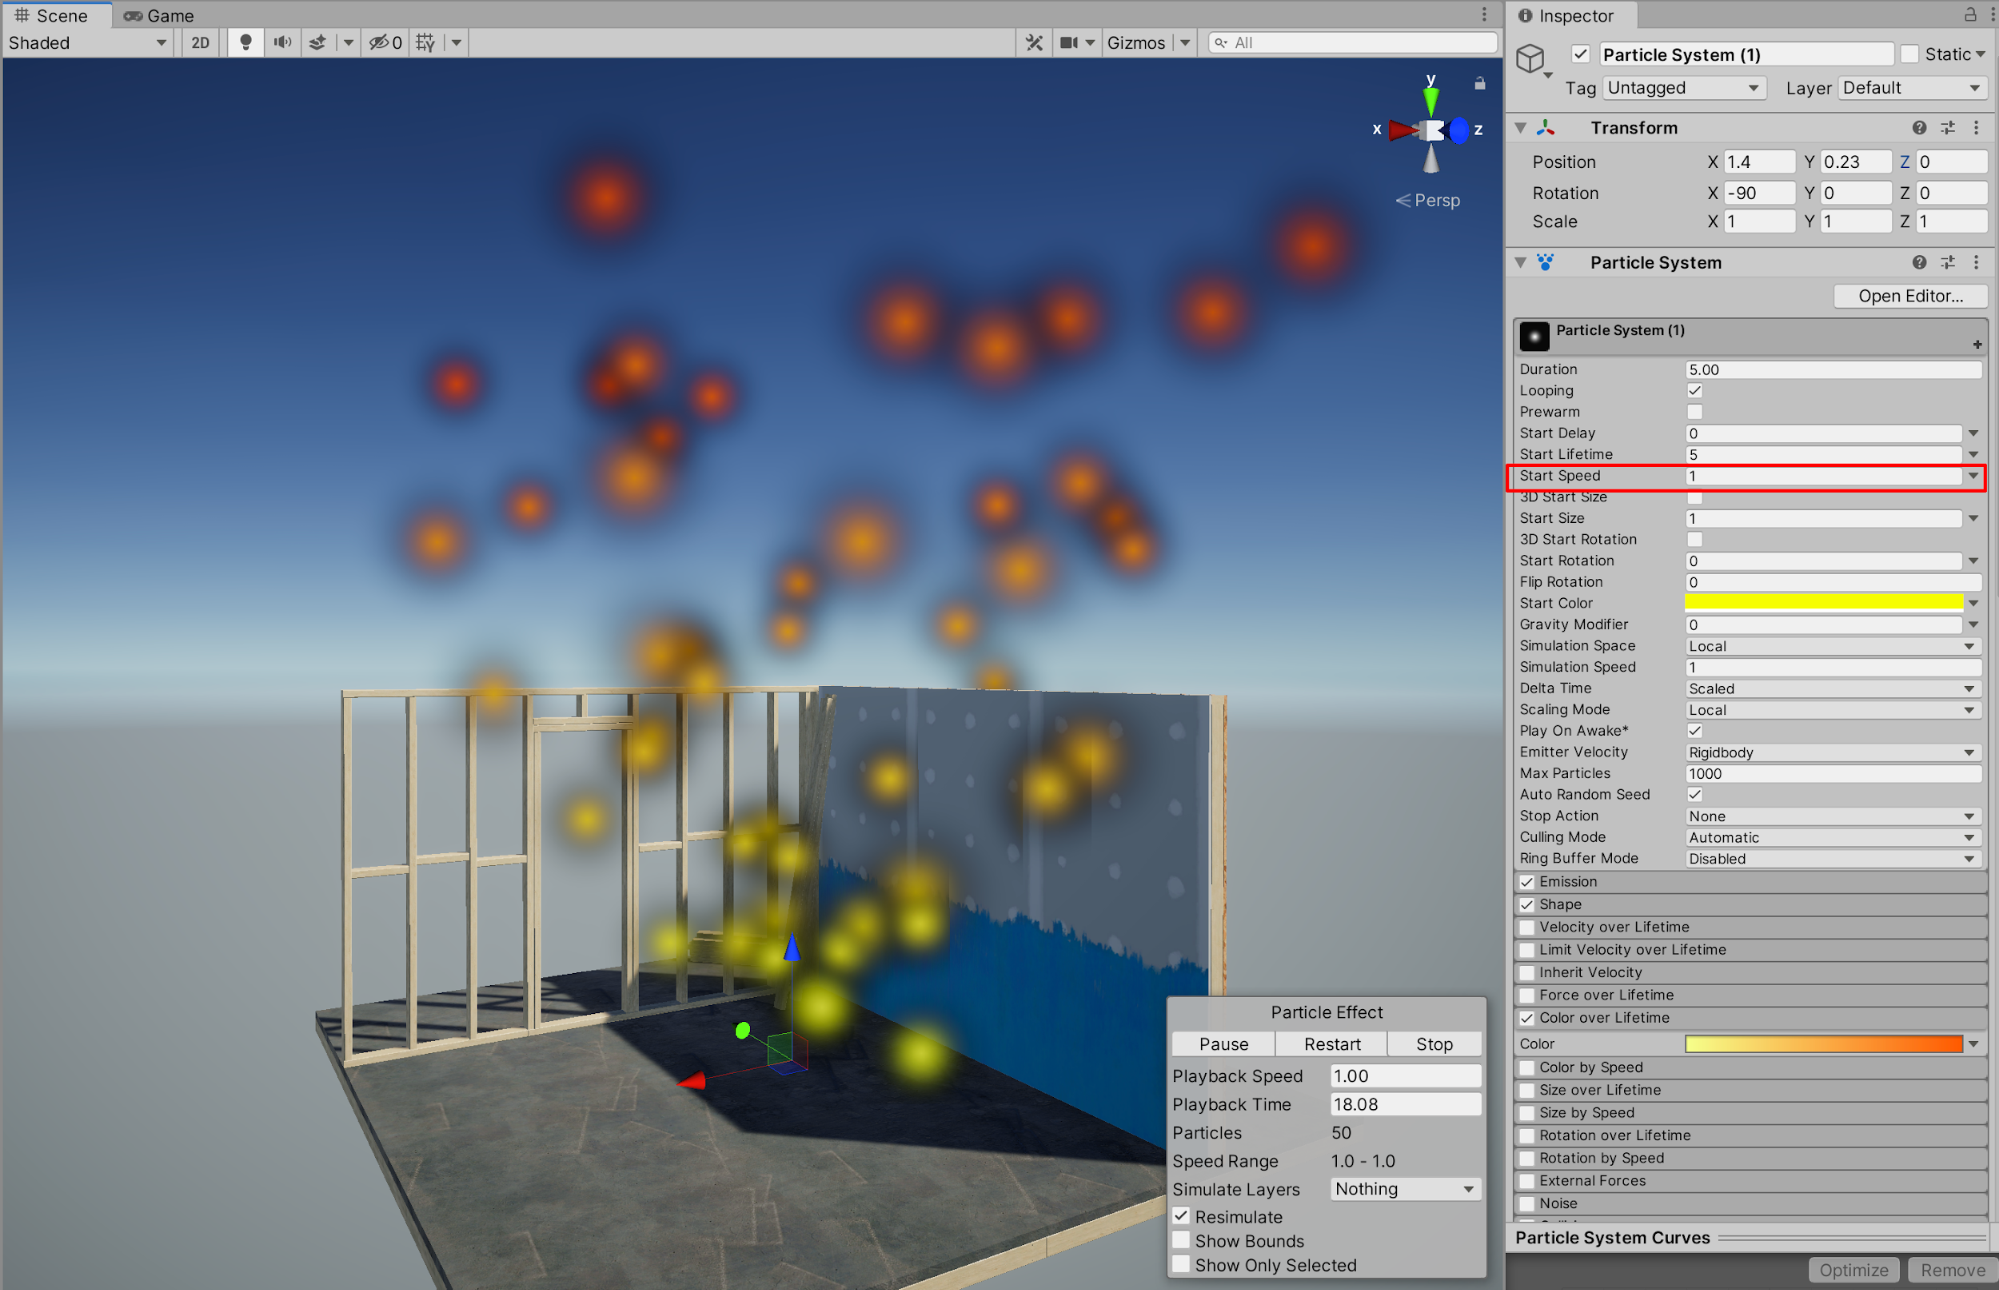
2.选择以展开“Velocity over Lifetime”属性,然后为“Linear X”属性输入值1。接下来,为NOrbital X、Y和Z属性输入值1,营造一种火花快速旋转的效果。
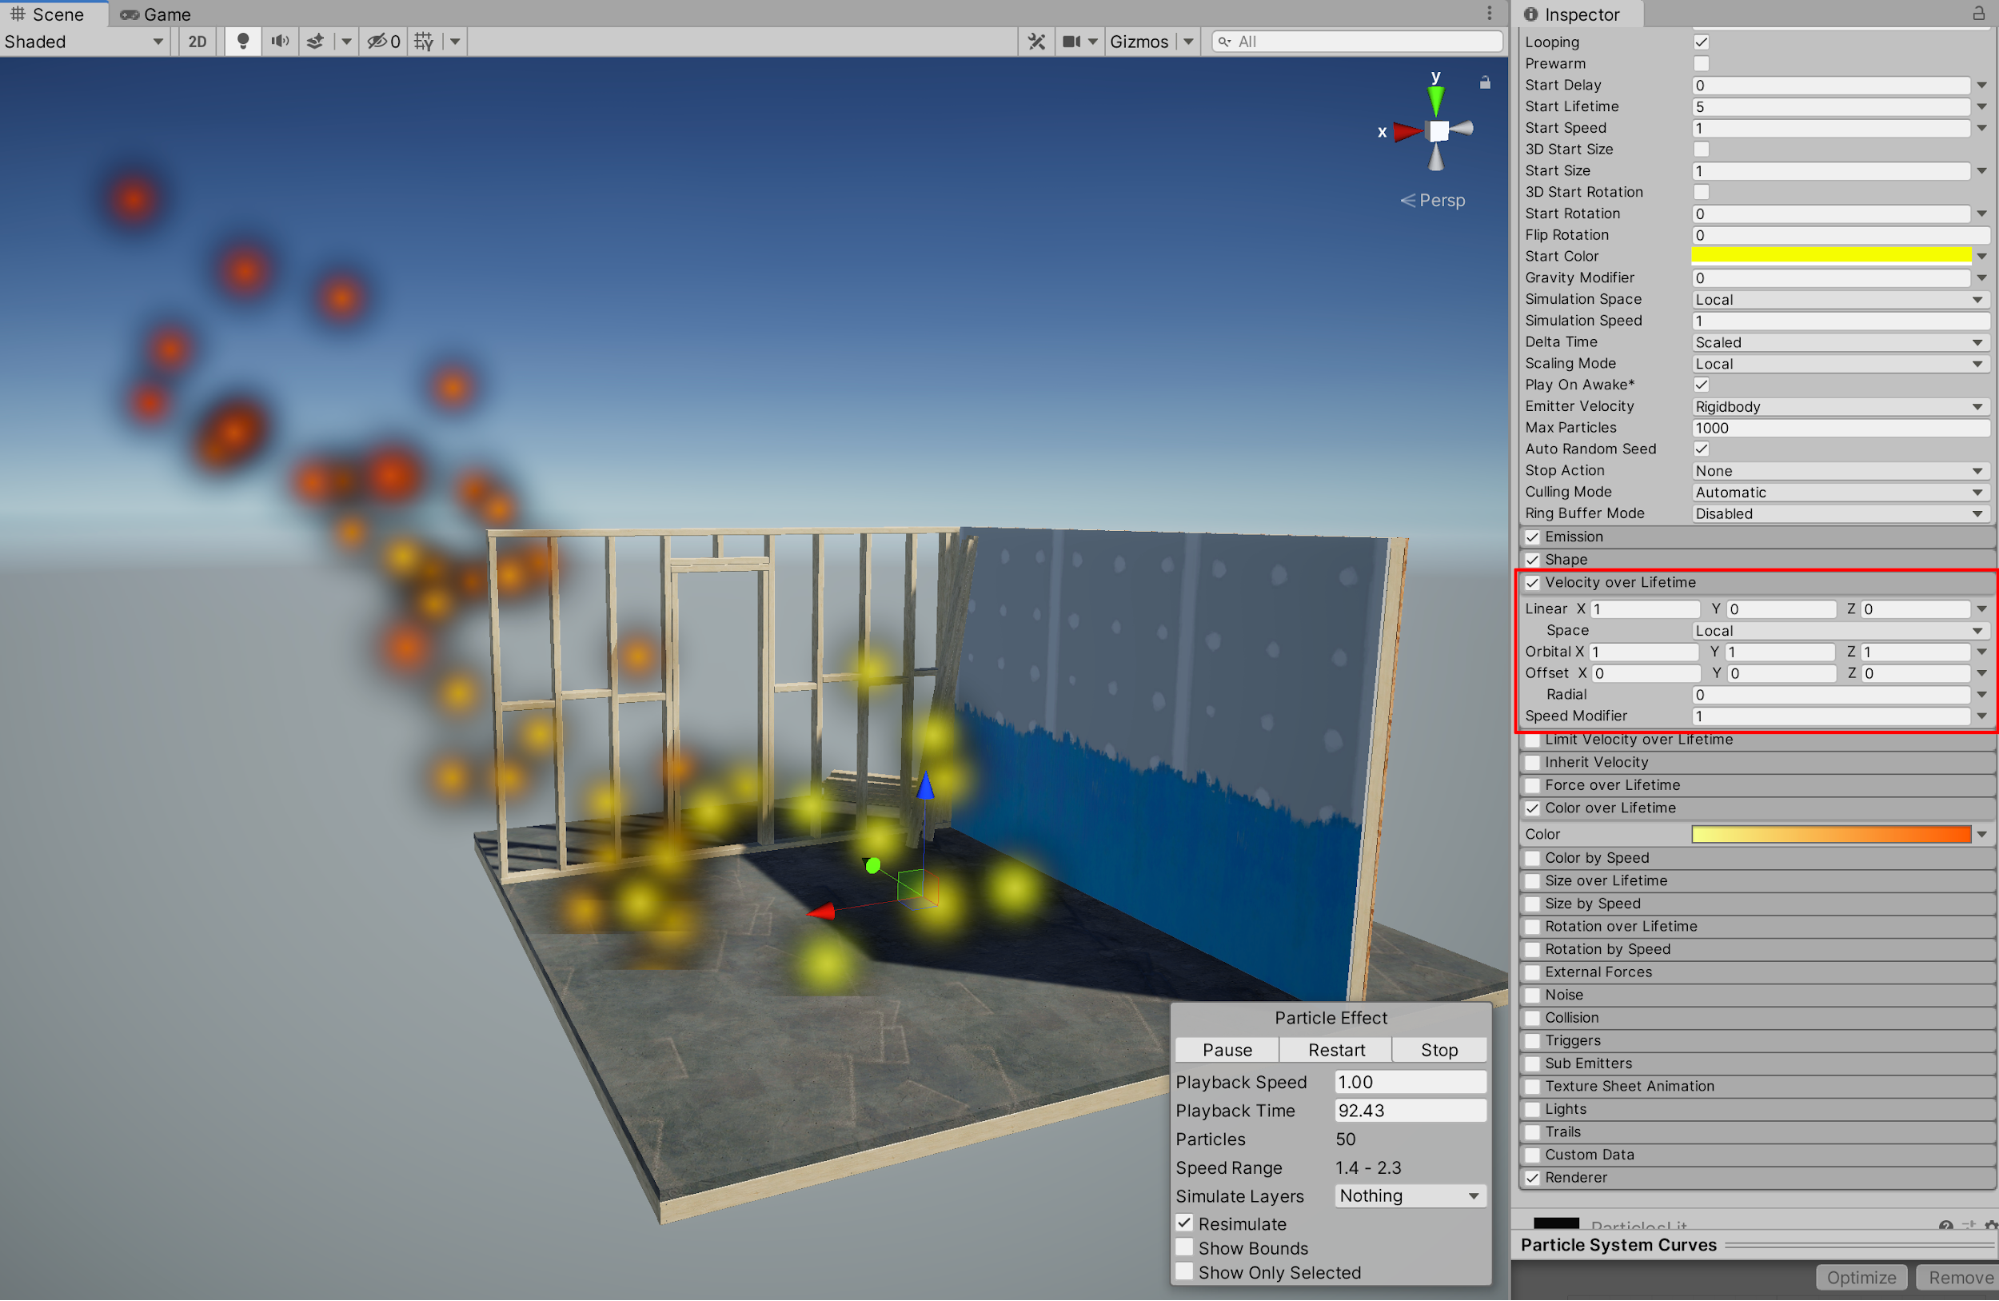
3.可以为渐变效果添加 2 种以上的颜色。为了向渐变效果添加第 3 种颜色,请选择“Color over Lifetime”字段,只需在“Gradient Editor”窗口中单击渐变颜色条下方即可。此时将出现第三个颜色标记光标。
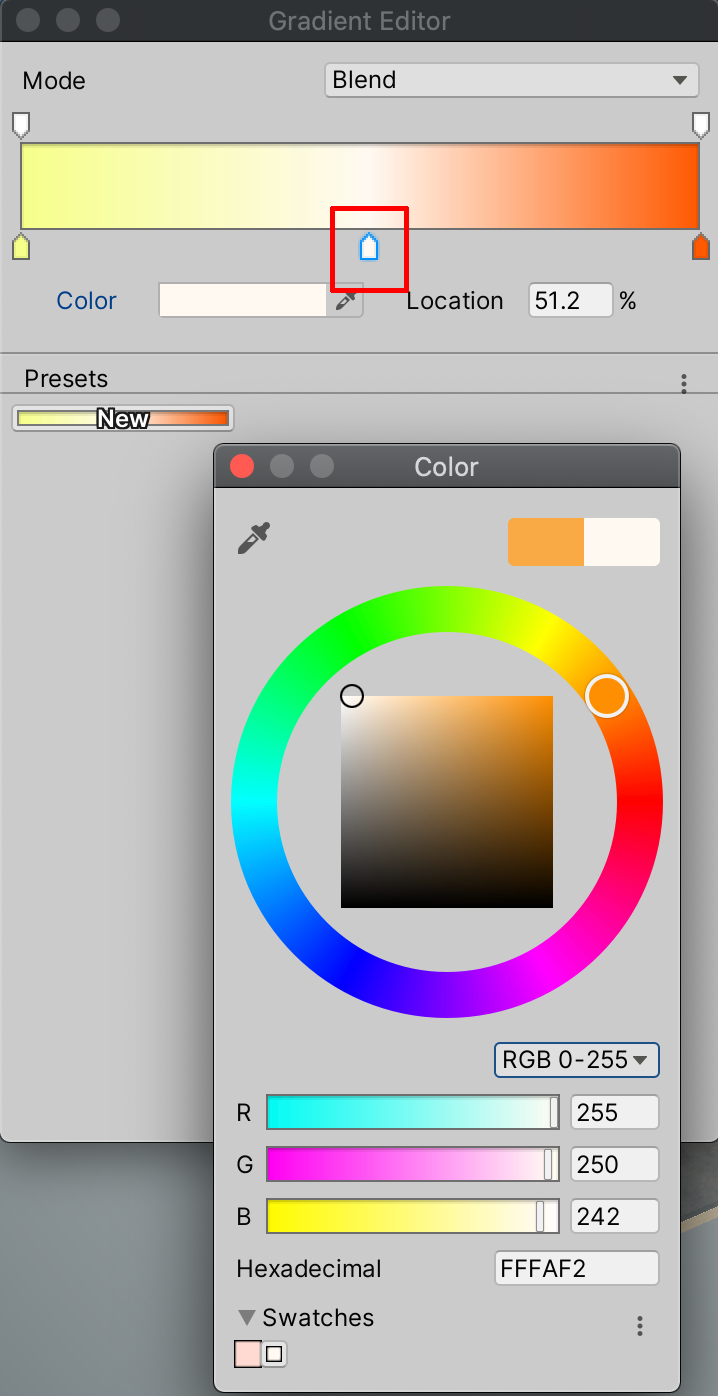
4.为了更改粒子大小,请在“Inspector”中选中“Size over Lifetime”复选框。
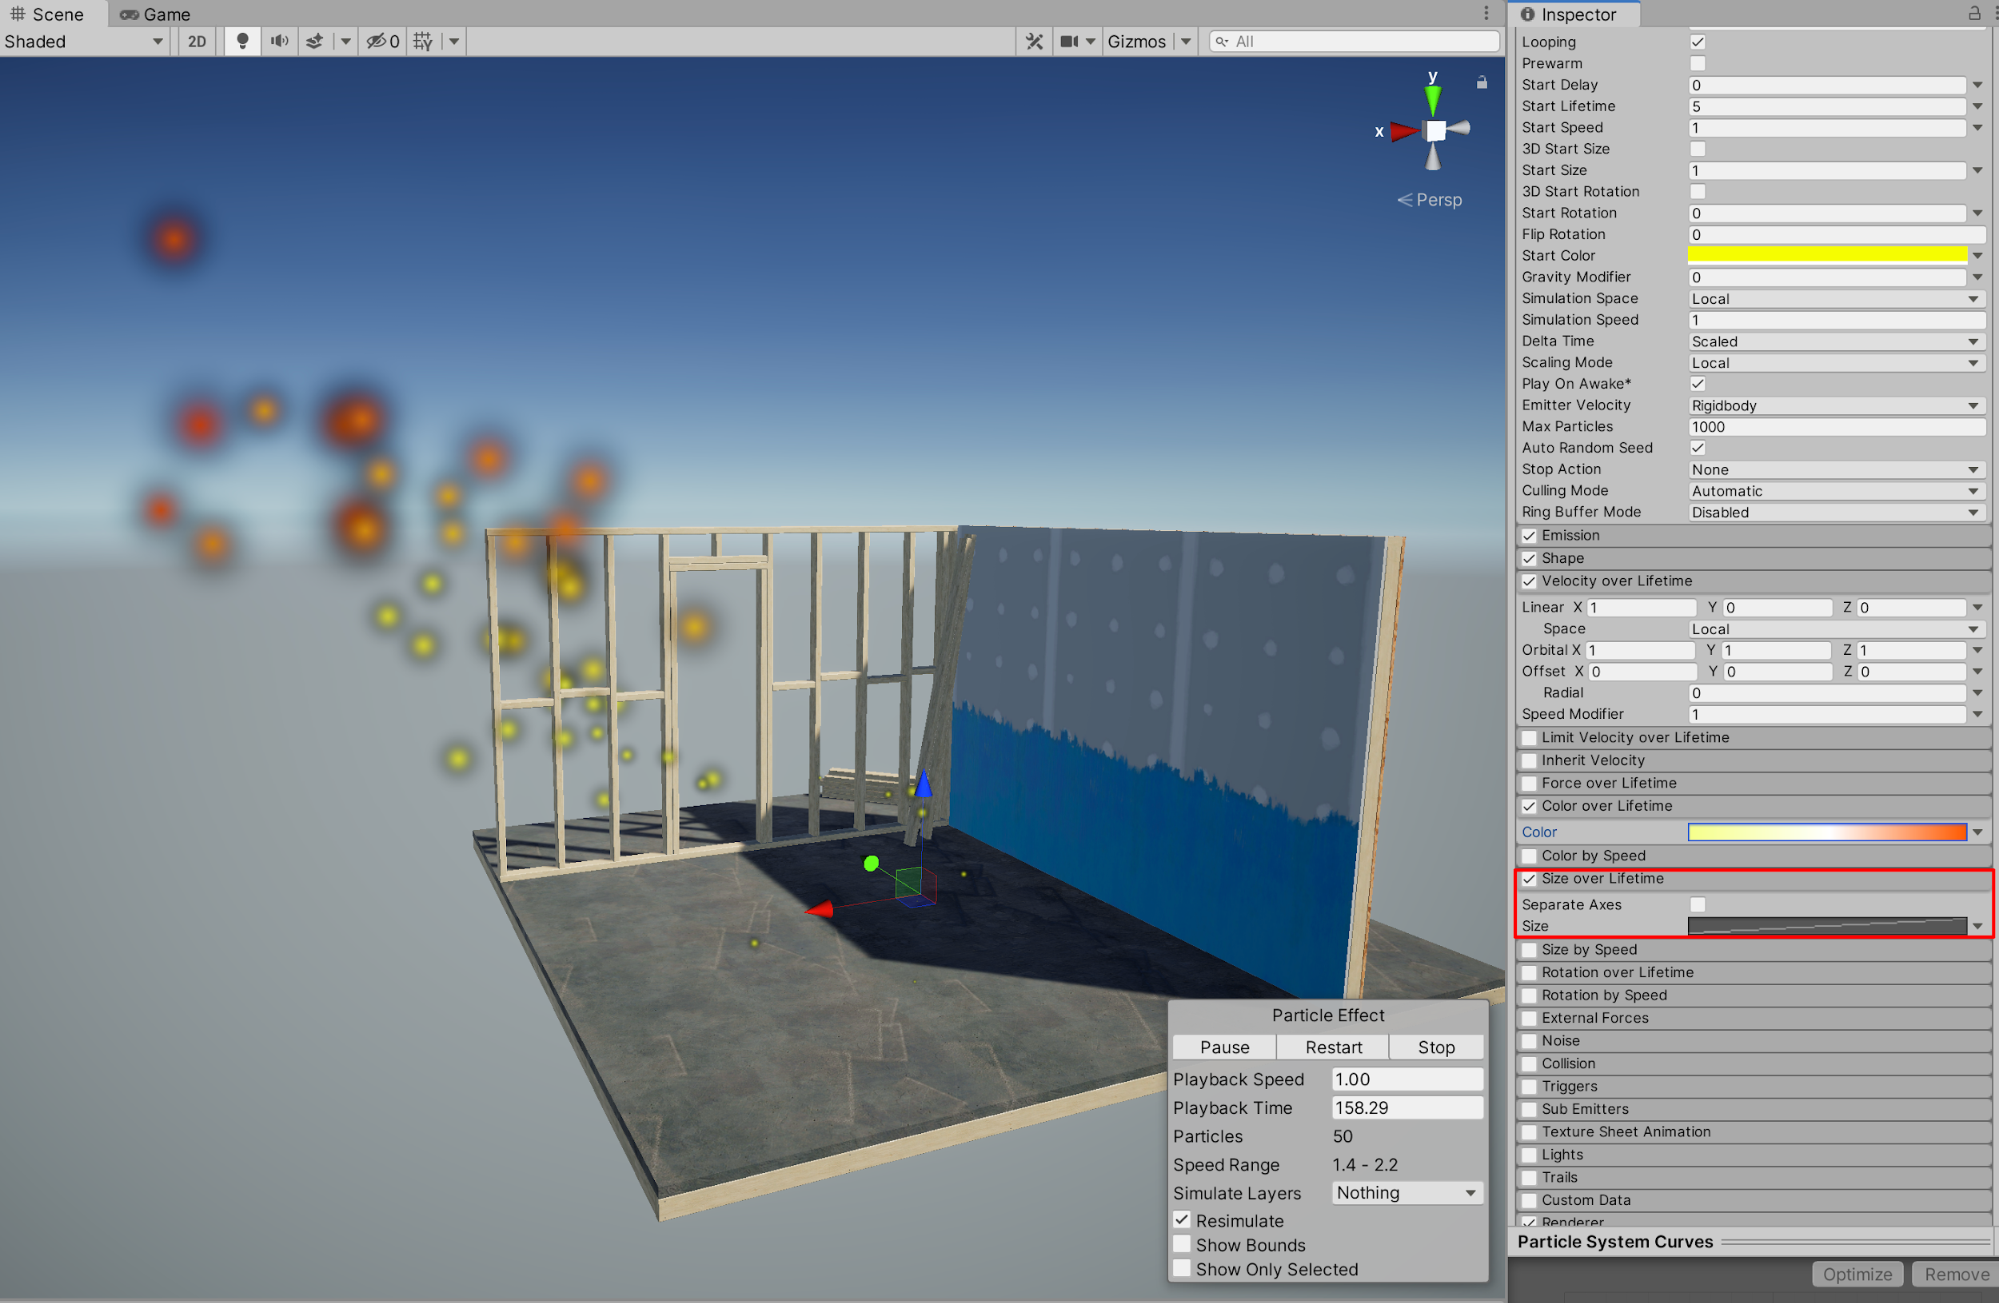
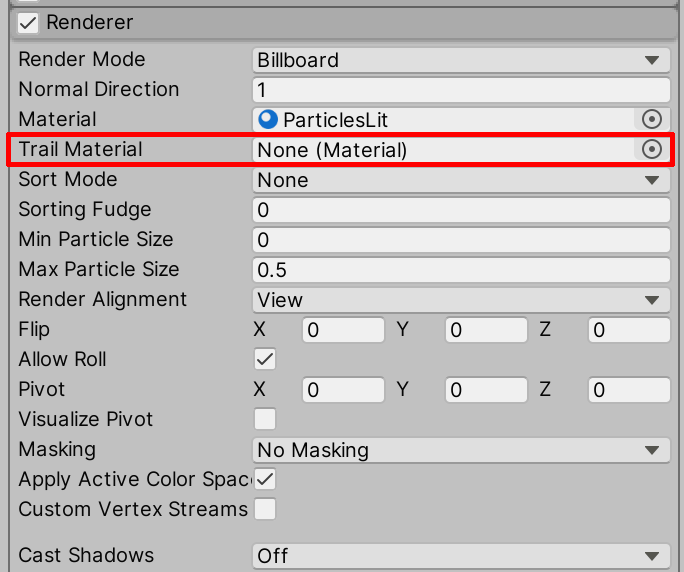
接下来我们将对火花添加轨迹效果。尽管已经为粒子设置了默认材质,但目前并没有附加材质可供渲染轨迹。我们可在启用效果前建立轨迹材质。
5.在“Inspector”中选择展开“Renderer”属性,然后选中“Trail Material”属性旁边的对象加载器圆圈按钮。
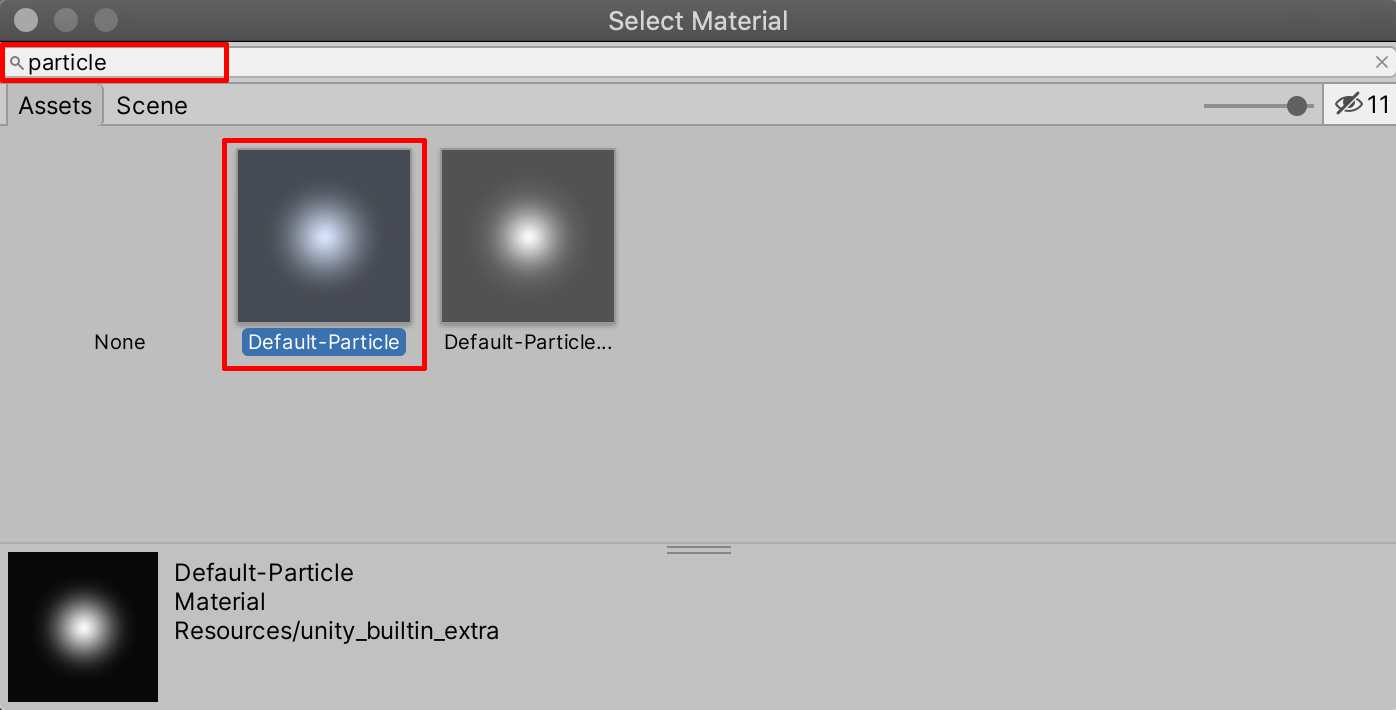
6.在“Select Material”弹出窗口中输入“particle”,搜索并选择“Default-Particle”。
7.接下来,在“Inspector”中选择启用“Trails”复选框。
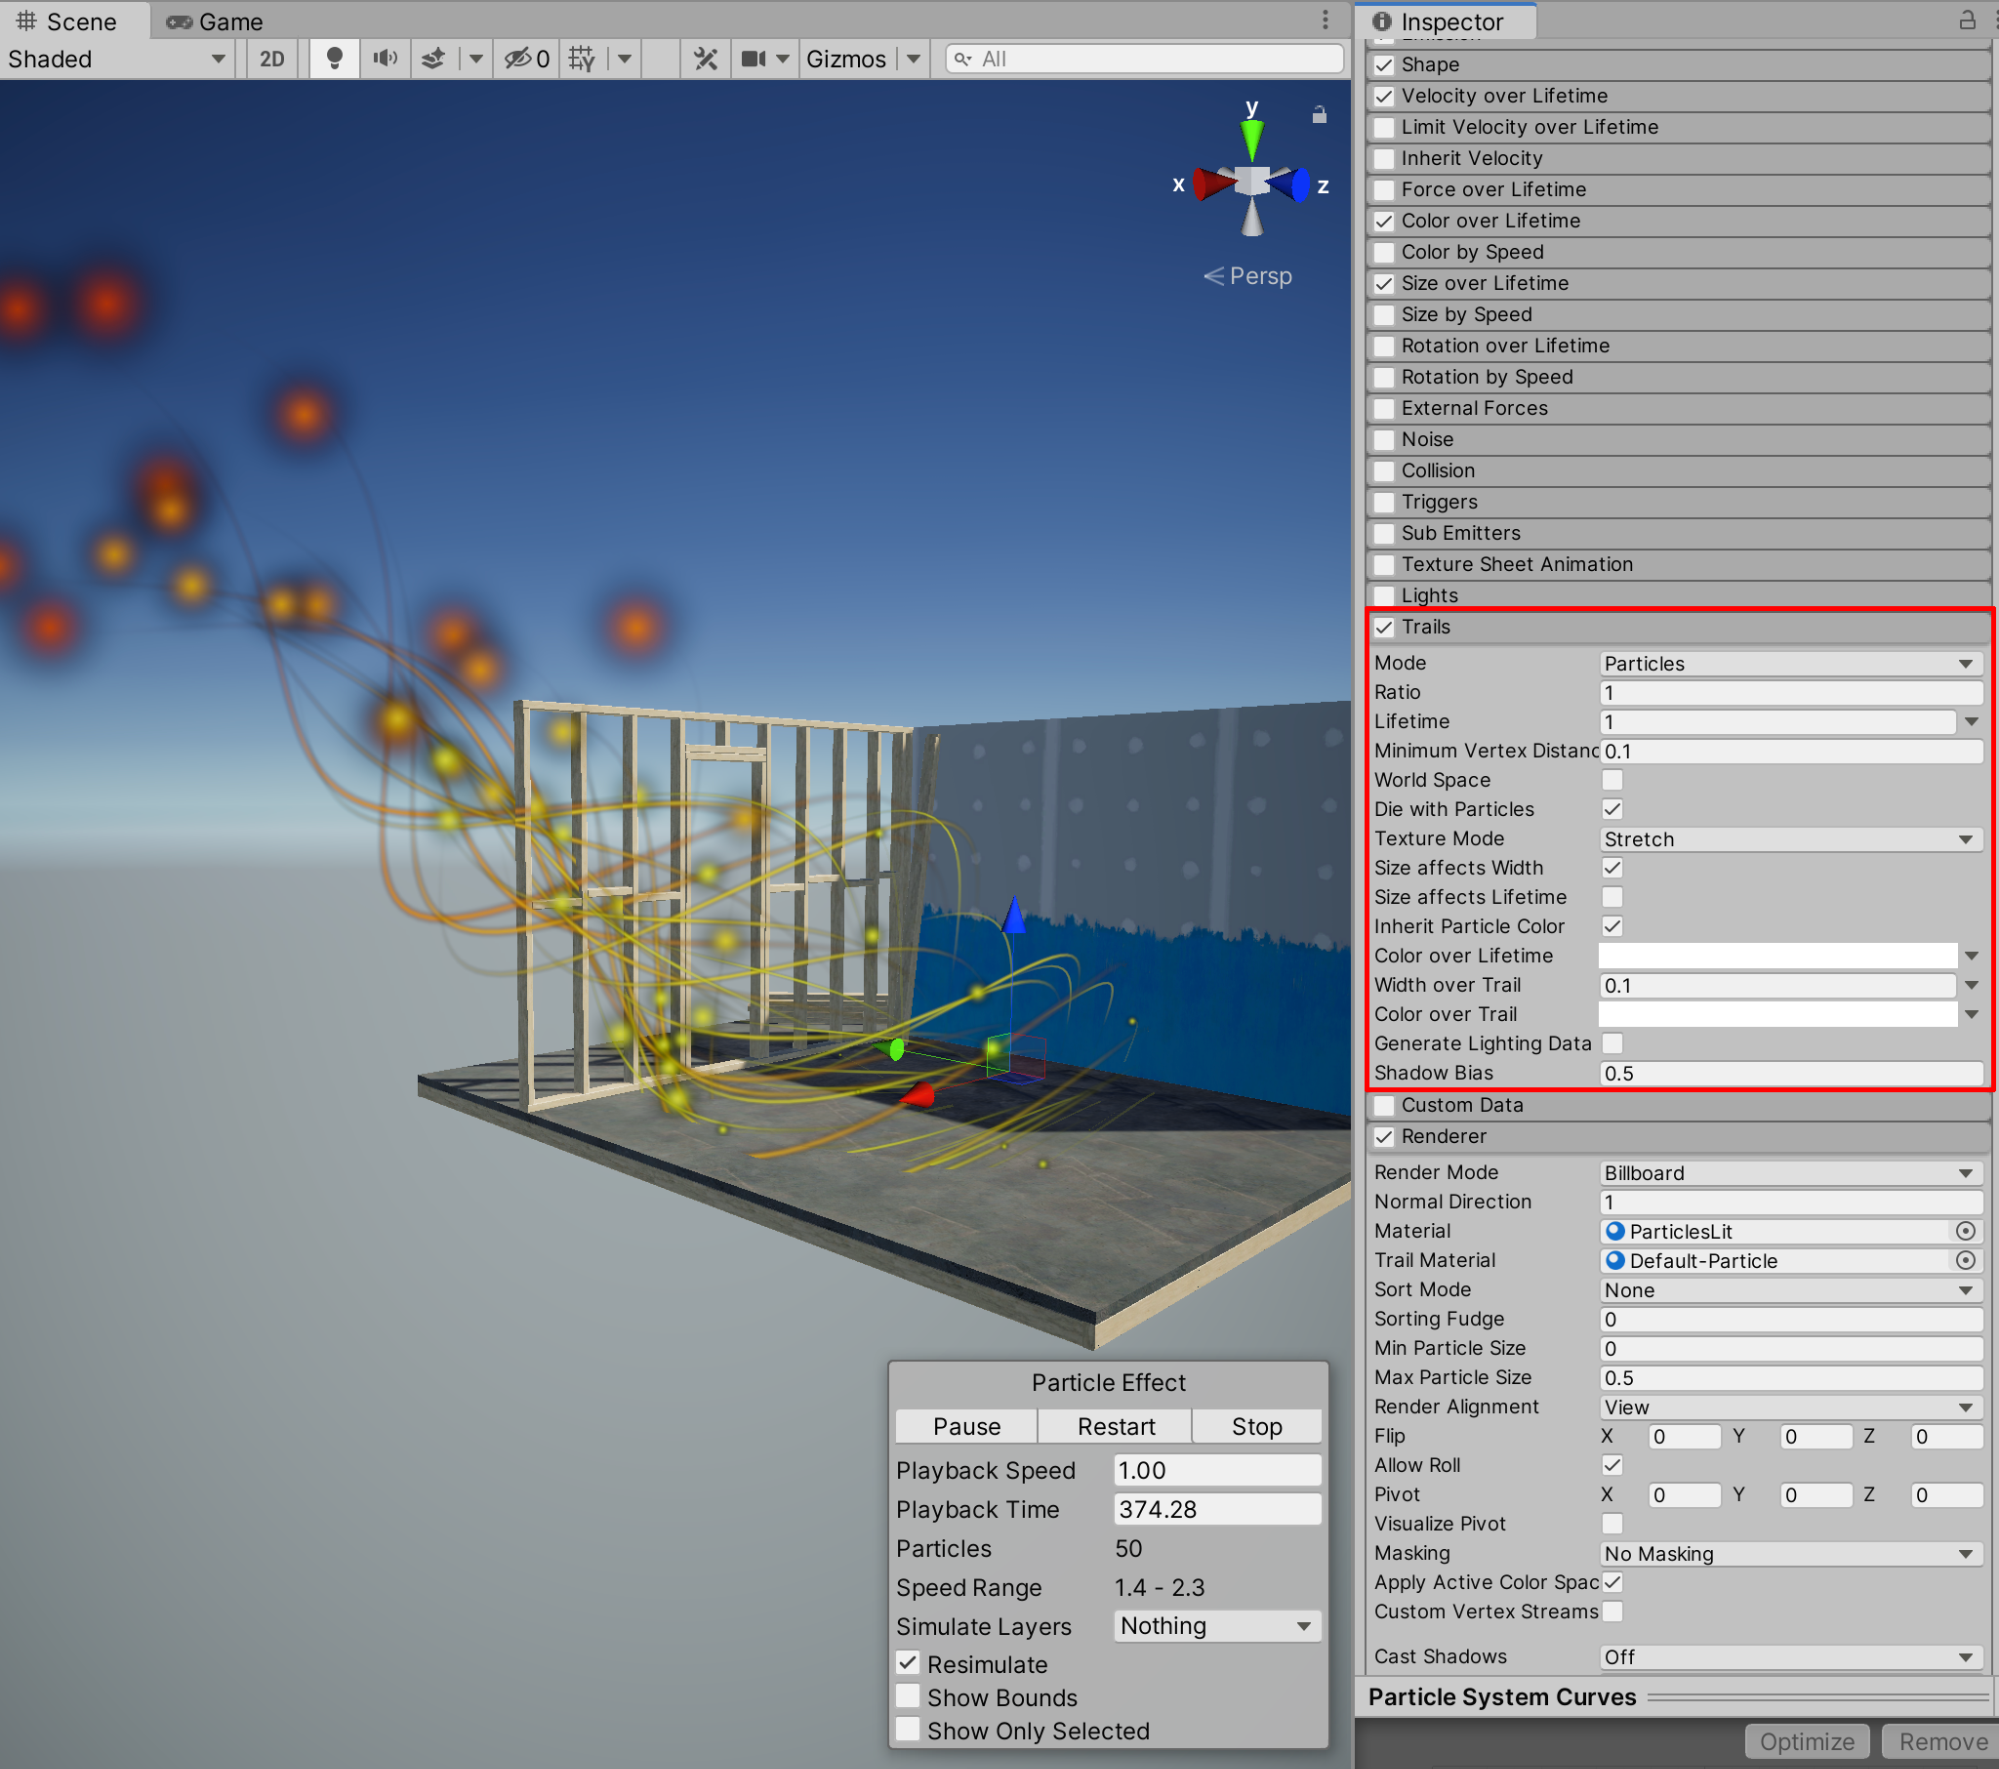
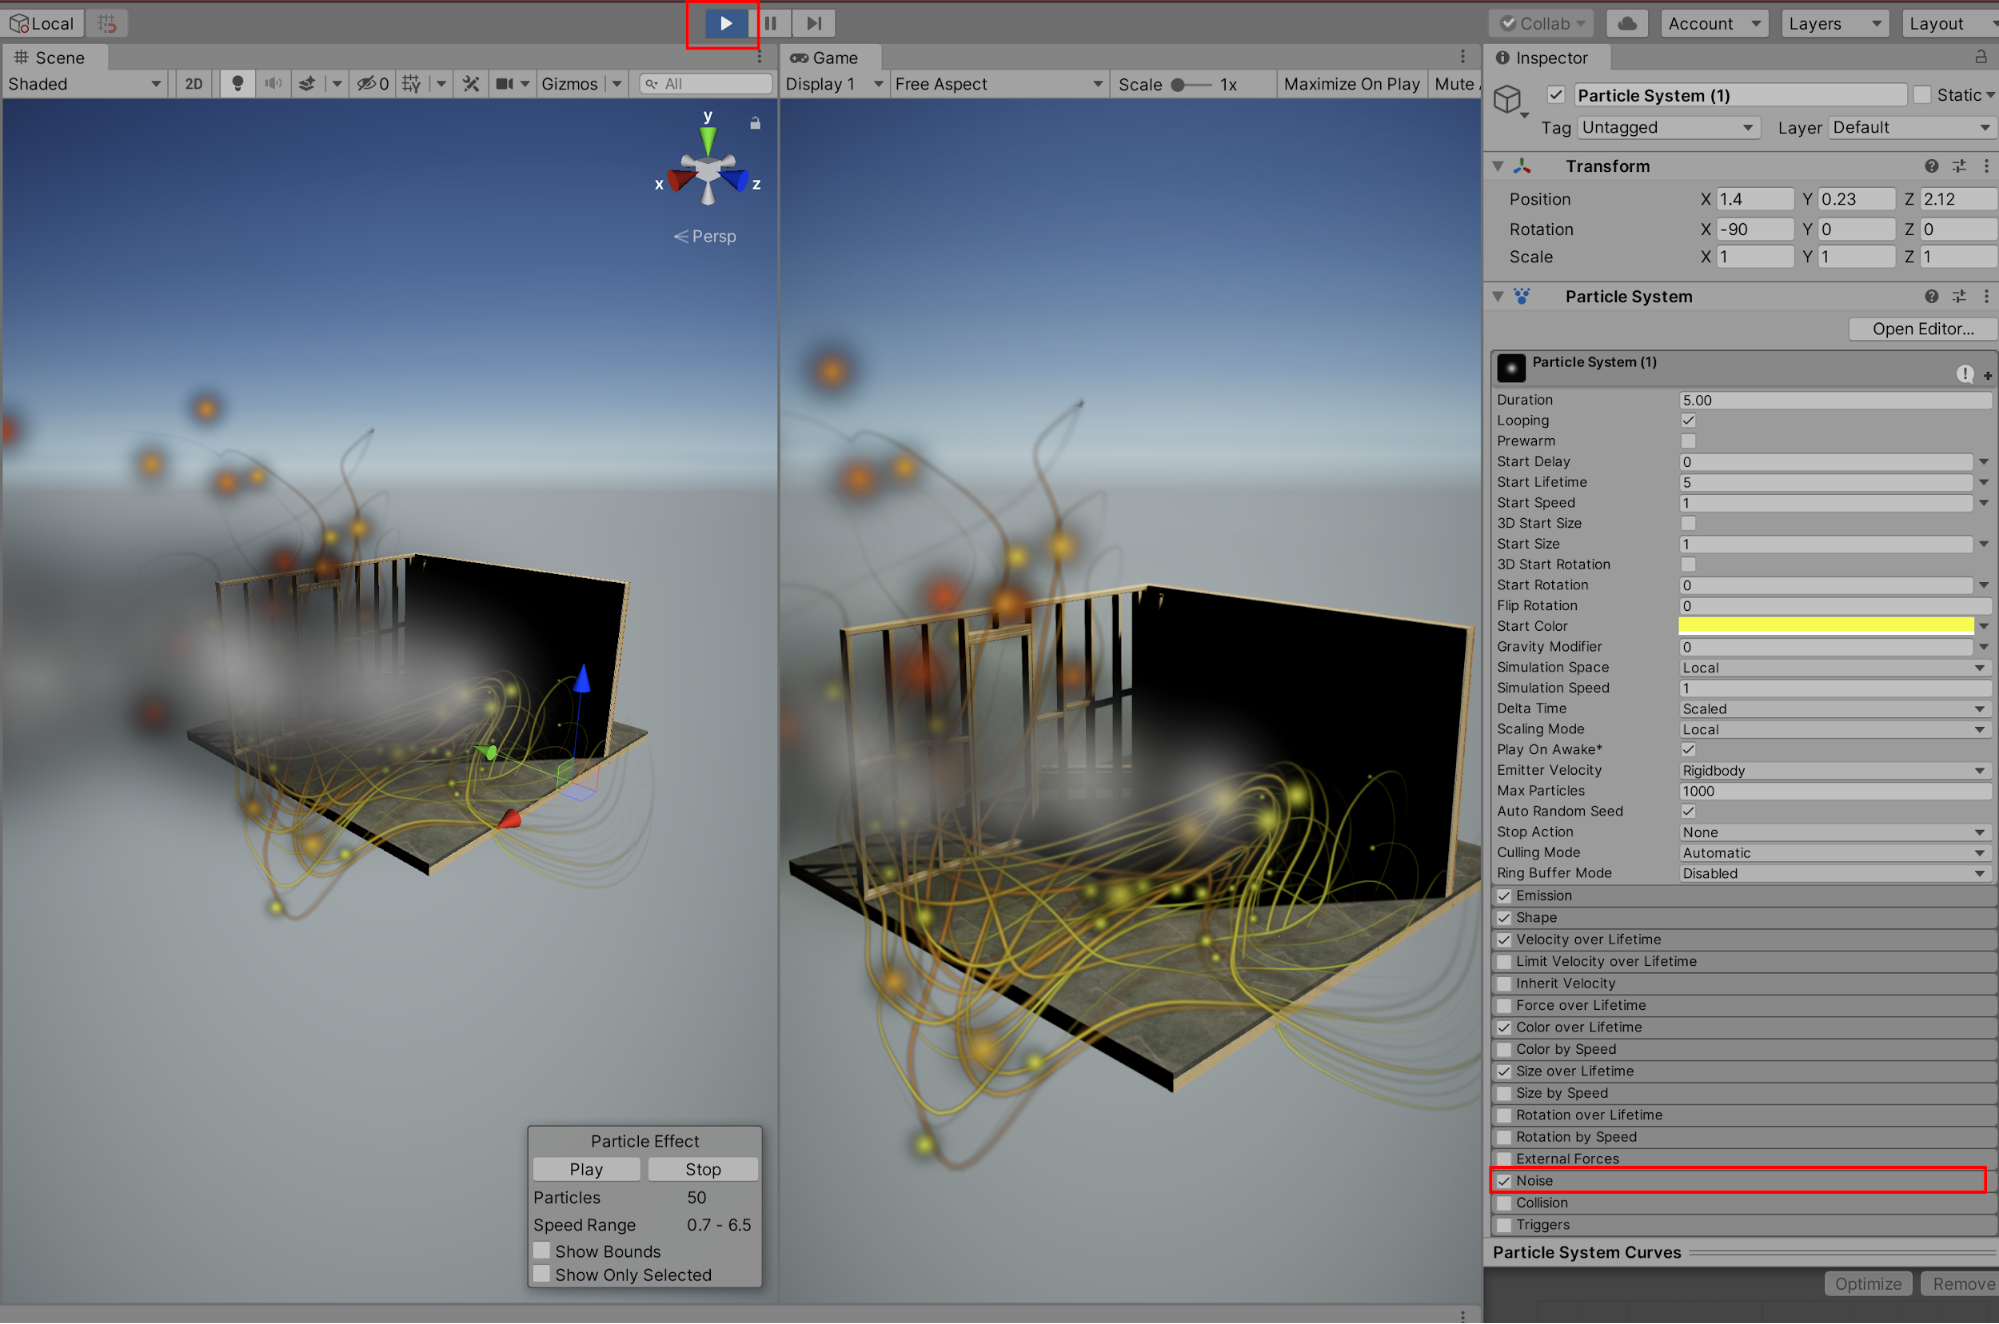
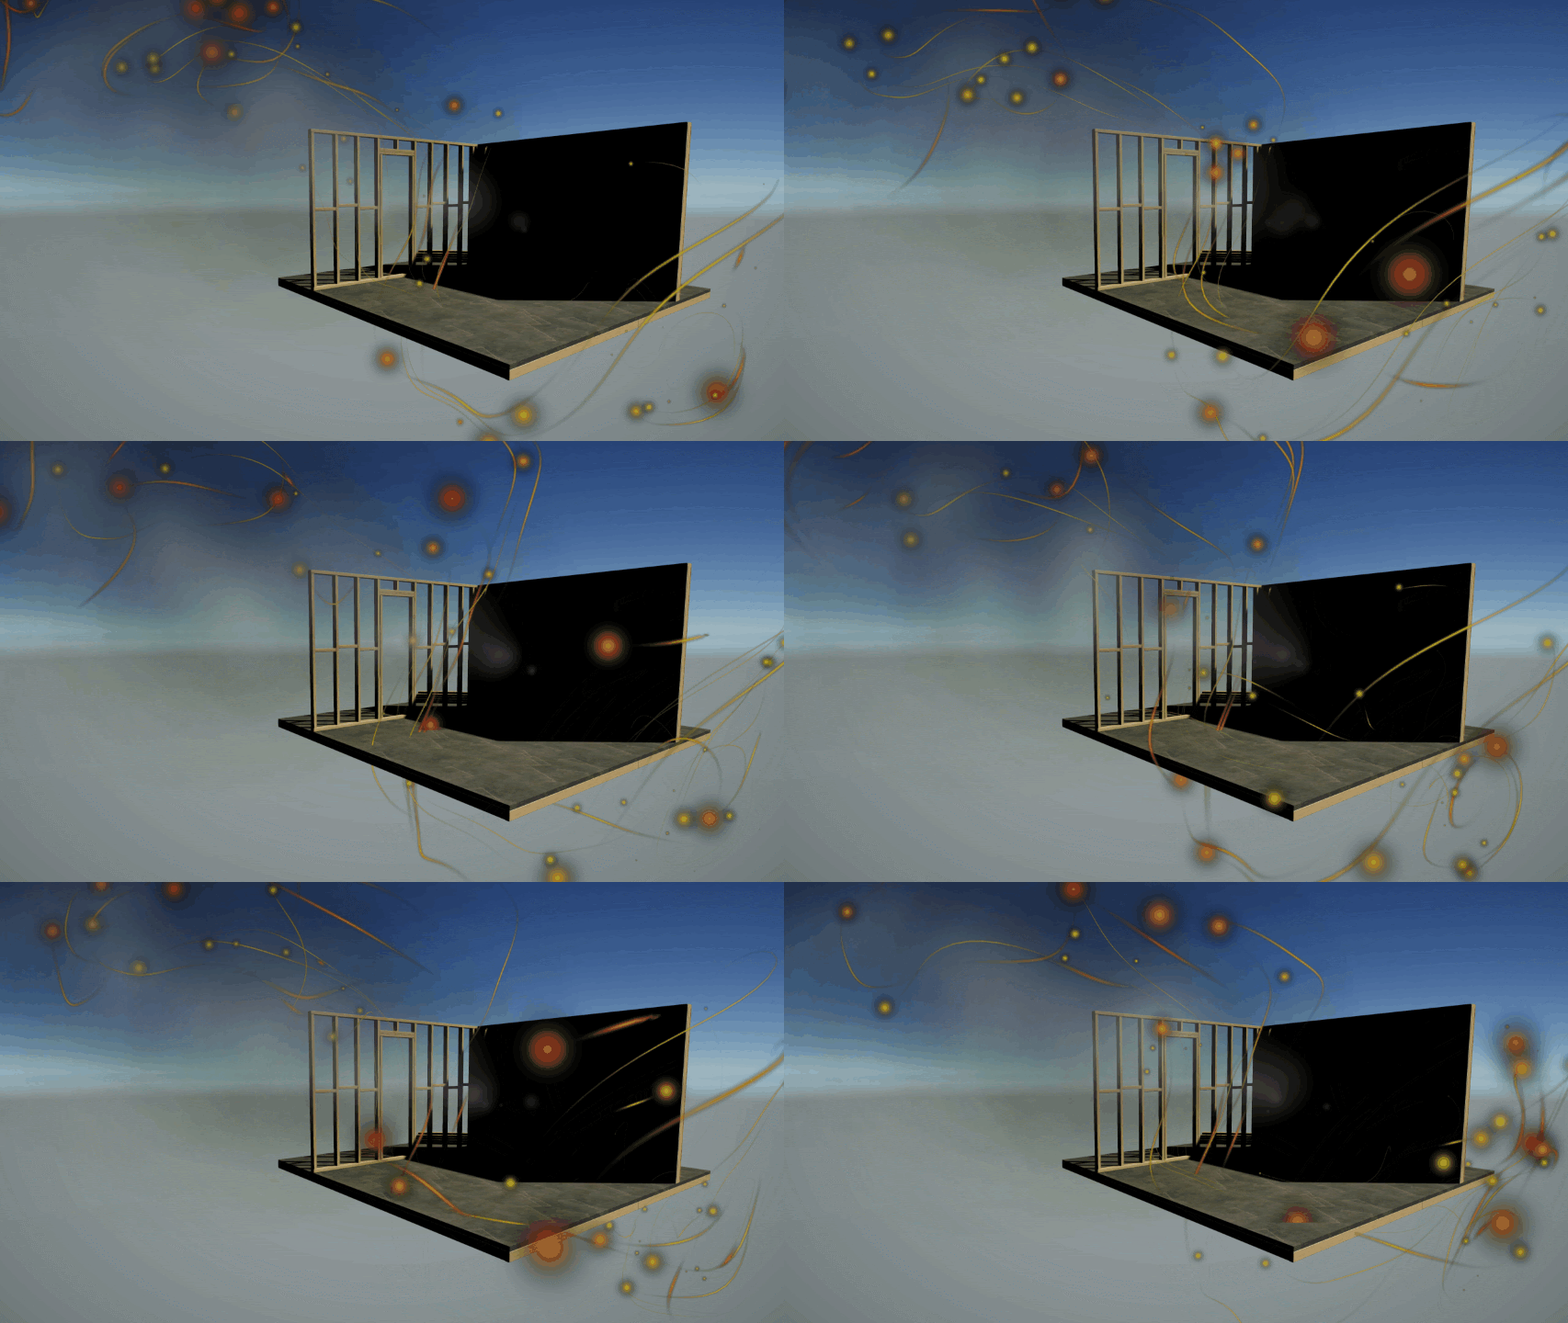
8.在Inspector中继续使用各种属性和其他粒子系统设置进行试验和尝试。在Inspector中选择启用“Noise”,为粒子增加更多湍流效果。最后,选择“Play”进入Play模式,重新启用烟雾效果,在“Game”窗口中预览场景与粒子特效的组合效果。
9. 后续步骤
Unity粒子系统提供了大量视觉特效。通过实践练习,您可以创建并配置惊艳的动态效果,从而再现许多独特有趣、多样化的行为。