
Get started with Unity's job system
Tutorial
intermediate
+10XP
30 mins
251
Unity Technologies

This tutorial introduces fundamentals of using jobs to take advantage of multicore CPUs.
By the end of this tutorial, you'll be able to do the following:
- Create, schedule, and complete single-threaded jobs.
- Create, schedule, and complete parallel jobs.
- Schedule jobs that depend upon other jobs.
- Use NativeArrays.
Materials
1. Overview
This tutorial introduces the fundamentals of using jobs to take advantage of multicore CPUs. We’ll go step-by-step through the Jobs tutorial sample from the Entity Component Samples repository on GitHub.
In this sample, you'll start with Seekers (blue cubes) and Targets (red cubes) that each move slowly in random directions on a 2D plane. Your task is to draw a white debug line from each Seeker to its nearest Target in real time.
First you'll see how to solve the problem without jobs. Then, you’ll learn how to solve this problem with jobs, and we'll look at profiles to see the performance improvements.
For a walkthrough of a slightly different version of this tutorial, watch the video below.
2. Before you begin
This tutorial assumes that you have a basic understanding of C# and GameObjects, and that you have completed the previous tutorials in this course to get familiar with DOTS and entities.
Set up your Unity project
To set up a Unity project for this tutorial, follow these instructions:
1. Create a new Unity project using the 3D (URP) Template.
2. Install the Collections package via the Package Manager.
Adding the Collections package will also automatically add the Burst and Mathematics packages as dependencies.
3. Create Seekers and Targets that wander on a 2D plane
First, for the Seekers and Targets, you’ll need to define MonoBehaviours that simply modify the Transform at a constant rate along a direction vector. To do this, follow these instructions:
1. Create a new script file named "Target.cs" and add the following lines of code:
using UnityEngine;

public class Target : MonoBehaviour
{
    public Vector3 Direction;

    public void Update()
    {
        transform.localPosition += Direction * Time.deltaTime;
    }
}
2. Create another new script file, "Seeker.cs", and add this content:
using UnityEngine;

public class Seeker : MonoBehaviour
{
    public Vector3 Direction;

    public void Update()
    {
        transform.localPosition += Direction * Time.deltaTime;
    }
}
3. Create a prefab named “Target” with a single root GameObject. Make it a red rendered cube and add the Target MonoBehaviour.
4. Create a prefab named “Seeker” with a single root GameObject. Make it a blue rendered cube and add the Seeker MonoBehaviour.
Next, you need a MonoBehaviour that will spawn the Targets and Seekers at the beginning of Play mode.
5. Create another new script file, name it "Spawner.cs", and add the following code:
using UnityEngine;

public class Spawner : MonoBehaviour
{
    // The set of targets and seekers are fixed, so rather than
    // retrieve them every frame, we'll cache
    // their transforms in these field.
    public static Transform[] TargetTransforms;
    public static Transform[] SeekerTransforms;

	    public GameObject SeekerPrefab;
	    public GameObject TargetPrefab;
    public int NumSeekers;
    public int NumTargets;
    public Vector2 Bounds;

    public void Start()
    {
        Random.InitState(123);

        SeekerTransforms = new Transform[NumSeekers];
        for (int i = 0; i < NumSeekers; i++)
        {
            GameObject go = GameObject.Instantiate(SeekerPrefab);
            Seeker seeker = go.GetComponent<Seeker>();
            Vector2 dir = Random.insideUnitCircle;
            seeker.Direction = new Vector3(dir.x, 0, dir.y);
            SeekerTransforms[i] = go.transform;
            go.transform.localPosition = new Vector3(
                Random.Range(0, Bounds.x), 0, Random.Range(0, Bounds.y));
        }

        TargetTransforms = new Transform[NumTargets];
        for (int i = 0; i < NumTargets; i++)
        {
            GameObject go = GameObject.Instantiate(TargetPrefab);
            Target target = go.GetComponent<Target>();
            Vector2 dir = Random.insideUnitCircle;
            target.Direction = new Vector3(dir.x, 0, dir.y);
            TargetTransforms[i] = go.transform;
            go.transform.localPosition = new Vector3(
               Random.Range(0, Bounds.x), 0, Random.Range(0, Bounds.y));
        }
    }
}
6. In the scene, add a single instance of this Spawner component to a GameObject and set its properties as follows:
- Set TargetPrefab to the Target prefab asset.
- Set SeekerPrefab to the Seeker prefab asset.
- Set NumSeekers to 1000.
- Set NumTargets to 1000.
- Set Bounds to 500 (x) and 500 (y).
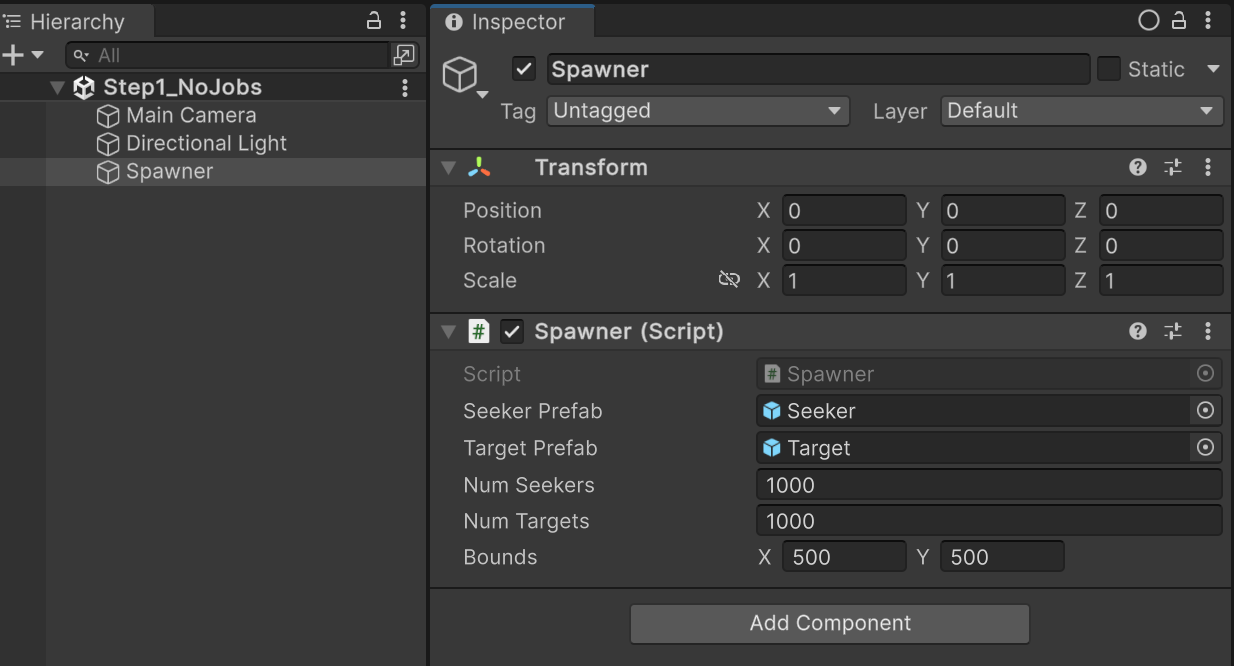
If you enter Play mode now, you will see red and blue cubes wandering around on the XZ plane, but you won’t yet see white debug lines connecting each Seeker (blue cube) with its nearest Target (red cube).
4. Find each Seeker’s nearest Target without jobs
To find the Target nearest to each Seeker and draw a white debug line between them, you need another MonoBehaviour. To add this MonoBehaviour, follow these instructions:
1. Create a new file, name it "FindNearest.cs", and add the following code:
using UnityEngine;

public class FindNearest : MonoBehaviour
{
    public void Update()
    {
        // Find the nearest Target.
        // When comparing distances, it's cheaper to compare
        // the squares of the distances because doing so
        // avoids computing square roots.
        foreach (var seekerTransform in Spawner.SeekerTransforms)
        {
            Vector3 seekerPos = seekerTransform.localPosition;
            Vector3 nearestTargetPos = default;
            float nearestDistSq = float.MaxValue;
            foreach (var targetTransform in Spawner.TargetTransforms)
            {
                Vector3 offset = targetTransform.localPosition - seekerPos;
                float distSq = offset.sqrMagnitude;

                if (distSq < nearestDistSq)
                {
                    nearestDistSq = distSq;
                    nearestTargetPos = targetTransform.localPosition;
                }
            }

            Debug.DrawLine(seekerPos, nearestTargetPos);
        }
    }
}
2. In the scene, add the FindNearest component to a new GameObject.
In the update, for every Seeker, the MonoBehaviour checks the distance to every Target and draws a white debug line between the Seeker and the closest Target found.
Note: To see the white debug lines being drawn in Play mode, you must enable Gizmos in the Scene view or Game view.
Below is a profile of a typical frame running with 1000 Seekers and 1000 Targets:

Each Seeker takes ~0.33 milliseconds to update, adding up to over 340 milliseconds total for all Seekers in the frame.
Obviously, these aren’t great results, but they’re unsurprising considering that this method uses a brute force N^2 solution that runs only on the main thread.
5. Find each Seeker’s nearest Target with a single-threaded job
By putting the hard work into a job, you can move the work from the main thread to a worker thread, and you can Burst-compile the code. Jobs and Burst-compiled code cannot access any managed objects (including GameObjects and GameObject components), so you must first copy all the data to be processed by the job into unmanaged collections, such as NativeArrays.
Note: Strictly speaking, jobs can access managed objects, but doing so requires special care and isn't normally a good idea. Besides, we want to Burst-compile this job to make it much faster, and Burst-compiled code strictly cannot access managed objects at all.
Note: Though we could still use Vector3's and Mathf, we'll instead use float3 and the math functions from the Mathematics package, which has special optimization hooks for Burst.
To move the work into a job, follow these instructions:
1. Create a new script file, name it "FindNearestJob.cs", and add the following lines of code:
using Unity.Burst;
using Unity.Collections;
using Unity.Jobs;

// We'll use Unity.Mathematics.float3 instead of Vector3,
// and we'll use Unity.Mathematics.math.distancesq instead of Vector3.sqrMagnitude.
using Unity.Mathematics;

// Include the BurstCompile attribute to Burst compile the job.
[BurstCompile]
public struct FindNearestJob : IJob
{
    // All of the data which a job will access should
    // be included in its fields. In this case, the job needs
    // three arrays of float3.

    // Array and collection fields that are only read in
    // the job should be marked with the ReadOnly attribute.
    // Although not strictly necessary in this case, marking data
    // as ReadOnly may allow the job scheduler to safely run
    // more jobs concurrently with each other.

    [ReadOnly] public NativeArray<float3> TargetPositions;
    [ReadOnly] public NativeArray<float3> SeekerPositions;

    // For SeekerPositions[i], we will assign the nearest
    // target position to NearestTargetPositions[i].
    public NativeArray<float3> NearestTargetPositions;

    // 'Execute' is the only method of the IJob interface.
    // When a worker thread executes the job, it calls this method.
    public void Execute()
    {
        // Compute the square distance from each seeker to every target.
        for (int i = 0; i < SeekerPositions.Length; i++)
        {
            float3 seekerPos = SeekerPositions[i];
            float nearestDistSq = float.MaxValue;
            for (int j = 0; j < TargetPositions.Length; j++)
            {
                float3 targetPos = TargetPositions[j];
                float distSq = math.distancesq(seekerPos, targetPos);
                if (distSq < nearestDistSq)
                {
                    nearestDistSq = distSq;
                    NearestTargetPositions[i] = targetPos;
                }
            }
        }
    }
}
In the job’s Execute() method, you’re going to use the same brute force N^2 logic as before, but now because it is running in a Burst-compiled job, the work should take less CPU time and can run on a worker thread instead of the main thread.
To run the job, instantiate and schedule it.
2. Replace the content of FindNearest.cs with the following code:
using Unity.Collections;
using Unity.Jobs;
using Unity.Mathematics;
using UnityEngine;

public class FindNearest : MonoBehaviour
{
    // The size of our arrays does not need to vary, so rather than create
    // new arrays every field, we'll create the arrays in Awake() and store them
    // in these fields.
    NativeArray<float3> TargetPositions;
    NativeArray<float3> SeekerPositions;
    NativeArray<float3> NearestTargetPositions;

    public void Start()
    {
        Spawner spawner = Object.FindObjectOfType<Spawner>();
        // We use the Persistent allocator because these arrays must
        // exist for the run of the program.
        TargetPositions = new NativeArray<float3>(spawner.NumTargets, Allocator.Persistent);
        SeekerPositions = new NativeArray<float3>(spawner.NumSeekers, Allocator.Persistent);
        NearestTargetPositions = new NativeArray<float3>(spawner.NumSeekers, Allocator.Persistent);
    }

    // We are responsible for disposing of our allocations
    // when we no longer need them.
    public void OnDestroy()
    {
        TargetPositions.Dispose();
        SeekerPositions.Dispose();
        NearestTargetPositions.Dispose();
    }

    public void Update()
    {
        // Copy every target transform to a NativeArray.
        for (int i = 0; i < TargetPositions.Length; i++)
        {
            // Vector3 is implicitly converted to float3
            TargetPositions[i] = Spawner.TargetTransforms[i].localPosition;
        }

        // Copy every seeker transform to a NativeArray.
        for (int i = 0; i < SeekerPositions.Length; i++)
        {
            // Vector3 is implicitly converted to float3
            SeekerPositions[i] = Spawner.SeekerTransforms[i].localPosition;
        }

        // To schedule a job, we first need to create an instance and populate its fields.
        FindNearestJob findJob = new FindNearestJob
        {
            TargetPositions = TargetPositions,
            SeekerPositions = SeekerPositions,
            NearestTargetPositions = NearestTargetPositions,
        };

        // Schedule() puts the job instance on the job queue.
        JobHandle findHandle = findJob.Schedule();

        // The Complete method will not return until the job represented by
        // the handle finishes execution. Effectively, the main thread waits
        // here until the job is done.
        findHandle.Complete();

        // Draw a debug line from each seeker to its nearest target.
        for (int i = 0; i < SeekerPositions.Length; i++)
        {
            // float3 is implicitly converted to Vector3
            Debug.DrawLine(SeekerPositions[i], NearestTargetPositions[i]);
        }
    }
}
Now when you enter Play mode and profile the result, a typical frame with 1000 Seekers and 1000 Targets without Burst compilation looks like the profile below.

~30 milliseconds is definitely better than the ~340 milliseconds you saw before, but next let's enable Burst compilation by adding the [BurstCompile] attribute on the job struct. Also make sure that Burst compilation is enabled in the main menu (Jobs > Burst > Enable Compilation).

The profile below shows the result with Burst enabled:
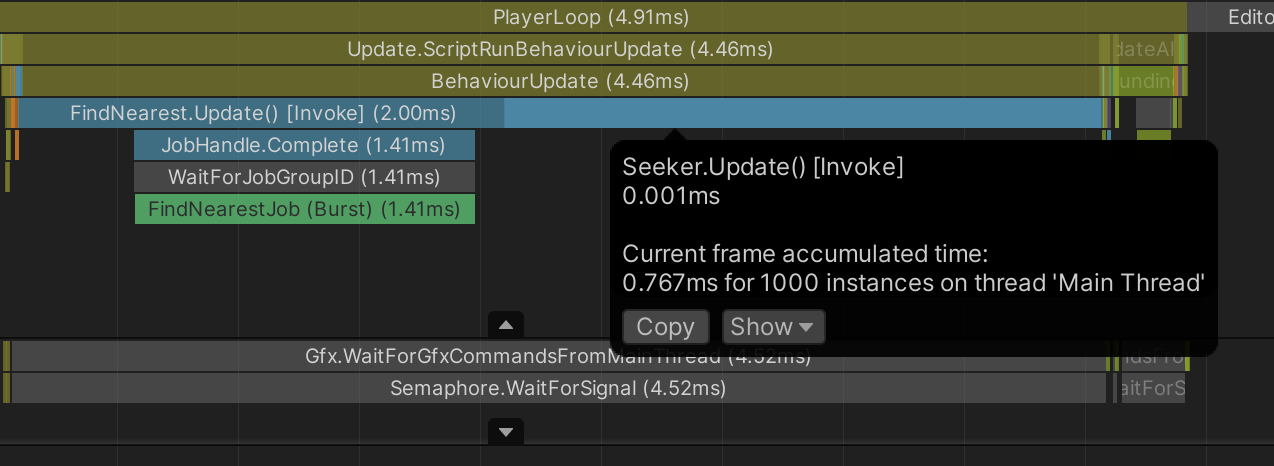
At ~1.5 milliseconds, we're well within the 16.6 millisecond budget of a 60fps target. Since there’s so much headroom now, let's try 10,000 Seekers and 10,000 Targets:

A 10-fold increase in Seekers and Targets results in a 70-fold increase in run time, but this is expected given that every Seeker is still brute force checking its distance to every Target.
Notice in these profiles that the jobs run on the main thread. This can happen when you call Complete() on a job that hasn't yet been pulled off the job queue: because the main thread would otherwise just be sitting idle while it waits for the job to finish anyway, the main thread itself might run the job.
Also notice that the time to update the Seeker and Target MonoBehaviours is itself significant, especially as you increase the numbers of Seekers and Targets. This is mostly the overhead of individually updating thousands of MonoBehaviours. For better results, you could update all of their Transforms from one update call. (Even better, you could use Entities instead of GameObjects, though that is beyond the scope of this tutorial.)
6. Find each Seeker’s nearest Target with a parallel job
For a job that processes an array or list, it's often possible to parallelize the work by splitting the indices into sub-ranges. For example, one half of an array could be processed on one thread while concurrently the other half is processed on another thread.
You can conveniently create jobs that split their work this way using IJobParallelFor, whose Schedule() method takes two int arguments:
- index count: the size of the array or list being processed.
- batch size: the size of the sub-ranges (the batches).
For example, if a job's index count is 100 and its batch size is 40, then the job is split into three batches: the first batch covering indexes 0 through 39, the second covering indexes 40 through 79, and the third covering indexes 80 through 99.
The worker threads pull these batches off the queue individually, so the batches can be processed concurrently on different threads.
To change your FindNearestJob job into an IJobParallelFor, replace the content of FindNearestJob.cs with the following code:
using Unity.Burst;
using Unity.Collections;
using Unity.Jobs;
using Unity.Mathematics;

[BurstCompile]
public struct FindNearestJob : IJobParallelFor
{
    [ReadOnly] public NativeArray<float3> TargetPositions;
    [ReadOnly] public NativeArray<float3> SeekerPositions;

    public NativeArray<float3> NearestTargetPositions;

    // An IJobParallelFor's Execute() method takes an index parameter and
    // is called once for each index, from 0 up to the index count:
    public void Execute(int index)
    {
        float3 seekerPos = SeekerPositions[index];
        float nearestDistSq = float.MaxValue;
        for (int i = 0; i < TargetPositions.Length; i++)
        {
            float3 targetPos = TargetPositions[i];
            float distSq = math.distancesq(seekerPos, targetPos);
            if (distSq < nearestDistSq)
            {
                nearestDistSq = distSq;
                NearestTargetPositions[index] = targetPos;
            }
        }
    }
}
The logic remains the same, but now you need to add parameters to the Schedule() call in FindNearest.cs to specify the number of Execute calls the job will perform and the batch size (100):
// This job processes every seeker, so the
// seeker array length is used as the index count.
// A batch size of 100 is semi-arbitrarily chosen here
// simply because it's not too big but not too small.
JobHandle findHandle = findJob.Schedule(SeekerPositions.Length, 100);
The image below shows the profile of a typical frame for this parallel job solution with 10,000 Seekers and 10,000 Targets:
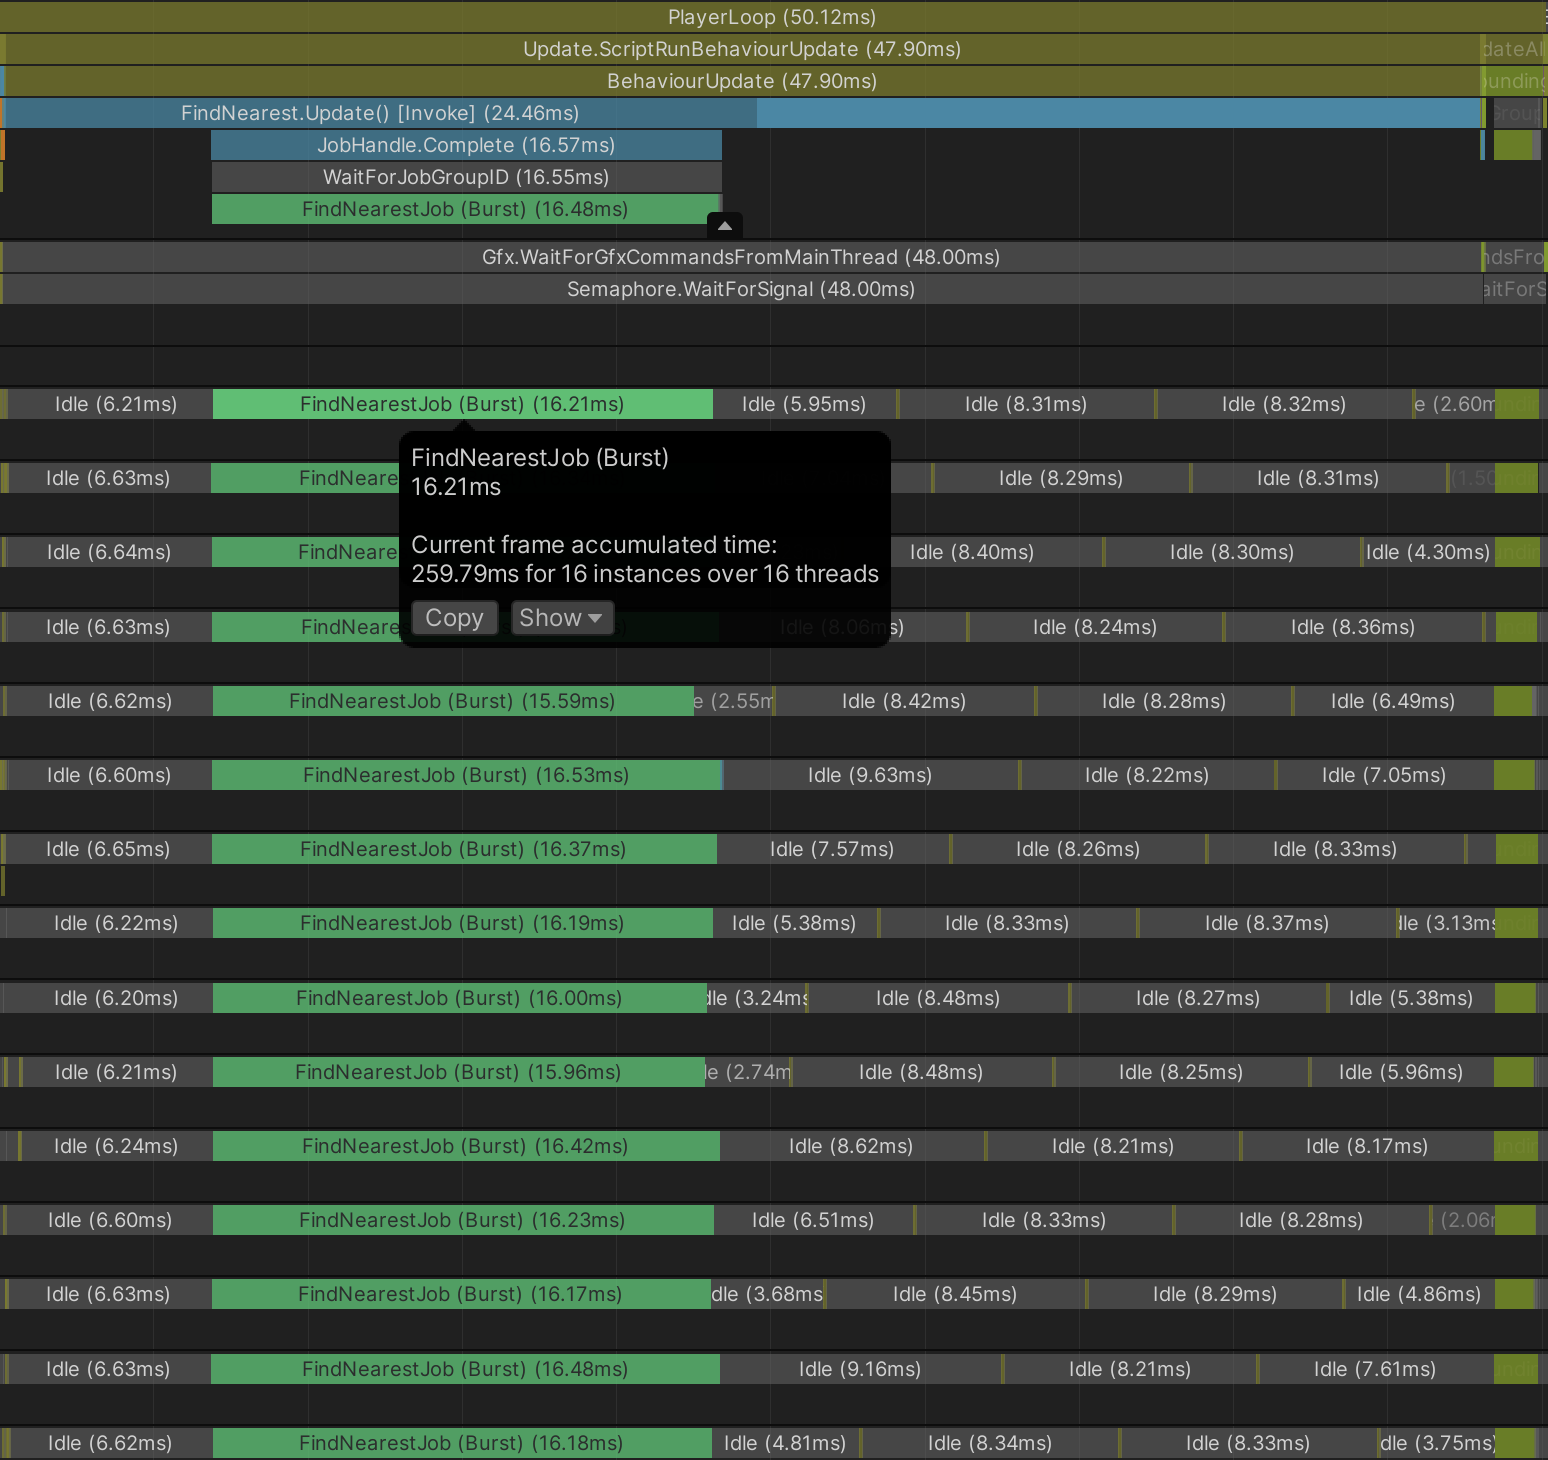
With the work split across 16 cores, it takes ~260 milliseconds total CPU time but less than 17 milliseconds from start to end.
Whether it’s better to use more total CPU time in exchange for shorter start-to-end time is highly contextually dependent. If you need to do other work at the same time, you might be better off restricting a job to run on fewer cores. In this example, we aren’t doing any other work, so the shorter start-to-end time is clearly preferable.
7. Find each Seeker’s nearest Target with a parallel job and a smarter algorithm
So far, you’ve used a crude brute force N^2 algorithm. For much better performance at scale, you should organize the data in some way, such as by sorting the Targets into a quadtree or k-d tree.
To keep things simple, you can sort the Targets along a single dimension. Whether you choose to sort by the x-coordinates or z-coordinates is arbitrary, but let's choose x-coordinates. Finding the nearest Target to an individual seeker can then be done in these three steps:
- Do a binary search for the Target with the x-coordinate nearest to the Seeker's x-coordinate.
- From the index of that Target, search up and down in the array for a Target with a shorter two-dimensional distance.
- As you search up and down through the array, you break from the loop once the x-axis distance exceeds the two-dimensional distance to the current candidate.
The win here is that you don't need to check any Target with an x-axis distance greater than the two-dimensional distance to the current candidate. Hence, the search no longer requires you to consider every individual Target for each Seeker.
To implement this smarter algorithm, follow these instructions:
1. Replace the content of FindNearestJob.cs with the following lines of code:
using System.Collections.Generic;
using Unity.Burst;
using Unity.Collections;
using Unity.Jobs;
using Unity.Mathematics;

[BurstCompile]
public struct FindNearestJob : IJobParallelFor
{
    [ReadOnly] public NativeArray<float3> TargetPositions;
    [ReadOnly] public NativeArray<float3> SeekerPositions;

    public NativeArray<float3> NearestTargetPositions;

    public void Execute(int index)
    {
        float3 seekerPos = SeekerPositions[index];

        // Find the target with the closest X coord.
        int startIdx = TargetPositions.BinarySearch(seekerPos, new AxisXComparer { });

        // When no precise match is found, BinarySearch returns the bitwise negation of the last-searched offset.
        // So when startIdx is negative, we flip the bits again, but we then must ensure the index is within bounds.
        if (startIdx < 0) startIdx = ~startIdx;
        if (startIdx >= TargetPositions.Length) startIdx = TargetPositions.Length - 1;

        // The position of the target with the closest X coord.
        float3 nearestTargetPos = TargetPositions[startIdx];
        float nearestDistSq = math.distancesq(seekerPos, nearestTargetPos);

        // Searching upwards through the array for a closer target.
        Search(seekerPos, startIdx + 1, TargetPositions.Length, +1, ref nearestTargetPos, ref nearestDistSq);

        // Search downwards through the array for a closer target.
        Search(seekerPos, startIdx - 1, -1, -1, ref nearestTargetPos, ref nearestDistSq);

        NearestTargetPositions[index] = nearestTargetPos;
    }

    void Search(float3 seekerPos, int startIdx, int endIdx, int step,
                ref float3 nearestTargetPos, ref float nearestDistSq)
    {
        for (int i = startIdx; i != endIdx; i += step)
        {
            float3 targetPos = TargetPositions[i];
            float xdiff = seekerPos.x - targetPos.x;

            // If the square of the x distance is greater than the current nearest, we can stop searching.
            if ((xdiff * xdiff) > nearestDistSq) break;

            float distSq = math.distancesq(targetPos, seekerPos);

            if (distSq < nearestDistSq)
            {
                nearestDistSq = distSq;
                nearestTargetPos = targetPos;
            }
        }
    }
}

public struct AxisXComparer : IComparer<float3>
{
    public int Compare(float3 a, float3 b)
    {
        return a.x.CompareTo(b.x);
    }
}
Before the FindNearestJob job executes, you must make sure the Seekers’ Transforms are sorted by their x-coordinates. You can write your own job to do the sorting, but instead let’s call the NativeArray extension method SortJob(), which returns a SortJob struct.
The Schedule() method of SortJob schedules two jobs: SegmentSort, which sorts separate segments of the array in parallel, and SegmentSortMerge, which merges the sorted segments. (Merging must be done in a separate single-threaded job because the merging algorithm can't be parallelized.)
The SegmentSortMerge job should not begin execution until the SegmentSort job has finished execution, so the SegmentSort job is made a dependency of the SegmentSortMerge job. As a rule, the worker threads will not execute a job until all of its dependencies have finished execution. Job dependencies effectively allow you to specify a sequential execution order amongst scheduled jobs.
2. In FindNearest.cs, replace the job scheduling code with the following:
SortJob<float3, AxisXComparer> sortJob = TargetPositions.SortJob(new AxisXComparer { });
JobHandle sortHandle = sortJob.Schedule();

FindNearestJob findJob = new FindNearestJob
{
    TargetPositions = TargetPositions,
    SeekerPositions = SeekerPositions,
    NearestTargetPositions = NearestTargetPositions,
};

// By passing the sort job handle to Schedule(), the find job will depend
// upon the sort job, meaning the find job will not start executing until
// after the sort job has finished.
// The find nearest job needs to wait for the sorting,
// so it must depend upon the sorting jobs.
JobHandle findHandle = findJob.Schedule(SeekerPositions.Length, 100, sortHandle);
findHandle.Complete();
The image below shows the profile of a typical frame for this new solution with 10,000 Seekers and 10,000 Targets:
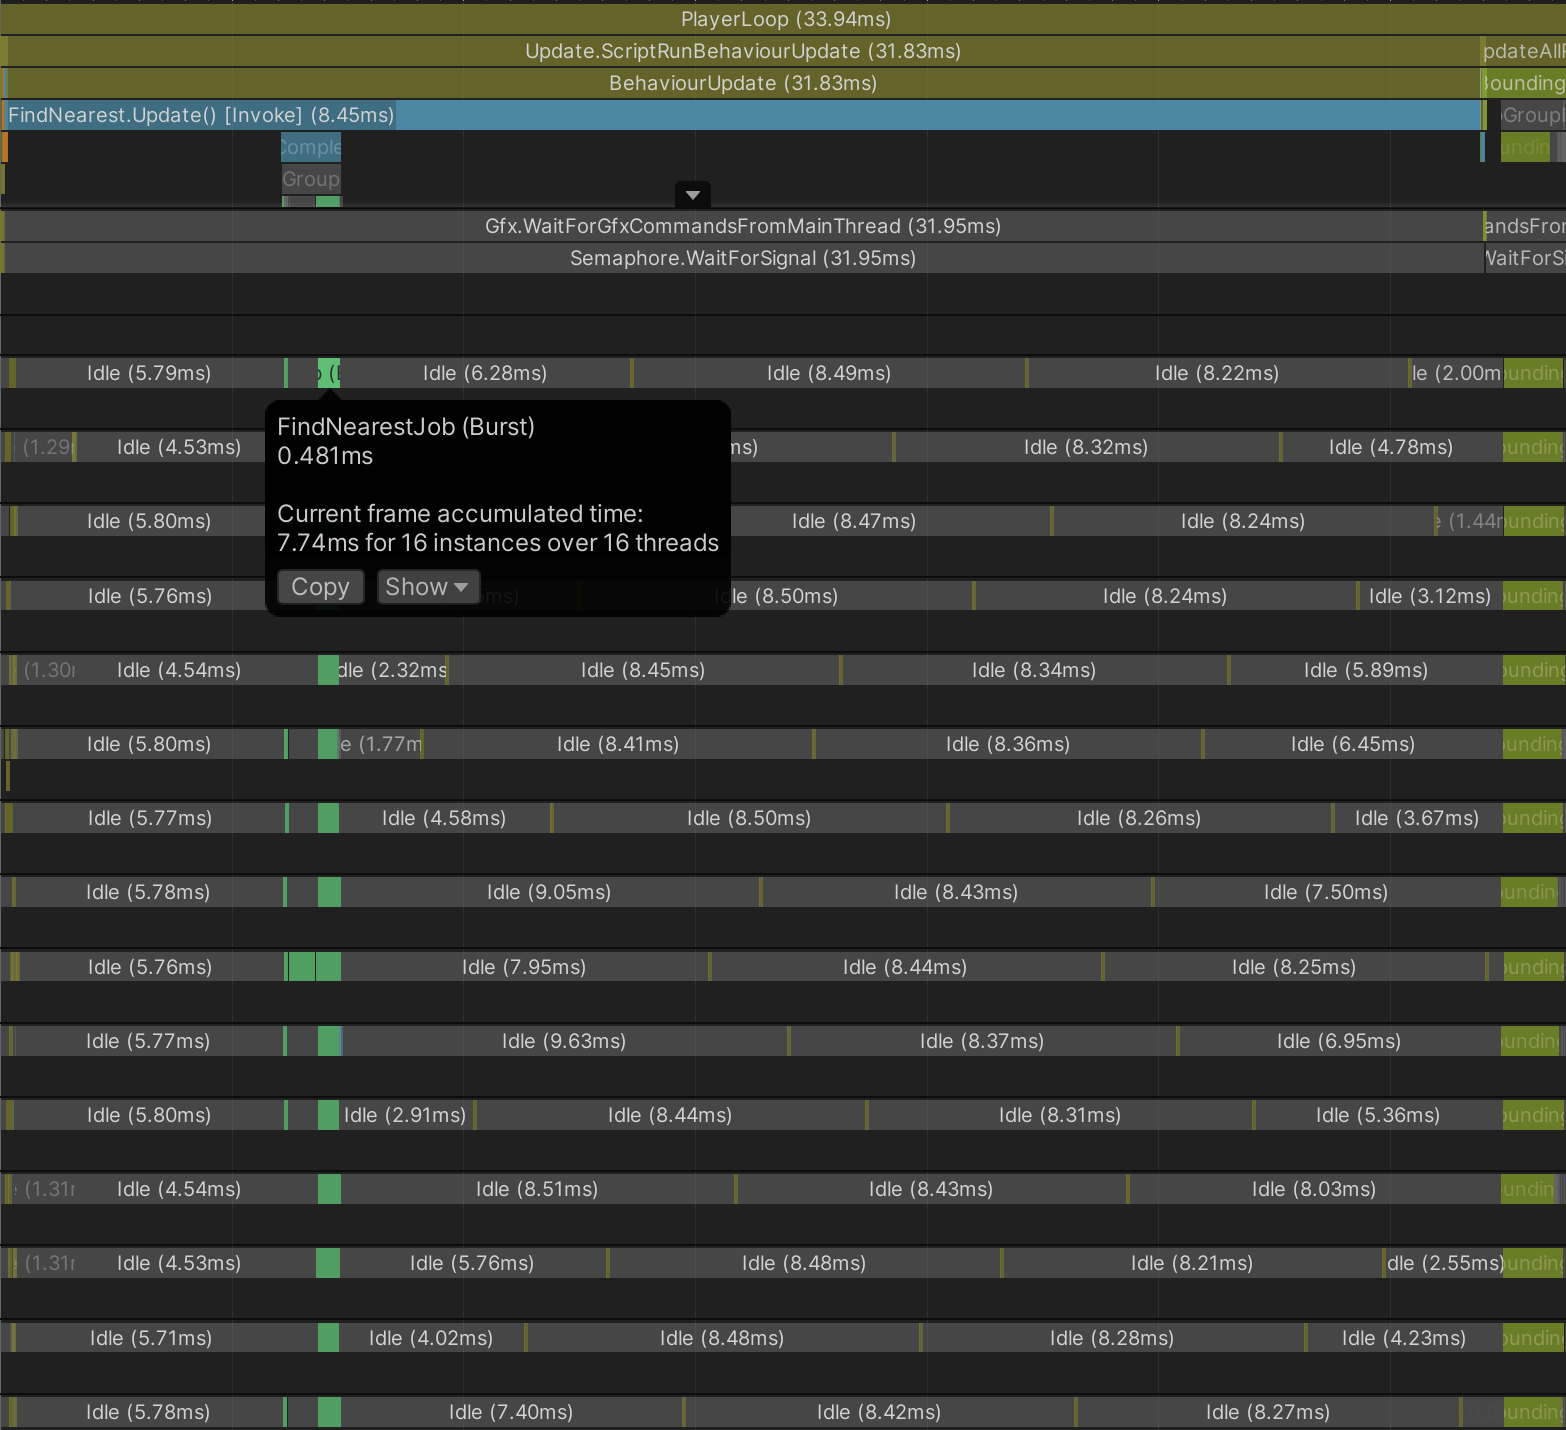
The FindNearestJob takes just ~7.5 milliseconds total CPU time and ~0.5 milliseconds from start-to-end.
If you zoom in on the profile, you can see the sort jobs:
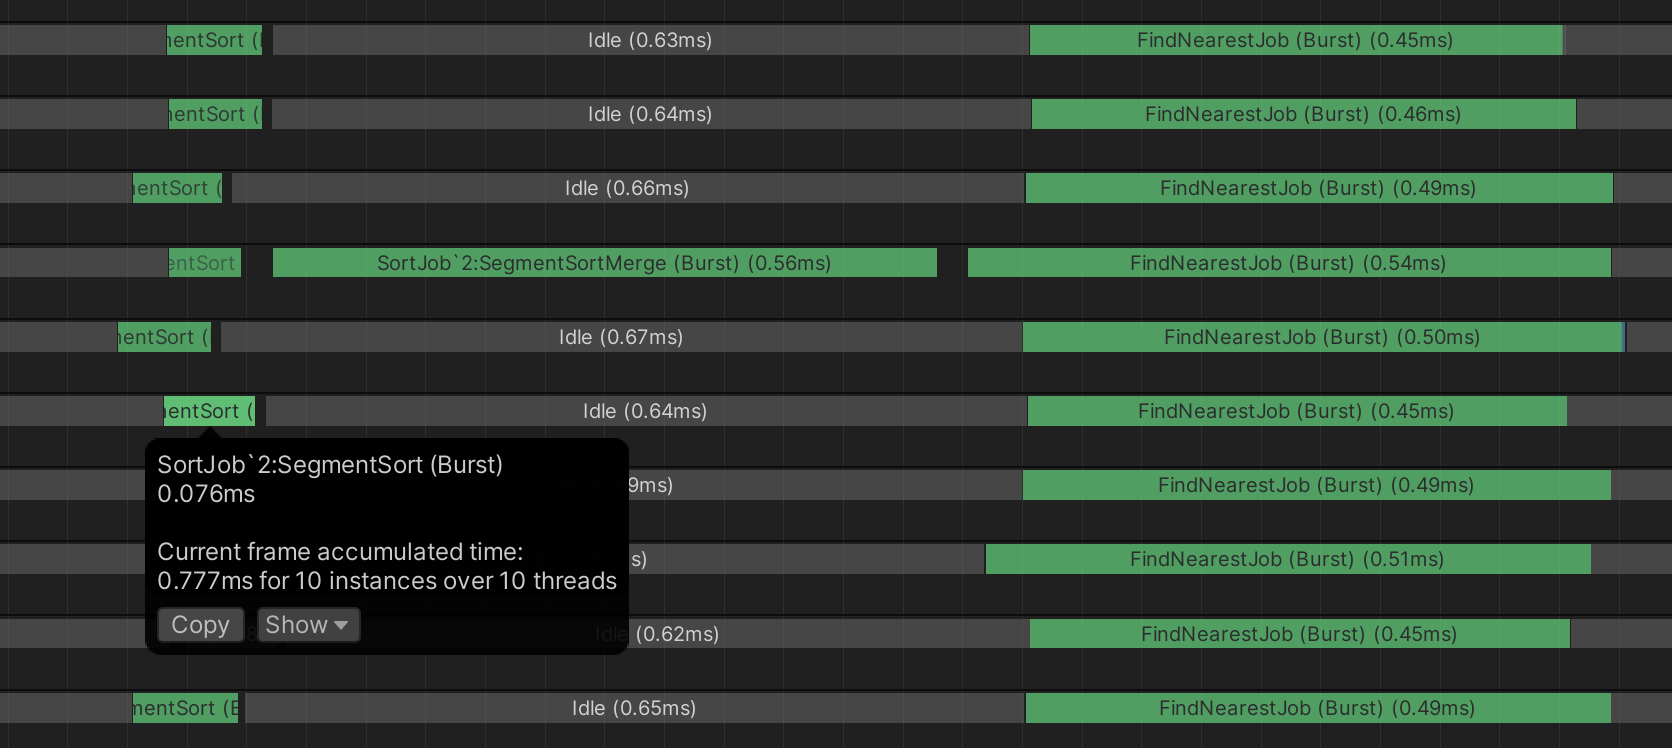
The SegmentSort takes under 0.1 milliseconds start-to-end, and the single-threaded SegmentSortMerge takes ~0.5 milliseconds. So despite now doing extra work to sort the target positions, the overall workload has radically decreased.
8. More things to try
As noted above, a lot of frame time is used up by the inefficiency of the many Target and Seeker MonoBehaviour updates. To address this overhead, you might try replacing the GameObjects with entities.
9. Next steps
In the next tutorial of this course, you'll access and modify entities in jobs.