Configure shadows in your scene
Tutorial
·
Beginner
·
+10XP
·
20 mins
·
(207)
Unity Technologies

Now that you’ve configured both real-time light sources and ambient light in your scene, you’re ready to configure the shadows.
By the end of this tutorial, you'll be able to:
- Explain the relationship between lighting and post-processing.
- Configure shadows in your scene to achieve realistic effects.
1. Overview
Now that you’ve configured both real-time light sources and ambient light in your scene, you’re ready to configure the shadows. You encountered shadows briefly in the second tutorial when you explored the difference between real-time and baked lighting.
When shadows are behaving as expected, they increase the sense of realism of an experience. It doesn’t matter whether or not an experience has a stylized aesthetic, we expect shadows to behave in a certain way. If they break too far from those expectations, it can break immersion for the user unless it is a very intentional decision supported by other aspects of the experience — for example, missing shadows for characters in a game could be a key narrative element and way to recognize enemies.
By the end of this tutorial, you'll be able to:
- Explain the relationship between lighting and post-processing.
- Configure shadows in your scene to achieve realistic effects.
2. Configure the render pipeline asset
When light cannot pass through an object, that object creates a shadow — now that you’ve got multiple light sources in your scene, you can configure these.
In Unity, shadows are stored on a texture called a shadow map, which flattens everything in the scene into one texture (image) and then prints the shadows over the top. The greater the texture’s resolution, the higher the quality of the shadows in your scene.
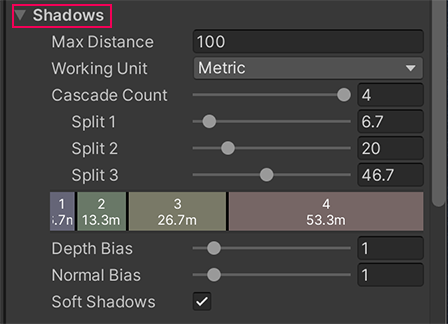
First, start by reviewing the Shadows section of your Universal Render Pipeline asset settings:
1. In the Project window, go to Assets > CreativeCore_Lighting > Settings > Rendering and select the UniversalRP_HighQuality asset. This is the render pipeline asset currently used in the project.
2. In the Inspector, find the Shadows section.

3. The Max Distance property is the maximum distance from the Camera at which Unity will render the shadows. Set Max Distance to 0, and then observe what happens in the scene as you gradually increase this value.
Set Max Distance back to 100 when you’re done. Sometimes you might want to configure this to achieve a particular effect, but for now this works well.
4. The Depth Bias and Normal Bias properties help address issues where pixels on an object are in shadow but should actually be lit (this is known as shadow acne). This shouldn’t currently be a significant problem in your scene, but try adjusting both of these settings to evaluate the impact.
5. Enable Soft Shadows. This property enables extra processing to make your shadows look smoother.
6. Find the Cascades Count property. This controls how many shadow cascades are used in your project. These help address pixelation of shadows close to the Camera that are created by the Directional Light (perspective aliasing). The more cascades you use in a scene, the less the shadows are affected by perspective aliasing.
7. Set the Cascade Count to 1, and then focus on the cluster of street lamps you created as you drag on the property name to incrementally increase the number of shadow cascades to 4. You should notice that each additional cascade improves the quality of the shadows in the scene.
3. Enable Soft Shadows in the Directional Light
Now that you’ve considered the pipeline asset, you can enable Soft Shadows in the Directional Light:
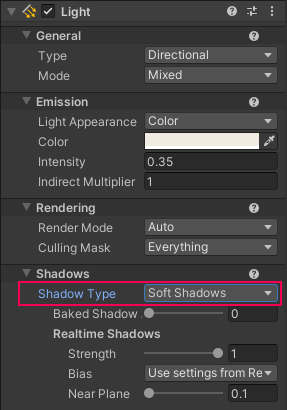
1. In the Hierarchy, select the Directional Light.
2. In the Inspector, go to the Light component and change the Shadow Type to Soft Shadows.

Note: The difference in this scene that this change makes is too subtle to notice; this is common. However, in some cases this can change the overall feel and style of the shadows in a scene — it’s worth including it in your process.
Both Soft Shadows and shadow cascades use memory and bandwidth for rendering, but they are less processing-intensive than using a high resolution shadow map, which is an alternative approach for improving the quality of shadows in a scene.
4. Consider the impact of post-processing on lighting
Have you ever taken a photograph of a beautiful setting outside and noticed that the colors are a lot less vibrant than the ones you can see? Not all camera sensors are created equal, and there are lots of variables that can impact exactly what a sensor receives.
If you wanted to make that photo more closely match your experience, you might add a filter or effect to it to increase the vibrancy of the colors. In simple image editors, this might involve just selecting a single preset, but there are many properties and effects that professionals can configure to refine an image to get just the right effect.
It’s similar in Unity: iteratively applying and refining post-processing effects can have a significant impact on the overall aesthetic of the lighting in your project.
As you’re focusing on lighting, we’ve added post-processing effects to the two example scenes already — you’ll learn more about these in Creative Core: Post-processing.
To review what this scene would look like without the post-processing effects in place:
1. In the Hierarchy, select the PostProcessing GameObject.
2. In the Inspector, find the Post-Processing Volume. You should see that there are four effects currently being used in the scene:
- Bloom
- Tonemapping
- Vignette
- Chromatic Aberration
3. Disable the PostProcessing GameObject to turn off these effects and review the impact this has in the Scene view. When you’re done, remember to enable it again!
5. Explore: Change the mood of your scene
In this tutorial, you’ve covered the basics of implementing lighting in a scene. But as you learned at the start of this experience, the role of a lighting artist also involves creativity.
Listen to the expert creators share how the best lighting they’ve experienced made them feel:
Refer back to your vision for the late-night outdoor scene. Considering what you’ve learned so far, how does the scene deliver on your vision?
Before you continue, take some time to play with the different things you have been working with to see how you can develop the atmosphere of the scene:
- Directional Light
- Skybox
- Additional lit props
- Ambient lighting
- Shadows
Tips:
- In the next tutorial, you’ll be working on implementing baked lighting in this same outdoor scene. If you’re planning on making dramatic changes but want your project to look the same as the example images provided there, duplicate your coworking scene and make your changes in the copy.
- Remember to save your changes regularly as you experiment!
6. Next steps
You’ve now lit the scene with real-time lights and configured some other aspects of the lighting to make a more realistic-feeling experience. But that’s only one of Unity’s Global Illumination systems — next you’ll learn about baked lighting and implement it in the scene.