
Custom events in Visual Scripting
Tutorial
·
Beginner
·
+10XP
·
20 mins
·
(66)
Unity Technologies

In programming, events are occurrences — that is, things that happen. Events allow you to design gameplay mechanics for when-this-do-that situations. In Visual Scripting, you can use custom events with just two nodes — a process that is much easier than in C#. In this tutorial, you will use custom events to make things happen for Clive the Cat.
By the end of this tutorial, you’ll be able to:
- Add a new custom event trigger to a visual script.
- Write a visual script that responds to a custom event.
- Pass a GameObject from one script to another by way of a custom event.
- Copy a visual script in the Project window.
- Adapt a visual script to another purpose.
- Add data inputs to an existing subgraph.
1. Overview
Events are occurrences in your project that can be detected and acted upon with scripts. User input, colliders colliding, and a player moving to a location are just a few examples of events.
Think of events like broadcast messages. In Visual Scripting, event nodes are the “receivers” of these messages, and they initiate scripts to make things happen in response to the event. Examples of event nodes are the Start and Update nodes that appear in new GameObject component scripts, and the scripted events you’ve already used to control Clive’s entry into cells.
In this tutorial, you’ll write scripts with custom events to make GameObjects interact with each other. Events are powerful programming tools that give you control over what happens, and when.
2. Open a door with a button
After Clive goes through the FirstDoor GameObject, he finds himself in a new room with a button in one of the cells. This button is the DoorButton GameObject. In this room, you will program another door, the SecondDoor GameObject, so that Clive must press the DoorButton GameObject to open it.
What is different about the SecondDoor GameObject is that it will open as soon as Clive pushes the DoorButton GameObject, unlike the previous door that doesn’t open until Clive approaches it.
To do this, you will use a custom event to detect when the button is pushed. The script on DoorButton will invoke the event when the button is pushed (when Clive enters that cell), and the script on SecondDoor will respond to the event immediately by running the door-opening sequence.
3. Script the custom event trigger on the button
Follow these instructions to create the event trigger on DoorButton.
1. Select ObjectRoot > DoorButton in the Hierarchy and add a new Script Machine. Then, add a new visual script in the Script Machine component using the ‘New’ button in front of the Graph variable and name it “DoorButtonScript”. Save it in Assets > UnityTechnologies > VisualScriptingTutorial > Tutorial > VisualScripts.
2. Delete the On Start and On Update nodes if they are present.
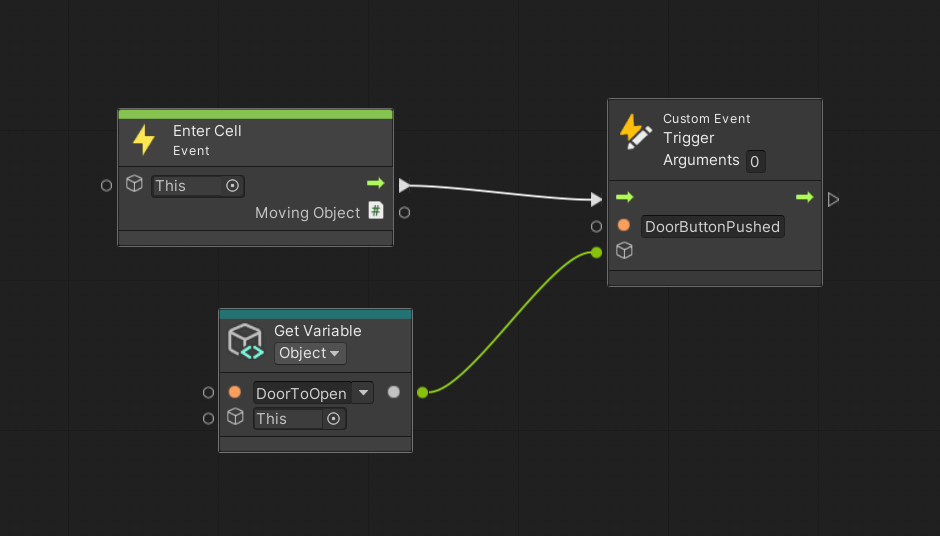
3. Add the Enter Cell event node to detect and handle the event triggered when a Moving Object enters the cell.
4. Add a Trigger Custom Event node to create a new custom event. Name this event “DoorButtonPushed”. This node will send a broadcast message to the script for the door. Connect the flow from Enter Cell node to the Trigger Custom Event node.
5. Examine the Custom Event Trigger node. This node has a GameObject input that defaults to “This”, which in this case is DoorButton. However, on the receiving end of this event, the script doesn’t need the button — it needs the door you want to open. You will pass the SecondDoor GameObject to this event node with an Object variable. (With custom events, you can pass values along to the receiving script, just like you do with the subgraph.)
6. Create an Object variable named DoorToOpen, with the Type of GameObject, and set its Value to the GameObject SecondDoor. Connect this node to the Custom Event Trigger’s input.
Tip: You can drag SecondDoor from the Hierarchy.
Tip: Since this Object variable appears in the Inspector, it will be easy for you or any other developer on your project to select a different door to open with this button! (Just make sure the door has a script for the event, like the one you’ll create in the next step.)
Your Graph should look like this:
4. Copy a visual script
Next, let’s script SecondDoor. You will adapt this script from FirstDoorScript so that you can build on the work you’ve already done.
1. In the Project window, go to the VisualScripts folder. Select the FirstDoorScript and press Ctrl+D (macOS: Cmd+D) to duplicate FirstDoorScript.
2. Rename the copy "SecondDoorScript".
3. Select ObjectRoot > SecondDoor in the Hierarchy so that its components appear in the Inspector.
4. From the Project window, click and drag the new file SecondDoorScript into the Script Machine component’s Graph property, to replace BaseDoorScript.
Now you can adapt this script to a new game mechanic.
5. Script the custom event on the door
Follow these instructions to script the custom event on the door:
1. Add the Object variable IsOpen to SecondDoor using the Object tab on the Blackboard.
2. There are two sets of nodes that don’t apply to this new door:
- The nodes that check for the key
- The nodes that close the door behind Clive after he goes through (if the door closes he won’t be able to get back in!)
Delete these nodes from your script. What is left should look something like this:
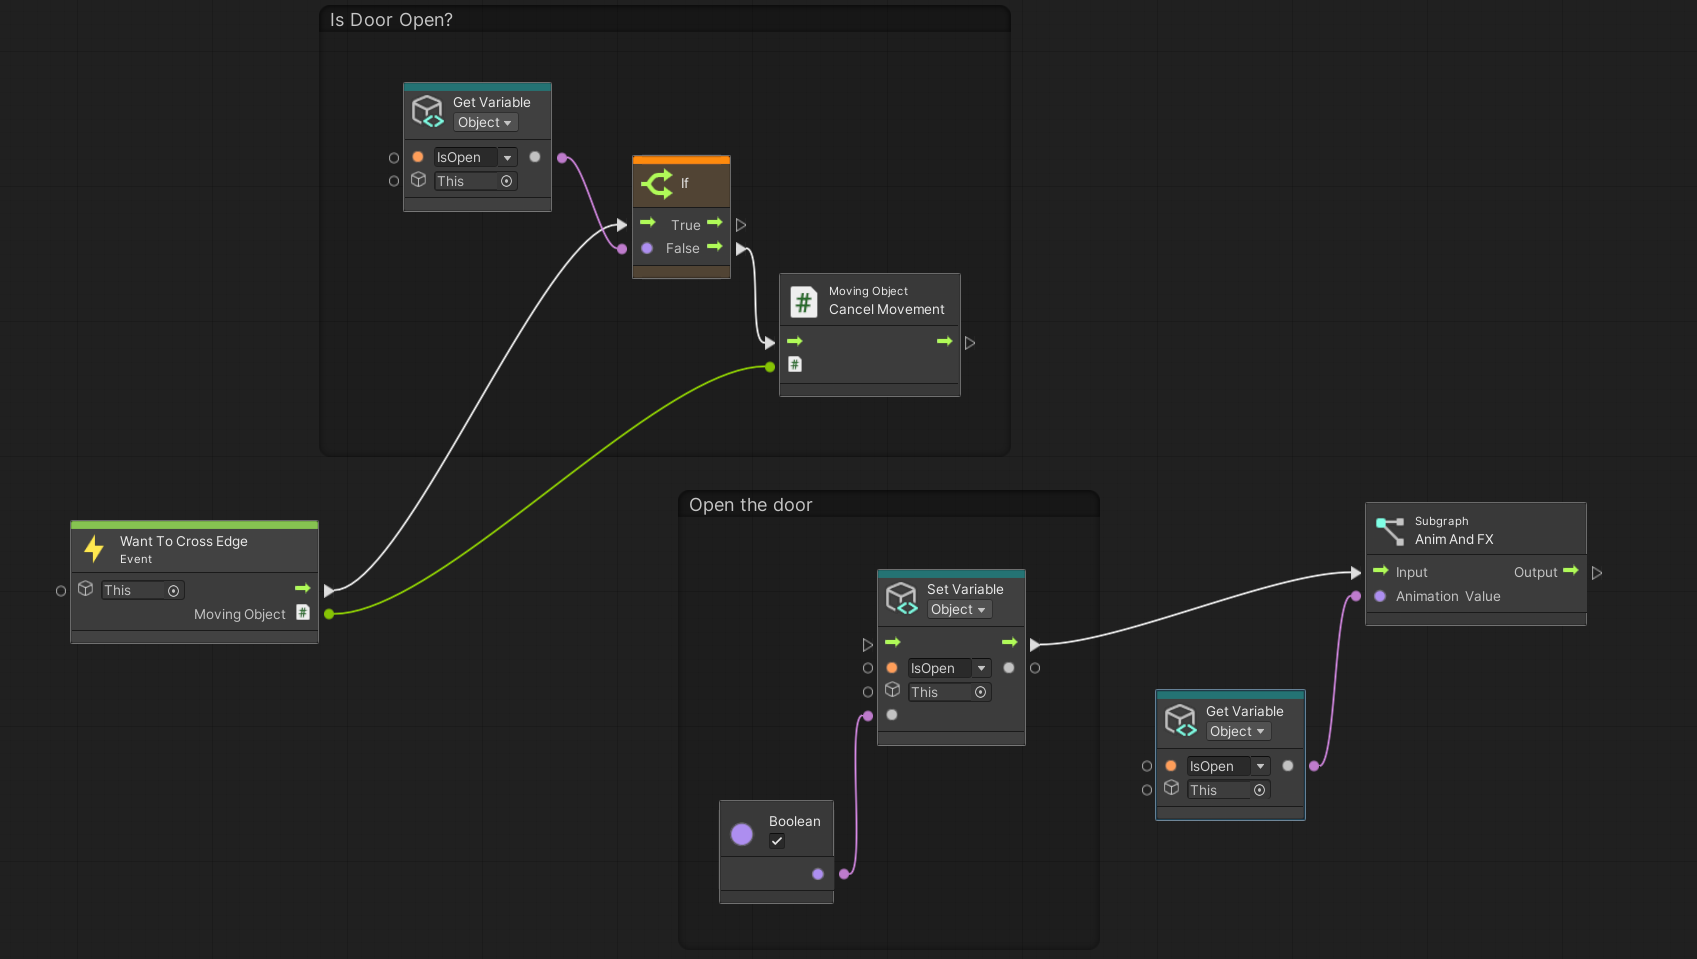
This visual script will need flows for two events. The first event to detect is when Clive wants to cross the door: the script either lets Clive through the door or cancels his movement, as you have seen before. This event flow is complete.
The second event to detect is when the button is pushed — and when that happens, DoorButtonScript triggers the DoorButtonPushed event.
3. To detect the DoorButtonPushed event, add a Custom Event node and name it “DoorButtonPushed”.
4. Connect the DoorButtonPushed event to the input of your “IsOpen” Set Variable in the “Open the door” group so that when it is detected, the door opens.
5. Press Ctrl+S (macOS: Cmd+S) to save your work.
6. Play test. Keep the Script Graph window open, with the Values button enabled, so that you can see when these two events get triggered.
Your Graph should look like the image below.
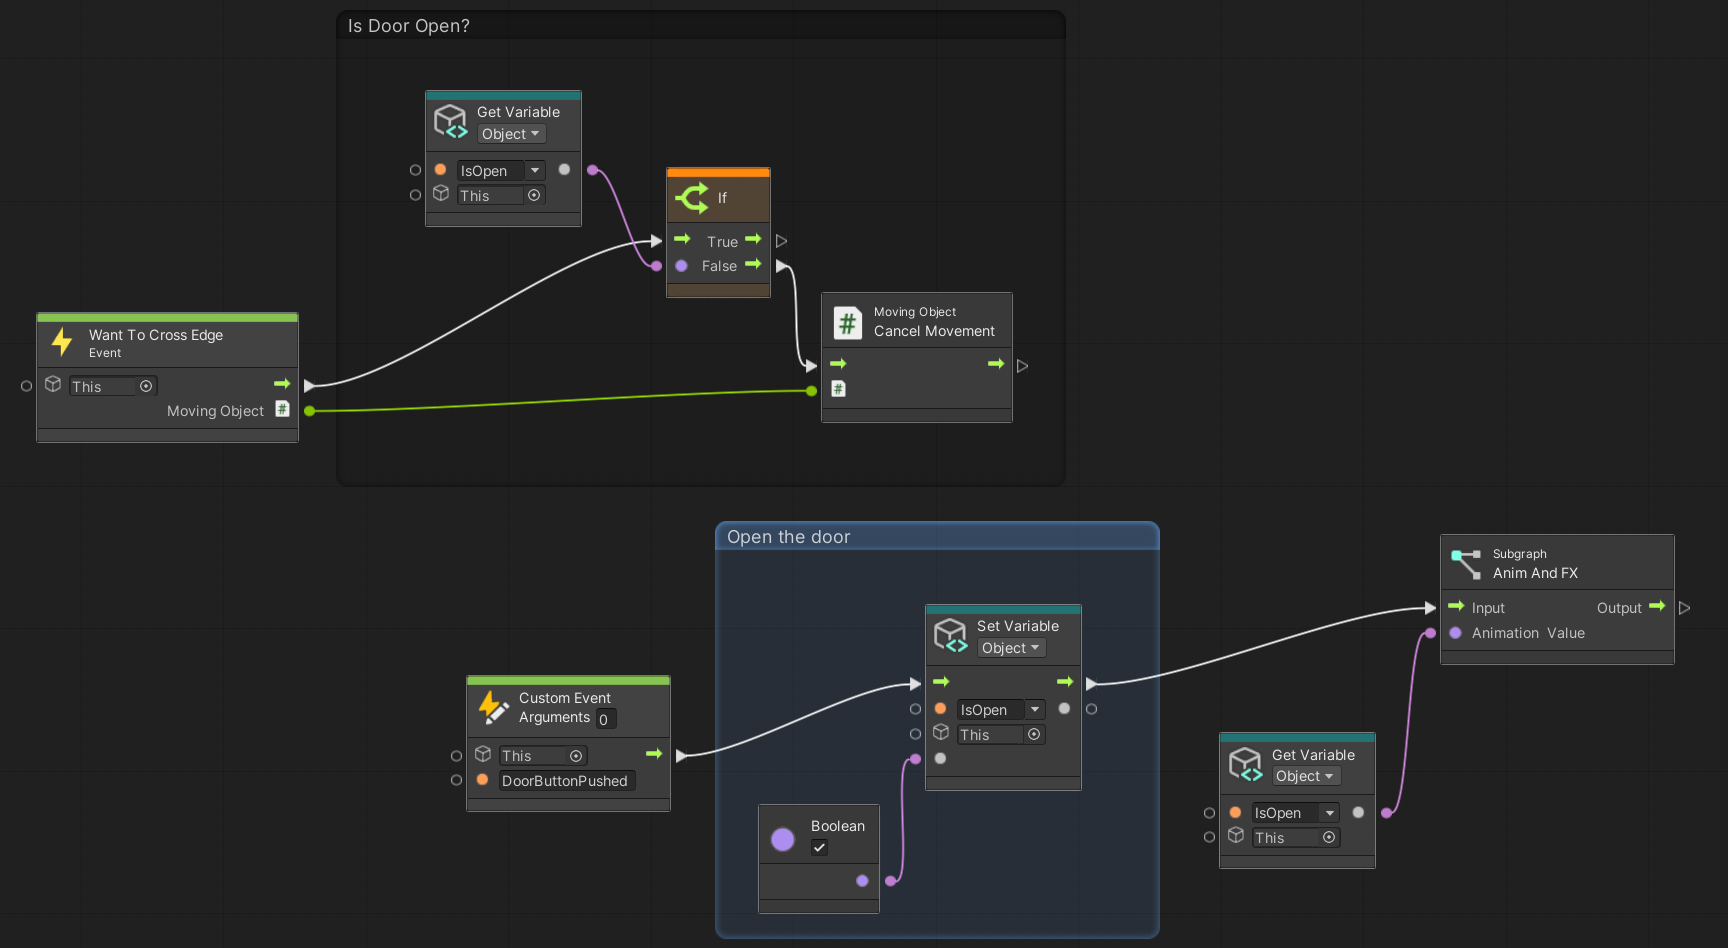
The door will open immediately when Clive pushes the button!
6. Animate the button
Now that the event to open the door is working, let’s return to the button and add its animation and effects. That script looks like this:

Look familiar? It looks just like the AnimAndFX subgraph! Since there is more than one button on this level, let’s enhance the subgraph so you can use it for buttons as well as doors.
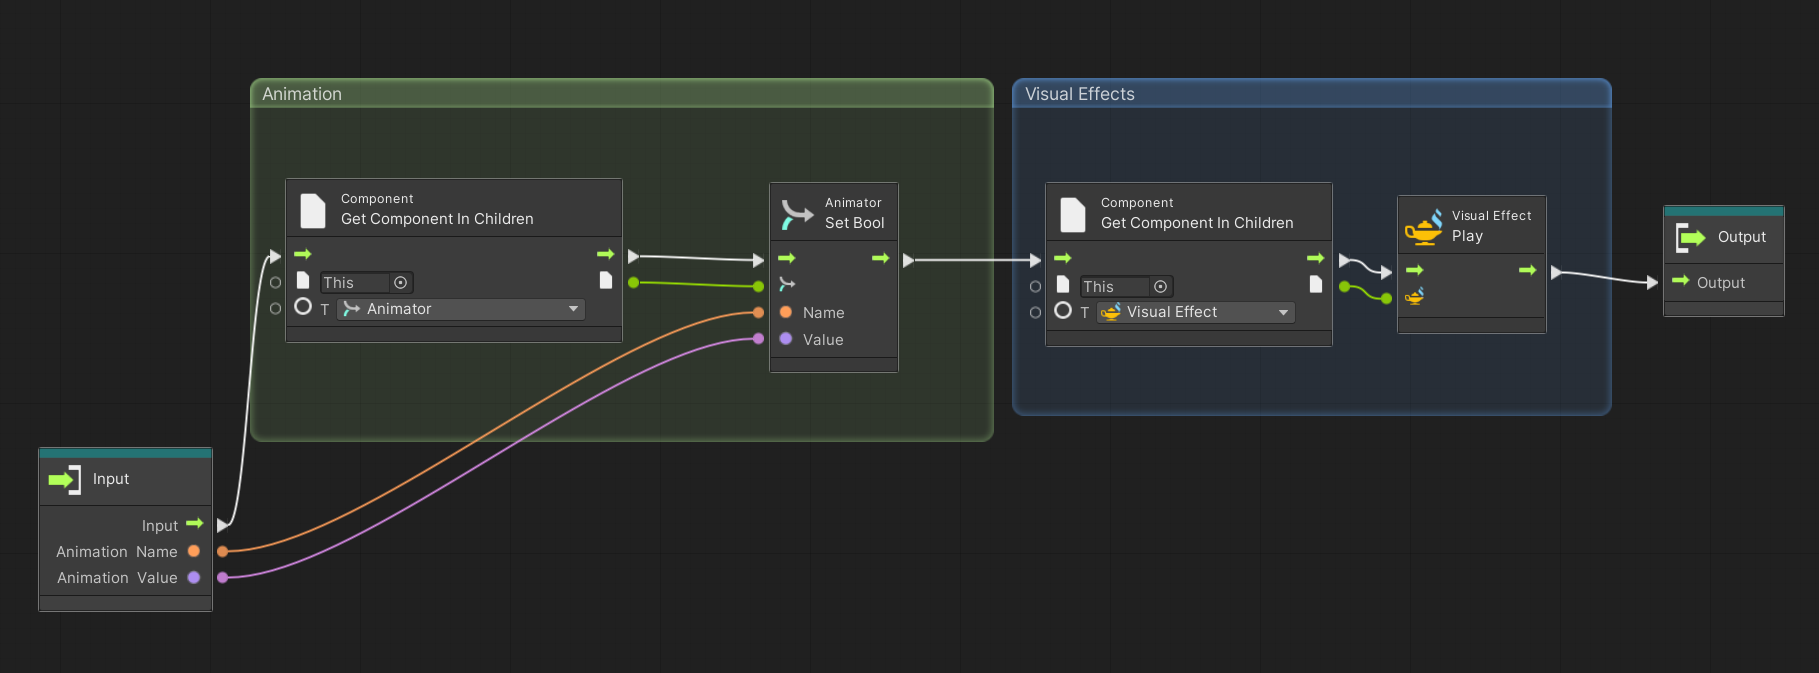
Here is how the subgraph visual script looks currently:

The only difference between the main nodes of these two scripts is that the animation for the button expects a parameter named Pushed, and the animation for the doors expects a parameter named Opened. Let’s add another data input to this subgraph so that you can specify that parameter.
Follow these instructions to update the subgraph and add a new editing shortcut:
1. Add the “AnimAndFX” subgraph to DoorButtonScript — then double-click the subgraph to edit it!
2. Add new Data Input in the Input node and name it “Animation Name”, Set its Type to String.
Tip: Click and drag the Data Inputs in the Graph Inspector to change their order so that Animation Name is on top.
Your updated subgraph should look like the image below.
3. Return to DoorButtonScript (select DoorButton at the left end of the Script Graph window menu).
4. Update DoorButtonScript to add the animation to push the button when Clive enters the cell, with the Animation “Pushed”.
5. Add more animation to reset the button when Clive Exits the cell.
The updated DoorButtonScript should look like the image below.
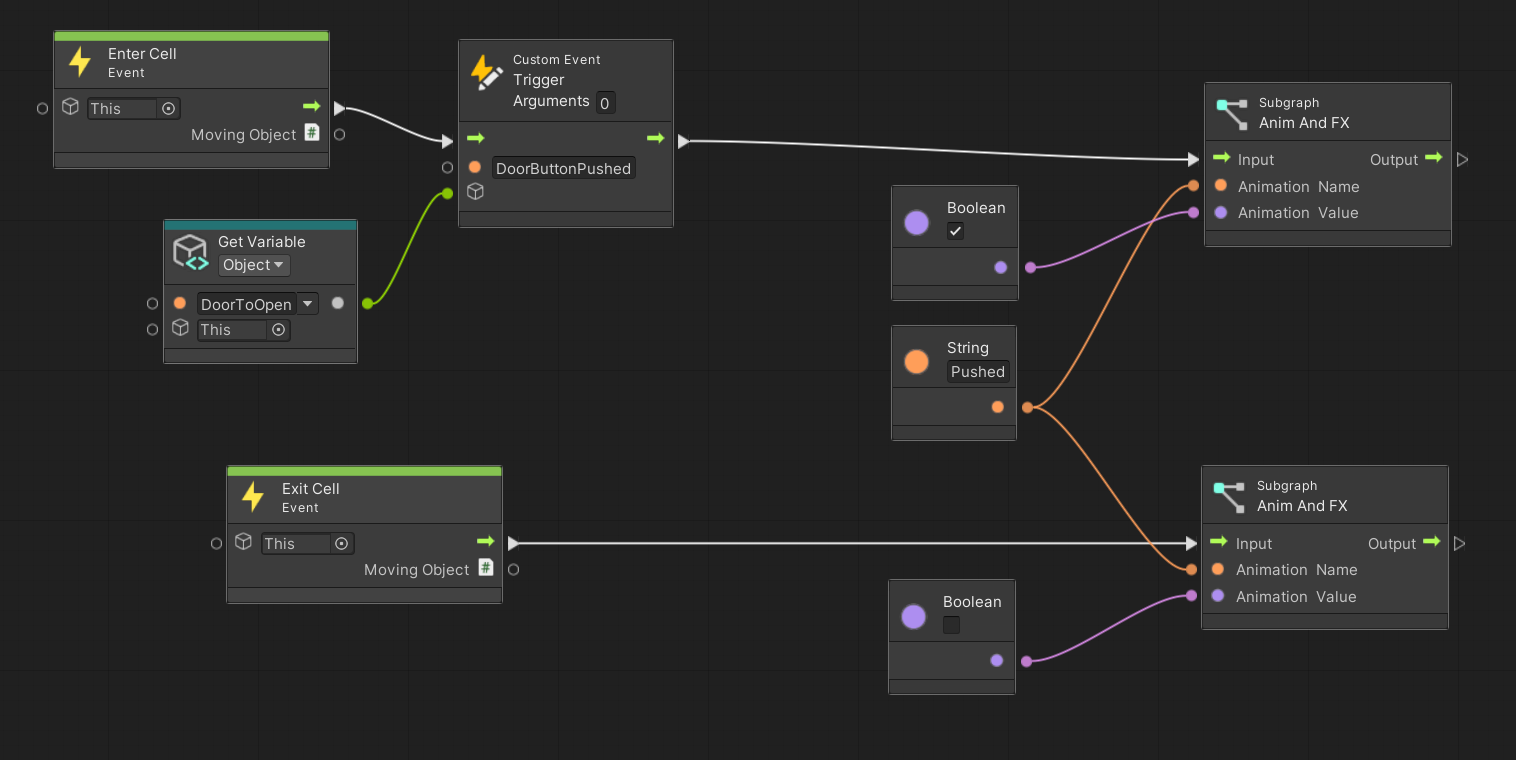
Once you have made this change, FirstDoorScript and SecondDoorScript will need updating — whereas the “Opened” parameter was hard-coded in the original subgraph, this(“Opened”) parameter must now be specified in each visual script that includes the AnimAndFX subgraph.
Remember to save your work as you go! Then play the level and get Clive through the first two rooms. The button in the second room should press and reset — and the glowing visual effects will continue to let you know the button is active. The door will open as soon as the button is pushed!
If you need a hint or get stuck, consult these visual script files in the Samples subfolder:
- Updated AnimAndFX subgraph: Super_1
- Completed DoorButtonScript: Final_DoorButtonScript
- Updated FirstDoorScript: Final_FirstDoorScript
- Updated SecondDoorScript: Final_SecondDoorScript
Note: The subgraphs used in these files are sample copies, not the subgraph visual script you created.
7. What’s next?
Clive can now get through two rooms in his crypt, thanks to events! You’ve used built-in events, custom events written in C#, and custom events you created in Visual Scripting. You can use events in many situations in which something that happens to one GameObject affects another GameObject, modifies your player’s score or damage, or changes any other condition.
In an upcoming tutorial, you’ll learn about State Machines, which can supercharge the ways you use events and make your gameplay as complex as you want to make it. But first, you will add more functionality and mystery to Clive’s Crypt by visually scripting a few more of the devices he can control.