
Create a burst particle
Tutorial
·
Beginner
·
+10XP
·
30 mins
·
(148)
Unity Technologies

Some VFX are triggered by a user’s actions, which makes the application feel more responsive and dynamic. In this tutorial, you will create a new smoke burst effect, then allow the user to generate that effect whenever they want to ignite or extinguish the fire.
By the end of this tutorial, you'll be able to:
- Create a single burst of particles, rather than a continuous emission over time by using the Bursts section of the Emission module.
- Add randomness to a Particle System by using the Random Between Two Constants feature.
- Change the color of a particle over its lifetime by using the gradient editor and the Color Over Lifetime module.
- Change the size of a particle over its lifetime by using the curve editor in the Size Over Lifetime module.
1. Overview
In addition to making a scene feel alive, Visual Effects (VFX) can make a scene feel more interactive and engaging. If the user successfully completes something, you could encourage them with a burst of confetti. If a character lands on the ground, a puff of dust at their feet might add an extra layer of visual interest.
Below you can see examples of a muzzle flash from a weapon firing, a sparkle celebration when the player reaches their goal, and a slash effect when the character swings her staff.
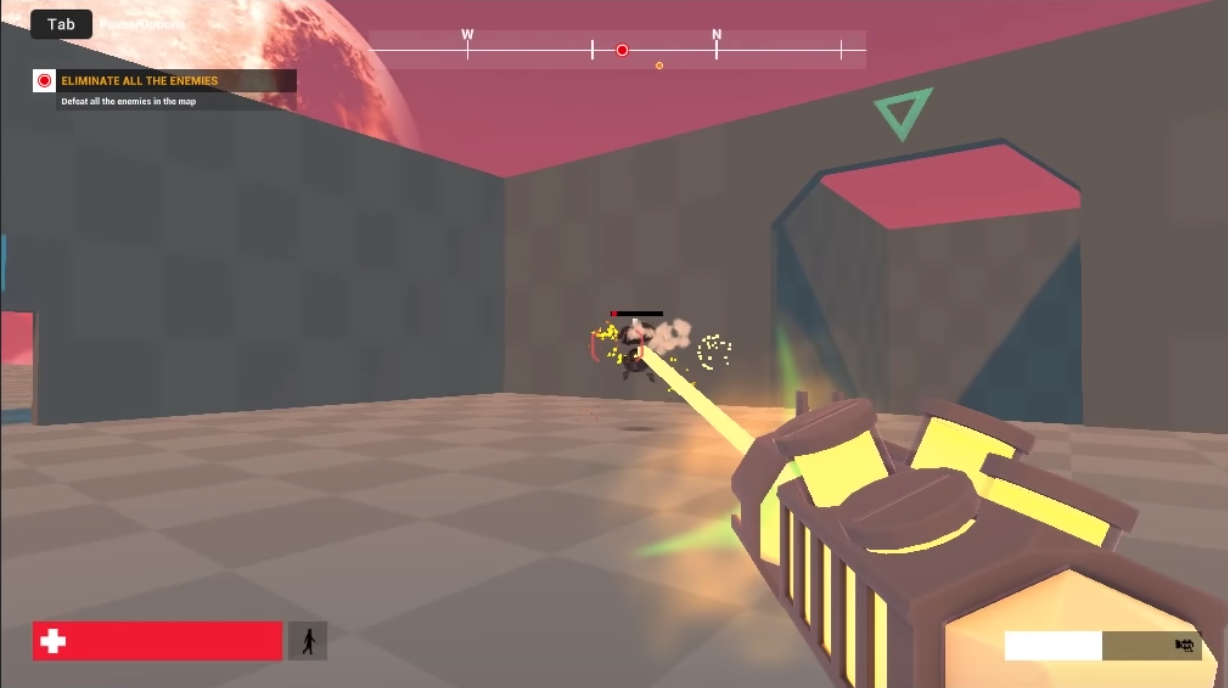
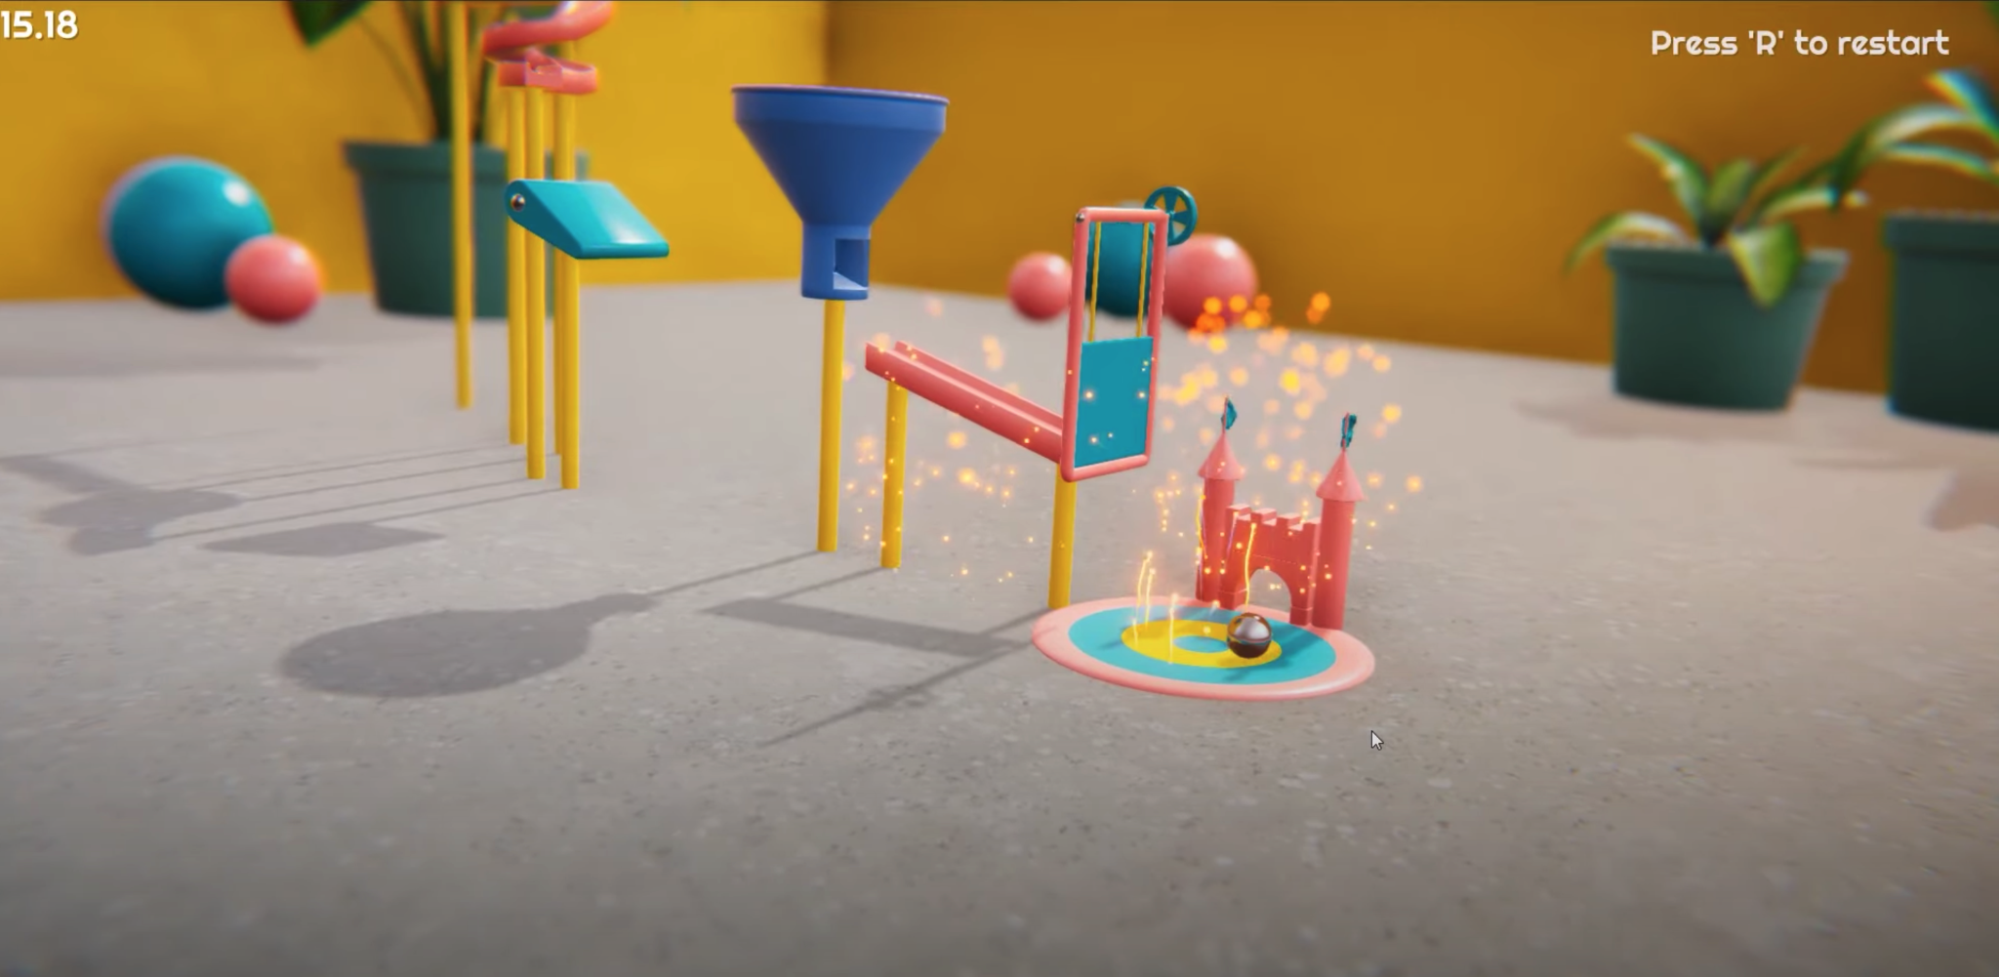
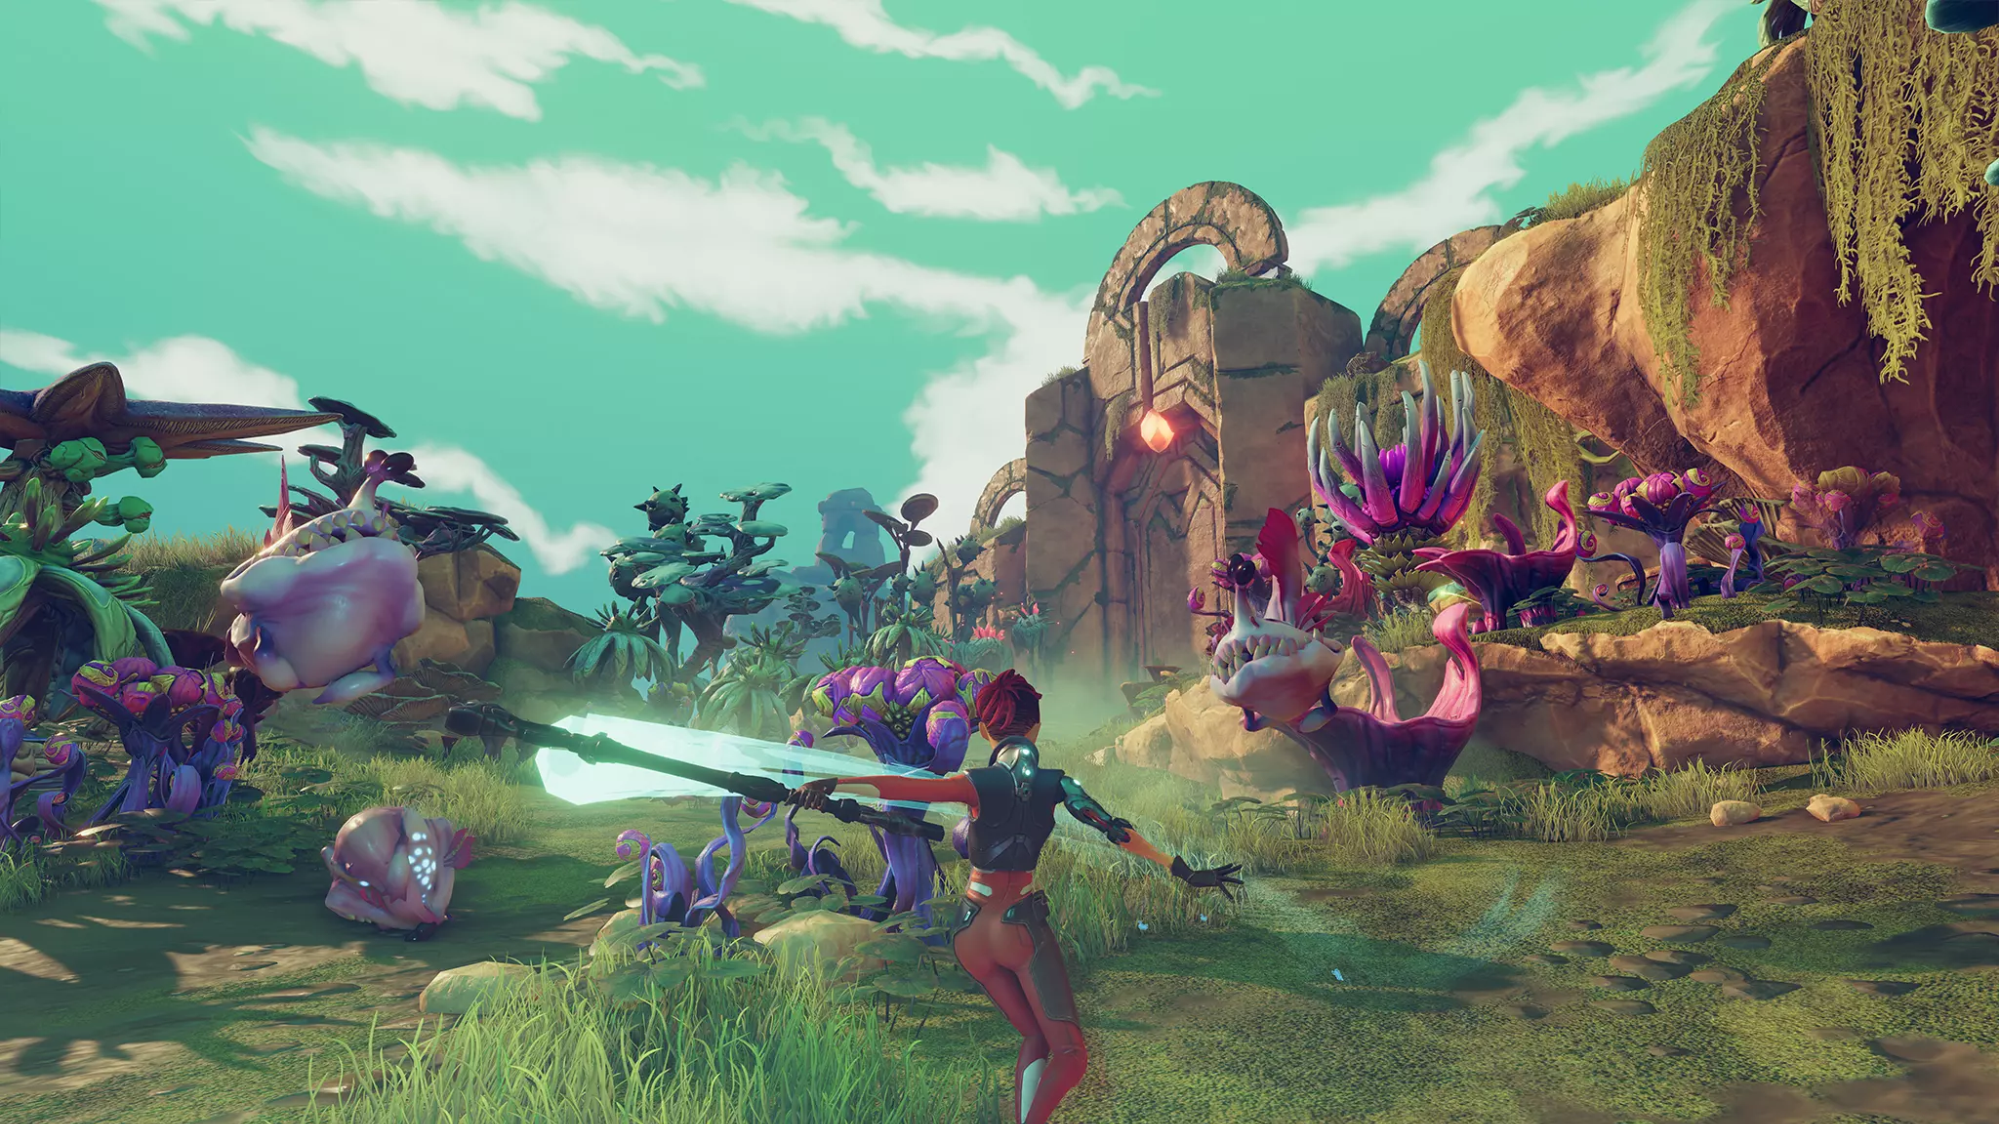
These event-based particle bursts are different from the environmental effects you made in the previous tutorial because they are a single burst of particles triggered by a specific event.
In this tutorial, you will create a burst of smoke that the user can trigger to extinguish and re-ignite the fire, making for a more satisfying interaction.
2. Clear the work area
Before you begin working on your smoke burst particle, let’s remove any distractions and temporarily disable any particles you already have in the scene.
1. Open the CreativeCore_VFX_ProjectFiles project in Unity Editor, if you haven’t already done so.
2. In the Project window, go to Assets > CreativeCore_VFX > Scenes and open the TutorialScene_VFX_Outdoor scene.
3. In the Hierarchy, select the Fire_ParticleSystem_Prefab object and mark it inactive in the Inspector. You can also deactivate the Point Light object attached to the firepit.
4. Deactivate any weather effects.
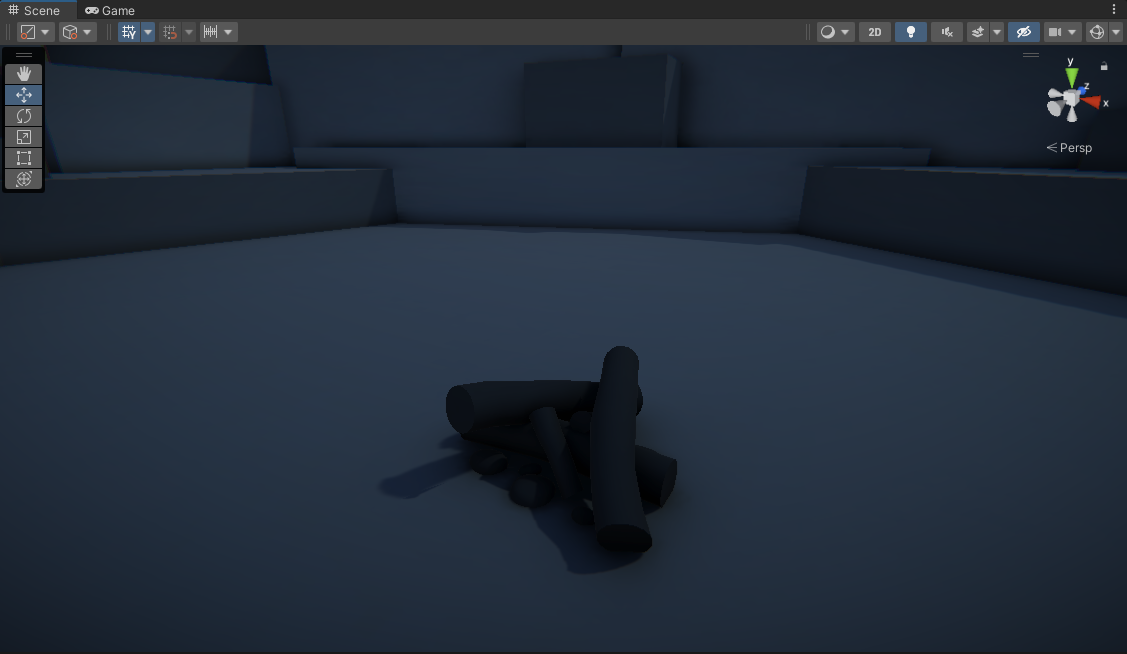
You should now have a nice, clean scene to begin working on your smoke burst particle.
3. Add a new burst of particles
A burst particle is similar to an environmental particle – it just doesn’t last as long and usually originates from a smaller area. So, just like you began with your weather effect, let’s begin by adding a new Particle System to the scene.
1. In the Hierarchy, right-click > Effects > Particle System to create a new Particle System, rename it “FX_SmokeBurst”, then position it at X=0, Y=0.5, Z=0 and rotate at X=-90, Y=0, Z=0 in the scene so that it’s right above the logs.
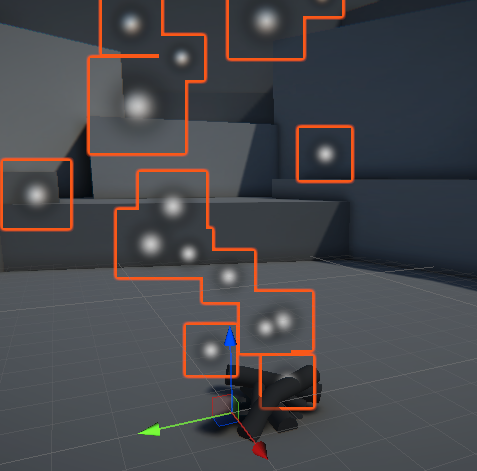
You will once again see the default white dots shooting out in cone shape from the firepit.
2. In the Particle System component of FX_SmokeBurst, expand the main module and deselect the Looping property.

The particle will stop playing immediately. Play the particle again from the Particle Effect window in Scene view and you will notice that it generates particles for 5 seconds and then stops. That is because the Duration property is set to 5. It’s already looking a lot more like a burst particle!
To create the appearance of a sudden burst of particles, you could technically reduce the Duration property to a very low value (like 0.05 seconds) and set the Rate over Time property to a very high value (like 1000 particles per second), and this would produce 50 particles over the course of 0.05 seconds (1000 * 0.05 = 50).
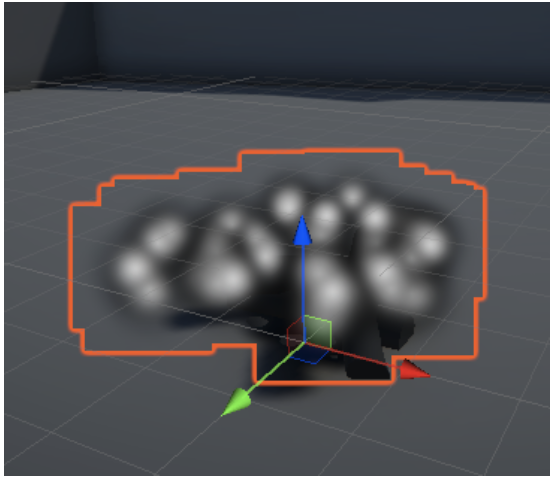
However, this is not ideal, since it doesn’t allow you to have a bunch of particles produced instantaneously. Luckily, there is a Bursts option available to do exactly what we want.
3. In the Emission module, set the Rate Over Time property to 0. This will prevent the Particle System from producing any particles over time.
4. In the Emission module, in the Bursts section, select the plus (+) button to add a new burst of particles.
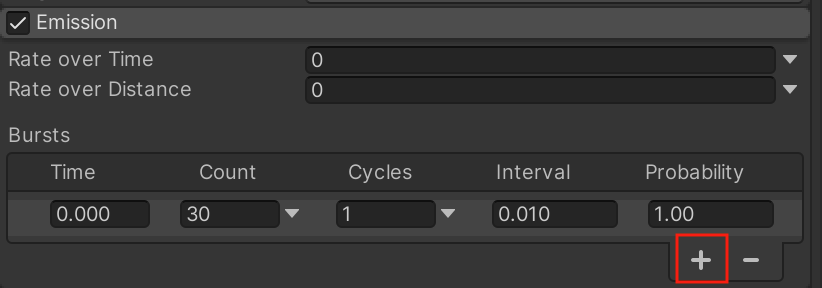
If you examine the default settings for a new burst, they will actually work pretty well for our purposes. At 0 seconds (Time), the burst will generate 30 particles (Count) 1 time (Cycles) with 100% likelihood (Probability). The Interval value is irrelevant, since we only have one burst cycle.
The smoke burst effect is already looking pretty good!
4. Make the particles move like smoke
The smoke particles are currently moving way too fast. Let’s slow them down so that they stay inside the firepit.
1. In the main module, decrease the Start Speed property to around 0.3 seconds. The particles should now move upward very slowly.
Next, the particles are surviving for too long, which doesn’t look natural for a puff of smoke. Let’s reduce their lifetime.
2. In the main module, reduce the Start Lifetime to a value around 1.0 seconds, depending on how long you want your burst to last.
There is also a very clear issue with the area that the particles are emitted: they seem to be coming from outside the base of the firepit. Let’s change the shape of the emitter.
3. In the Shape module, change the Shape property from a Cone to a Sphere, then change the Radius to a value around 0.5, depending on how large of an area you want the burst to consume.
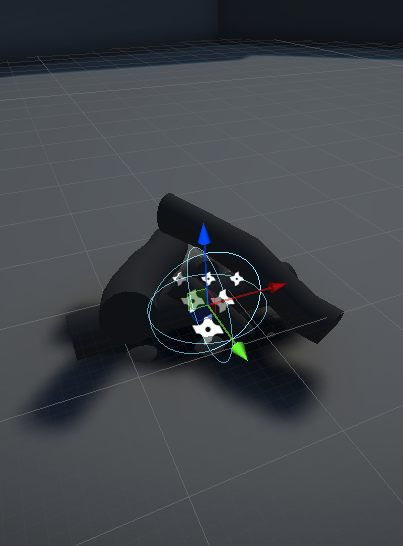
The particles should now all appear to emanate from the center of the firepit.
Each particle’s movement now looks about right, but it looks unnatural to have all of the particles moving at the exact same speed and disappearing at the exact same time. We need to introduce some randomness to this system to make it more interesting and realistic.
5. Add randomness to the particles
You may have noticed that many of the properties within the modules have small dropdown arrows that you can select. These dropdowns provide additional options for setting values, including the ability to randomize them.
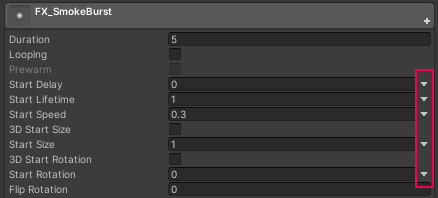
To prevent the particles from all disappearing at the exact same time, you could randomize their Start Lifetime.
1. From the Start Lifetime property dropdown arrow, select Random Between Two Constants.

You will notice that you now have two fields to enter minimum and maximum values for this property rather than just one constant value.
2. Enter minimum and maximum Start Lifetime values that surround your original constant. For example, if your Start Lifetime value was 1, you might enter 0.5 and 1.5, or an even wider range like 0.25 and 3.0, depending on how much variation you want in your particles.
Each particle in your system will be assigned a random value between those two numbers, causing them to disappear at slightly different times:
To simulate more natural randomness, you can repeat this process for other values, such as the Start Speed.
3. From the Start Speed dropdown arrow, select Random Between Two Constants and then enter appropriate minimum and maximum values.
Your particles should now have slightly different speeds.
Randomness adds a lot of visual interest to a Particle System. Next we’ll add even more visual interest by making the individual particles change over time.
6. Edit Color over Lifetime with the Gradient editor
To change the appearance of the particles over the course of their lifetime, we will need to enable some new modules.
First, it is a bit odd that the particles appear and disappear so abruptly. Instead, let’s make them fade in and fade out.
1. Select the checkbox to enable the Color over Lifetime module and then select the module to expand it.

2. Within the Color over Lifetime module, select the white rectangular color box to bring up the Gradient Editor window.
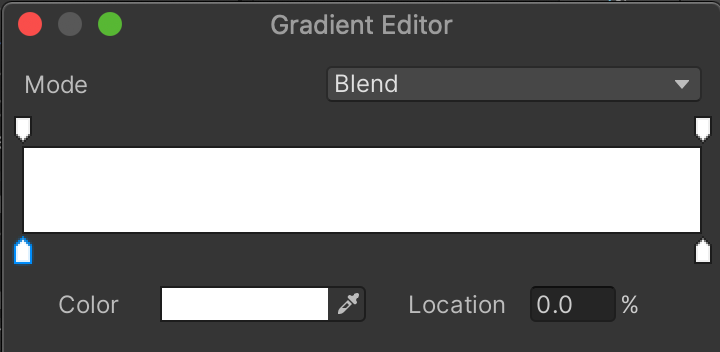
This horizontal bar represents what color and level of transparency the particle will have over its lifetime, starting from the left side of the bar and ending at the right side. So by default, the particle will be white and opaque for its entire lifetime. Using this gradient editor, you can make your particle transition through unlimited color and opacity states, like the example below, which fades in and out of blue and orange.
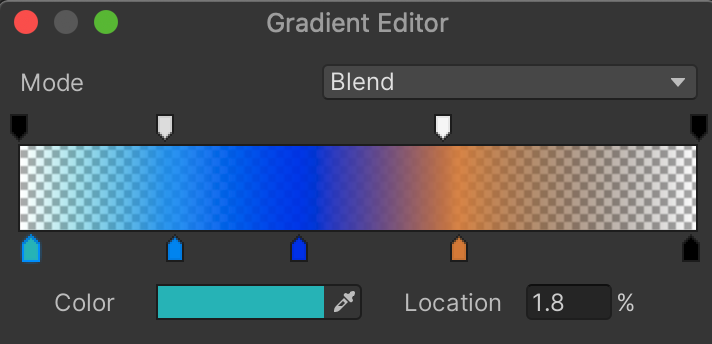
The set of markers above the horizontal bar dictate the transparency over time and the set of markers below the color bar dictate the color, allowing you to control transparency and color independently.
For now, we just want to make our particles fade in at the start of their life and fade out at the end.
3. To make the particle fade in, select the marker in the top-left, then drag the Alpha value (opacity) all the way down to 0.
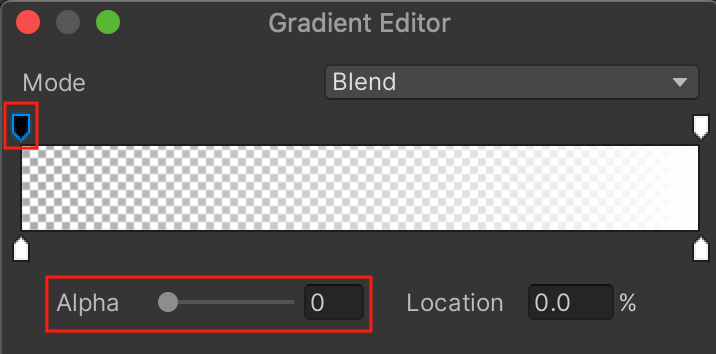
The marker now turns black, indicating the color is fully transparent. Note that the Alpha value slider will only appear after you select one of the transparency markers.
If you preview the particle, you will see it slowly go from transparent to opaque over the course of its lifetime. What we want is for it to fade in quickly at the start and then slowly fade out at the end. This requires going from a black to a white marker and then from a white to a black one.
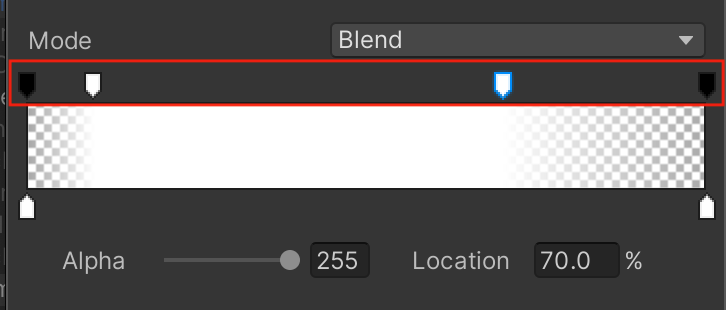
4. Use the gradient editor to make your particle fade in and out. To create a new transparency marker, simply select an empty spot in the area above the color bar, then adjust the Alpha value. To remove a marker, move it up or down.
If you’ve done this successfully, your particles should now quickly fade in and gradually fade out.
The Particle System is almost perfect – now we just need to replace that default particle texture.
7. Edit the Renderer and Texture Sheet Animation
Rather than replacing the default particle texture with another single texture, we are going to use something called a texture sheet.
What are texture sheets?
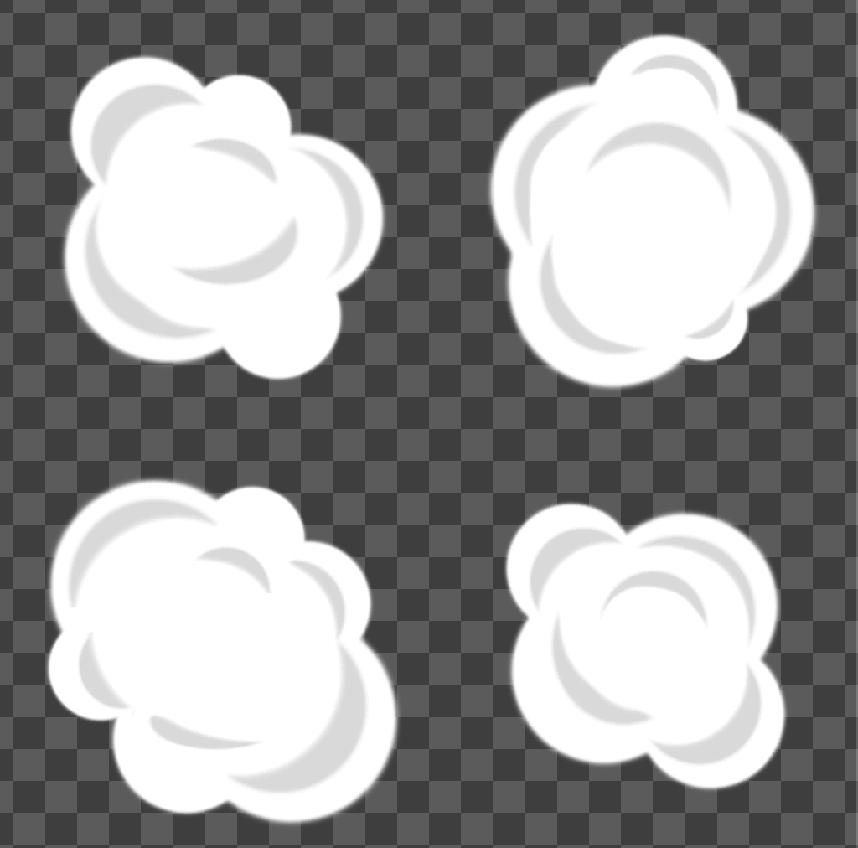
A texture sheet contains a number of sub-images that can be cycled through to produce a more dynamic animation, as opposed to an individual image.
You can use a texture sheet to animate each individual particle over the course of its lifetime, like this:
But you can also use a texture sheet to randomize which texture is used for individual particles, introducing variety into the Particle System.
This second use case is what we’ll implement with our smoke burst.
Randomize your textures from a texture sheet
First, we’ll need to change the default particle material to one that contains one of these texture sheets. The Renderer module controls the appearance of the individual particles.
1. Expand the Renderer component, then for the Material property, use the object picker to choose the texture sheet material (named SmokePuffMaterial).
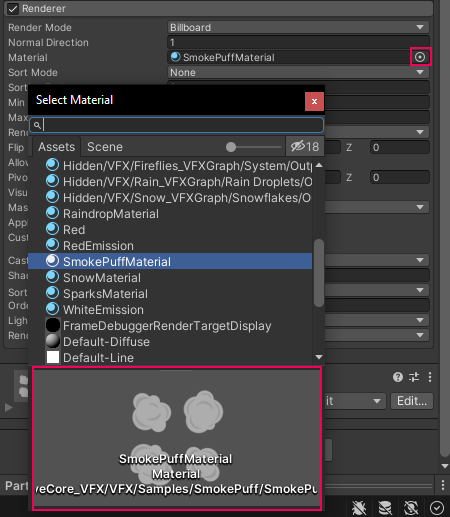
In the small preview panel at the bottom of the Select Material window, you will see that the material is a series of four smaller images.
If you zoom in on the effect playing in the Scene view, you’ll see that all four of these sub-images are now appearing for every single particle!
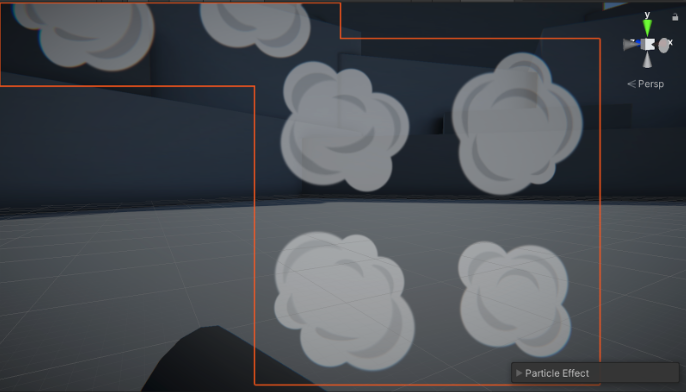
To resolve this problem, you need to enable the Texture Sheet Animation module. This module allows you to slice up and animate between individual images in a texture sheet.
2. Enable the Texture Sheet Animation module and then select it to expand it.
Nothing will happen yet because the Tiles property is not set up correctly. This property defines how many rows and columns your texture sheet has.
3. In the Texture Sheet Animation module, for the Tiles property, set X=2 and Y=2, since the texture sheet has two rows and two columns.
Each particle should now appear to cycle through all four sub-images over the course of its lifetime.
You can see that, by default, the Start Frame is set to 0 and Cycles is set to 1. This means that each particle will cycle through all four frames of the texture sheet (starting at frame 0) exactly one time over the course of its lifetime.
Though this could be ideal for some use cases, it looks a bit odd for the smoke burst. Instead of this, let’s randomize the starting frame and then use that single frame for the particle’s entire lifetime.
4. Change the Start Frame to be Random Between Two Constants, then set the start and end frame to 0 and 3, respectively. This will randomly select a starting frame, which are numbered 0, 1, 2, and 3.
5. Set the Cycles to 0. The value will automatically change to 0.0001, but the result will be the same.
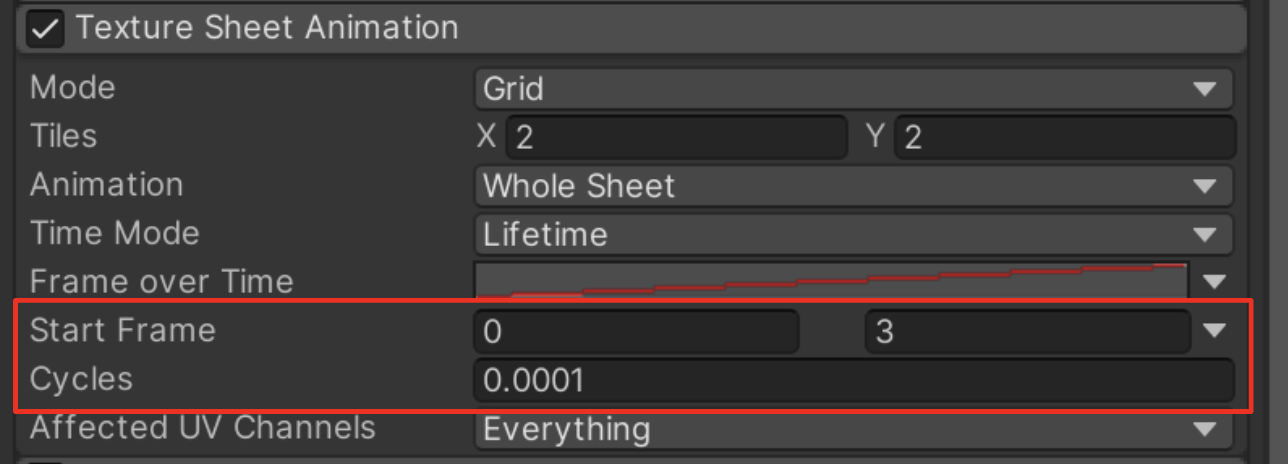
The randomized frame will now stay constant over the course of the animation.
8. Use a curve to change size over lifetime
The final touch that will really make this smoke puff come to life is changing its Size Over Lifetime. We will have the particles grow in size as they appear and then shrink as they disappear. This will make it feel more explosive and dynamic.
1. Enable the Size Over Lifetime module and then select it to expand it. In the dropdown for the Size property, you’ll see that Curve is selected.

2. Select the Size property’s curve preview box. When you select it, the line within it will turn red, indicating it’s selected.

Because the preview is so small, you won’t really be able to tell that it’s a curve yet or be able to edit it.
3. If you don’t already see the Particle System Curve window, move it up from the bottom of the Inspector window.
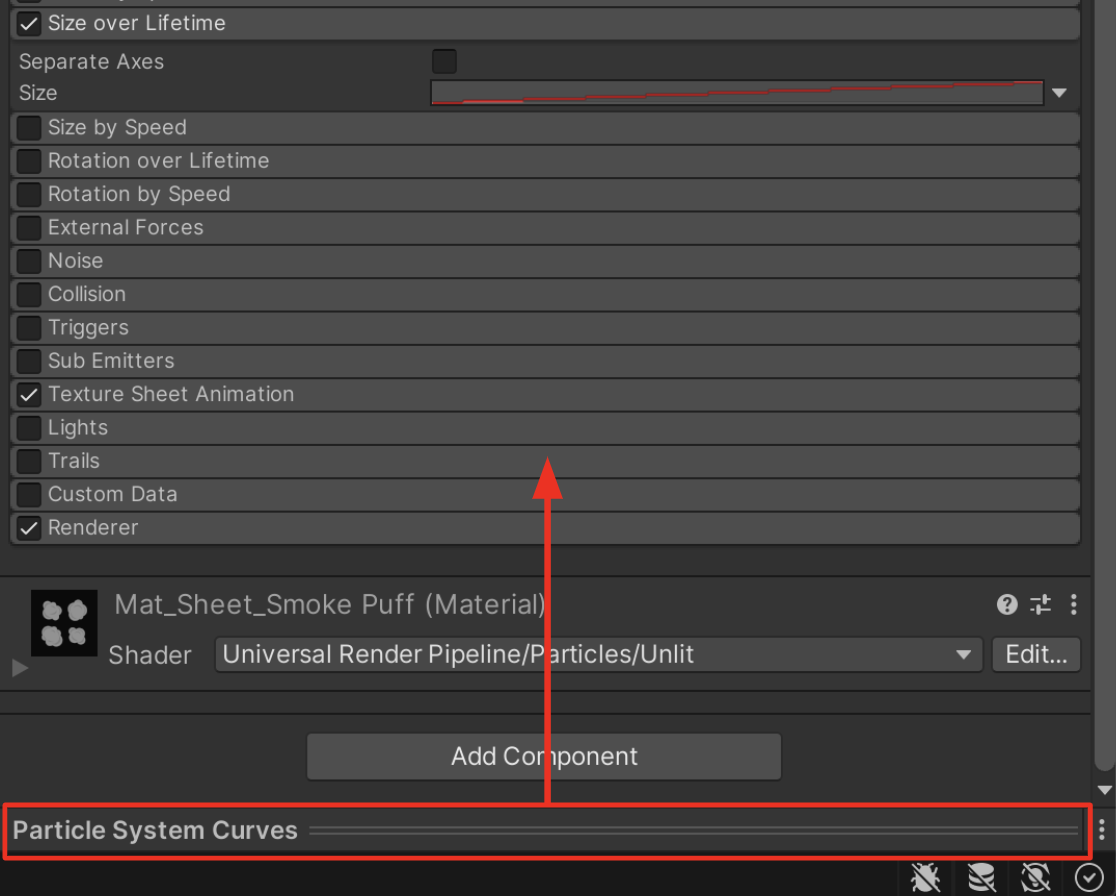
You should now be able to clearly see the graph, which has a diagonal red line through it by default.
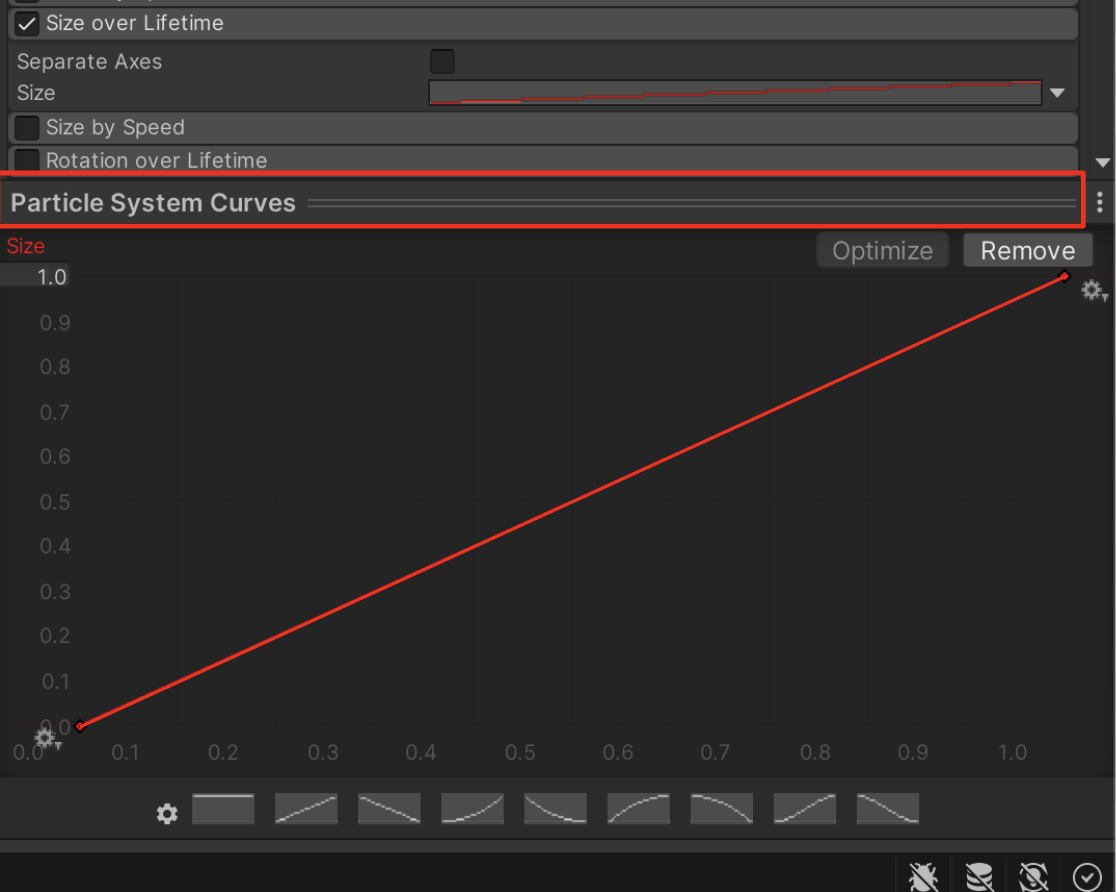
In this graph, time (from 0-1) goes along the bottom X axis and size (from 0-1) goes along the left Y axis.
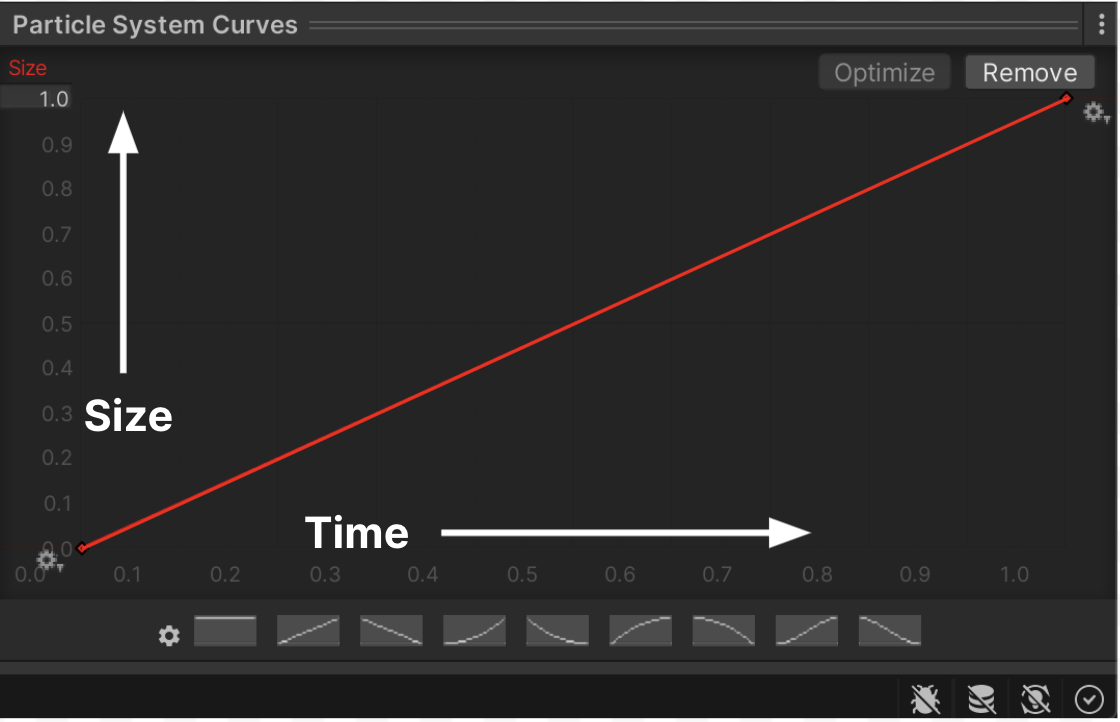
This default curve shows the particle increasing linearly over time. In other words, it starts at size 0 at time 0 (when it’s born) and ends at its full size 1 at time 1 (when it dies).
You can see this when you preview your particle.
9. Customize the curve
Now that you understand how the Particle System Curves editor is laid out, let’s manually edit the curve to make the particles grow and then shrink over their lifetime.
1. Experiment by selecting some of the preset curves located at the bottom of the Particle System Curves editor. Notice the effect that each has on your particles.
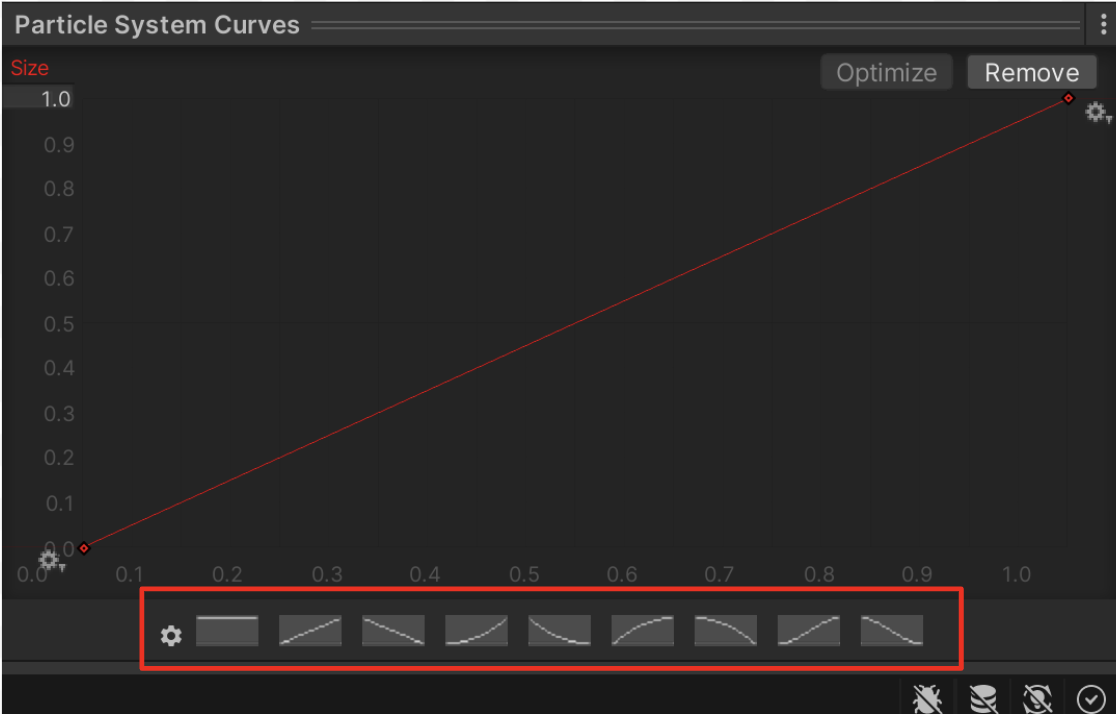
The curve we want is something like an upside down U shape – kind of like a typical bell curve – so that it starts out small, grows to full size, then returns to being small. There is no preset for that, so you need to make a custom curve.
2. Select the sixth curve from the left that looks a bit like the upper left corner of a circle to use as a starting point.
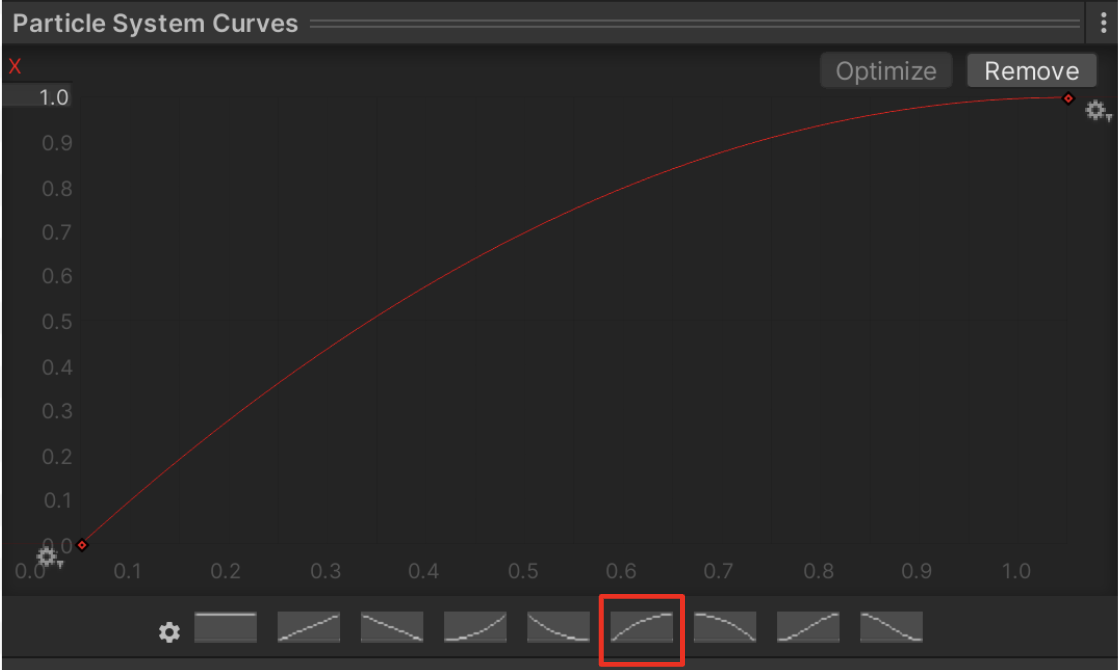
3. Select and drag the small red circle (the keyframe) from the top-right corner downward so that the curve comes back down at the end.
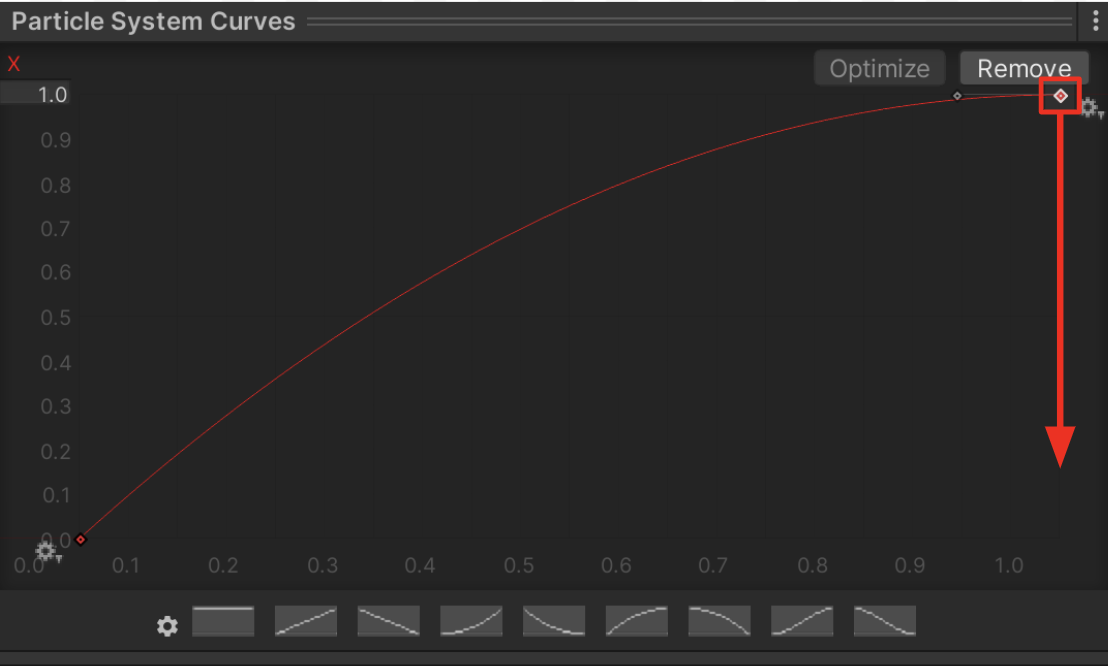
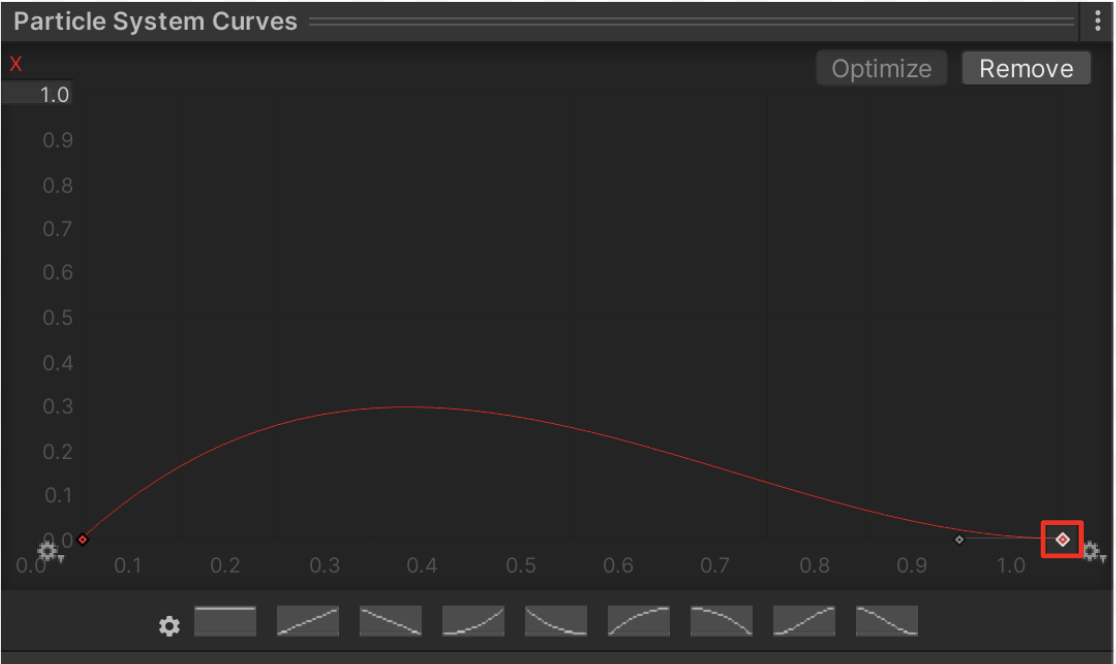
If you test your effect now, you’ll notice that the particles are way too small. That’s because the highest value the size ever reaches with this new curve is only around 0.3 (which you can see along the left Y axis). The curve needs to be taller.
4. Select the bottom-left keyframe. You’ll notice that a small arm now sticks out of it, which you can move around.
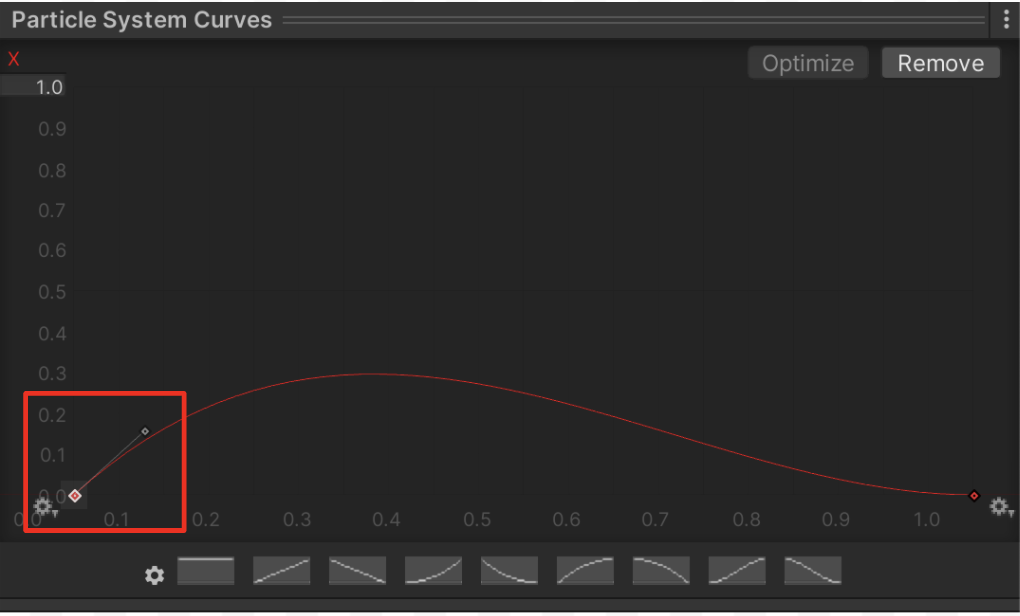
5. Select the handle at the end of this and move it upward to increase the height of the curve.
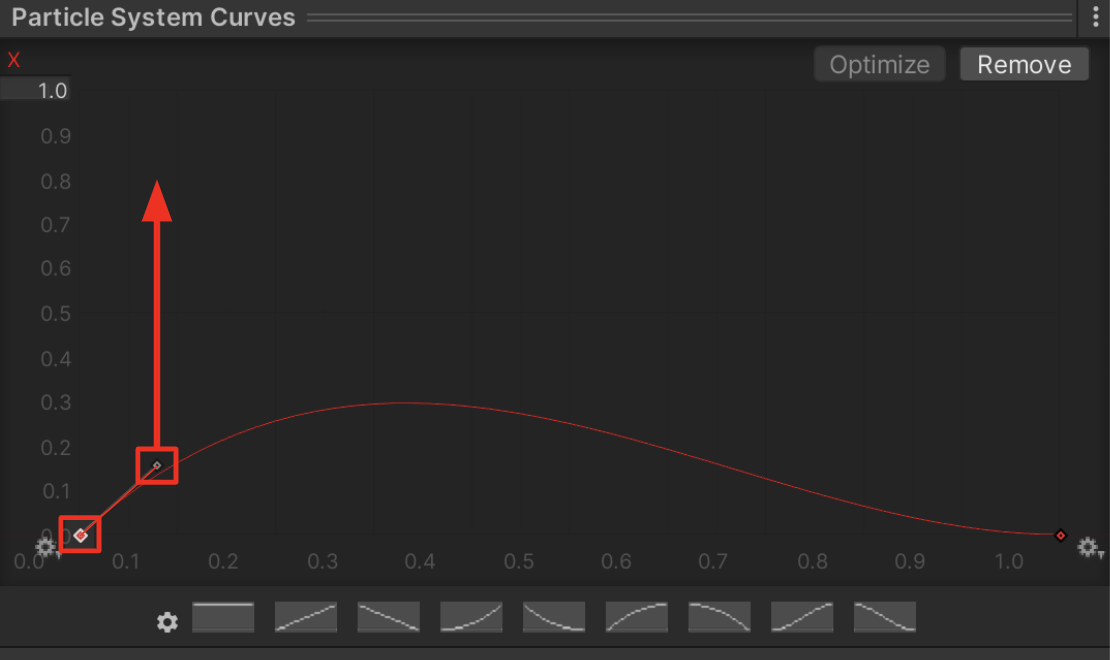
Now the curve starts at 0, quickly increases to around 1.0, and slowly eases back towards 0 again.
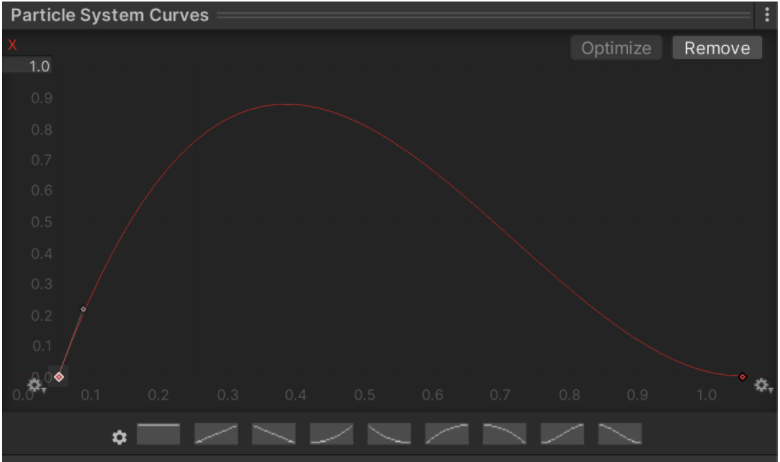
Test your smoke puff and see how it looks.
After making this adjustment, you may want to go back and tweak some other values to make the burst effect look just right, such as the Start Lifetime, Start Speed, or Color over Lifetime. If you want to explore other modules, there’s information on all of them in the Particle Systems documentation.
6. When you’re happy with your Particle System, drag it from the Hierarchy into the Prefabs folder in the Project window. This will give it a new blue Prefab icon in the Hierarchy and the Project window.
Next, let’s allow the user to trigger it with the press of a button on the keyboard.
10. Trigger the animation
To tie the effects in this scene together, we are going to give the user the ability to toggle this smoke burst with a key press, which will also ignite and extinguish the fire.
First, let’s configure our scene’s starting state correctly, with the fire effect playing and the smoke burst not playing.
1. Enable the Fire_ParticleSystem_Prefab and Point Light GameObjects.
In the fire effect’s main module, make sure the Play on Awake property is enabled. This means it will play automatically when added to a scene.
2. In the smoke burst’s main module, disable the Play On Awake property. This allows the particle to sit secretly in the scene, invisible, waiting to be triggered.
Now when you play the scene, the fire should start without the smoke burst.
Next, we need to give the user the ability to toggle the fire on and off with a key press. We have provided a simple script to help you do this, which we encourage you to look at if you’re interested.
3. From the Project window, in CreativeCore_VFX > Scripts, drag the ToggleFireParticle script onto the Fire_ParticleSystem_Prefab GameObject in the Hierarchy to assign it as a component. You will need to assign a reference to the point light, ignite and the extinguish particles. Use the Point Light and your FX_SmokeBurst respectively.
By default, pressing the spacebar will now alternate playing and stopping the fire particle.
4. In the ToggleFireParticle component, you can select a different key to use for user input. You can assign one particle to ignite the fire and another to extinguish it. You can also assign the point light attached to the fire, which will go on and off with the fire as well.

You can assign your smokeburst particle as the ignite particle, the extinguish particle, or both.
Now, pressing the spacebar should trigger the smoke as it ignites or extinguishes the fire.
To enjoy the full experience of your scene, feel free to also reactivate your weather effect!
11. Explore: Experiment with sub-emitters
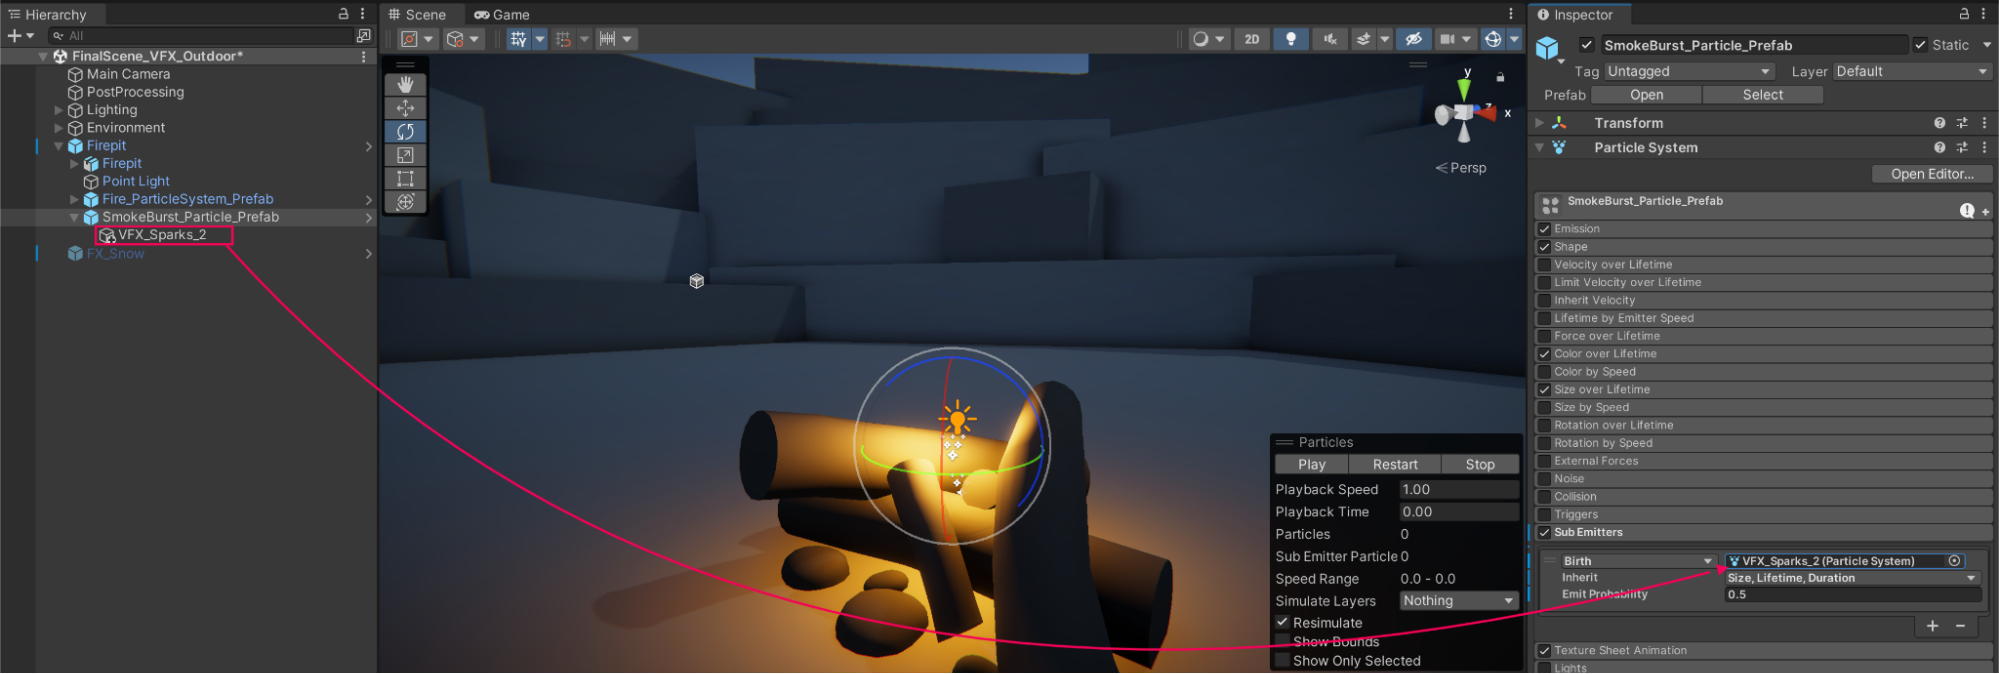
The sub-emitter module in Unity's Built-in Particle System allows you to spawn additional particle systems from within an existing particle system, creating more complex particle effects. This module can be useful for adding secondary particle effects such as sparks, smoke, or debris to enhance the visual impact of the primary particle system.
The example below shows a sub-emitter on the puff of smoke effect that shoots out additional sparks.
To create a sub-emitter, you first need to create a new particle system as a child GameObject of the particle system you want to extend. Then, in the parent particle system, enable the Sub-emitter module, assign the child particle system, and configure its properties. You can read more about these properties in the sub-emitter documentation.
12. Next steps
You are now pretty comfortable using the Particle System to create effects from scratch. Next, we’ll look at a completely different way to create particles: VFX Graph.