
2.1 The Animation window: features and settings
Tutorial
Beginner
+10XP
45m
(586)
Unity Technologies
In this tutorial, you’ll review key features and settings of the Animation window in context.
Languages available:
1. Overview
In 1.2: Animation systems core concepts: Animation data, you explored how animation data exists as bindings and values.
In this tutorial, you will:
- Develop your understanding of how bindings and values are represented in the Animation window.
- Explore the basics for viewing Animation Clips in the Animation window.
2. Before you begin
This tutorial uses the Introduction to 3D Animation Systems Unity project. If you haven't already done so, download this before continuing.
When you’ve downloaded the project:
1. Open the project in Unity Editor.
2. In the Project window, go to Assets > 2.1 Animation Window Features and Settings.
All the assets you need for this tutorial are located in this folder.
3. Recap: Data on Animation Clips
The animation data stored on Animation Clips exists in two parts: bindings and values.
Before you begin this tutorial, let’s recap the key information about this data:
- Bindings indicate which field of a GameObject or Component should be changed during the animation playback.
- Values indicate what the field should be changed to at a given time. Typically, these values are a float (fractional value) that changes over time and is represented as a curve.
- The Animation window (which is not the same as the Animator window) shows the bindings and values associated with an Animation Clip.
- You can use the Animation window to edit both the bindings and values of an Animation Clip.
4. Review an example animation
Let’s start by reviewing an example animation that’s a little different to the circle and square example in the Core Concepts tutorials.
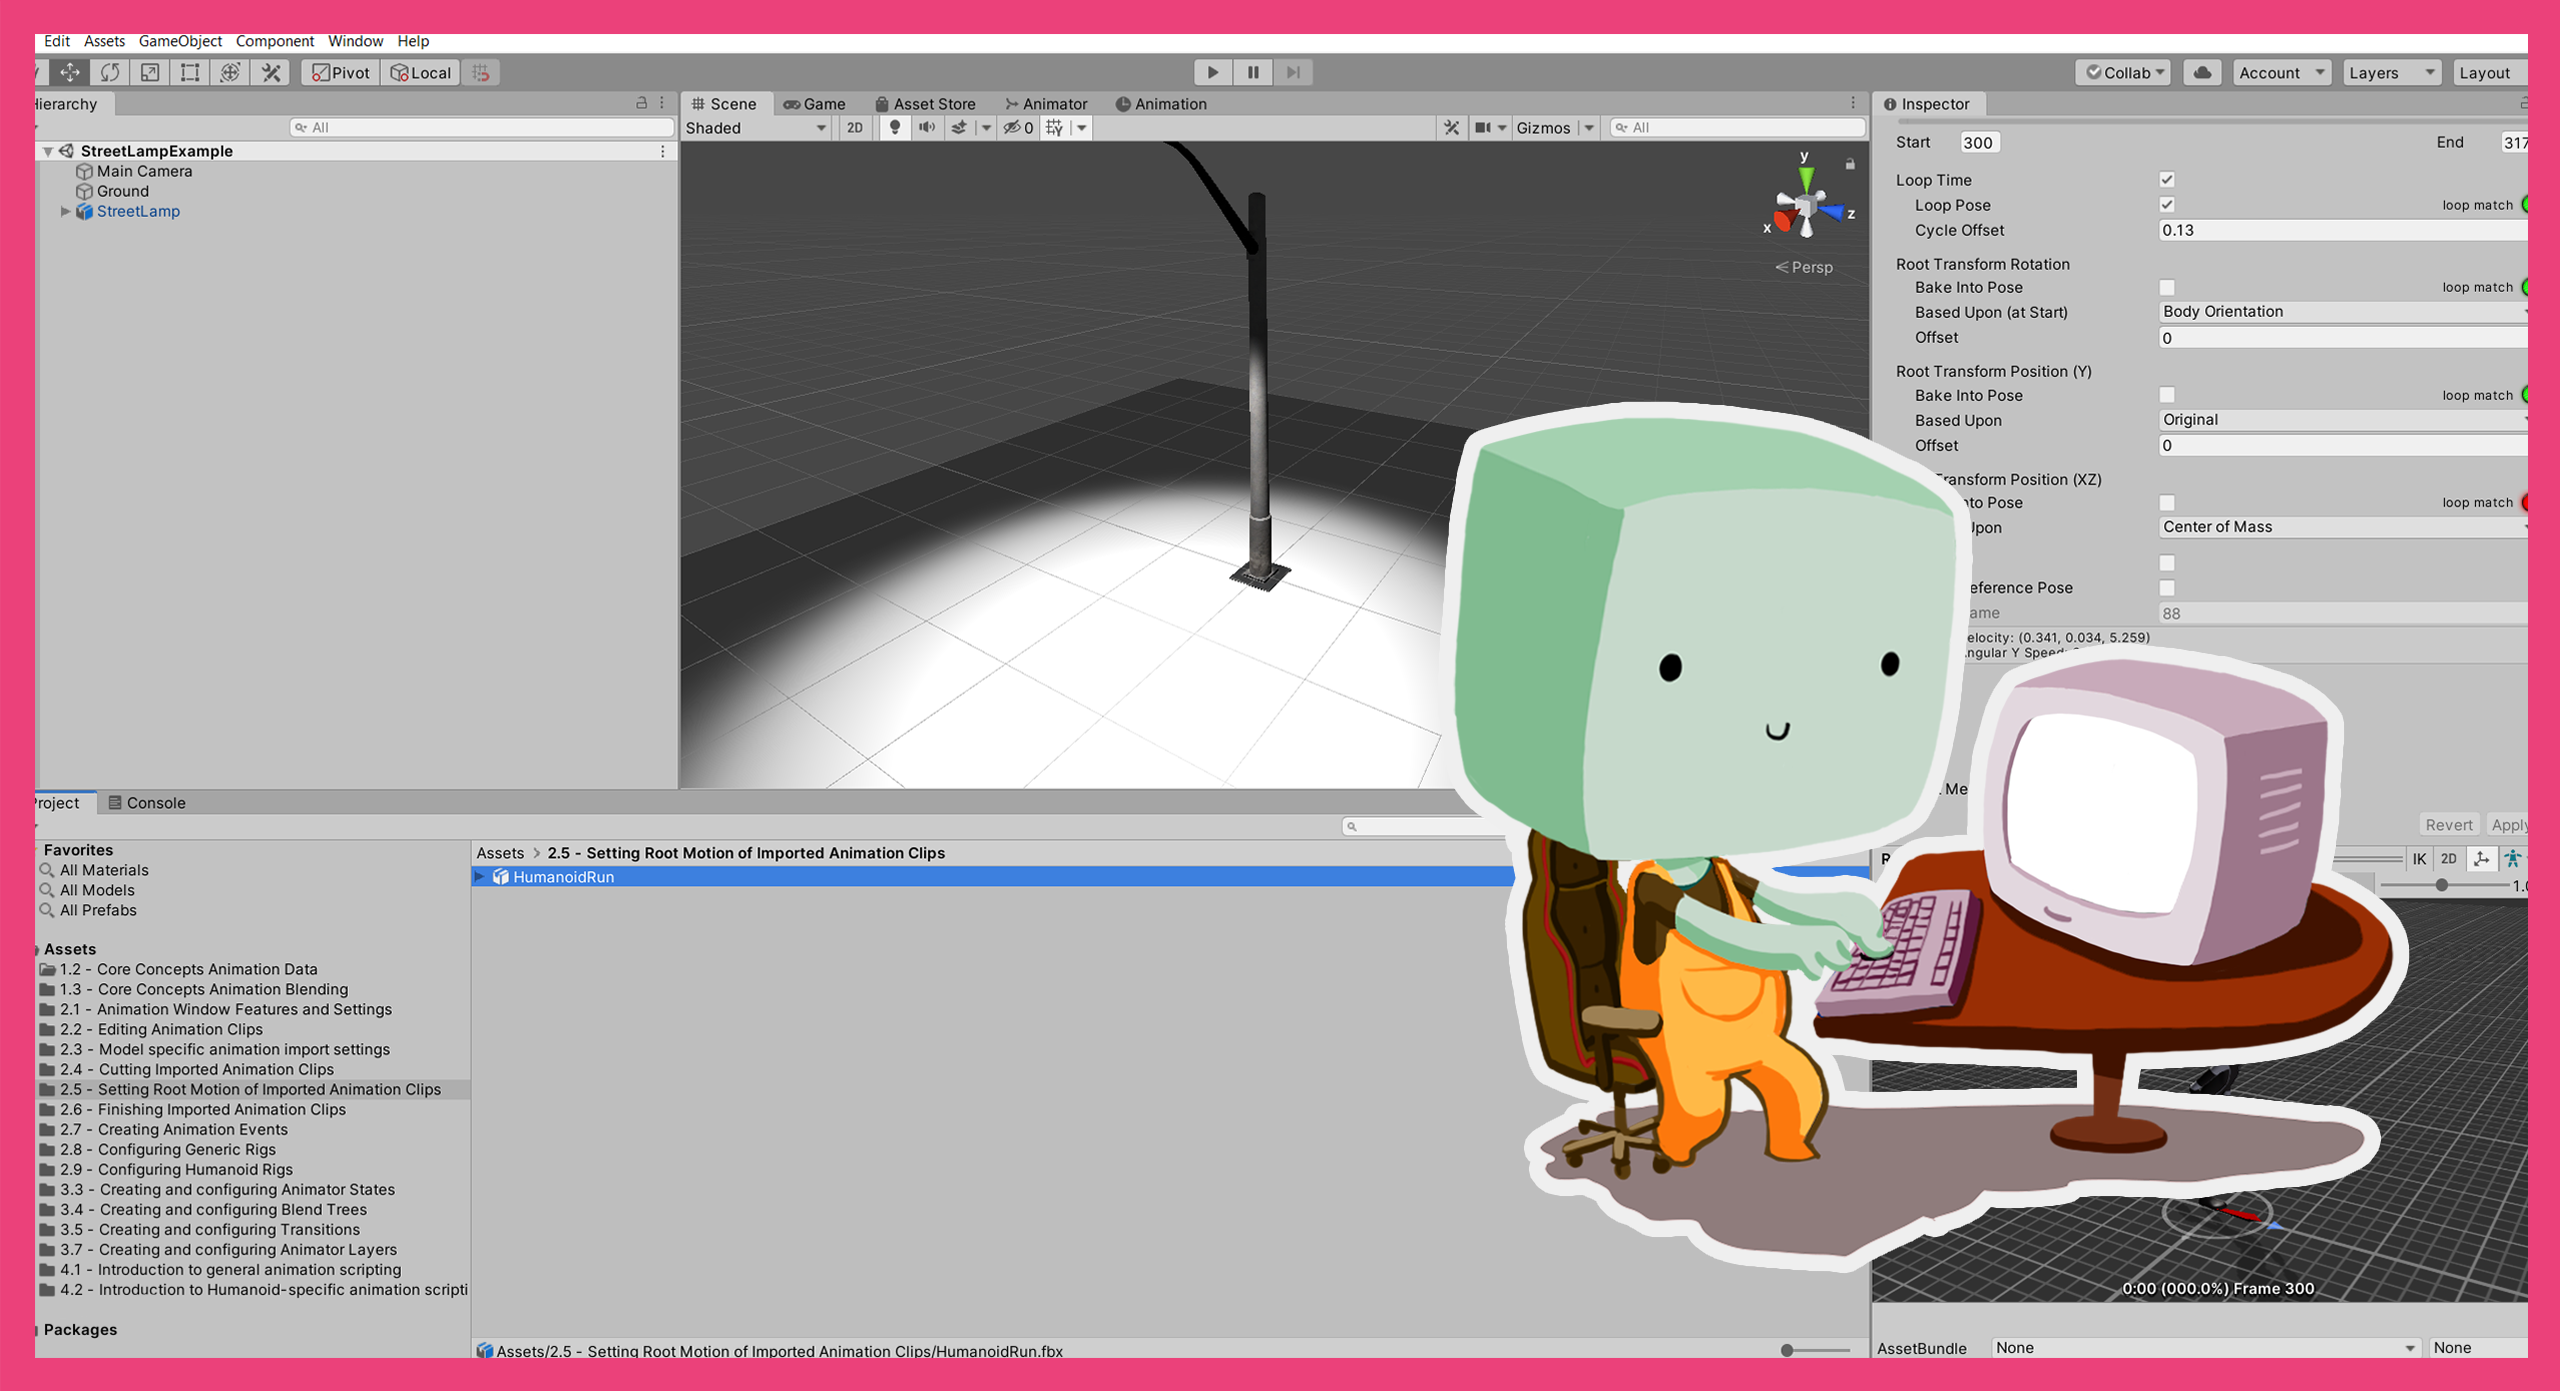
In this tutorial, you’re going to explore an animation of a street lamp.
To open this animation:
1. In the Project window, go to Assets > 2.1 - Animation Window Features and Settings > Scenes and double-click on the StreetLampExample Scene to open it.
2. Press the Play button to enter Play Mode to check that the animation works. You should see a streetlamp with a flickering light.
3. Press the Play button again to exit Play Mode.
4. In the Project window, go to 2.1 - Animation Window Features and Settings > AnimationClips and double-click on the LightFlicker Animation Clip to open it in the Animation window.
This Animation Clip has a single binding-value pair that changes the Intensity field of the Light component.
5. Make sure that the Animation window is set to Curves Mode, so that when you start editing the values you can see the changes more clearly.
5. Editing imported Animation Clips
The Animation Clips for the StreetLamp animation were created directly in Unity, but you can also import models with Animation Clips created in other software. Animation Clips that are imported as part of a model are read-only and cannot be edited.
If you want to edit an Animation Clip that has been imported as part of a model, you can duplicate the Animation Clip asset and edit this new Animation Clip. The copy of the Animation Clip will not be associated with the model, and therefore it will not change if the model’s import settings are changed.
Let’s duplicate and edit an Animation Clip for an imported HumanoidCrouch model:
1. In the Project window, go to Assets > 2.1 - Animation Window Features and Settings > AnimationClips folder and select the HumanoidCrouch model.
2. Click the foldout arrow to the left of the HumanoidCrouch model icon, to show its sub-assets. This model has several Animation Clips nested beneath it.
3. Select one of the Animation Clips to view it in the Animation window.
4. Press Ctrl + D (Windows) or Cmd + D (MacOS) to duplicate the Animation Clip.
You can now edit the properties in the new Animation Clip, but remember that it is no longer associated with the HumanoidCrouch model.
Show read-only imported Animation Clips
In Unity, you can hide read-only properties. To hide or reveal these properties:
1. In the Animation window, select the contextual menu next to the timeline (the lower of two adjacent context menus).
2. Enable or disable Show Read-only Properties to reveal or hide read-only properties.
6. Animation Clip context
There are two ways you can view Animation Clips in the Animation window: as an asset or in context. The approach you choose will impact the ways the Animation Clip can be edited.
View an Animation Clip as an asset
When you view an Animation Clip as an asset, the Animation window does not have any context of the GameObject(s) that will be used to play it. This means you cannot add any more Animation Curves to the Animation Clip as Unity doesn’t know which fields are available to be added.
To view an Animation Clip as an asset:
- In the Project window, select the Animation Clip to open it.
View an Animation Clip in context
When you view an Animation Clip through the GameObject Hierarchy, the Animation window does have context. This means you can add additional Animation Curves.
To view an Animation Clip in context:
- In the Hierarchy, select the GameObject with an Animator Controller containing the Animation Clip. The Clips referenced by the Animator Controller will be available in the Animation window, and you will be able to access the settings which require context.
This idea of context affects the features of the Animation window in other ways, too. For example, without context, an Animation Clip cannot be previewed.
As you explore the different features, settings and tools of the Animation window, you will learn if and how context affects each element.
7. Animation Clip context: StreetLamp example
Let’s use the StreetLamp example to explore the concept of context in the Unity Editor.
View LightFlicker as an asset
To view the LightFlicker Animation Clip as an asset:
- In the Project window,, go to Assets > 2.1 - Animation Window Features and Settings > AnimationClips and select the LightFlicker Animation Clip to open it in the Animation window.
The Add Property button is disabled, which means that you cannot edit the existing Animation Curve. This is because you’re viewing the Animation Clip without the context of a GameObject.
View LightFlicker in context
To view the LightFlicker Animation Clip in the context of a GameObject:
- In the Hierarchy, select the StreetLamp GameObject. The LightFlicker Animation Clip will appear in the Animation window.
If you want to edit the Animation Clip, you can now access the properties on the GameObject. This is because the Animation window has detected the context for the Animation Clip. The Add Property button is now enabled.
You’ll learn more about editing Animation Clips in the next tutorial.
8. Review the Animation window modes
Now you’ve learned how Animation clips can be opened and edited in the Animation window, let’s explore some of the functions of the Animation window in more detail.
Animation window overview
Animation Clips are made up of two parts: values and bindings. The Animation window is split into two main areas, one for each part of an Animation Clip, with the bindings on the left and the values on the right.
Keyframes
For each binding in the Animation Clip, there is a collection of keyframes that make up the corresponding values. These keyframes hold information on the value of the Animation Curve at a specific time, as well as how to interpolate the values in-between.
Dopesheet and Curves modes
The values in an Animation Clip can be viewed in the Animation window in two different modes: Dopesheet mode and Curves mode.
Dopesheet mode is a condensed view where only the keyframes themselves are shown. This view is useful when you want to see how the keyframes are laid out, or when the keyframes represent object references instead of float values. This is common in 2D animation, when different sprites are swapped with each keyframe.
The Curves mode shows the keyframe values and their interpolation, for either all the bindings or just the selected ones.
This course is focused on Unity’s 3D animation systems, but the majority of the content also applies to 2D animation in Unity. However, this course does not cover Object Reference Curves, which are used for Sprite animation.
Change the mode
So far in this tutorial you’ve been viewing Animation Clips in Curves mode. Let’s change the Animation window to Dopesheet mode:
1. In the bottom left of the Animation window, select the Dopesheet tab to change to Dopesheet mode.
You’ll notice that this mode is much more condensed than Curves mode, and it doesn’t show any of the details about the animation you’re going to need in this tutorial.
2. Select the Curves tab to change back to Curves mode.
Change the speed
Whether you’re in Dopesheet or Curves mode, there’s always a timeline across the top of the Animation window. It shows the time in a seconds:frames format. For example, 1:15 means 15 frames and 1 second from the start of the Animation Clip.
To change the speed of your animation, you can change the number of frames per second. To do this:
1. In the context menu next to the timeline, select Frames.
2. Open the same context menu again and select Show Sample Rate.
3. You can then set the number of frames manually in the Animation window.
Alternatively, you can use the context menu to select Set Sample Rate and choose one of the available options to change the speed.
9. Review the Animation window toolbar
On the left side of the Animation window, above the bindings, there are several buttons and settings that help you view and edit the data on your Animation Clip.
If you’re viewing an Animation Clip as an asset, some of these buttons will be inactive. Select the relevant GameObject in the Hierarchy to view the Animation Clip in context and access all of these tools.
Preview mode
The first button is the Preview button. When you’re in Preview mode, both the timeline and any properties in the Inspector that are being previewed will be tinted blue.
Enabling this mode temporarily sets the values of the Animation Clip to the GameObject, so you can preview how it will look. This means the setting will be unavailable if the Animation Clip is being viewed as an asset.
You can also click and drag on the timeline above the curves display to enter Preview mode.
Record Mode
The next button in the Animation window toolbar is the Record button. When you’re in Record mode, both the timeline and any properties in the Inspector that are being previewed will be tinted red.
Similar to Preview mode, enabling Record mode will temporarily set the values of the Animation Clip to the GameObject. The critical difference is that any changes to properties you make while this mode is enabled will be recorded to the Animation Clip.
The changes you can make and save in this mode include:
- Adding new bindings to the Animation Clip
- Adding keyframes to Animation Curves
- Setting the values of keyframes
This means you can change the properties of GameObjects and that any new values, bindings and keyframes will be recorded to the Animation Clip.
Timeline playhead
The timeline playhead indicates the exact point on the timeline that is being previewed.
The next five buttons on the toolbar are for setting the position of the timeline playhead.
Play button
You can only use the Play button here if you’re viewing the Animation Clip in context. When you press this button:
- Preview Mode is activated.
- The animation will start playing from the playhead’s current time.
- You’ll be able to see the animation in the Scene view.
First, previous, next and last buttons
The buttons on either side of Play are available whether you are viewing the Animation Clip as an asset or in context. You can use them to move the playhead between keyframes. They move the playhead to the first, previous, next or last keyframe respectively.
Current frame
To the right of the last five buttons, there’s a numerical field you can also use to set the position of the playhead. The number represents the position of the current frame. Changing this number will change the position of the playhead.
If the Animation Clip is being viewed in context, and you select one of the playhead position buttons or change the numerical field, Preview mode will be activated.
10. Select or create an Animation Clip
On the second row of settings and buttons in the Animation window, you’ll see the name of the Animation Clip you're currently viewing.
To select a different Animation Clip or create a new one when you’re viewing an Animation Clip in context:
1. In the Animation window, select the Animation Clip name to open a drop-down selection menu.
2. Select any of the Animation Clips currently being used by the Animator Controller, or select Create New Animation Clip to create a new Animation Clip.
If you create a new Animation Clip, it will automatically be added to the Animator Controller that is currently being used, placing it in the context of the current GameObject.
11. Filtering the Animation Curves for an Animation Clip
As a general rule, the more complicated the Animation Clip, the more Animation Curves there will be in it. If there are lots of Animation Curves in your Animation Clip, it’s useful to be able to filter which you see.
To filter the Animation Curves so that you can only see those associated with selected GameObjects:
1. In the Hierarchy, select the GameObject (or any of its children) for which you want to see the associated Animation Curves.
2. In the Animation window, click Filter by selection (to the right of the Animation Clip name).
Example
You might use this filter functionality when you’re viewing a character animation but you want to focus specifically on the hand animation. To see only the Animation Curves associated with the hand Transforms, you would:
1. In the Hierarchy, select the child GameObject for the hand.
2. In the Animation window, click the Filter by selection button.
12. Adding keyframes and Animation Events
The final two buttons you will review in this tutorial add keyframes and Animation Events.
Add keyframe
The Add keyframe button adds a keyframe to every selected Animation Curve at the playhead’s current time. If you haven’t selected any Animation Curves and you click Add keyframe, a keyframe will be added to all Animation Curves associated with the selected GameObject.
Add event
The Add event button adds a new Animation Event. It works whether you’re viewing the Animation Clip as an asset or in context, but this will impact how the Animation Event is set. You will learn more about Animation Events in 2.7: Creating and configuring Animation Events.
13. Summary
In this tutorial, you have explored the Animation window’s different features. You’ve learned:
- That you can duplicate imported Animation Clips to edit them
- The different functions available in the Animation window when you view Animation Clips as an asset or in context
- The difference between Dopesheet and Curves modes
You’ve also reviewed each button in the Animation window.
Although you’ll explore some of the features in more detail further on in this course, this overview will enable you to use the Animation window with confidence. It provides a foundation for the other tutorials you will complete in this learning project.
In the next tutorial, you’ll create and edit Animation Clips in the Unity Editor.