2.8 Configuring Generic Rigs
Tutorial
Beginner
+10XP
45 mins
315
Unity Technologies
In this tutorial, you’ll:
- Learn about Animation Types
- Create and configure an Avatar asset for a Generic Rig
Languages available:
1. Overview
Rigs are a way of defining the structure of the model being imported and are used to define how animations play. In this tutorial, you’ll learn about Animation Types and create and configure an Avatar asset for a Generic Rig.
2. Before you begin
This tutorial uses the Introduction to 3D Animation Systems Unity project. If you haven't already done so, download this before continuing.
When you’ve downloaded the project:
1. Open the project in Unity Editor.
2. In the Project window, go to Assets > 2.8: Configuring Generic Rigs.
All the assets you need for this tutorial will be in this folder.
3. Open the Rig tab
To start configuring rigs, you’ll first need to open the Rigs tab in Unity:
1. In the Project window, go to 2.8 - Configuring Generic Rigs > Models and select the Ellen model.
2. In the Inspector, click the Rig tab (next to the Model tab) to open it.

The only available setting is the Animation Type.
If a model has no animation or it’s not intended to be used to play animations, then leave the Animation Type as None. The other options are Legacy, Generic and Humanoid.
4. Review the Animation Type setting
Let’s review the three other Animation Types in a little more detail.
Legacy
Legacy is used to ensure compatibility with versions of Unity before 4.x.
Generic
The most common Animation Type setting for animated models is Generic. You should use this Animation Type for most animated models.
Humanoid
You should use Humanoid Animation Type if the model you’re importing is a character with a humanoid shape and one or more of the following applies:
- The model has animations that are intended to be played through another Humanoid model with a different hierarchical structure.
- You’re using the model to play animations that are from Humanoid models with a different hierarchical structure.
- You want to use the built-in Humanoid features, such as arm and leg IK or target matching.
You’ll explore the Humanoid Rig Type in more detail in 2.9 Configuring Humanoid Rigs.
Select an Animation Type for your model
- For this tutorial, set the Animation Type to Generic.
5. Create a new Avatar asset
Now you’ve set the Animation Type to Generic, you’ll see more settings to configure.
The first setting you’ll see below Animation Type is the Avatar Definition.
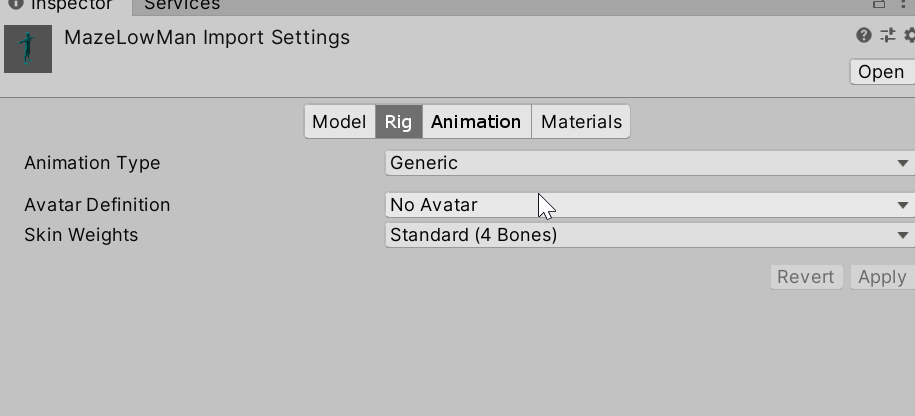
Introduction to Avatars
Avatars are an asset representation of the model’s Rig. They take different forms depending on whether the Rig is Generic or Humanoid.
Avatars are required for some animation functionality, such as animation masking. A common practice is to create an Avatar for the model that will be playing the animation and let the models that contain the animation data use it.
Create an Avatar
To create an Avatar for your model:
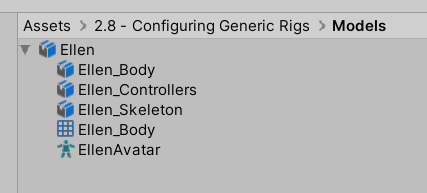
1. Set the Avatar Definition field to Create From This Model.
2. Select the Apply button to create the new Avatar asset.
6. Select a Root node
When the Animation Type is set to Generic, the next setting available is the option to select a Root node.
Introduction to Root nodes
Root nodes are used to define Root Motion in animations. Root Motion is when an animation causes GameObjects to offset from their previous position rather than just moving in absolute terms.
For example, if a GameObject is animated to move forward on its z-axis, then with Root Motion, the GameObject would continue to move further and further along the z-axis as the animation loops.
Without Root Motion, whenever the animation loops, the GameObject would return to where it started and then move forward in its z-axis again. The Root node is used as a reference for this Motion.
Set the Root node for your model
The appropriate Root Node for the example model is the Ellen_Root GameObject, which is a child of Ellen_Skeleton.
- If the Root node is not set to Ellen_Skeleton/Ellen_Root, set it now using the drop-down menu.
7. Set the Skin Weights
The next setting available is the Skin Weights.
Models are represented by a triangle mesh, as you explored in 2.3 Model-specific animation import settings. Let’s recap the basics:
- Generally, animated models have a skinned mesh.
- Skinning is the process of connecting each vertex of a mesh to one or multiple bones and then giving those bones a weight to affect that vertex.
- In Unity, bones are represented by the Transforms of a model, so each vertex moves with a weighted combination of the Transforms it is skinned to.
The Skin Weights setting allows you to adjust how many bones a vertex can be skinned to. By default, this is set to 4 bones and it’s recommended you keep it at 4 in most use cases.
Some advanced users may want to adjust this for performance or accuracy reasons in special cases. In such cases, the Skin Weights setting can be changed from Standard (4 bones) to Custom. This means you can adjust the Max Bones/Vertex and Max Bone Weight settings.
Max Bones/Vertex setting
The Max Bones/Vertex setting allows you to set how many bones should be considered in calculating the position of a vertex. The Max Bone Weight setting allows you to set a minimum Weight a bone must have before it’s considered for the position calculation of a vertex.
You don’t need to change the Skin Weights of your example model from the default.
8. Optimize the model GameObjects
The final available settings in the Rig tab are about optimizing GameObjects in the model. These settings are important for any models that will be instantiated at any point.
Normally, the bones of a model are represented by Transforms that are part of GameObjects. Sometimes, however, models can have very complicated hierarchies. This can result in having many GameObjects that are there simply to define the positions of the vertices of a skinned mesh.
If Optimize GameObjects is enabled, all GameObjects that have no components on them are removed. The Skinned Mesh is then moved directly by the animation.
Optimizing GameObjects results in a significant performance increase, so you should do it as often as possible.
Expose Extra Transforms settings
Sometimes, it might be necessary to keep a GameObject that would otherwise be removed when you enable Optimize GameObjects. For example, if you have a character who wears changeable armour, you might need to expose the Chest GameObject so that the armour can be attached. To keep the GameObject(s), you need to use the Expose Extra Transforms settings.
Let’s test this by exposing the chest of the example character model:
1. In the Inspector, enable Optimize Game Objects.
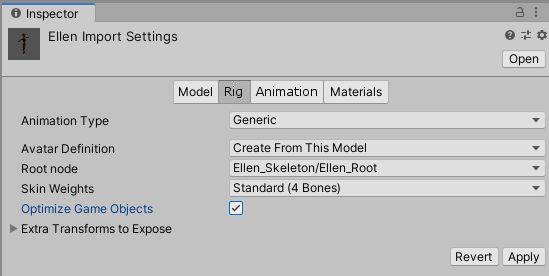
2. Expand the Extra Transforms to Expose foldout.
3. Expand each node’s foldout to go to Ellen_Skeleton > Ellen_Root > Ellen_Hips > Ellen_Spine > Ellen_Chest.
4. Enable the Ellen_Chest node.

5. Click Apply to save the changes to the Rig.
6. Drag the Ellen model from the Project window into the Hierarchy to instantiate it.
7. In the Hierarchy, expand the Ellen GameObject to see its children.
The Rig will no longer have any child GameObjects other than Ellen_Body (which has a Skinned Mesh Renderer component) and Ellen_Chest (which you exposed).
9. Creating and applying Avatar Masks
The final thing you will consider in this tutorial is Avatar Masks for Generic Avatars.
Avatar Masks are a way of preventing animation data from being written to its binding. They work differently for Humanoid and Generic Avatars, but the overall effect is the same: Transform data is not used from sources that have been masked.
Avatar Masks are assets and can be created in the same way as you would create other assets.
- Using the Create menu in the Project window, select Avatar Mask.
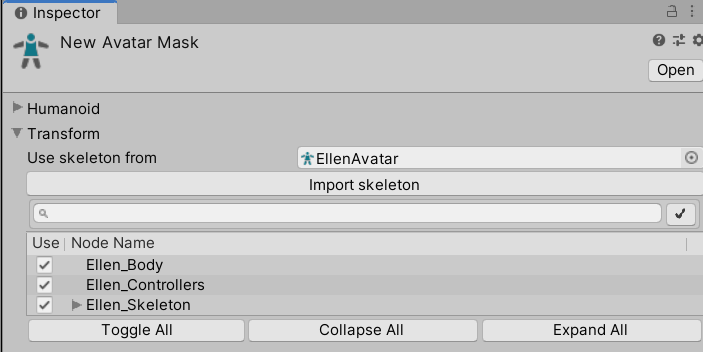
Avatar Masks for Generic Avatars
Avatar Masks for Generic Avatars have a foldout list of Transforms. You can use this list to deselect individual Transforms to be masked, or select Transforms you want unmasked.
Applying Avatar Masks
You can apply Avatar Masks in two different situations:
- To imported Animation Clips during the import process, to stop the animation data of certain Transforms being added to that Animation Clip.
- To Animation Layers in an Animator Controller, to prevent animation data of certain Transforms being added to the resultant blend of all the Layers of the Animator Controller. These Avatar Masks must be created as assets but work identically to other Avatar Masks.
You can find out more about importing Animation Clips and Animation Layers in other tutorials in this course.
Note: It’s important to remember that Avatar Masks only mask Transform data. They do not mask data on the same GameObject as a masked Transform.
10. Summary
In this tutorial, you’ve explored how to configure generic rigs. You've learned:
- When to use each of the three animation types: legacy, generic and humanoid.
- That Avatars are an asset representation of a rig and how to create them.
- How Root Nodes work in relation to generic rigs.
- Reviewed skin weights are learned how to set them for generic rigs.
- How to optimize your generic rig models and how to override the removal of GameObjects in the optimization process.
- How Avatar masks apply to generic rigs and how to create and apply them.
In the next tutorial, you’ll learn how to configure another type of animation: humanoid rigs.