2.9 Configuring Humanoid Rigs
Tutorial
Beginner
+10XP
45 mins
294
Unity Technologies
In this tutorial, you’ll explore how to configure Humanoid Rigs, including:
- Mapping bones to Transforms, and using Automap to make this process easier
- Applying the t-pose as a reference pose for your Humanoid model
- Changing the Per-muscle settings, and the effect this has on the resulting animation
- Creating and applying Avatar Masks
Languages available:
1. Overview
In this tutorial, you’ll explore an important part of the model import process: rigs. Rigs are a way of defining the structure of the model being imported and are used to define how animations play.
In this tutorial, you’ll explore how to configure Humanoid Rigs, including:
- Mapping bones to Transforms, and using Automap to make this process easier
- Applying the t-pose as a reference pose for your Humanoid model
- Changing the Per-muscle settings, and the effect this has on the resulting animation
- Creating and applying Avatar Masks
2. Before you begin
This tutorial uses the Introduction to 3D Animation Systems Unity project. If you haven't already done so, download this before continuing.
When you’ve downloaded the project:
1. Open the project in Unity Editor.
2. In the Project window, go to Assets > 2.9: Configuring Humanoid Rigs.
All the assets you need for this tutorial will be in this folder.
3. Recap: Humanoid Animation Type
2.8 Configuring Generic Rigs provided an overview of the different possible Animation Types for a Rig. Generally, an animated model should use the Generic Animation Type, with a few exceptions.
These exceptions are when:
- The model has animations that are intended to be played through another Humanoid model with a different hierarchical structure.
- You’re using the model to play animations that are from Humanoid models with a different hierarchical structure.
- You want to use the built-in Humanoid features, such as arm and leg IK or target matching.
Note: The Humanoid Animation Type is not necessarily the right choice for a bipedal, human-like character.
In this tutorial, you will investigate how rigs with the Humanoid Animation Type (commonly called Humanoid Rigs) work.
4. Change the Animation Type to Humanoid
First, open the model for this tutorial and set it to Humanoid. To do this:
1. In the Project window, select the MazeLowMan model.
2. In the Inspector, select the Rig tab.
3. Set the Animation Type to Humanoid.
4. Select Apply.
5. Mapping and Humanoid Avatar complexity
The core difference between Generic Rigs and Humanoid Rigs is their Avatars. Humanoid Rigs require Avatars to play their animations, which is not the case for Generic Rigs. This is because Humanoids are a special case; their Transform hierarchy is mapped to the bones of a human-like shape.
Under normal circumstances, in order for an animation to be shared among multiple targets, each target must have an identical hierarchy with identical names to those on the Animation Clip. This is because the names of Transforms are used to construct the bindings of an Animation Clip. If the hierarchy through which an Animation Clip is being played doesn’t have a specific binding, the binding is just ignored. This means that if the names don’t match, the animation won’t play.
When an imported model is a Humanoid, its Animation Clips are no longer played using just standard bindings. Instead, the parts of the Animation Clips that match the Humanoid definition are played through the Avatar.
At import time, Animation Clips from Humanoid models are converted from writing to Transforms directly to writing to Muscles instead. These are called Muscle Clips. At runtime, Muscle Clips are converted back to write to Transforms.
Because all humanoids have this mapping, any Humanoid Animation Clip can be played through any Humanoid model.
Process recap
These conversion processes can be summed up by the following high level overviews:
On import: Animation Clip with Transform bindings → Humanoid Avatar → Muscle Clip
At runtime: Muscle Clip → Humanoid Avatar → set Transform properties
The process of taking Animation Clips intended for one hierarchy and playing them through a different hierarchy is known as retargeting.
6. Load the Humanoid Avatar configuration
If the Configure… button in the Inspector has a tick symbol to its left, Unity was able to automatically set up the Avatar.
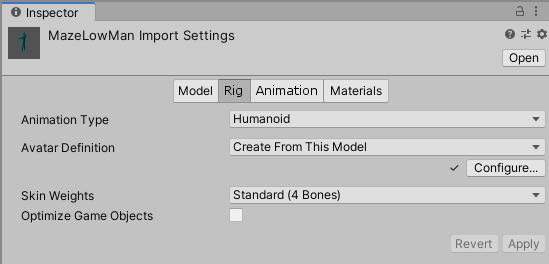
Whether this is present or not, let’s review the Avatar settings. To open the Avatar settings:
- Select the Configure… button.
When you do this, you may be prompted to save the Scene you had open. This is because Humanoid Avatar configuration is done in a separate Scene, so the current Scene needs to be unloaded.
7. Review the Mapping
When the Avatar configuration Scene has loaded, the Inspector will show the mapping for the Avatar.
Avatar configuration is split into two parts, with the settings split among two tabs at the top of the Inspector:
- Mapping
- Muscles & Settings

Let’s start by reviewing the Mapping tab.
Mapping tab
The mapping defines exactly which of the model’s Transforms is linked to which of the pre-defined Humanoid bones.
The Inspector window shows a diagram of the area the bones can currently be assigned for.
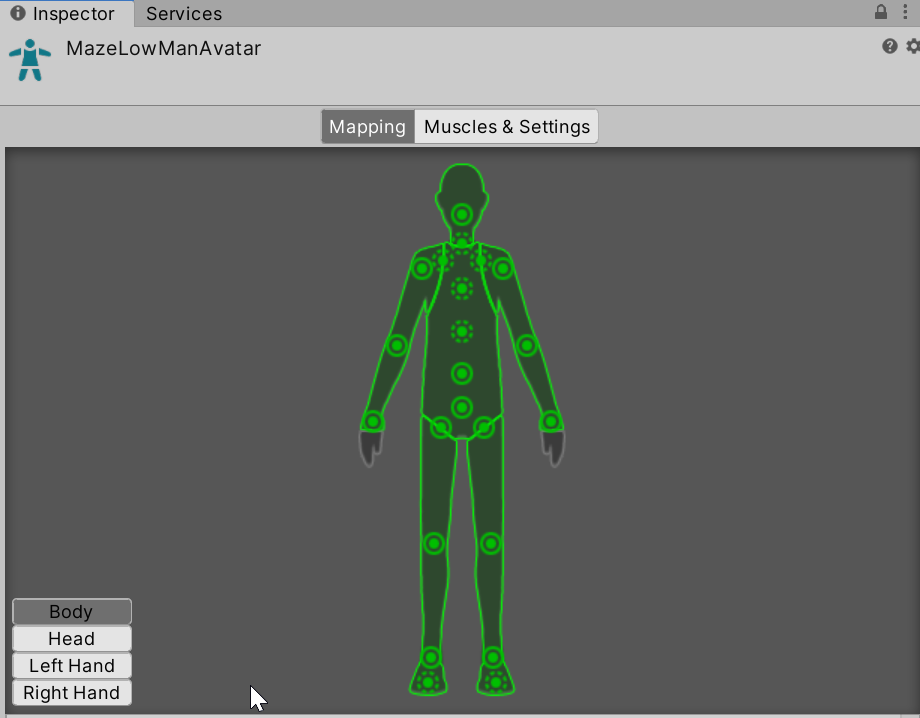
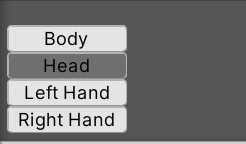
By default, this is the whole body, and more detailed areas such as the head and hands can be selected using the buttons.
Each dot on the diagram refers to a bone. If the dot has a solid outline then the bone is required in order for the mapping to work. If the dot has a dotted outline, the bone is optional. The more optional bones you map, the higher the quality of the retargeting.
Use Automap
In order to make setting up the mapping easier, there is the option to try and automatically complete it by matching the expected hierarchy and names. To enable Automapping:
- Click the Mapping dropdown at the bottom of the Mapping tab, and select Automap.
8. Apply a standard animation pose
The positions and rotations of the Transforms as they exist in the Avatar setup are also extremely important.
They form a reference pose from which animations are measured. Each rotation and translation in an animation is compared to this reference pose when it’s converted to and from a Muscle Clip. Because this pose is so important, Unity uses a standard animation pose as the target all humanoid models should aim for: the T-pose.
A T-pose is when a human stands up straight with their arms straight out from their shoulders and legs straight down from the hips. Once the mapping has been set, Unity can try to set the skeleton to a T-pose. It’s recommended you do this before finalising your Avatar setup.
To do this:
- Click the Pose dropdown (at the bottom of the Mapping tab) and select Enforce T-Pose.
9. Configure the Muscles & Settings
Muscle definitions exist as a range within or beyond which a bone is expected to rotate on a given axis.
This range is normalised, which means that rotations at one end of the range would have a value of 0 and rotations at the other end of the range would have a value of 1. Transform rotations are converted into these normalised rotation ranges at import time. The normalised rotation ranges are then converted back into Transform rotations at runtime.
The expected range of motion for the Avatar at import time and the expected range of motion for the Avatar at runtime may be different. If they are, the conversion can still happen, because the data is stored as normalised values over common bone definitions.
However, this will impact the rotation in the animation.
Example
Consider this example:
A model has a muscle definition with a range between 10 and 90 degrees around an axis. An animation on that model calls for a rotation of 50 degrees on a particular frame.
Since the range is normalised, this rotation can be said to be 0.5 of the range around that axis.
This animation is being retargeted to a different model. This model has a range of between 0 and 110 degrees. The conversion of this 0.5 rotation from the animation becomes 55.
Explore this in the Editor
To explore this in the Editor:
1. At the top of the Inspector, select the Muscles & Settings tab.
2. In the Per-Muscle Settings section, expand the Head and Neck Nod Down-Up foldouts.
3. Try changing the range from its default of -40 to 40 to a bigger range, using the Preview slider to the left to view what happens.
4. When you’ve finished, return to the default range of -40 to 40.
10. Creating and applying Avatar Masks
The final thing you’ll explore in this tutorial is Avatar Masks for Humanoid Avatars.
Avatar Masks are a way of preventing animation data from being written to its binding. They work differently for Humanoid and Generic Avatars, but the overall effect is the same: Transform data is not used from sources that have been masked.
Avatar Masks for Humanoid Avatars
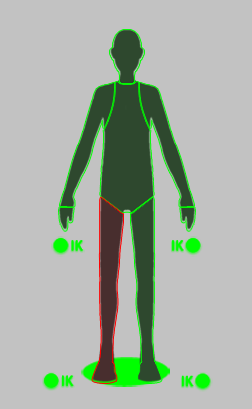
Avatar Masks for Humanoid Avatars work by using an image of a Humanoid with the different areas of the humanoid being selectable. Deselecting an area of the Humanoid masks it.
Applying Avatar Masks
Avatar Masks can be applied in two different situations:
- To imported Animation Clips during the import process, to stop the animation data of certain Transforms being added to that Animation Clip.
- To Animation Layers in an Animator Controller, to prevent animation data of certain Transforms being added to the resultant blend of all the Layers of the Animator Controller. These Avatar Masks must be created as assets but work identically to other Avatar Masks.
You can find out more about importing Animation Clips and Animation Layers in 3.7 Creating and configuring Animation Layers.
Note: It’s important to remember that Avatar Masks only mask Transform data. They do not mask data on the same GameObject as a masked Transform.
11. Summary
In this tutorial, you’ve explored how to configure Humanoid Rigs, including
- Mapping bones to Transforms, and using Automap to make this process easier
- Applying the t-pose as a reference pose for your Humanoid model
- Changing the Per-muscle settings, and the effect this has on the resulting animation
- Creating and applying Avatar Masks.
In the next learning project, you’ll explore the Animator component and animation blending.