
Entities in action: Tanks
Tutorial
intermediate
+10XP
30 mins
136
Unity Technologies
In this tutorial, you'll put your new knowledge of jobs and entities into action in a sample project that will demonstrate how to implement common features of games. Your objective is to spawn moving tanks that shoot cannonballs from a spinning turret. Tanks are destroyed when hit by a cannonball. The player controls the movement of one tank.
By the end of this tutorial, you'll be able to do the following:
- Make an entity move randomly using code.
- Spawn entities from a prefab using code.
- Control the behavior of spawned entities using code.
- Add a user input system to an entities project.
Resources
Languages available:
1. Overview
This tutorial demonstrates the essentials of the Entities package and is intended as a follow-up to the HelloCube and job system tutorials.
Your objective in this tutorial is to spawn moving tanks that shoot cannonballs from a spinning turret. Tanks are destroyed when hit by a cannonball. The player controls the movement of one tank.
The tutorial uses a few DOTS features: entities, systems, entity queries, entity command buffers, entity jobs (IJobEntity), baking, and subscenes.
(This tutorial is a variation of the Tanks tutorial in the Entities samples repository.)
2. Before you begin
This tutorial assumes that you have a basic understanding of C# and GameObjects. It also assumes you have gone through the HelloCube tutorial (which covers basics of Entities, such as entity creation and subscenes) and the jobs tutorial.
Set up your Unity project
To set up a Unity project for this tutorial, follow these instructions:
1. Create a new Unity project using the 3D (URP) Template.
2. Install the Entities Graphics package via the Package Manager.
You’ll need the Entities Graphics package to render entities, and installing Entities Graphics will also automatically install the Entities package itself as a dependency.
3. Create a single, immobile tank
First you’ll create the tank that will be used throughout this tutorial. To create a Tank GameObject, follow these instructions:
1. In the Main scene, create a new subscene (check out the HelloCube tutorial for a refresher on how to do this). The name of the subscene is not important, so the default name "New Sub Scene" is fine.
2. In the subscene, create a 3D cube GameObject and name it “Tank”.
3. Create a 3D sphere GameObject as a child GameObject of Tank and name it “Turret”.
4. Set the position of the Turret GameObject to (0, 0.5, 0).
5. Create a 3D cylinder GameObject as a child GameObject of Turret and name it “Cannon”.
6. Set the scale of the Cannon GameObject to (0.2, 0.5, 0.2).
7. Set the position of the Cannon GameObject to (0, 0.5, 0).
8. Set the rotation of the Turret GameObject to (45, 0, 0).
Your tank should now look something like this:
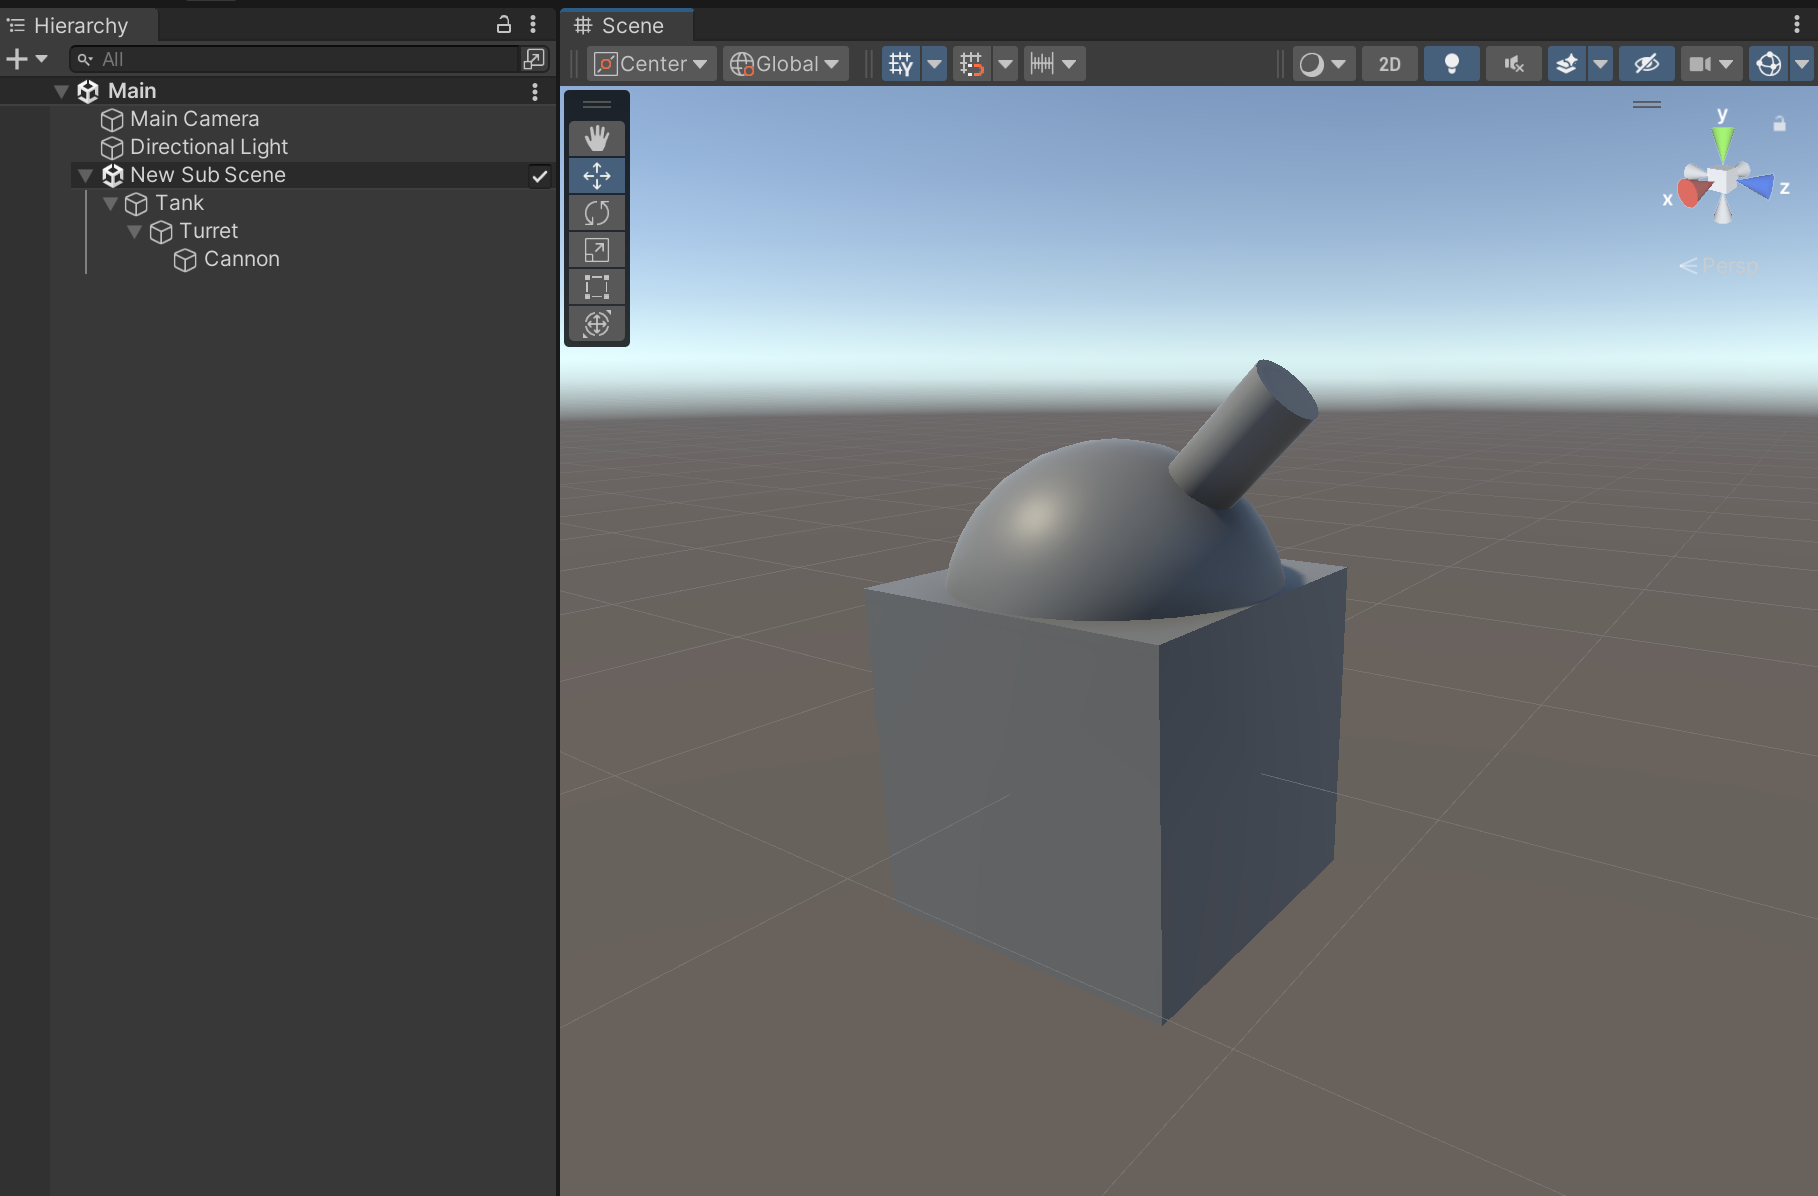
As explained in the HelloCube tutorial, baking will serialize one entity for each of these GameObjects and give each entity Transform and Rendering components. When the scene is loaded at runtime, the entities are loaded, not the GameObjects, so the tank rendered in Play mode will be composed of three entities.
4. Move the tank along a random curvy path
First, let’s add a Tank component to each tank entity in baking (as explained in the HelloCube tutorial). Create a new script file named TankAuthoring.cs and add the following code:
using Unity.Entities;
using UnityEngine;

public class TankAuthoring : MonoBehaviour
{
    public GameObject Turret;
    public GameObject Cannon;

    class Baker : Baker<TankAuthoring>
    {
        public override void Bake(TankAuthoring authoring)
        {
            // GetEntity returns the Entity baked from the GameObject
            var entity = GetEntity(authoring, TransformUsageFlags.Dynamic);
            AddComponent(entity, new Tank
            {
                Turret = GetEntity(authoring.Turret, TransformUsageFlags.Dynamic),
                Cannon = GetEntity(authoring.Cannon, TransformUsageFlags.Dynamic)
            });
        }
    }
}

// A component that will be added to the root entity of every tank.
public struct Tank : IComponentData
{
    public Entity Turret;
    public Entity Cannon;
}
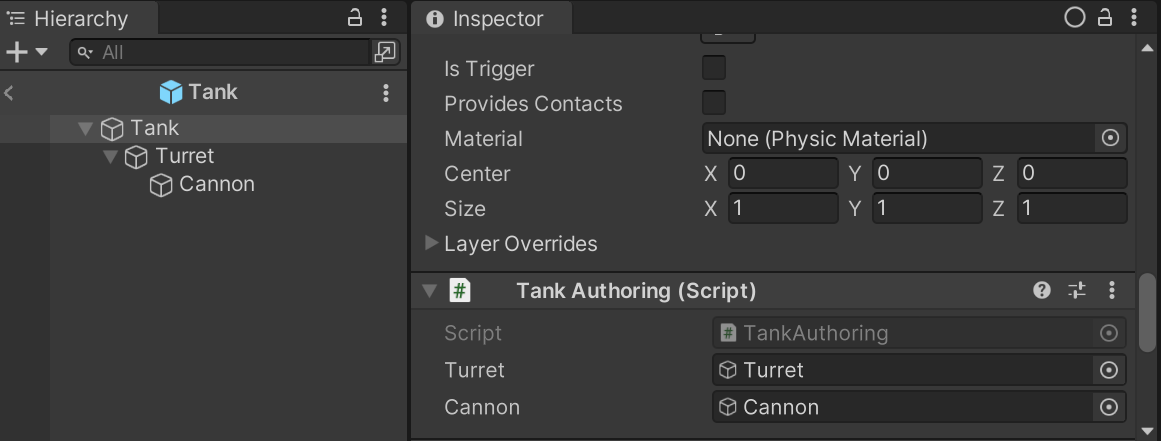
Add a TankAuthoring component to the Tank GameObject, set the Turret property to the Turret GameObject, and set the Cannon property to the Cannon GameObject. In baking, the Tank component will be added to the baked tank root entity, the turret entity will be assigned to its "Turret" field, and the cannon entity will be assigned to its "Cannon" field. (These Turret and Cannon fields will be used in a later step).
Now let’s create a system to move the tank along a random curvy path. Create a new script file named "TankMovementSystem.cs" and add the following lines of code:
using Unity.Burst;
using Unity.Entities;
using Unity.Mathematics;
using Unity.Transforms;

public partial struct TankMovementSystem : ISystem
{
    [BurstCompile]
    public void OnUpdate(ref SystemState state)
    {
        var dt = SystemAPI.Time.DeltaTime;

        // For each entity having a LocalTransform and Tank component,
        // we access the LocalTransform and entity ID.
        foreach (var (transform, entity) in
                 SystemAPI.Query<RefRW<LocalTransform>>()
                     .WithAll<Tank>()
                     .WithEntityAccess())
        {
            var pos = transform.ValueRO.Position;

            // This does not modify the actual position of the tank, only the point at
            // which we sample the 3D noise function. This way, every tank is using a
            // different slice and will move along its own different random flow field.
            pos.y = (float)entity.Index;

            var angle = (0.5f + noise.cnoise(pos / 10f)) * 4.0f * math.PI;
            var dir = float3.zero;
            math.sincos(angle, out dir.x, out dir.z);

            // Update the LocalTransform.
            transform.ValueRW.Position += dir * dt * 5.0f;
            transform.ValueRW.Rotation = quaternion.RotateY(angle);
        }
    }
}
The MovementSystem will update every frame. In the update, the system queries for all entities that have a LocalTransform and Tank component, and it updates the LocalTransform to move each tank along a random, curvy path.
5. Spawn many tanks with random colors
To spawn many tanks, first you’ll turn your tank into a baked prefab. First, make the Tank GameObject and its child GameObjects into a new prefab named “Tank”, then delete the original tank from the subscene.
Next, add the URPMateiralPropertyBaseColorAuthoring component to all three GameObjects in the Tank prefab (the Tank, Turret, and Cannon GameObjects). This adds the Entities.Rendering.URPMaterialPropertyBaseColor component to the entities. Setting the value of this component at runtime dynamically changes the color of the entity.
To bake the prefab as an entity, follow these instructions:
1. Add a new GameObject in the subscene and name it “Config”.
2. Create a new script file named "ConfigAuthoring.cs" with the following code:
using Unity.Entities;
using UnityEngine;

public class ConfigAuthoring : MonoBehaviour
{
    public GameObject TankPrefab;
    public GameObject CannonBallPrefab;
    public int TankCount;

    class Baker : Baker<ConfigAuthoring>
    {
        public override void Bake(ConfigAuthoring authoring)
        {
            // The config entity itself doesn’t need transform components,
            // so we use TransformUsageFlags.None
            var entity = GetEntity(authoring, TransformUsageFlags.None);
            AddComponent(entity, new Config
            {
                // Bake the prefab into entities. GetEntity will return the
                // root entity of the prefab hierarchy.
                TankPrefab = GetEntity(authoring.TankPrefab, TransformUsageFlags.Dynamic),
                CannonBallPrefab = GetEntity(authoring.CannonBallPrefab, TransformUsageFlags.Dynamic),
                TankCount = authoring.TankCount,
            });
        }
    }
}
public struct Config : IComponentData
{
    public Entity TankPrefab;
    public Entity CannonBallPrefab;
    public int TankCount;
}
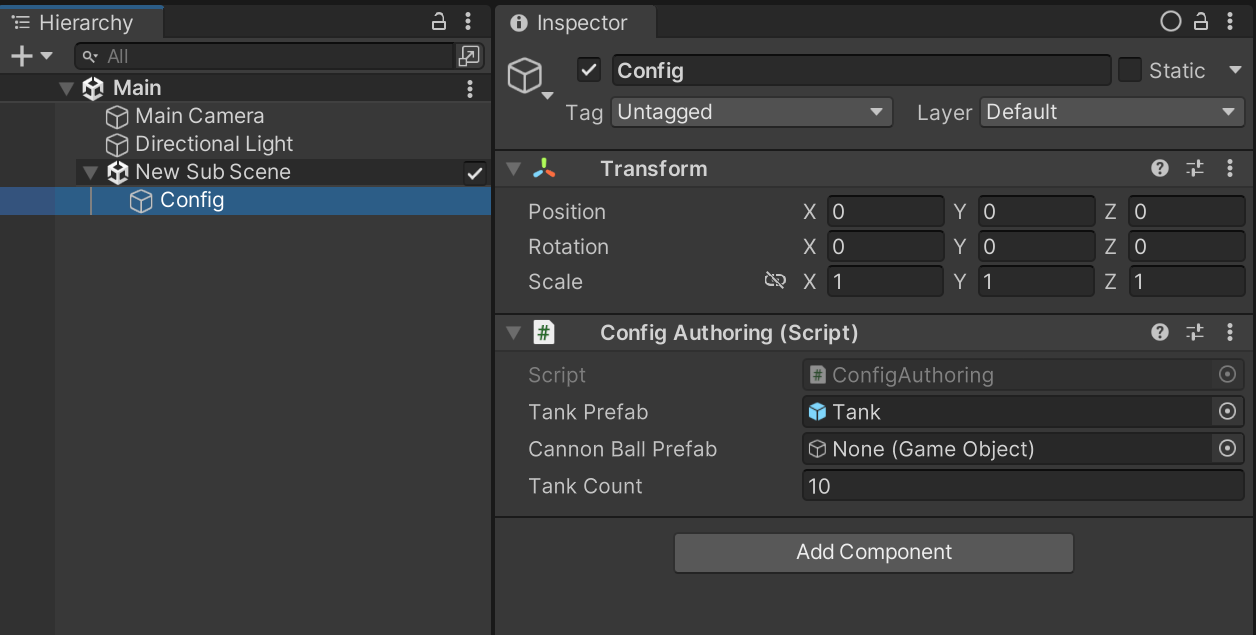
3. Add an instance of ConfigAuthoring to the Config GameObject, set its "Tank Prefab" field to the Tank prefab, and set its "Tank Count" to 10. (The "CannonBallPrefab" field will be set in a later step.)
Now, to spawn the tanks and set their colors, create a new script file named TankSpawnSystem.cs with the following code:
using Unity.Burst;
using Unity.Entities;
using Unity.Mathematics;
using Unity.Rendering;
using UnityEngine;
using Random = Unity.Mathematics.Random;

public partial struct TankSpawnSystem : ISystem
{
    [BurstCompile]
    public void OnCreate(ref SystemState state)
    {
        // This RequireForUpdate means the system only updates if at
        // least one entity with the Config component exists.
        // Effectively, this system will not update until the
        // subscene with the Config has been loaded.
        state.RequireForUpdate<Config>();
    }

    [BurstCompile]
    public void OnUpdate(ref SystemState state)
    {
        // Disabling a system will stop further updates.
        // By disabling this system in its first update,
        // it will effectively update only once.
        state.Enabled = false;

        // A "singleton" is a component type which only has a single instance.
        // GetSingleton<T> throws an exception if zero entities or
        // more than one entity has a component of type T.
        // In this case, there should only ever be one instance of Config.
        var config = SystemAPI.GetSingleton<Config>();

        // Random numbers from a hard-coded seed.
        var random = new Random(123);

        for (int i = 0; i < config.TankCount; i++)
        {
            var tankEntity = state.EntityManager.Instantiate(config.TankPrefab);

            // URPMaterialPropertyBaseColor is a component from the Entities.Graphics package
            // that lets us set the rendered base color of a rendered entity.
            var color = new URPMaterialPropertyBaseColor { Value = RandomColor(ref random) };

            // Every root entity instantiated from a prefab has a LinkedEntityGroup component, which
            // is a list of all the entities that make up the prefab hierarchy (including the root).

            // (LinkedEntityGroup is a special kind of component called a "DynamicBuffer", which is
            // a resizable array of struct values instead of just a single struct.)
            var linkedEntities = state.EntityManager.GetBuffer<LinkedEntityGroup>(tankEntity);
            foreach (var entity in linkedEntities)
            {
                // We want to set the URPMaterialPropertyBaseColor component only on the
                // entities that have it, so we first check.
                if (state.EntityManager.HasComponent<URPMaterialPropertyBaseColor>(entity.Value))
                {
                    // Set the color of each entity that makes up the tank.
                    state.EntityManager.SetComponentData(entity.Value, color);
                }
            }
        }
    }

    // Return a random color that is visually distinct.
    // (Naive randomness would produce a distribution of colors clustered
    // around a narrow range of hues. See https://martin.ankerl.com/2009/12/09/how-to-create-random-colors-programmatically/ )
    static float4 RandomColor(ref Random random)
    {
        // 0.618034005f is inverse of the golden ratio
        var hue = (random.NextFloat() + 0.618034005f) % 1;
        return (Vector4)Color.HSVToRGB(hue, 1.0f, 1.0f);
    }
}
Now if you enter Play mode, you should see 10 random-colored tanks wandering in different directions:
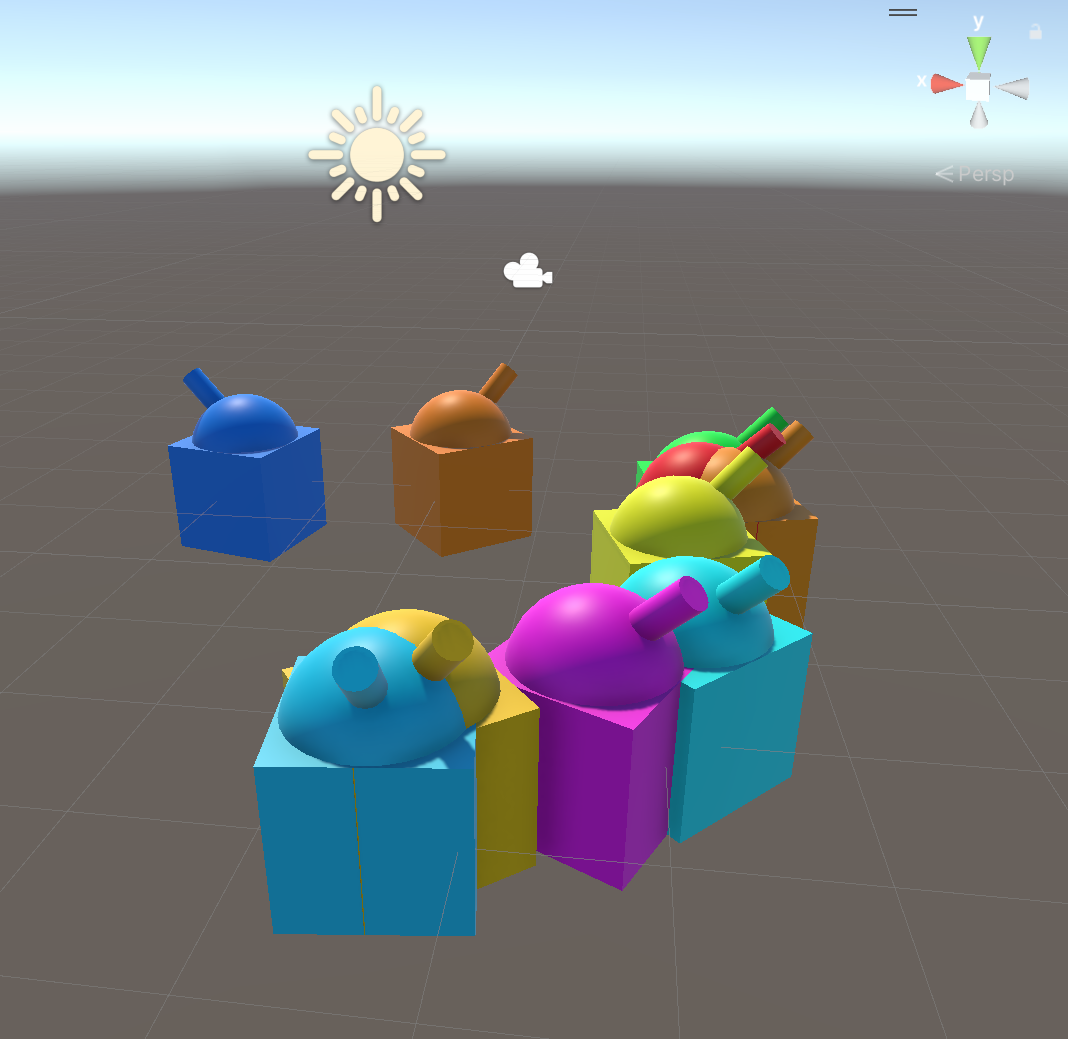
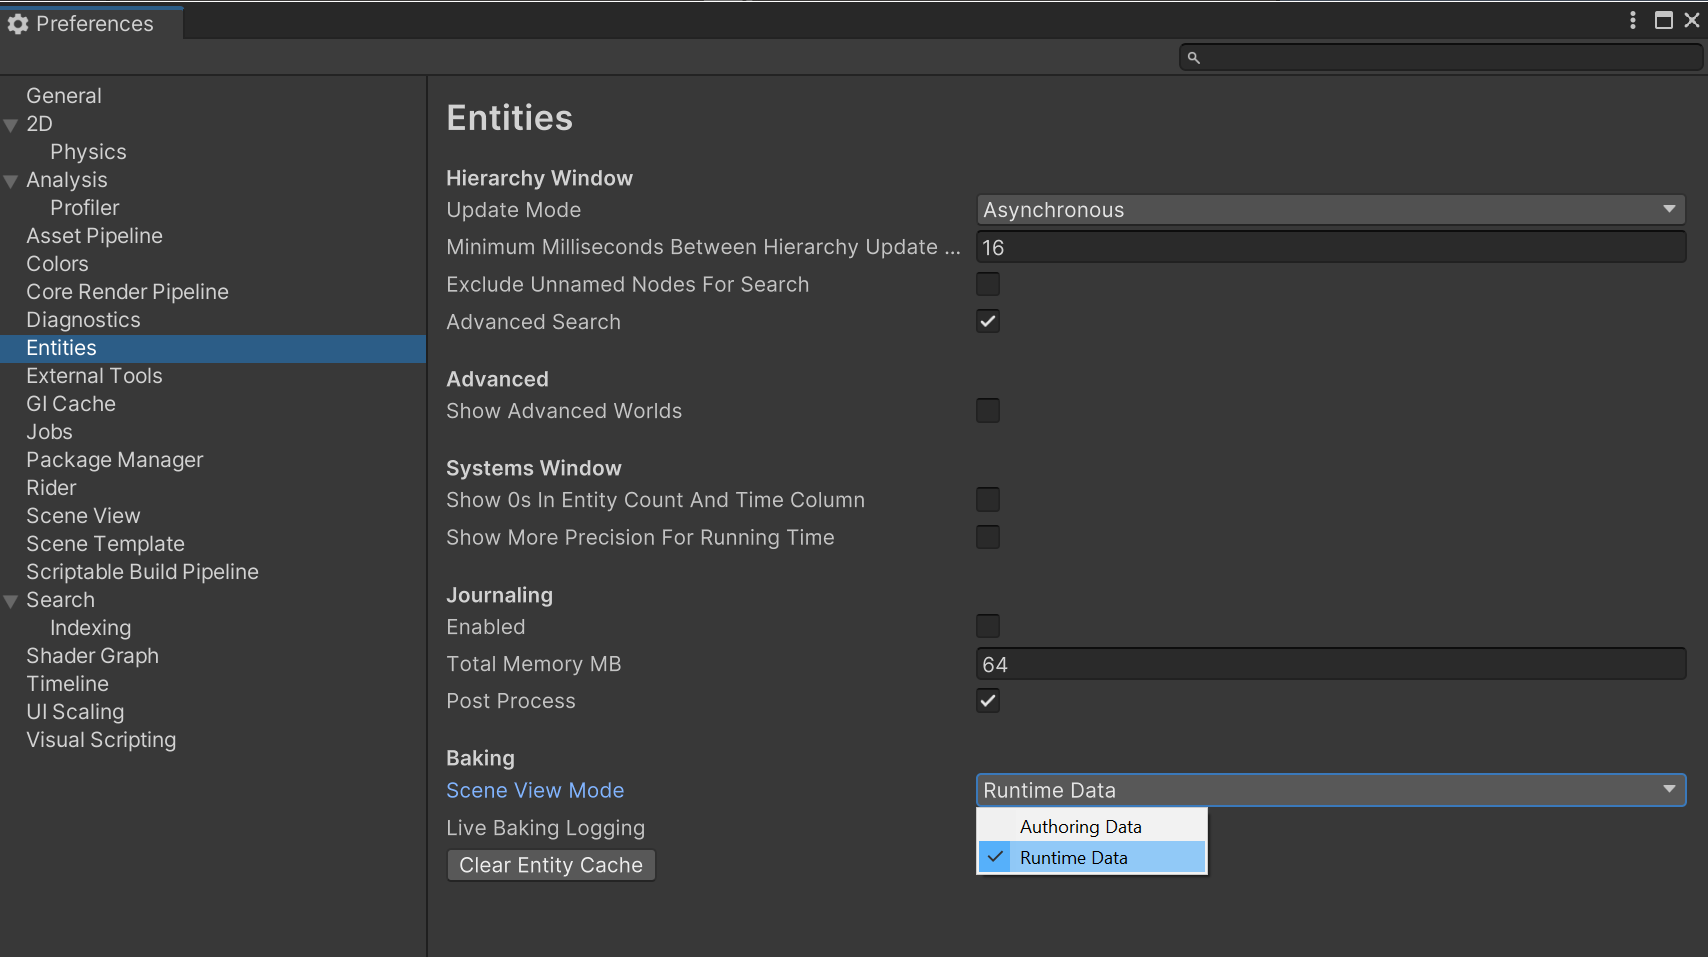
Note that you might see the tanks in the Game view but not the Scene view. To make the tanks visible in the Scene view, select Edit > Preferences > Entities > Scene View Mode to "Runtime Data":
6. Move one tank with player input and have the camera follow
If you want one tank to be controlled by the player, you first need a way to distinguish the player’s tank entity from the other tanks, so let’s create a new Player component add it to one of the spawned tanks:
1. Add the following code to to a new file Player.cs:
using Unity.Entities;

public struct Player : IComponentData
{
}Note: As a matter of convention, entity component types are often defined in the same file as a related authoring component, but in this case the Player component doesn't need an authoring component.
2. In the TankSpawnSystem, add the following code in the loop that creates the tanks (after the line that instantiates the prefab):
// Add the Player component to the first tank
if (i == 0)
{
    state.EntityManager.AddComponent<Player>(tankEntity);
}
3. To stop the player tank from moving along a random path like the other tanks, modify the header of the loop in TankMovementSystem to match the following code:
foreach (var (transform, entity) in
           SystemAPI.Query<RefRW<LocalTransform>>()
                .WithAll<Tank>()
                .WithNone<Player>()  // exclude the player tank from the query
                .WithEntityAccess())
The WithNone<Player> call specifies that the query should exclude any entity that has a Player component, so the player tank will no longer be moved in this loop.
4. To move the player and the camera, create a new script file named PlayerSystem.cs with the following code:
using Unity.Entities;
using Unity.Mathematics;
using Unity.Transforms;
using UnityEngine;

public partial struct PlayerSystem : ISystem
{
    // Because OnUpdate accesses a managed object (the camera), we cannot Burst compile
    // this method, so we don't use the [BurstCompile] attribute here.
    public void OnUpdate(ref SystemState state)
    {
        var movement = new float3(
            Input.GetAxis("Horizontal"),
            0,
            Input.GetAxis("Vertical")
        );
        movement *= SystemAPI.Time.DeltaTime;

        foreach (var playerTransform in
                SystemAPI.Query<RefRW<LocalTransform>>()
                    .WithAll<Player>())
        {
            // move the player tank
            playerTransform.ValueRW.Position += movement;

            // move the camera to follow the player
            var cameraTransform = Camera.main.transform;
            cameraTransform.position = playerTransform.ValueRO.Position;
            cameraTransform.position -= 10.0f * (Vector3)playerTransform.ValueRO.Forward();  // move the camera back from the player
            cameraTransform.position += new Vector3(0, 5f, 0);  // raise the camera by an offset
            cameraTransform.LookAt(playerTransform.ValueRO.Position);  // look at the player
        }
    }
}
Now in Play mode, you should be able to control the first tank, and the camera will follow. Because the camera moves with you, it may be hard to tell in the Game view that you're moving.
7. Spawn cannonballs at the tip of the turret
To have the tank fire cannonballs, you first need a CannonBall component:
1. Create a new script named CannonBallAuthoring.cs with the following code:
using Unity.Entities;
using Unity.Mathematics;
using Unity.Rendering;
using UnityEngine;

public class CannonBallAuthoring : MonoBehaviour
{
    class Baker : Baker<CannonBallAuthoring>
    {
        public override void Bake(CannonBallAuthoring authoring)
        {
            var entity = GetEntity(authoring, TransformUsageFlags.Dynamic);

            // By default, components are zero-initialized,
            // so the Velocity field of CannonBall will be float3.zero.
            AddComponent<CannonBall>(entity);
            AddComponent<URPMaterialPropertyBaseColor>(entity);
        }
    }
}

public struct CannonBall : IComponentData
{
    public float3 Velocity;
}
2. Create a new prefab named CannonBall with a single GameObject that renders a 3D sphere and set its scale to (0.4, 0.4, 0.4).
3. Add the CannonBallAuthoring component to the CannonBall prefab's root GameObject.
4. In the Config GameObject in the subscene, set the "CannonBallPrefab" field in ConfigAuthoring to the CannonBall prefab.
5. To spawn the cannonballs, create a new script file named ShootingSystem.cs with the following code:
using Unity.Burst;
using Unity.Entities;
using Unity.Mathematics;
using Unity.Rendering;
using Unity.Transforms;

// This attribute puts this system before TransformSystemGroup in the update order.
// ShootingSystem only sets the local transforms of the cannonballs, but the transform systems
// in TransformSystemGroup will set their world transforms (LocalToWorld).
// If the ShootingSystem were to update after TransformSystemGroup in the frame, the cannonballs
// it spawned would render at the origin for a single frame.
[UpdateBefore(typeof(TransformSystemGroup))]
public partial struct ShootingSystem : ISystem
{
    private float timer;

    [BurstCompile]
    public void OnUpdate(ref SystemState state)
    {
        // Only shoot in frames where timer has expired
        timer -= SystemAPI.Time.DeltaTime;
        if (timer > 0)
        {
            return;
        }
        timer = 0.3f;   // reset timer

        var config = SystemAPI.GetSingleton<Config>();

        var ballTransform = state.EntityManager.GetComponentData<LocalTransform>(config.CannonBallPrefab);

        // For each turret of every tank, spawn a cannonball and set its initial velocity
        foreach (var (tank, transform, color) in
                 SystemAPI.Query<RefRO<Tank>, RefRO<LocalToWorld>, RefRO<URPMaterialPropertyBaseColor>>())
        {
            Entity cannonBallEntity = state.EntityManager.Instantiate(config.CannonBallPrefab);

            // Set color of the cannonball to match the tank that shot it.
            state.EntityManager.SetComponentData(cannonBallEntity, color.ValueRO);

            // We need the transform of the cannon in world space, so we get its LocalToWorld instead of LocalTransform.
            var cannonTransform = state.EntityManager.GetComponentData<LocalToWorld>(tank.ValueRO.Cannon);
            ballTransform.Position =  cannonTransform.Position;

            // Set position of the new cannonball to match the spawn point
            state.EntityManager.SetComponentData(cannonBallEntity, ballTransform);

            // Set velocity of the cannonball to shoot out of the cannon.
            state.EntityManager.SetComponentData(cannonBallEntity, new CannonBall
            {
                Velocity = math.normalize(cannonTransform.Up) * 12.0f
            });
        }
    }
}
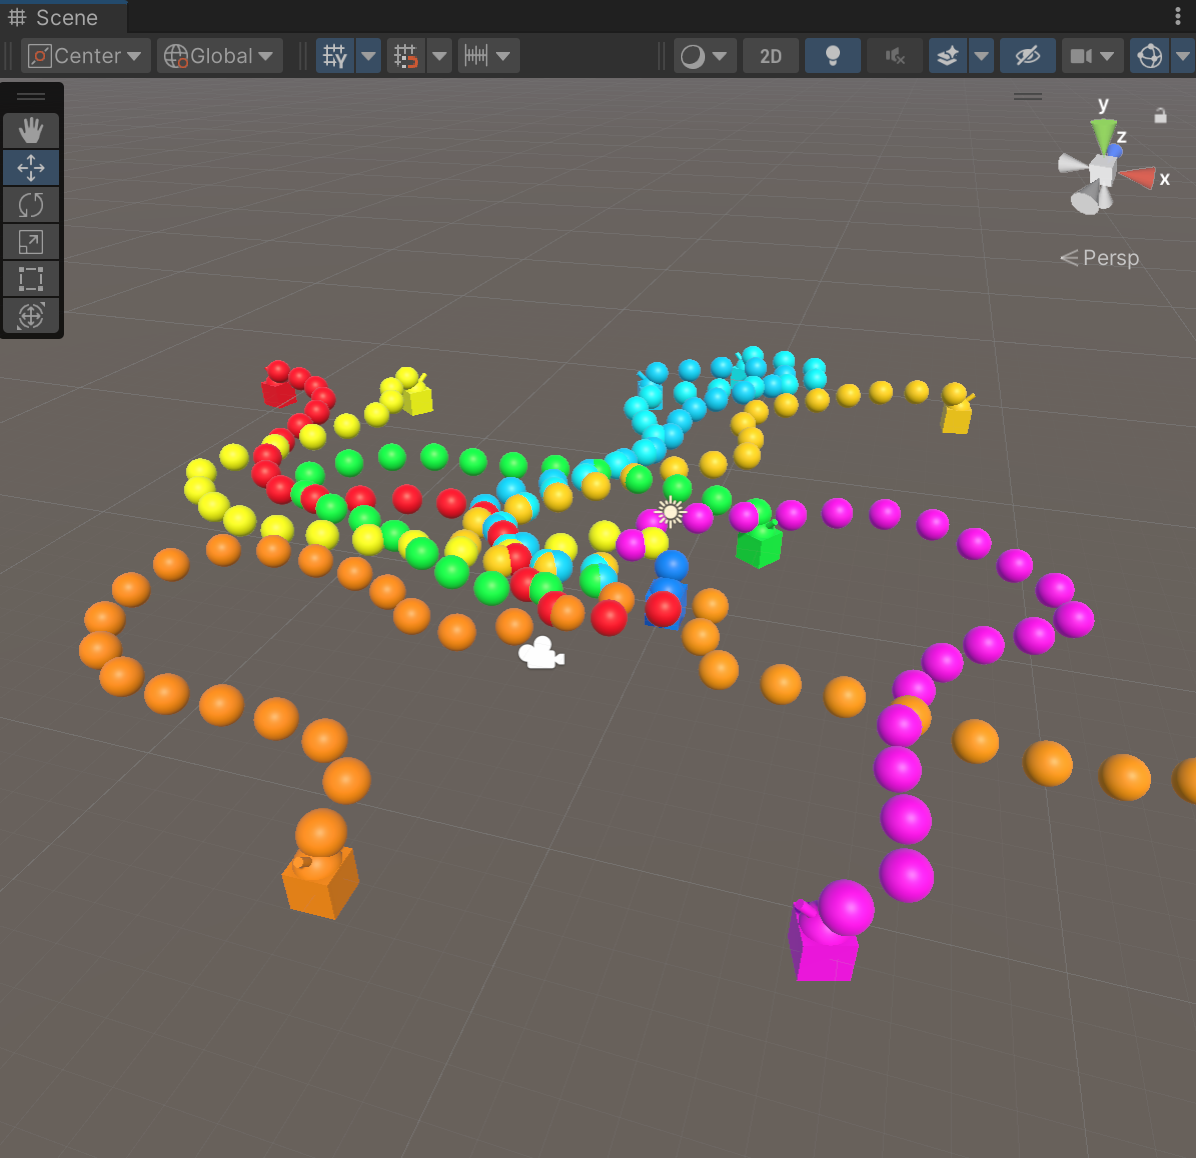
Now in Play mode, the tanks fire cannon balls at regular intervals, but the cannonballs don't yet move, so they stay where they spawn:
8. Rotate the turret
To rotate the turrets, you can create another system, but it’s simpler to add some additional code to the bottom of the OnUpdate method of the TankMovementSystem:
var spin = quaternion.RotateY(SystemAPI.Time.DeltaTime * math.PI);

foreach (var tank in
         SystemAPI.Query<RefRW<Tank>>())
{
    var trans = SystemAPI.GetComponentRW<LocalTransform>(tank.ValueRO.Turret);

    // Add a rotation around the Y axis (relative to the parent).
    trans.ValueRW.Rotation = math.mul(spin, trans.ValueRO.Rotation);
}9. Move the cannonballs
To move the cannonballs and to destroy them when they hit the ground, create a new script named CannonBallSystem.cs and add the following lines of code:
using Unity.Burst;
using Unity.Entities;
using Unity.Mathematics;
using Unity.Transforms;

public partial struct CannonBallSystem : ISystem
{
    [BurstCompile]
    public void OnUpdate(ref SystemState state)
    {
        var ecbSingleton = SystemAPI.GetSingleton<EndSimulationEntityCommandBufferSystem.Singleton>();

        var cannonBallJob = new CannonBallJob
        {
            ECB = ecbSingleton.CreateCommandBuffer(state.WorldUnmanaged),
            DeltaTime = SystemAPI.Time.DeltaTime
        };

        cannonBallJob.Schedule();
    }
}

// IJobEntity relies on source generation to implicitly define a
// query from the signature of the Execute method.
// In this case, the implicit query will look for all entities that
// have the CannonBall and LocalTransform components.
[BurstCompile]
public partial struct CannonBallJob : IJobEntity
{
    public EntityCommandBuffer ECB;
    public float DeltaTime;

    // Execute will be called once for every entity that
    // has a CannonBall and LocalTransform component.
    void Execute(Entity entity, ref CannonBall cannonBall, ref LocalTransform transform)
    {
        var gravity = new float3(0.0f, -9.82f, 0.0f);

        transform.Position += cannonBall.Velocity * DeltaTime;

        // if hit the ground
        if (transform.Position.y <= 0.0f)
        {
            ECB.DestroyEntity(entity);
        }

        cannonBall.Velocity += gravity * DeltaTime;
    }
}
By putting the work into a job, the work is moved from the main thread to the worker threads.
10. More things to try
Here are some gameplay tweaks you might implement:
- Give the player direct control of their turret.
- Destroy tanks when they are hit by a cannonball.
- Respawn destroyed tanks after a timer.
- Display a victory message when the player destroys all enemy tanks.
- Respawn the player but give them a limited number of lives.
11. Next steps
For more tutorials and samples demonstrating all the features of the Entities package, see the Entities Components Samples repository on GitHub.
Then, as you explore DOTS further, be sure to try our DOTS Best Practices course.