Get started with Netcode for GameObjects
Tutorial
Beginner
+10XP
90 mins
586
Unity Technologies

By the end of this tutorial, users will have acquired a fundamental understanding of Netcode for GameObjects and know how to employ it when creating a casual co-op multiplayer game. This includes the effective use of the NetworkManager component and the methods used to spawn objects at the Host/Client/Server side. The tutorial provides practical steps on building and testing a basic multiplayer game in Unity, as well as utilizing and testing Remote Procedure Calls (RPCs) and Network Variables. Users will also learn how to create a simple user interface for different modes (Host, Client, and Server) and add and control basic movements in these modes.
Languages available:
1. Overview
In this tutorial, you’ll learn how to create a simple multiplayer game with Netcode for GameObjects. You'll create a simple Hello World project that includes the basic features of Netcode for GameObjects.
2. Before you begin
To set up your Unity project for this tutorial, follow these instructions:
1. Create a new 3D Unity project using Unity Editor version 6000.0.3f1 or later and call it “Hello Multiplayer World”.
2. Refer to the Multiplayer Network documentation, Netcode for GameObjects requirements, for additional requirements.
3. Add the com.unity.netcode.gameobjects package to your project. Navigate to Window > Package Manager > Unity Registry and search for “Netcode for GameObjects” in the search bar.
4. Select “Netcode for GameObjects” and select the Install button.
Note: When working with closed platforms like consoles (PlayStation, Xbox, Nintendo Switch), there may be specific policies and considerations. Refer to your console's documentation for more information.
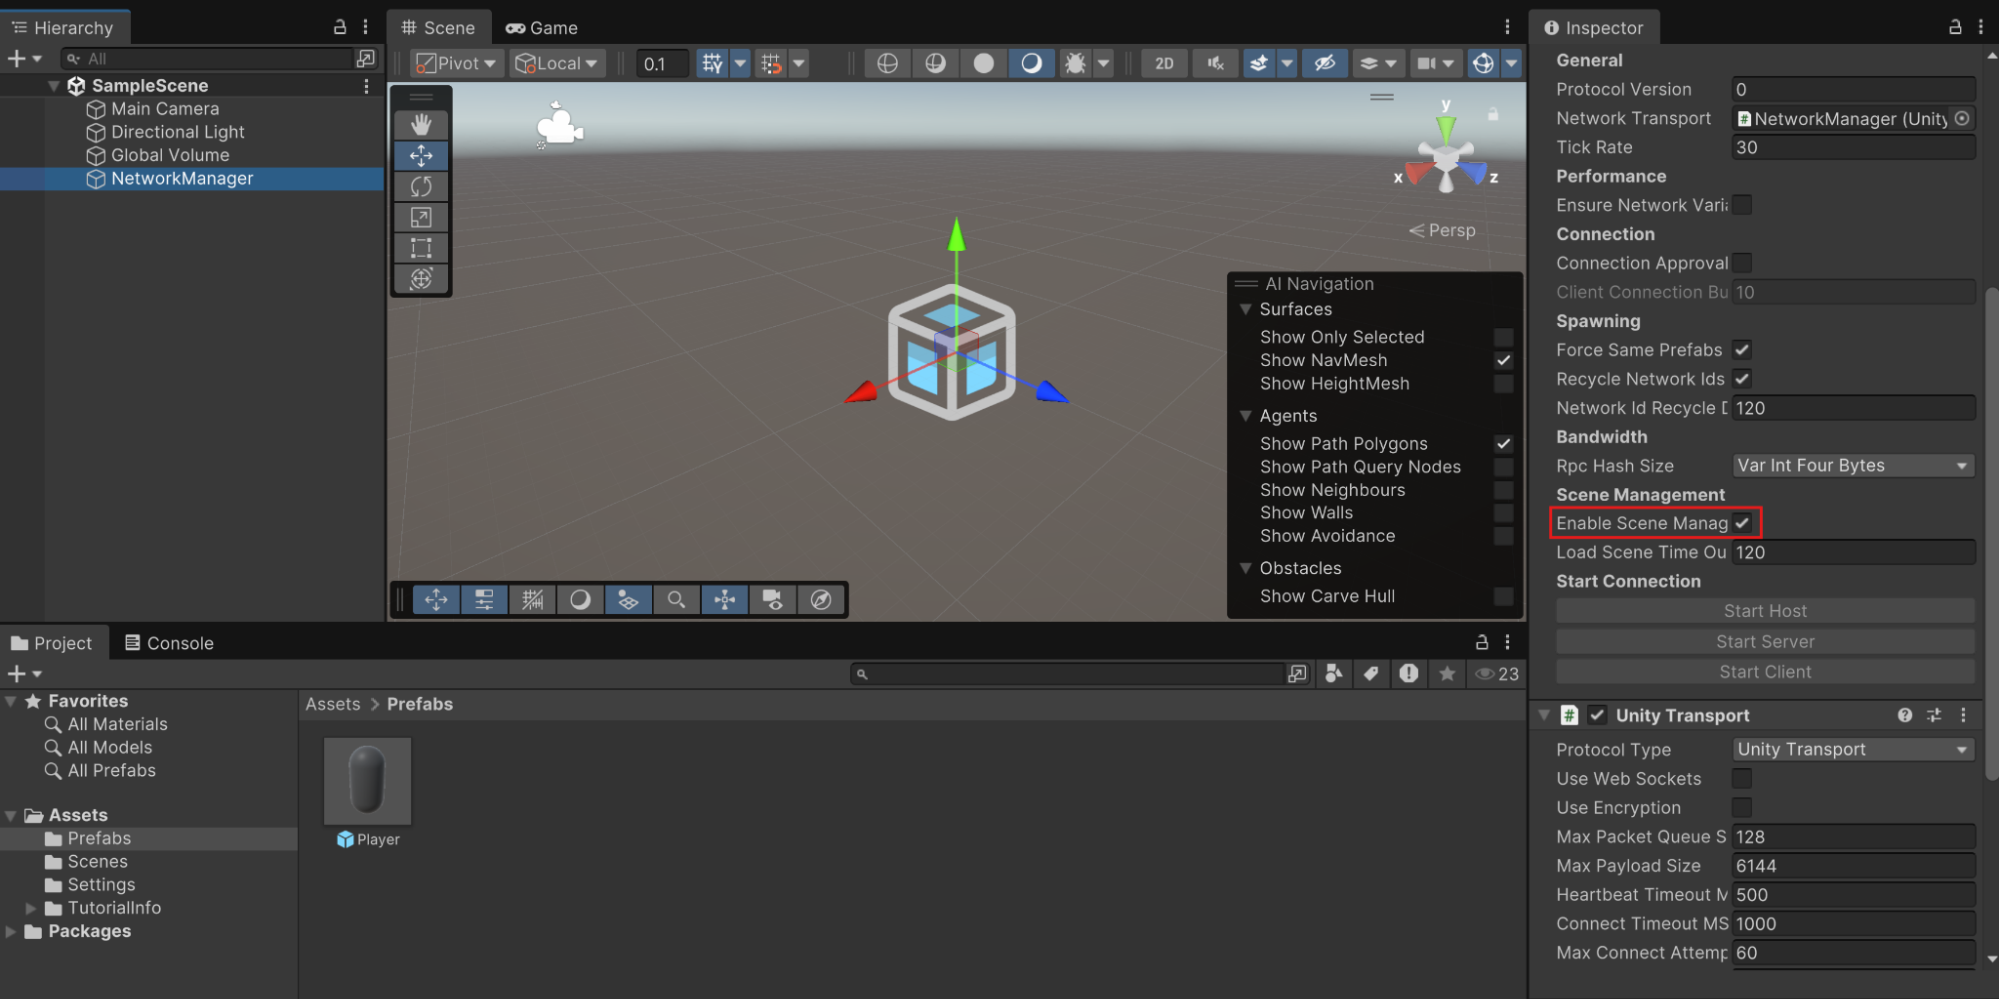
3. Set up the NetworkManager component
In this section, you’ll add a Network Manager and add Unity Transport to your project. The NetworkManager is the component that has all your project's Netcode-related settings. Unity Transport is the transport layer that Netcode uses for communication between the server and the clients.
To create and set up the Network Manager, follow these instructions:
1. Create an empty GameObject (right-click in the Hierarchy window, then select Create Empty), and name it “NetworkManager”.
2. Select NetworkManager, then go to the Inspector window and select Add Component. Select Netcode > NetworkManager from the component list.
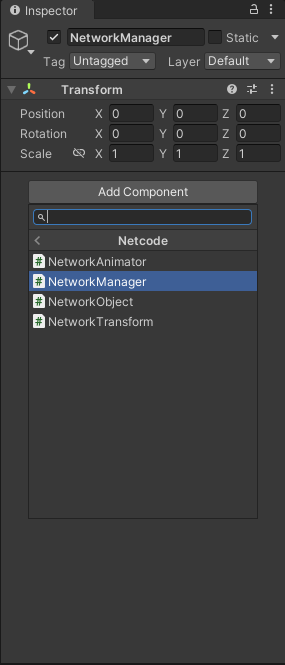
3. In the Network Manager component in the Inspector window, open the Select transport dropdown and select UnityTransport.
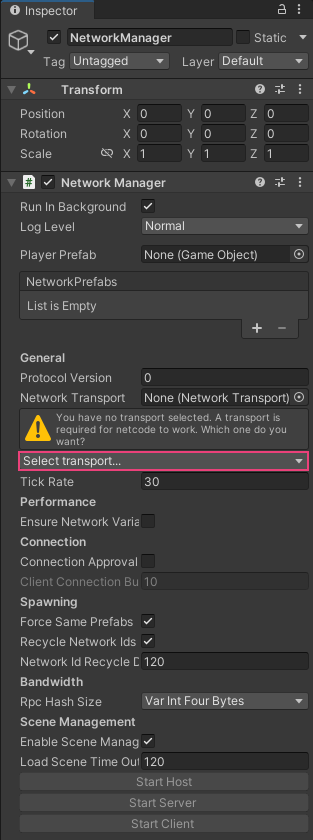
A new section of the component will appear, as shown below.
4. Save the scene by pressing Ctrl+S (macOS: Cmd+S) or by selecting File > Save.
4. Create an object to spawn for each connected player
In many multiplayer games, your application spawns a player prefab to create a player character. If your game will spawn a player character, you'll need to specify a Player Prefab in the Network Manager component. For your Hello World project, you'll use a simple capsule to represent the player character.
To create an object that spawns for each connected player, follow these instructions:
1. In the Unity Editor, right-click in the Hierarchy window, then select 3D Object > Capsule.
2. Name the capsule “Player”.
3. With Player selected, add a NetworkObject component in the Inspector window by selecting Add Component > Netcode > NetworkObject.
4. In the Project window, right-click within the Assets folder, then select Create > Folder.
5. Name the folder “Prefabs”.
6. Make the Player GameObject into a prefab by dragging it from the Hierarchy window into the Prefabs folder.
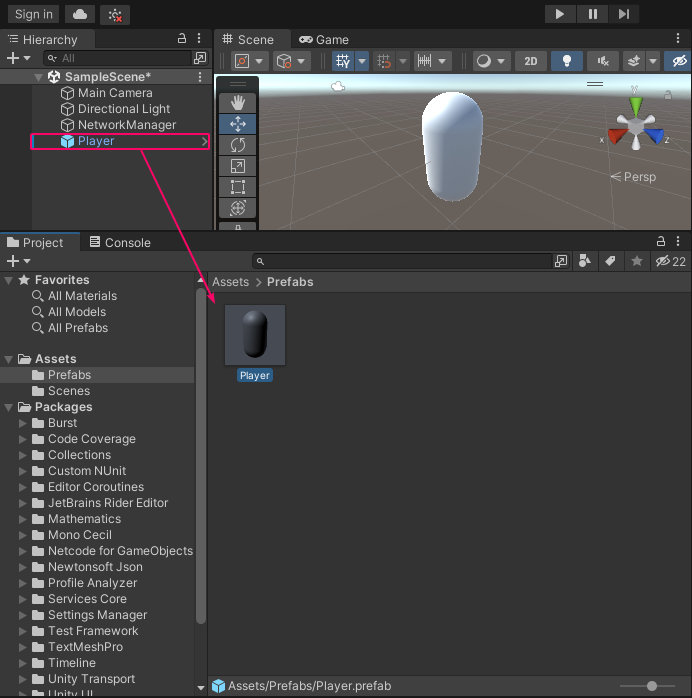
7. To delete the Player GameObject from the scene, select it in the Scene view, then press the Delete key (macOS: Cmd+Delete).
You can remove the Player GameObject from the scene because you will assign Player prefab to the Default Player Prefab property in the NetworkManager component, and then the player will spawn automatically. This needs to be done because the library doesn't support defining a player object as an in-scene placed NetworkObject. The NetworkObject component enables the NetworkManager to spawn the player object when connecting as a client or host.
8. Select the NetworkManager GameObject.
9. Locate the Default Player Prefab property in the Inspector window.

10. Drag the Player prefab from the Project window into the Default Player Prefab property.

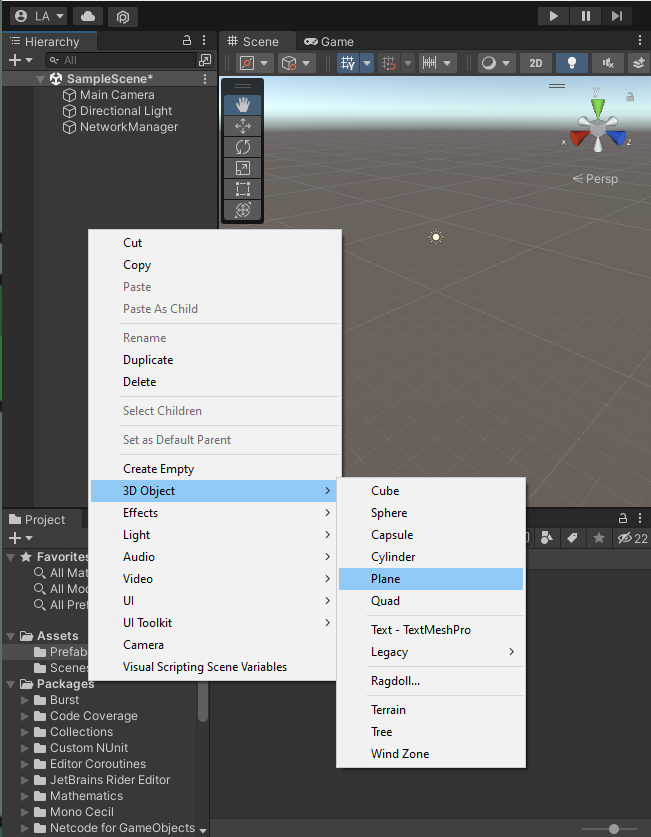
11. Add a Plane GameObject (centered at 0,0,0) to the scene by right-clicking in the Hierarchy window, then selecting 3D Object > Plane.
Note: Adding the Plane GameObject adds a visual reference point to visualize the Player prefab's position, but it isn't necessary.
12. Save the scene by pressing Ctrl+S (macOS: Cmd+S) or by selecting File > Save.
5. Add your scene to the build
The Enable Scene Management property of the NetworkManager component allows the server to control which scenes load for clients when the game is played. However, you must add the current scene to the build to enter Play mode. When Enable Scene Management is enabled, Netcode for GameObjects will handle scene management and client synchronization for you. When Enable Scene Management is disabled, users will have to create their own scene management scripts and handle client synchronization.
The Enable Scene Management setting for the NetworkManager component is enabled by default.
To add your scene to the build, follow these instructions:
1. Open the Build Profiles window by selecting File > Build Profiles.
2. Select Scene List and then select Add Open Scenes.
Scenes/SampleScene is listed under Scene List. You can close the Build Profiles window.
You can test the functionality you created now by entering Play mode.
3. Select the Play button to enter Play mode.
4. Select the NetworkManager component in the Hierarchy window and select its Start Host property in the Inspector window to connect as a host to the session.
The Player Prefab will then be spawned.
6. Add remote procedure calls
Remote procedure calls (RPCs) are common in video games and in software generally. RPCs are a way to send messages from the server to the client(s) and vice versa. Their main purpose is to send events (in other words, things that happened).
RPCs are invoked in one place (server-side code) and executed in another (clients).
They should not be used to synchronize data (for example, the health of a player. That should be done with Network Variables, but you will learn about these later).
In this step, you'll add a script to your Player prefab that tests the usage of RPCs. The script sends ServerRPCs to the server of the host, and also sends ClientRPCs from the server to the host and all clients. After you add this script, we'll go through the tests one by one.
To add basic RPCs to the project, follow these instructions:
1. In the Project window, open the Assets folder, then right-click and select Create > Folder.
Name your new folder “Scripts”.
This is where you'll keep all your scripts as part of this Hello World project.
2. In the Scripts folder, right-click and select Create > MonoBehaviour Script.
3. Name the script “RpcTest”.
4. Select the Player prefab in Assets > Prefabs.
5. In the Inspector window, select Add Component and then select Scripts > Rpc Test.
6. Double click on “RpcTest” to open the script.
This opens this script in the default local IDE.
7. Edit the RpcTest.cs script to match the following:
using Unity.Netcode;
using UnityEngine;

public class RpcTest : NetworkBehaviour
{
   public override void OnNetworkSpawn()
   {
       if (!IsServer && IsOwner) //Only send an RPC to the server on the client that owns the NetworkObject that owns this NetworkBehaviour instance
       {
           TestServerRpc(0, NetworkObjectId);
       }
   }

   [Rpc(SendTo.ClientsAndHost)]
   void TestClientRpc(int value, ulong sourceNetworkObjectId)
   {
       Debug.Log($"Client Received the RPC #{value} on NetworkObject #{sourceNetworkObjectId}");
       if (IsOwner) //Only send an RPC to the server on the client that owns the NetworkObject that owns this NetworkBehaviour instance
       {
           TestServerRpc(value + 1, sourceNetworkObjectId);
       }
   }

   [Rpc(SendTo.Server)]
   void TestServerRpc(int value, ulong sourceNetworkObjectId)
   {
       Debug.Log($"Server Received the RPC #{value} on NetworkObject #{sourceNetworkObjectId}");
       TestClientRpc(value, sourceNetworkObjectId);
   }
}
10. Save the scene by pressing Ctrl+S (macOS: Cmd+S) or by selecting File > Save.
This script showcases how RPCs are defined and executed.
Let’s have a closer look at the different parts of the script:
public class RpcTest : NetworkBehaviour
{
   public override void OnNetworkSpawn()
   {
       if (!IsServer && IsOwner) //Only send an RPC to the server on the client that owns the NetworkObject that owns this NetworkBehaviour instance
       {
           TestServerRpc(0, NetworkObjectId);
       }
   }
OnNetworkSpawn is invoked on each NetworkBehaviour associated with a NetworkObject spawned. This is where all netcode related initialization should occur. Check out the NetworkBehaviour documentation for more information.
Here the TestServerRpc gets sent once to the server on the client that owns the corresponding NetworkObject. A value of 0 will be printed to the console on the server.
[Rpc(SendTo.ClientsAndHost)]
   void TestClientRpc(int value, ulong sourceNetworkObjectId)
   {
       Debug.Log($"Client Received the RPC #{value} on NetworkObject #{sourceNetworkObjectId}");
       if (IsOwner) //Only send an RPC to the server on the client that owns the NetworkObject that owns this NetworkBehaviour instance
       {
           TestServerRpc(value + 1, sourceNetworkObjectId);
       }
   }
This part of the script describes the content of an RPC named TestClientRpc that gets invoked on all clients or a host. A message including value gets printed to the console of clients and the host (due to Debug.Log).
Only the owners of this NetworkBehaviour will invoke TestServerRpc. Each time this RPC is invoked on owning clients, value will be incremented by 1.
[Rpc(SendTo.Server)]
   void TestServerRpc(int value, ulong sourceNetworkObjectId)
   {
       Debug.Log($"Server Received the RPC #{value} on NetworkObject #{sourceNetworkObjectId}");
       TestClientRpc(value, sourceNetworkObjectId);
   }
}
Here the RPC TestServerRpc, which got executed in OnNetworkSpawn, is defined. The RPC only gets sent to a server. A message is printed in the server’s console.
For instance the execution within OnNetworkSpawn prints the following into the server’s console:
“Server Received the RPC #0 on NetworkObject #(here it prints the NetworkObjectId of the NetworkObject spawned and owner of this NetworkBehaviour).”
The client increments value each time it receives an RPC from the server and sends to the server an RPC containing the newly incremented value.
7. Test the RPCs
Install Multiplayer Play Mode
To begin testing your multiplayer functionality, you must first install the Multiplayer Play Mode package.
1. From the main menu, select Window > Package Manager.
2. Select Unity Registry.
3. Search for the “Multiplayer Play Mode” package and select Install.
Unity's Play mode uses the Main Editor Player to test your gameplay. By adding the Multiplayer Play Mode (MPPM) package, you can enable up to three additional Virtual Players to the Play mode for a total of four players to test projects with multiple players.
You must enable Virtual Players before you enter Play mode.
Enable virtual players
To enable Virtual Players for Play mode, do the following.
1. Open the Multiplayer Play Mode window by navigating to Window > Multiplayer Play Mode.
2. Enable Virtual Player 2.
3. Wait for the player status to change from inactive to active for the Virtual Player you selected.
When active, the Virtual Player(s) appear in Play mode in the Main Editor window. A separate window opens for each enabled player with the player name as the window title.
Note: To understand how Multiplayer Play Mode works with Play mode, refer to Synchronize with Play mode.
4. Select the Play button to enter Play mode.
5. Select the NetworkManager in the Hierarchy window of the Main Editor.
6. Select the Start Server button in the Inspector window of the NetworkManager component.
7. Navigate to the window of the Virtual Player and select the Layout button in the upper-right corner.
8. Enable the checkboxes for Hierarchy and Inspector and select Apply to enable them in the Virtual Player.
9. Select the NetworkManger in the Hierarchy window of the Virtual Player.
10. Select the Start Client button in the Inspector window of the GameObject.
Both editors are now connected through the console logs: The main editor as the server and the Virtual player as the client.
After the client and server spawn, a log displays in both the client's console and the server's console where you can see the messages that the client and server are sending to each other.
The client kicks off the exchange in its OnNetworkSpawn call for the first time with a counter value of 0. It then makes a remote procedure call to the server with the next value. The server receives this and calls the client. The Console displays the following for the server and client respectively.
Server Received the RPC #0 on NetworkObject #1
Server Received the RPC #1 on NetworkObject #1
Server Received the RPC #2 on NetworkObject #1
Server Received the RPC #3 on NetworkObject #1
...
Client Received the RPC #0 on NetworkObject #1
Client Received the RPC #1 on NetworkObject #1
Client Received the RPC #2 on NetworkObject #1
Client Received the RPC #3 on NetworkObject #1
...Only the client that owns the NetworkObject that runs the RpcTest script will send RPCs on the server, but they will all receive RPCs from the server. Therefore, if you test with multiple clients, the Consoles will log RPCs received once per NetworkObject per iteration on the server and all clients. If testing with both a host and a client, you will see the following on the host's Console:
Server Received the RPC #0 on NetworkObject #2
Client Received the RPC #0 on NetworkObject #2
Server Received the RPC #1 on NetworkObject #2
Client Received the RPC #1 on NetworkObject #2
Server Received the RPC #2 on NetworkObject #2
Client Received the RPC #2 on NetworkObject #2
Server Received the RPC #3 on NetworkObject #2
Client Received the RPC #3 on NetworkObject #2
...
You'll see these messages on the server because the server will receive the other client's server RPCs, and you'll see these messages on the client because it will also receive its own client RPCs.
Note: The NetworkObjectId here is 2 because the host also has a NetworkObject with the RpcTest script spawned for it, but it won't send the initial RPC starting the chain because it's a server.
8. Add a simple user interface
So far in this project, you have created a NetworkManager by adding the pre-created NetworkManager component. This component provides buttons that allow you to start the Host, Client, or Server directly from the component.
Next, let's extend the functionality of the project with a new script, HelloWorldManager.cs, which simplifies this process slightly by creating an on-screen button menu to start the Host, Client, and Server.
To create the HelloWorldManager.cs script, follow these instructions:
1. Create a new script in the Scripts folder named “HelloWorldManager.cs”.
2. Create a new UI Document in scene by right clicking in the Hierarchy window, then selecting UI Toolkit > UI Document, rename it to “HelloWorldManager”, and attach the HelloWorldManager.cs script as a component.
3. Copy the following code into the HelloWorldManager.cs script:
using System;
using Unity.Netcode;
using UnityEngine;
using UnityEngine.UIElements;

namespace HelloWorld
{
    public class HelloWorldManager : MonoBehaviour
    {
        VisualElement rootVisualElement;
        Button hostButton;
        Button clientButton;
        Button serverButton;
        Button moveButton;
        Label statusLabel;

        void OnEnable()
        {
            var uiDocument = GetComponent<UIDocument>();
            rootVisualElement = uiDocument.rootVisualElement;

            hostButton = CreateButton("HostButton", "Host");
            clientButton = CreateButton("ClientButton", "Client");
            serverButton = CreateButton("ServerButton", "Server");
            moveButton = CreateButton("MoveButton", "Move");
            statusLabel = CreateLabel("StatusLabel", "Not Connected");

		    rootVisualElement.Clear();
            rootVisualElement.Add(hostButton);
            rootVisualElement.Add(clientButton);
            rootVisualElement.Add(serverButton);
            rootVisualElement.Add(moveButton);
            rootVisualElement.Add(statusLabel);

            hostButton.clicked += OnHostButtonClicked;
            clientButton.clicked += OnClientButtonClicked;
            serverButton.clicked += OnServerButtonClicked;
            moveButton.clicked += SubmitNewPosition;
        }

        void Update()
        {
            UpdateUI();
        }

        void OnDisable()
        {
            hostButton.clicked -= OnHostButtonClicked;
            clientButton.clicked -= OnClientButtonClicked;
            serverButton.clicked -= OnServerButtonClicked;
            moveButton.clicked -= SubmitNewPosition;
        }

        void OnHostButtonClicked() => NetworkManager.Singleton.StartHost();

        void OnClientButtonClicked() => NetworkManager.Singleton.StartClient();

        void OnServerButtonClicked() => NetworkManager.Singleton.StartServer();

        // Disclaimer: This is not the recommended way to create and stylize the UI elements, it is only utilized for the sake of simplicity.
        // The recommended way is to use UXML and USS. Please see this link for more information: https://docs.unity3d.com/Manual/UIE-USS.html
        private Button CreateButton(string name, string text)
        {
            var button = new Button();
            button.name = name;
            button.text = text;
            button.style.width = 240;
            button.style.backgroundColor = Color.white;
            button.style.color = Color.black;
            button.style.unityFontStyleAndWeight = FontStyle.Bold;
            return button;
        }

        private Label CreateLabel(string name, string content)
        {
            var label = new Label();
            label.name = name;
            label.text = content;
            label.style.color = Color.black;
            label.style.fontSize = 18;
            return label;
        }

        void UpdateUI()
        {
            if (NetworkManager.Singleton == null)
            {
                SetStartButtons(false);
                SetMoveButton(false);
                SetStatusText("NetworkManager not found");
                return;
            }

            if (!NetworkManager.Singleton.IsClient && !NetworkManager.Singleton.IsServer)
            {
                SetStartButtons(true);
                SetMoveButton(false);
                SetStatusText("Not connected");
            }
            else
            {
                SetStartButtons(false);
                SetMoveButton(true);
                UpdateStatusLabels();
            }
        }

        void SetStartButtons(bool state)
        {
            hostButton.style.display = state ? DisplayStyle.Flex : DisplayStyle.None;
            clientButton.style.display = state ? DisplayStyle.Flex : DisplayStyle.None;
            serverButton.style.display = state ? DisplayStyle.Flex : DisplayStyle.None;
        }

        void SetMoveButton(bool state)
        {
            moveButton.style.display = state ? DisplayStyle.Flex : DisplayStyle.None;
            if (state)
            {
                moveButton.text = NetworkManager.Singleton.IsServer ? "Move" : "Request Position Change";
            }
        }

        void SetStatusText(string text) => statusLabel.text = text;

        void UpdateStatusLabels()
        {
            var mode = NetworkManager.Singleton.IsHost ? "Host" : NetworkManager.Singleton.IsServer ? "Server" : "Client";
            string transport = "Transport: " + NetworkManager.Singleton.NetworkConfig.NetworkTransport.GetType().Name;
            string modeText = "Mode: " + mode;
            SetStatusText($"{transport}\n{modeText}");
        }

        void SubmitNewPosition()
        {
            if (NetworkManager.Singleton.IsServer && !NetworkManager.Singleton.IsClient)
            {
                foreach (ulong uid in NetworkManager.Singleton.ConnectedClientsIds)
                {
                    var playerObject = NetworkManager.Singleton.SpawnManager.GetPlayerNetworkObject(uid);
                    var player = playerObject.GetComponent<HelloWorldPlayer>();
                    player.Move();
                }
            }
            else if (NetworkManager.Singleton.IsClient)
            {
                var playerObject = NetworkManager.Singleton.SpawnManager.GetLocalPlayerObject();
                var player = playerObject.GetComponent<HelloWorldPlayer>();
                player.Move();
            }
        }
    }
}
Important: You need to set up the HelloWorldPlayer.cs script explained below for the HelloWorldManager.cs script to work.
About the HelloWorldManager script
The script works as follows:
- The Host starts the server and joins as a client.
- The Client joins the server as a client player.
- The Server starts the game as a server without instantiating a player.
The HelloWorldManager.cs script creates this menu within the OnEnable() function. After you select a button, the UpdateStatusLabels() method adds a label on screen to display the mode you have selected. This status display helps you to distinguish Game view windows from each other when testing your multiplayer game.
The HelloWorldManager.cs script also uses the NetworkManager's instance via its Singleton to grab properties like the IsClient, IsServer, and IsHost. The IsClient and IsServer properties dictate the established connection state.
A singleton ensures only one instance of something exists and can be accessed everywhere. Imagine a single key to a shared resource that everyone uses, rather than everyone having their own copy. It simplifies access and control.
The HelloWorldManager.cs script also introduces a new method called SubmitNewPosition() that the HelloWorldPlayer.cs script uses to create a simple RPC call.
9. Add basic player movement
Now let's add some basic movement to the player using a script named HelloWorldPlayer.cs.
Both the server player and the client player can move. However, this movement occurs through the server's position NetworkVariable, which means the server player can move immediately, but the client player must request movement from the server, wait for the server to update the position NetworkVariable, and then replicate the change locally.
Important: You need to set up the HelloWorldManager.cs script explained above for the HelloWorldPlayer.cs script to work.
To set up the HelloWorldPlayer.cs script, follow these instructions:
1. Create a new script in the Scripts folder named “HelloWorldPlayer.cs”.
2. Copy the following code into the HelloWorldPlayer.cs script (you need to do this first in order to solve the errors):
using Unity.Netcode;
using UnityEngine;

namespace HelloWorld
{
public class HelloWorldPlayer : NetworkBehaviour
{
public NetworkVariable<Vector3> Position = new NetworkVariable<Vector3>();

public override void OnNetworkSpawn()
{
Position.OnValueChanged += OnStateChanged;

if (IsOwner)
{
Move();
}
}

public override void OnNetworkDespawn()
{
Position.OnValueChanged -= OnStateChanged;
}

public void OnStateChanged(Vector3 previous, Vector3 current)
{
// note: `Position.Value` will be equal to `current` here
if (Position.Value != previous)
{
transform.position = Position.Value;
}
}

public void Move()
{
SubmitPositionRequestServerRpc();
}

[Rpc(SendTo.Server)]
void SubmitPositionRequestServerRpc(RpcParams rpcParams = default)
{
var randomPosition = GetRandomPositionOnPlane();
transform.position = randomPosition;
Position.Value = randomPosition;
}

static Vector3 GetRandomPositionOnPlane()
{
return new Vector3(Random.Range(-3f, 3f), 1f, Random.Range(-3f, 3f));
}
}
}
About the HelloWorldPlayer script
The HelloWorldPlayer class inherits from Unity.Netcode's NetworkBehaviour instead of MonoBehaviour, which allows you to customize the networking code as you override what happens when the player spawns.
public class HelloWorldPlayer : NetworkBehaviourThe HelloWorldPlayer class defines a NetworkVariable to represent the player's networked position.
public NetworkVariable<Vector3> Position = new NetworkVariable<Vector3>();For multiplayer games, every object runs on at least two machines: player one and player two. Because of this, you need to ensure that both machines have the same behavior and that they have the correct information about the object on screen. However, only one player controls how the Player GameObject moves.
The following code enforces this by validating if the machine running the code is the player's owner:
public override void OnNetworkSpawn()
{
Position.OnValueChanged += OnStateChanged;

if (IsOwner)
{
Move();
}
}
The OnNetworkSpawn() method fires in response to the NetworkObject spawning, and the HelloWorldPlayer class overrides OnNetworkSpawn. This happens because the clients and the server run on different logics. You can override this behavior on any NetworkBehaviour component.
Because the server and client can be the same machine (referred to as the Host) and the Player's owner, it’s best practice to differentiate the two and have different Move behaviors for each.
If the current player is the server, the code determines a random position to spawn the Player GameObject. You can't find the spawn location if the current player is the client, you have to get it from the server.
public void OnStateChanged(Vector3 previous, Vector3 current)
{
// note: `Position.Value` will be equal to `current` here
if (Position.Value != previous)
{
transform.position = Position.Value;
}
}
The position gets applied locally through the OnValueChanged event of the Position NetworkVariable. The Player GameObject reacts as soon as the client receives the updated variable data client-side.
SubmitPositionRequestServerRpc();You can call this RPC when the player is a client or a server. When you call an RPC with SendTo.Server on the server side, it executes in the same way as a local function call by default.
The RPC sets the position NetworkVariable on the server's instance of the player by picking a random point on the Plane GameObject.
[Rpc(SendTo.Server)]
        void SubmitPositionRequestServerRpc(RpcParams rpcParams = default)
        {
            var randomPosition = GetRandomPositionOnPlane();
            transform.position = randomPosition;
            Position.Value = randomPosition;
        }
The server instance of the player modifies the Position NetworkVariable through the RPC. Since the two values are the same on the server, the server can run the same logic with no side effects, but you could also add if(IsClient) here.
Because the HelloWorldPlayer.cs script handles the position NetworkVariable, the HelloWorldManager.cs script can define the contents of SubmitNewPosition().
void SubmitNewPosition()
        {
            if (NetworkManager.Singleton.IsServer && !NetworkManager.Singleton.IsClient)
            {
                foreach (ulong uid in NetworkManager.Singleton.ConnectedClientsIds)
                {
                    var playerObject = NetworkManager.Singleton.SpawnManager.GetPlayerNetworkObject(uid);
                    var player = playerObject.GetComponent<HelloWorldPlayer>();
                    player.Move();
                }
            }
            else if (NetworkManager.Singleton.IsClient)
            {
                var playerObject = NetworkManager.Singleton.SpawnManager.GetLocalPlayerObject();
                var player = playerObject.GetComponent<HelloWorldPlayer>();
                player.Move();
            }
        }
This part is related to the interaction with the HelloWorldPlayer script. If the Move/Request Position change button is pressed then it executes the Move() function of the HelloWorldPlayer script, which means the SubmitPositionRequestServerRpc gets called.
The SubmitNewPosition() method updates the player’s position in a networked game. If the instance is a server, it loops through all connected clients, retrieves each player's network object, and calls the Move() method on their HelloWorldPlayer component. However, if the instance is a client or host, it retrieves the local player's network object and calls the Move() method. This ensures that the player’s position is updated correctly, depending on whether the instance is functioning as a server, client, or host.
10. Add the HelloWorldPlayer.cs script to the Player prefab
To add the HelloWorldPlayer.cs script to the Player prefab, follow these instructions:
1. From the Project window, select Assets > Prefabs.
2. Select Player.
3. Select Add Component from the Inspector window.
4. Select Scripts > Hello World > Hello World Player.
11. Create a build to test the functionality
Now you're ready to create a build that demonstrates the concepts outlined above.
1. Change the Fullscreen Mode under Edit > Project Settings > Player > Resolution and Presentation to Windowed instead of Fullscreen Window.
This allows you to open the build twice on one screen.
2. Open File > Build Profiles, select Windows/macOS and select Build and Run to create a build.
You can create a new folder via New folder with the name Builds and then hit Select Folder on it. The new build will open once the compilation finishes.
Note: In Windows the build file will automatically take the name of the folder where it is saved. For example, if you create a folder named Builds, the executable will appear as Builds.exe.
In order to test the functionality, open one build for the host and another build instance for the client (to join the host's game).
3. Navigate to the folder via File > Open Project, then in the Unity Hub right click on the project and click Show in Explorer. Navigate to the Builds folder you created earlier and open a second build through double-clicking the Hello Multiplayer World application.
4. Join one game as host and the second build as client via pressing the GUI buttons in the started builds.
Both build instances can move the player with the GUI button. The server moves the player immediately and replicates the movement on the client.
The client can request a new position, instructing the server to change that instance's position NetworkVariable. After the server updates the position NetworkVariable, the client applies that NetworkVariable position inside its Update() method.
5. Close the builds again after testing them.
12. Add a NetworkTransform
This section guides you through adding a NetworkTransform component that moves the player. NetworkTransform is a component used to synchronize the position, rotation, and scale of objects across the network. It handles many of the tricky aspects of transform synchronization and can be configured via Inspector properties.
To add a NetworkTransform component that moves the player, follow these instructions:
1. Select the Player prefab in Assets > Prefabs.
2. In the Inspector window, select Add Component.
3. Select Netcode > NetworkTransform.
4. Select Add Component again.
5. Enter “NetworkTransformTest”, select New Script, then select Create and Add.
6. Double click the NetworkTransformTest script to open the default local text editor.
7. Edit the NetworkTransformTest.cs script to match the following:
using System;
using Unity.Netcode;
using UnityEngine;

public class NetworkTransformTest : NetworkBehaviour
{
   void Update()
   {
       if (IsServer)
       {
           float theta = Time.time;
           transform.position = new Vector3((float) Math.Cos(theta), 0.0f, (float) Math.Sin(theta));
       }
   }
}
8. Save the scene by pressing Ctrl+S (macOS: Cmd+S or by selecting File > Save).
This script is designed to make an object move in a circle. IsServer checks if the object is on the server. If it is, it makes the object move in a full circle within 6.28 seconds.
This circular movement happens because of the Cos and Sin math functions. These two functions trace a circle over time when used to compute the X and Z coordinates. Everyone connected to the game will then see the object moving in this circle, because the server tells them where the object is.
Test the NetworkTransform
To test the NetworkTransform you added in the earlier section, follow these instructions:
1. Select File > Build And Run.
2. Connect as Host by selecting the Host button in the opened build.
After the clients and server spawn, each spawned Player GameObject moves in a circle in their respective builds.
13. Summary and review
Through this tutorial you have learned how to create the setup for a casual co-op multiplayer game. You understand the purpose and possibilities of the NetworkManager, NetworkObject and NetworkTransform components and can create a simple application utilizing them.
You now know how to spawn prefabs and enable simple movement for different players. You understand the purpose of RPCs and NetworkVariables and how to send messages between server, clients and host. You are also able to change the state of different modes (for example, sending updates of transform position). You can now create a user interface for starting the different connection modes (host, client, etc.), which is used in most multiplayer games. And you learned how to build and test a multiplayer application via Multiplayer Play Mode.
We hope this tutorial helped you to gain a solid understanding of basic Multiplayer principles. Have a look at our Multiplayer documentation for further information. Also, we suggest you take a look at the Multiplayer Use Cases Samples to get more familiar with the basic concepts used in multiplayer development.