Add spatial audio to your marker-based app
Tutorial
Beginner
+10XP
45 mins
61
Unity Technologies
Audio makes an application come to life. Whether it is the sound of buttons being clicked, background music that heightens emotions, or sound effects when objects move, audio helps make experiences feel complete.
In 3D environments, you can use spatial audio to add to a 3D effect by making sounds louder when their source is closer and softer when it is farther away. Spatial audio helps users to feel immersed in your app.
In this tutorial you’ll make spatial audio emit from your model on a button press.
Languages available:
1. Overview
Audio makes an application come to life. Whether it is the sound of buttons being clicked, background music that heightens emotions, or sound effects when objects move, audio helps make experiences feel complete.
In 3D environments, you can use spatial audio to add to a 3D effect by making sounds louder when their source is closer and softer when it is farther away. Spatial audio helps users to feel immersed in your app.
In this tutorial you'll make spatial audio emit from your model on a button press.
Note: You can also go through the Creative Core: Audio tutorials to learn more about audio in Unity.
2. Add an audio source
You will use audio sources and audio clips to play sounds in your AR app. Audio clips are the specific audio files, and an audio source tells Unity how to play the clips you select. Audio sources have many different settings that you can control, including volume, priority, and spatial sound settings. You can read about Audio Sources in the Unity Manual to learn more.
Follow these instructions to add an audio source to your model’s prefab:
1. In the Project window, find your selected model’s prefab and open it in prefab editing mode.
2. In the Hierarchy window, create an empty GameObject as a child GameObject of the Mesh and name it “Audio”.
Audio should be next to CanvasPopup in the Hierarchy window.

3. In the Inspector window, add an Audio Source component to the Audio GameObject.
4. Find the AudioClip property of the Audio Source component, and use the picker (circle) to select the sound file you would like to play in your app. A few clips are included with the project files.
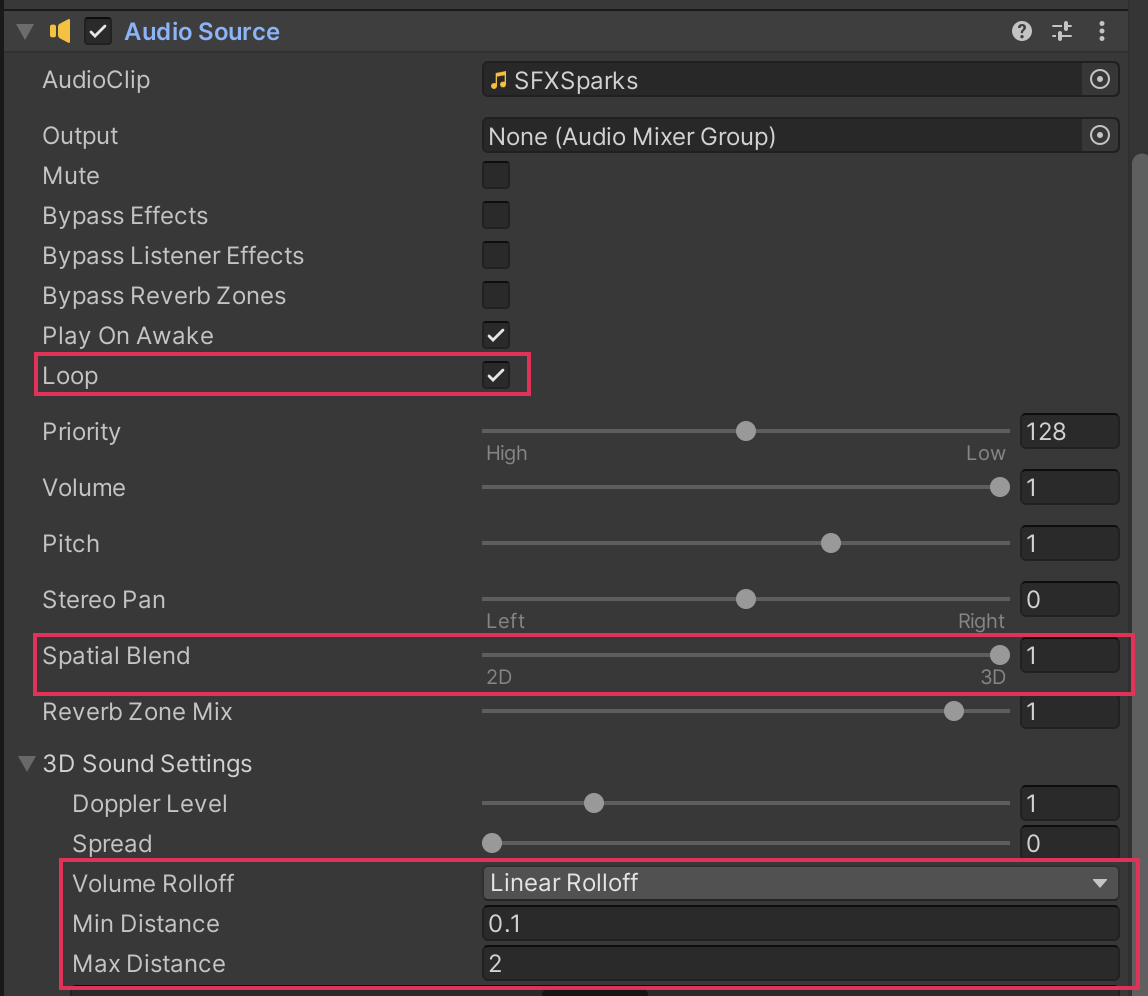
5. Enable Loop for testing purposes.
6. Set the Spatial Blend value to 1, which indicates spatial 3D audio. With a 3D spatial blend, the audio will get louder when the camera is closer to the audio source and quieter as the camera moves farther away.
7. Set the Volume Rolloff to Linear Rolloff. Set the Min Distance to 0.1 and the Max Distance value to 2.0. With these values, the volume will play at a maximum volume if you are 0.1 meters or closer to the model, but the volume will gradually decrease until you are two meters away, where you won’t be able to hear it at all.
8.Test the audio in Unity by selecting Play, then gradually moving closer or farther away from the prefab spawned on the simulated marker.
9. You will probably need to tweak the Min Distance and Max Distance properties of the Audio Source component as you get a feeling for the way spatial audio works. You might need to build and test a few times to get the sounds to play exactly the way you want.
10. Exit prefab editing mode when you are satisfied with the spatial audio.
3. Update the UI button
Follow these instructions to adjust the button that will play your audio:
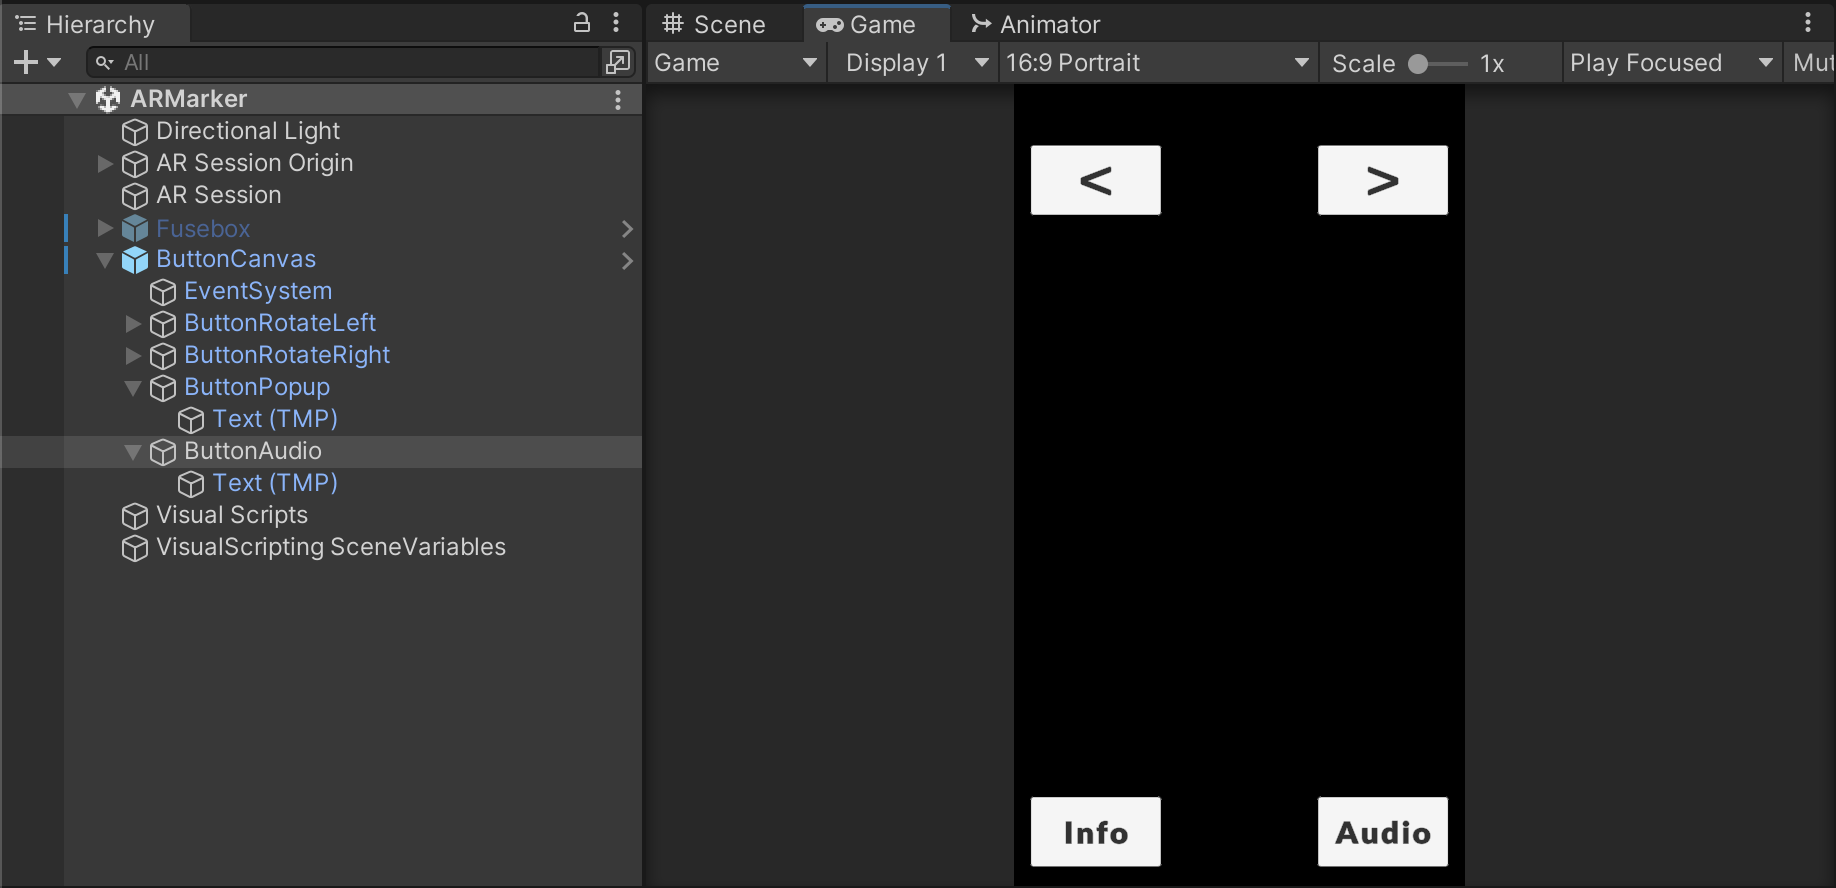
1. In the Hierarchy window, select Button4 and change its name to “ButtonAudio”.
2. In the Inspector window, find the Image component of the button and change the sprite by using the picker (⊙).
3. In the Hierarchy window, select the Text (TMP) child GameObject of the ButtonAudio GameObject and change the text to something like “Audio” or “Play Audio”.
4. Customize the style, font, and other properties of the text as you like.
4. Set up and assign new variables
Your button is ready, but it doesn’t do anything yet. Making the button work will take two steps in Visual Scripting. In the first step, you will make the references for the button and the audio, and in the second step, you will make the audio actually play on a button press. This is almost the same exact process you used to implement the popup canvas functionality.
Watch the video or follow the instructions below to make a visual script to control your audio:
1. In the Hierarchy window, select your VisualScripts GameObject and open the Setup graph.
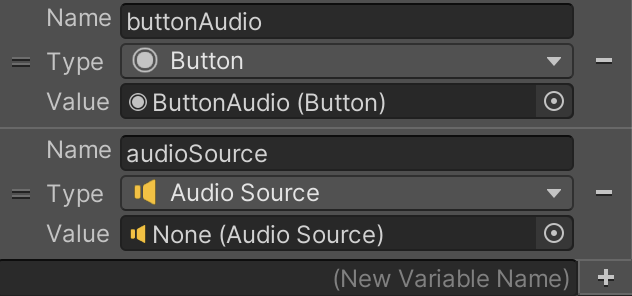
2. In the Blackboard, make a new Object variable called “buttonAudio”, set its Type to Button, and set its Value to the ButtonAudio button.
3. In the Blackboard, make a new Object variable called “audioSource” and set its Type to Audio Source, but leave the Value unassigned.
4. Add a Get Component in Children (Type, Include Inactive) node to the end of your graph. Set its Type to Audio Source, and enable Include Inactive.
5. Click and drag the modelObject variable from the Blackboard into the Graph Editor, then connect its output to the object input of the Get Component in Children node.
6. Add a Set Object Variable node to the end of your graph. Select audioSource as the GameObject. Connect the output type node to the bottom input node (without a label) of Set Variable.
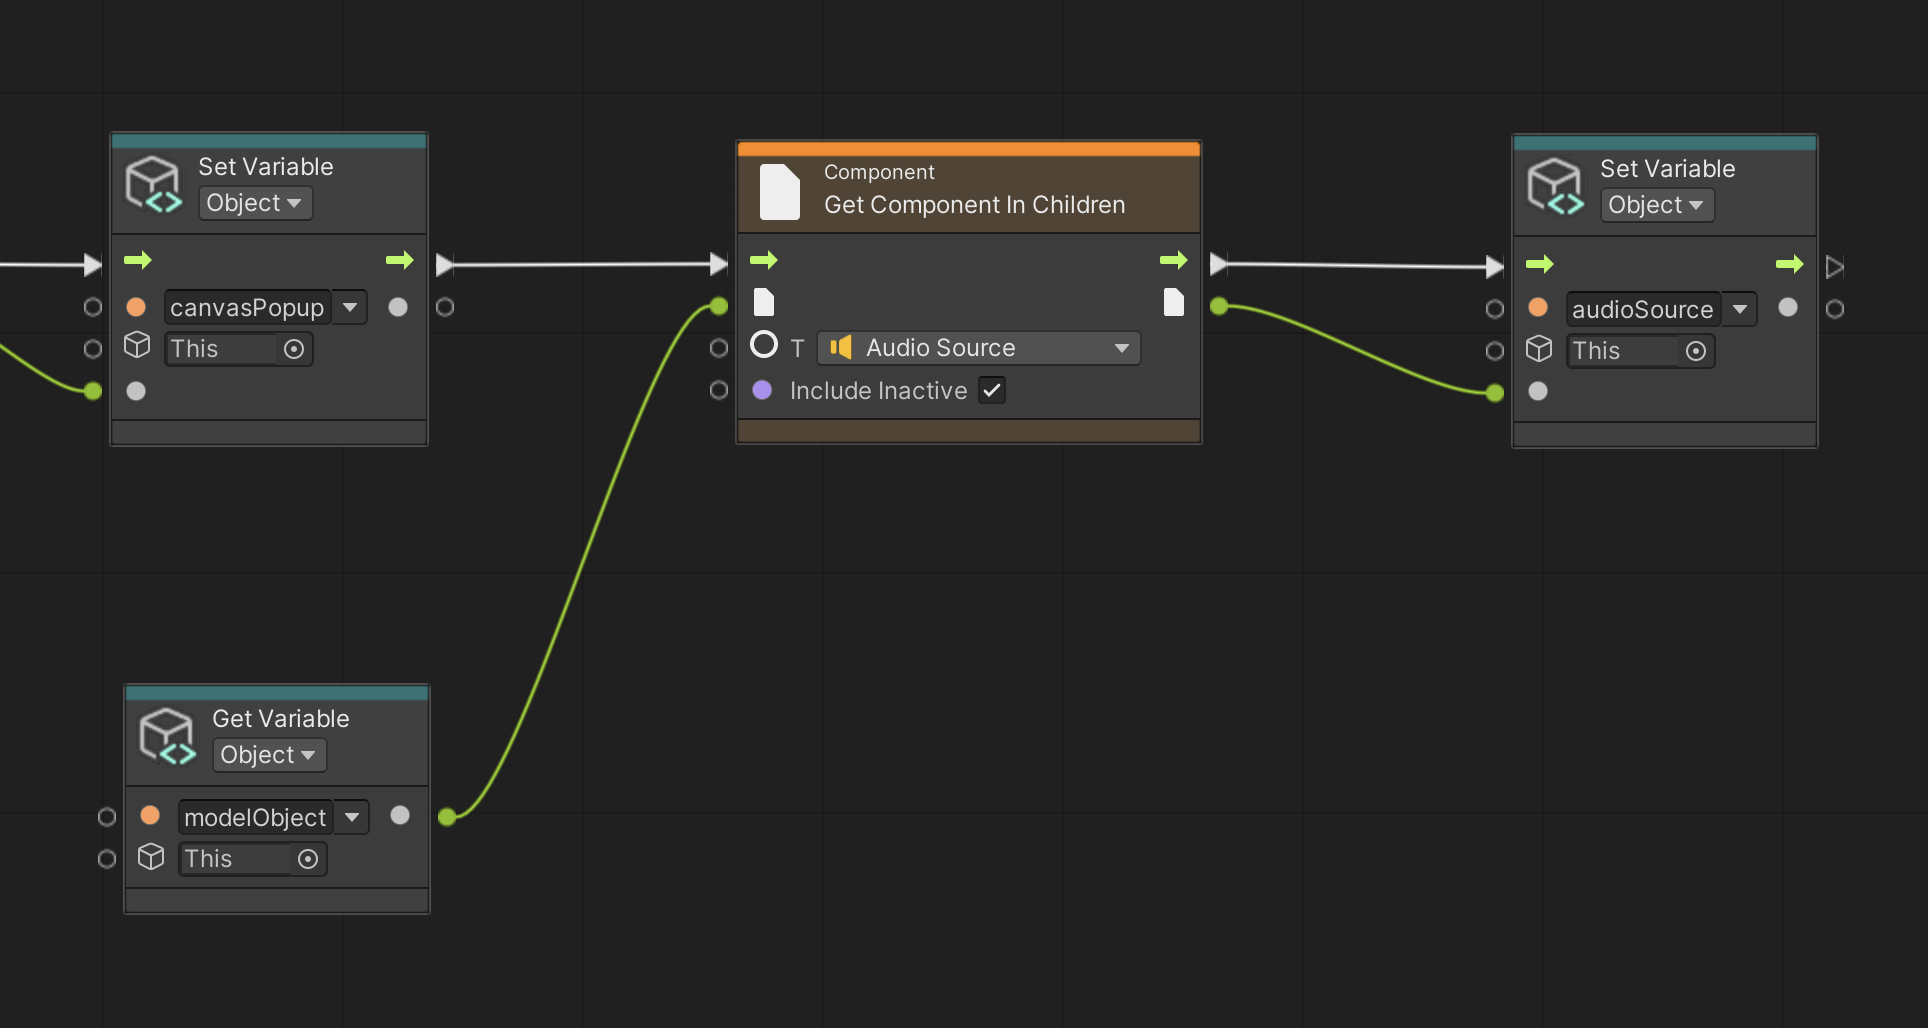
7. Enter Play mode in the Editor and see if the audio source populates the variable in the script graph when the model GameOobject is detected.
5. Make the button play audio
The last step is to make a new script to turn the audio on when the button is pressed.
Watch the video or follow the instructions below to make your button play audio when pressed:
1. In the Hierarchy window, locate your VisualScripts GameObject and make a new Script Machine component named “PlayAudio”.
2. Edit the name to “Play Audio” and the description to “Controls the audio on button press”. Then select Edit Graph.

3. Delete the On Start and On Update nodes.
4. Click and drag the buttonAudio variable from the Blackboard into the Graph Editor.
5. In the Graph Editor, add an On Button Click node and connect the Get Variable: buttonAudio node flow output to the input on the On Button Click node.
6. Drag the audioSource variable from the Blackboard into the Graph Editor.
7. In the Graph Editor, add an Audio Source Play node and connect the On Button Click node flow output to the flow node input.
8. Connect the Get Variable: audioSource output to the sound input of the Audio Source Play node.
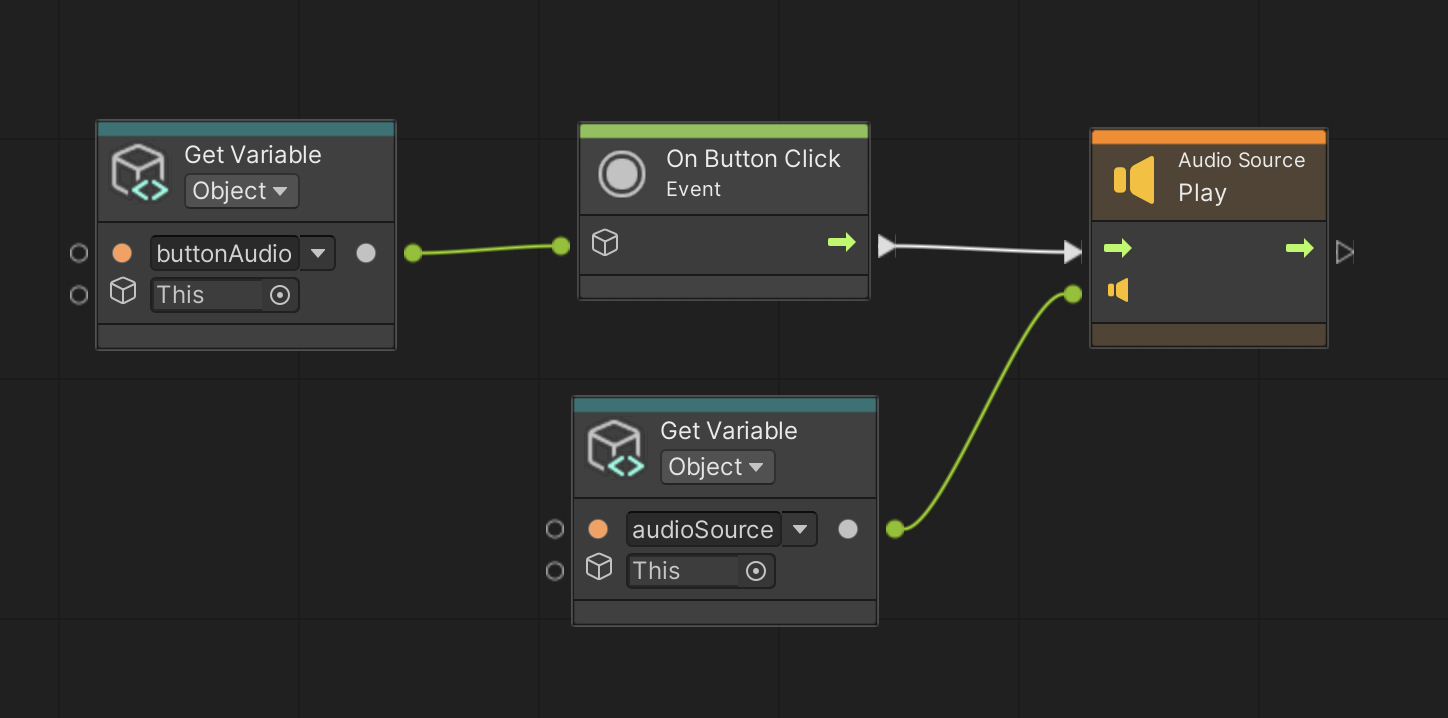
9. In the Project window, find your selected object prefab, open it in prefab editing mode, select the Audio child GameObject, and disable the Loop property in the Audio Source component if you don’t want your audio to loop.
10. If you want, disable the Play On Awake property. If this is enabled, the audio will play when the GameObject spawns in the scene, which may be a cool effect, depending on the sound.
11. Test in Play mode or build and test on your device.
The button should play your audio!
6. More things to try
If you want to further develop your skills, explore new concepts, or improve your project, check out some of the optional activities below. Each activity is identified as being either Easy, Medium, or Difficult, so you know what level of difficulty to expect.
These activities are entirely optional, so if you’re not interested, no problem – just skip this step. We do recommend attempting at least one of them in order to get the most out of this learning experience. Good luck!
Easy: Download free music files from the Unity Asset Store and put one in your project
There are lots of amazing free sounds on the Unity Asset Store. The example below uses a track from the Free Game Music Collection from The Indie Devs Nation. Spend some time browsing the Unity Asset Store to find a package you like, and then add some background music to your experience.
Then, add a button to the user interface that will turn music on with a button press.
Medium: Download audio from an online repository and implement it in your experience
Audio files can be licensed in different ways, but one of the most accessible ways to get great audio for your creations is to look for music and sound effects with Creative Commons (CC) licenses. There are many audio files released each year with different types of Creative Commons licensing. You can find out more about CC licenses at the Creative Commons website. You can find CC music and sound effects on a variety of sites such as the Free Music Archive, Wikimedia Commons, and the Internet Archive.
You can also find some other fantastic audio covered by other licenses that allow you to use the files for free. One amazing resource is the Royalty Free Sound Effects Archive: GameAudioGDC from Sonniss. This resource has gigabytes of high quality audio and sound effects. The only issue might be setting aside enough time to find what you’re looking for! Each pack includes a track list to make it easier to find exactly the right effect.
There are great files out there and amazing artists that want to make their work available to you. Whatever resources you go to for your audio files, ensure that you are following the license guidelines so that they continue to share and so that you avoid trouble.
For this challenge, try to find, download, and implement some audio files to make your experience sound amazing.
Difficult: Make your button toggle audio on and off
Making audio play is great, but for many audio files you will also want to be able to turn off the audio, especially if the audio loops. The good news is that you are halfway toward making your button toggle the audio. To turn off the audio, you'll need to modify your PlayAudio graph by adding the following nodes:
- A node that checks to see if your audio is playing.
- An If node.
- A node that stops an audio source if it is playing.
7. Next steps
Congratulations! You have made an AR application that detects a marker, spawns a model over that marker, and allows the user to interact with that model. To do this, you did the following:
- Implemented image marker tracking in AR to spawn a 3D model.
- Implemented screen space and world space UI in an AR app.
- Implemented spatial audio in AR.
Now it’s time to take all your skills and knowledge and put them towards a new challenge. You’ll create your own unique AR app in response to a project brief. Once you have a new AR experience you are proud of, you’ll submit your work to share it with others!