Leaving soon
This content will no longer be available as of Jun 11, 2026. Go to FAQ for more details.

Setting up the Input System
Tutorial
Beginner
+0XP
10 mins
(655)
Unity Technologies
With the release of Unity 6, the new Input System, simply referred to as the Input System, is now the standard for managing player input in Unity projects. The Input System simplifies the process of setting up, configuring, and managing player input through code, making it easier to develop and iterate on user input systems. As of Unity 6, developers are encouraged to use the Input System for all new projects to take full advantage of its advanced features and capabilities.
In this tutorial, you’ll learn how to install the Input System package and quickly get set up with game-ready inputs.
Languages available:
1. Overview
With the release of Unity 6, the new Input System, simply referred to as the Input System, is now the standard for managing player input in Unity projects. While the Legacy Input system has served developers well for many years by providing robust and reliable input handling across numerous platforms, the new Input System offers enhanced flexibility and better support for modern devices and platforms. The Input System simplifies the process of setting up, configuring, and managing player input through code, making it easier to develop and iterate on user input systems. As of Unity 6, developers are encouraged to use the Input System for all new projects to take full advantage of its advanced features and capabilities.
In this tutorial, you’ll learn how to install the Input System package and quickly get set up with game-ready inputs.
Before you begin working through this tutorial, ensure your game controller or device's driver is correctly installed for your computer’s operating system. Check the device's make and model, download the appropriate driver, and run the installation. You might need to restart your computer. Make sure to verify device recognition in your system settings or preferences.
Note: This tutorial uses an Xbox controller and standard keyboard inputs.
2. Setup for projects upgraded to Unity 6
In new Unity 6 projects, the Input System is installed by default. However, if you’re upgrading a project from an earlier version of Unity, you'll need to install the Input System package from the Package Manager. Older projects must also ensure that the project’s Editor Assemblies Compatibility Level is set to .Net Framework. If you’re working on a project that was created in Unity 6, please proceed to the next step.
To install the Input System from the Package Manager and upgrade the Editor Assemblies Compatibility Level for upgraded projects, follow these instructions:
1. Navigate to Edit > Project Settings to open up the Project Settings window.
2. Select the Player option from the left column, then use the foldout (triangle) to expand the Other Settings section in the main Project Settings window. Scroll down to the Configuration section and ensure that the Editor Assemblies Compatibility Level setting is set to Default (.Net Framework) .
3. Ensure the Active Input Handling setting is set to Both.
4. A popup might appear and notify you that the Unity Editor must be restarted for the change to take effect. Select Apply and let the project restart, and once it has, close the Project Settings window.
5. Navigate to the Package Manager by selecting Window > Package Manager from the main menu.
6. In the left column of the Package Manager window, select Unity Registry and enter “input system” in the Search Unity Registry box. Select Install if the package isn’t already installed.
The Input System is now configured for your upgraded project.
3. Prepare the scene and create an Input Action
This tutorial will demonstrate how to set up the Input System with the example shown in the 3D Beginner: Roll-a-Ball Game project. You can refer to the Roll-a-Ball project for further details on how to set up primitive GameObjects such as a ground plane and a sphere, as well as how to add materials and a Rigidbody component. Alternatively, you can work with an existing player GameObject you’ve already set up in your own project.
1. Set up a GameObject in your scene to be designated as the player you will control through your device.
In this example scene, a sphere GameObject is placed in the center of a ground plane and will serve as the player. The player sphere will be programmed with commands to enable movement using a C# script. The C# script commands will be explained in a later tutorial.
2. If you haven’t already done so, plug in your controller. You can verify that Unity has recognized your controller either by the debug message that appears in the console or by navigating to Window > Analysis > Input Debugger and locating it in the list of devices. In this case we’re using a Xbox controller.
For projects upgraded to Unity 6, a default Input Action asset must be created. Projects created with Unity 6 contain this asset by default. If needed, create a default Input Action asset:
3. Navigate to Edit > Project Settings and select the Input System Package from the left column of the Project Settings window. Select the Create and assign a default project-wide Action Asset button.
A newly created input settings asset is now saved in the root of your Project folder structure as InputSystem_Actions. You’re able to customize settings that pertain to how events are processed in either update or fixed update methods, and the default timings of button taps.
4. Leave the Input System Package settings unchanged with its default settings for now and close the Project Settings window.
To edit any of these settings later on, you can either open the Project Settings window or first select the InputSystem asset in the Project window and then select the Edit Project Settings Window button in the Inspector window to open the Project Settings window.
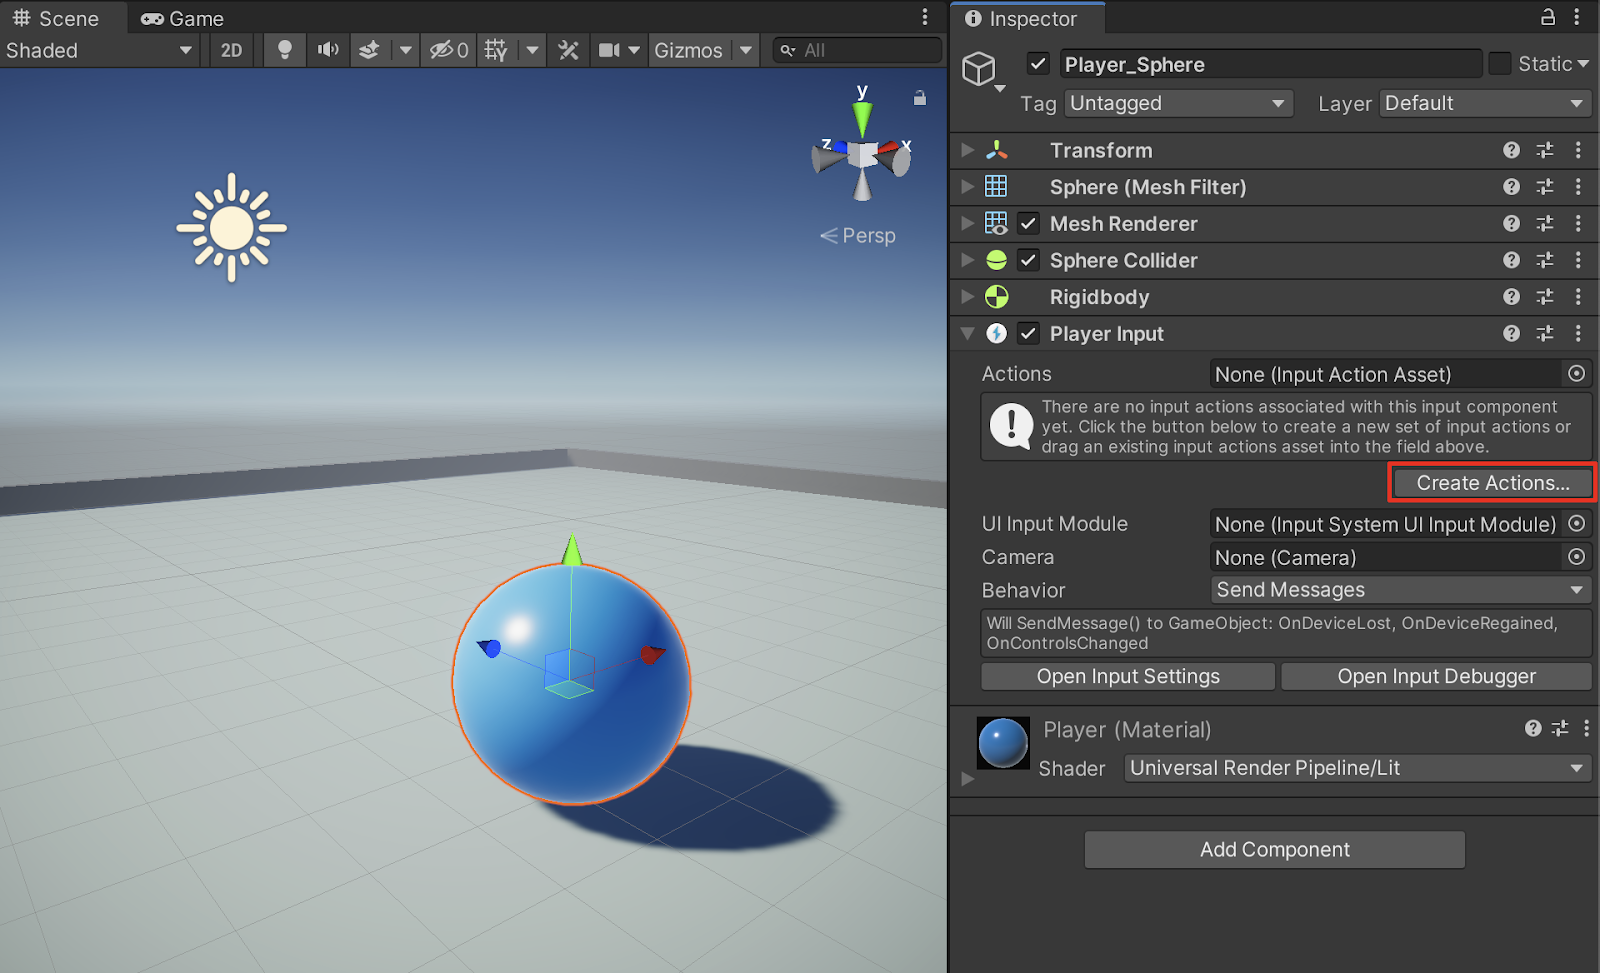
In order to control the player’s movements, you must first add the Player Input component.
5. Select your player GameObject in the Hierarchy window, select the Add Component button in the Inspector window, enter “player input” in the search box, and select Player Input from the dropdown menu.
6. The InputSystem_Actions asset that you created previously should be automatically added to the Actions property. If the Actions property is empty, select the Actions picker (⊙) to open the Select Actions window and select the InputSystem_Actions asset.
Your player GameObject is now fully configured and ready to use the Input System!
4. Next steps
The Input System package offers support for a wide range of device inputs. After installing and setting up the Input System package, you’ll be able to quickly apply a game-ready default input action to start working with your project.