Add special effects to existing audio
Tutorial
Beginner
+10XP
20 mins
117
Unity Technologies

In this tutorial, you’ll create an echo effect using an audio reverb zone.
By the end of this tutorial, you'll be able to:
- Add special audio effects to a scene
- Describe the science of audio in digital environments.
- Explain the role of audio in developing atmosphere.
- Control the priority of different audio sources in a scene by setting Priority settings.
Languages available:
1. Overview
Ambient audio goes a long way to build believability into a scene, but sometimes extra steps must be taken to make sure that the sounds are rooted in realism. In the example scene, a cave sits just behind the waterfall. If you’ve been following the Creative Core pathway, you've already added footsteps that make it sound like the player character is walking on a stone surface: however, this doesn’t entirely represent what would occur in real life. Generally speaking, when sounds are made in an enclosed space made of hard surfaces, an echo should be present. In this tutorial, you’ll create an echo effect using an audio reverb zone.
2. What is an audio reverb zone?
Sound waves, just like lightwaves, always interact with whatever environment they’re in. In the presence of soft materials and variant surface depths, sound is quickly absorbed. On the opposite end of the spectrum, hard, flat surfaces readily reflect sound waves, which produce echoes.

The cave in the scene is a small space made entirely out of stone. In this case, echoing would absolutely be occurring.
Unity can’t natively determine whether or not a sound should echo, so it’s up to you to identify these areas on your own, but once you do, implementation is simple.
Unity is able to simulate echo areas through something called an audio reverb zone. Like an audio source, reverb zones have a minimum and maximum distance, but also include settings for simulating the type of echo you need. They also include several common echo type presets.
3. Create a reverb zone
1. In the Hierarchy, right-click and select Audio > Audio Reverb Zone.
2. Name the reverb zone “Cave Reverb”.
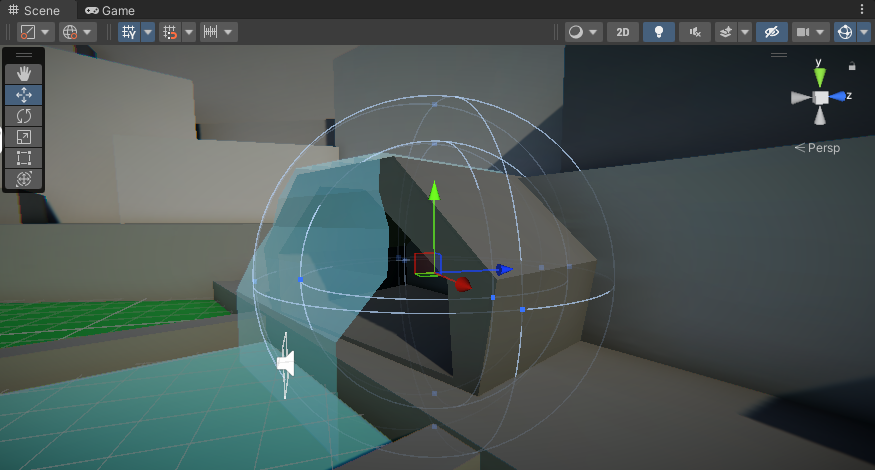
3. Move the Cave Reverb object to the center of the cave and adjust the minimum distance to take up the majority of the interior of the cave.

4. Adjust the maximum distance so it’s just beyond the cave entrance.
Note that some parts of the reverb zone may spill outside of the cave itself. That’s okay. In more advanced scenarios, reverb zones are often triggered to be active only when the player character is inside where the echoing should be occurring, and then is turned off when the player character leaves the area.
5. Set the Reverb Preset to Cave.
6. Playtest the scene and run into the cave.
The player character’s footsteps now echo. To hear this more distinctly, while still in Play mode, disable the reverb zone by disabling the box next to the reverb zone’s name and take a few steps. Enable it again and take a few more steps. Notice that in addition to the footsteps echoing, the pitch of the waterfall shifts in the cave as well.
4. Test different presets
There are a large selection of Reverb Presets to choose from, and you can even create your own custom user generated preset as well. Explore the different presets to see how they change the overall mood and believability of the cave.
1. Set the Reverb Preset to Padded Cell.
The echo is completely eliminated, and the footsteps seem to be dampened compared to how they sound outside of the reverb zone.
2. Next, try Stone Corridor.
Like the cave preset, the stone corridor has a lot of echo, but those echoes are sharper and last longer. This is because a corridor is generally expected to be narrower and perhaps even taller, giving more opportunities for the sound waves to bounce around before reaching the player character’s ears.
Try reviewing a few other presets and think about why the effect changes the audio in the ways that it does. If you find a setting that you think suits the cave better, feel free to use it; otherwise, when you’re finished, switch the preset back to cave.
5. Add a water drop sound effect
Let’s add an extra level of detail to the interior of the cave by adding some extra ambient water sounds. These will only be audible inside the cave itself and will reflect the fact that the cave is behind the waterfall.
1. Create a new Audio Source and name it “Cave Water Drops”.
2. Add the WaterDroplets audio clip to the audio source.
3. Set the Spatial Blend to 3D and enable Loop on the Audio Source so that the audio will repeat infinitely.
4. Set the Volume Rolloff to Linear.
The water drops will only be able to be heard within the cave itself, and the sound of the waterfall will be competing with the drops. Because of this, it’s less important to worry about the volume rolloff.
5. Set the minimum and maximum distance to fill the interior of the cave. It’s fine to keep the two relatively close to one another in this case.
6. Set audio importance
As you have learned, multiple audio sources can be layered on top of each other to create a more dynamic soundscape in a scene. However, sometimes when this occurs some audio sources can be lost over others or are deprioritized.
It’s possible to set the priority of audio sources to ensure that important sounds are never lost. This is accomplished via the Priority setting. By default, all audio sources are set with the Priority setting of 128. The lower the value, the more important the sound is.
1. Set the Cave water drops audio source to a priority of 100, so it gets greater priority over the other audio sources.
2. Playtest the scene.
Once you get into the cave, you’ll be able to hear the water drops affected by the reverb zone.
7. Add effects with the audio mixer
The Audio Mixer in Unity is a tool that allows for precise control of all the audio in your scene from a single window. Rather than editing each audio source individually, you can easily edit the entire soundscape – or specific groups of sounds together. Using the audio mixer, you can quickly adjust volume levels, apply effects, and implement more complex audio routing to ensure immersive audio for your game or application.
To set up the Audio Mixer for your scene, follow these instructions:
1. To open the Audio Mixer window, go to the main menu and select Window > Audio > Audio Mixer.
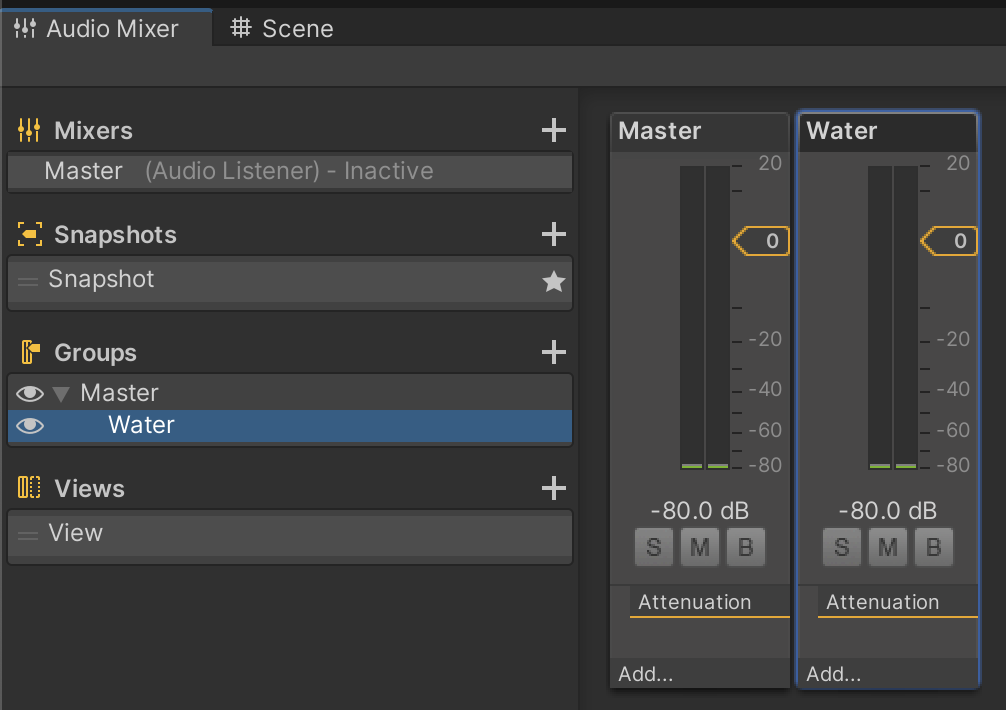
2. In the Audio Mixer window, select the Add (+) button to create a new Audio Mixer, then rename it “Master" or any desired name. This Master mixer will contain all the audio in your scene.
3. In the Groups section, select the Add (+) button to create a new Group, then rename it “Water” - this will include the waterfall and water droplets sounds.

4. To assign the waterfall sound to the Water mixer group, select the waterfall audio GameObject, locate the Output property in the Audio Source component, and use the Output picker (⊙) to select the Water group.
5. Repeat this process for the water droplet sound effect.

6. With your mixer group set up, press the Play button and use the Edit in play mode option to adjust volume levels, add effects, or perform other actions while your application is running.
Check out the video below for a demonstration.
You’ll notice that the volume control for each group (Attenuation) appears underlined in orange, while each audio effect appears underlined in green.
The Audio Mixer may not be necessary for smaller projects like this one, but it becomes much more important and useful for more complex games with hundreds of sound effects and a wide range of distinct soundscapes. To learn more, browse through the Audio Mixer documentation.
8. Next steps
In this tutorial, you learned how to add echoes to audio effects in the Scene view. These types of special effects may seem like minor details, but their addition helps sell the realism of the environment. Once you notice a detail like an echo is missing, it’s hard to forget about it. As you continue working on your soundscapes, remember that small details like these are highly important.