
Audio Reverb Zones
Tutorial
Beginner
+10XP
30 mins
(122)
Unity Technologies
Audio Reverb Zones add soundscape realism to your Scene by controlling how a 3D environment’s space may affect the qualities of sound reverberating or echoing off of surfaces. Consider a game character’s footsteps. The sound effect of the footsteps would vary depending on the environment. Audio resonating in an open spacious environment has properties of sound that will change upon entering an enclosed corridor. Audio Reverb Zones address these types of changing sound environments.
Languages available:
1. Getting Set Up
In this tutorial, we will demonstrate Audio Reverb Zones using Assets provided in the 3D Game Kit.
For the detailed instructions on how to install the 3D Game Kit Template, refer to the Audio Setup tutorial. It is not required, however, to download the complete 3D Game Kit Template package for this tutorial. Feel free to practice with Audio Reverb Zones by using the Assets of your own project. To get set up:
1. Include an area within your environment which may have unique sound properties or characteristics such as a tunnel or canyon. To create a stone tunnel structure from the 3D Game Kit Template, assemble Prefabs within the
3DGamekit > Prefabs > Environment > Structures folder in the Project window, and then drag/drop them into the Scene to arrange them together in an environment. Alternately, to sculpt a canyon into your terrain, refer to the Working with the Terrain Editor tutorial.
2. Ensure that your Scene has an Audio Listener component. Use the default camera, or attach an Audio Listener component to a character.
3. Include a GameObject with an Audio Source component to play sound.
In this tutorial’s example Scene, the third-person character Prefab Ellen already has the audio source of footsteps included within the Prefab. We will control her running from a grassy terrain, into a stone corridor tunnel, illustrating how the footstep’s audio properties will change upon entering an Audio Reverb Zone.
2. Working with Audio Reverb Zones
We will proceed to add an Audio Reverb Zone. Audio Reverb Zones can be attached to any GameObject as a component, or simply added from the menu drop-down.
1. From the top menu drop-down, select:
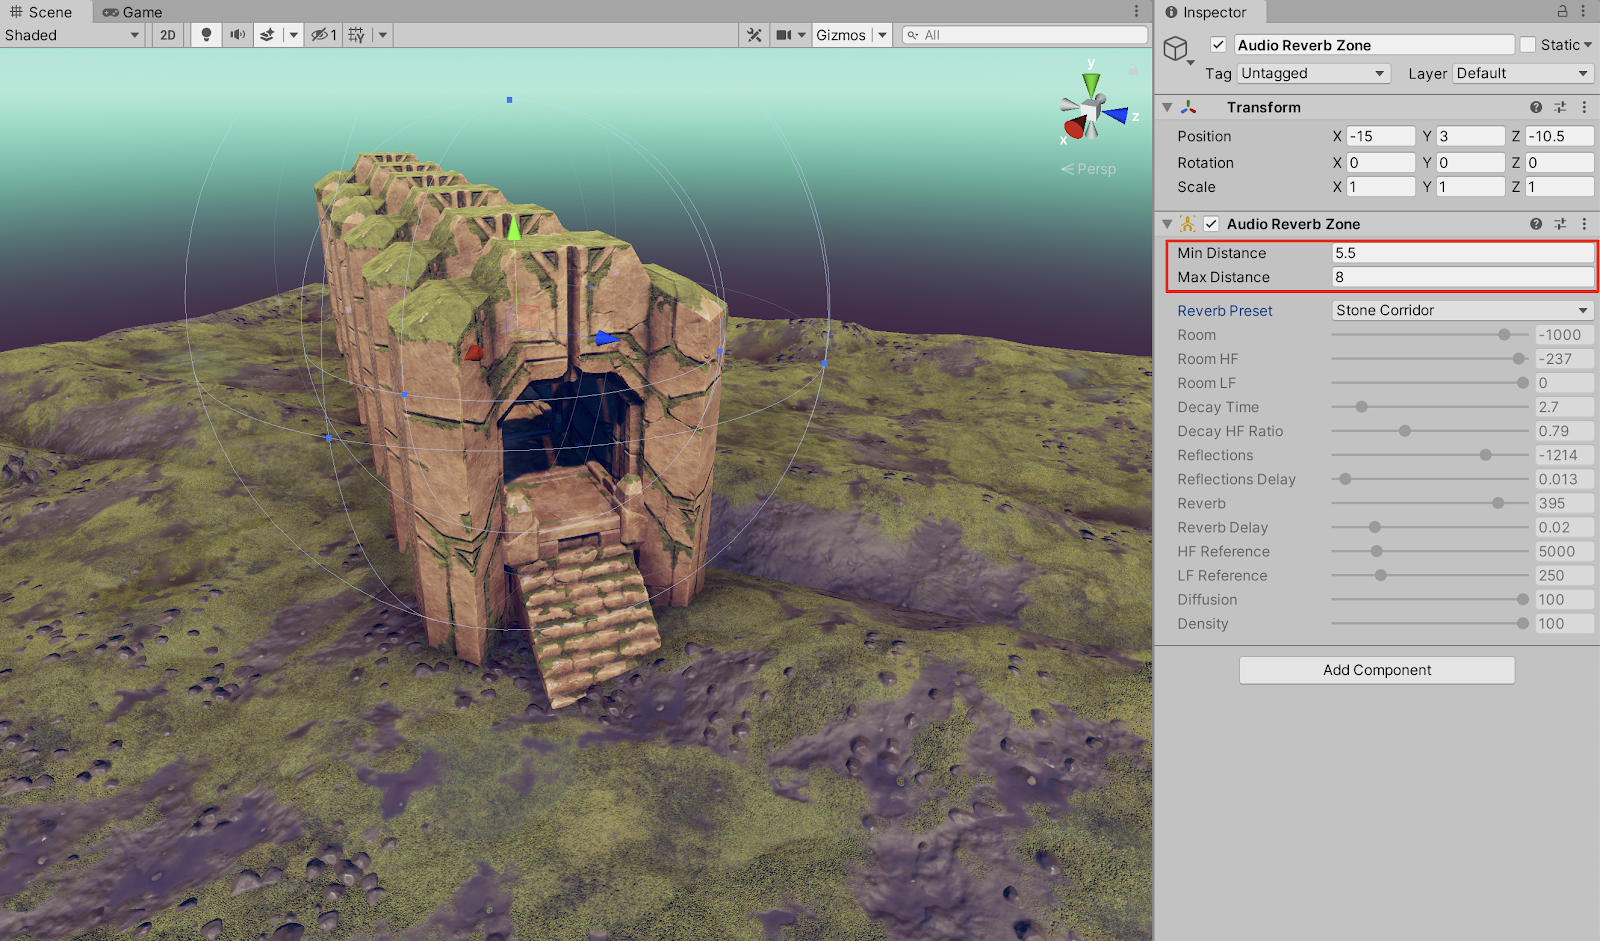
GameObject > Audio > Audio Reverb Zone. Orient the position of the Audio Reverb Zone GameObject to center it upon where you want the sound to echo in your Scene. Here the Audio Reverb Zone is centered around the tunnel structure.
2. Set the Reverb Preset to a preset setting of your choice to match the conditions in your Scene. In the example Scene, Stone Corridor is selected from the drop-down menu.
We will now set the Minimum and Maximum Distance values, represented by the GameObject’s blue spherical gizmo. When the listener is outside of the outer sphere’s Maximum Distance range, the Reverb Zone will have no effect. As the character approaches the inner sphere’s Minimum Distance, the reverb effect increases. Once inside the inner sphere, the reverb will have full effect.
3. Set the Audio Reverb Zone’s Min Distance and Max Distance values to match your Scene’s environment. In the example Scene, the Min Distance is reduced to 5.5, and the Max Distance is reduced to 8.
4. Enter Play mode to preview the audio. Control the character to run into the Audio Reverb Zone to hear the audio properties echo and reverberate through the stone corridor.
You will be able to hear that the Reverb Zone’s audio properties depict the way sound interacts within an enclosed hollow environment, simulating how physical sound waves reflect off of surfaces.
5. To make further specific customized adjustments for any of the Reverb Presets, ranging from Cave to Cathedral, select User from the Reverb Preset drop-down menu, and adjust any of the individual value sliders.
- Room: adjusts the room effect output levels in mB.
- Room HF: adjusts the room effect output levels in mB at high frequencies.
- Room LF: adjusts the room effect output levels in mB at low frequencies.
- Decay Time: adjusts the reverberation decay time at low frequencies in seconds.
- Decay HF Ratio: adjusts the high frequency to low frequency decay time ratio.
- Reflections: adjusts the early reflections level relative to the room effect in mB.
- Reflections Delay: adjusts the early reflections delay time relative to the room effect in mB.
- Reverb: adjusts the late reverberation level relative to the room effect in mB.
- Reverb Delay: adjusts the late reverberation time relative to the first reflection in seconds.
- HF Reference: adjusts the reference high frequency in Hz.
- LF Reference: adjusts the reference low frequency in Hz.
- Diffusion: adjusts the reverberation diffusion (echo density) in a percentage.
- Density: adjusts the reverberation density (modal density) in a percentage.
3. Next Steps
When working with Audio Reverb Zones in Unity, practice setting up various different or multiple scenarios within a 3D sound environment. Experiment with the different preset settings, or even your own custom settings to hear their audio qualities. Unity’s Audio Reverb Zones offer a highly configurable means to represent how sound interacts with the Scene.