Build, Run, Distribute
Tutorial
Beginner
+10XP
5 mins
2365
Unity Technologies
You’ve now looked at every step you need to take to create a game in Unity, from creating your first GameObject to writing custom scripts.
Now that your game is complete, you need to build it to create a standalone application that you can upload to a digital store. This means people will be able to play the game without having to install the Unity Editor and downloading all your Assets to their machine.
Languages available:
1. Adjust Basic Player Settings
The application you create from the Editor to distribute your game to users is called the Player. Before creating the Player, let’s adjust some Player Settings:
1. In the top menu bar, go to Edit > Project Settings and select Player. This is where you can set some of the information about your game.
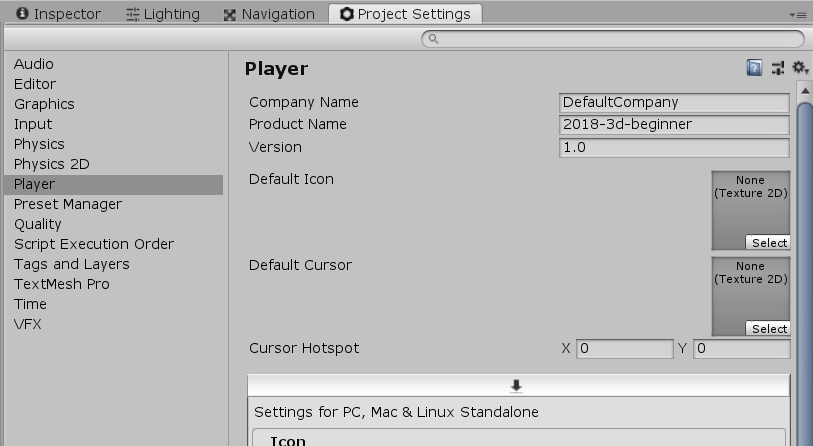
2. The Company Name is used to create the folders where the files created for built games will be stored. You can change this if you want, but that isn’t required for the build process to work.
3. The Product Name is the name of your game. Change this name to “John Lemon’s Haunted Jaunt”. If you’d like to learn more about the general Player Settings, you can find more information in the documentation.
4. The downward arrow button at the top of the next section here means that all the settings in this section are for PC, Mac & Linux Standalone platforms. If you installed support for other platforms when installing Unity, you will see multiple buttons in that toolbar:

Each section can be clicked on to expand it and show its settings. We will only highlight a couple here, but you can find an explanation of every setting in the documentation on Player settings for Standalone platforms.
2. Adjust Resolution and Presentation Settings
Let’s adjust how your game will display to players:
1. Click on the Resolution and Presentation section to open it.
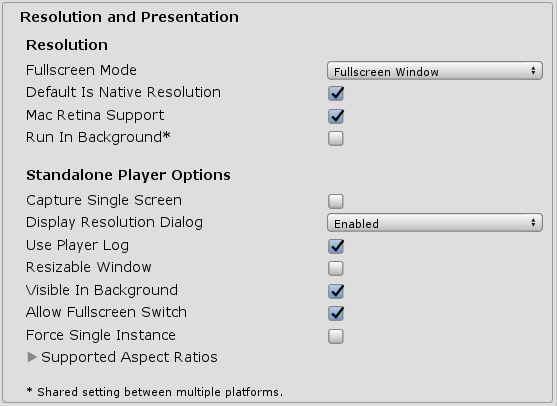
2. Resolution allows you to define the default mode that the game starts in. The Run In Background setting determines whether your game continues to run if the window/application doesn’t have the focus. For example, when that option is disabled and the person playing the game opens a web browser and browses the web while playing, the game will pause until they return to the game.
3. In the Standalone Player Options subsection, make sure that Display Resolution Dialog is set to Enabled. This allows you to show a window when the user launches the game which lets them select the resolution:
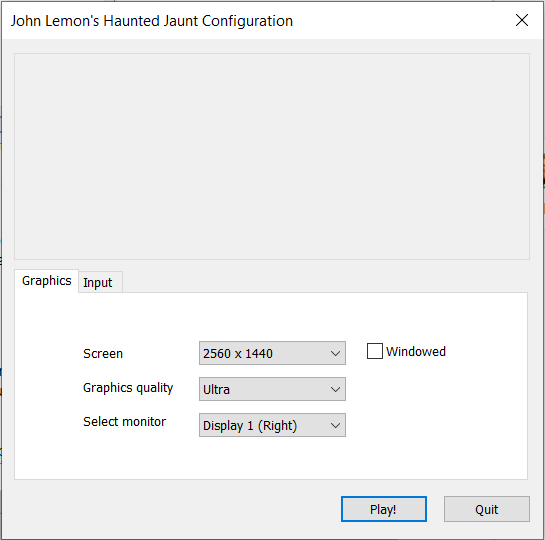
4. In the Splash Images section, you can change the image shown at the top of the above dialog (Application Config Dialog Banner) or the logo shown when the game starts (Logos).
We don’t need to adjust any more settings — now you’re ready to build the game.
3. Build Your Game
Now that you have set up the Player settings, it’s time to build your game! This takes all the Assets, (for example, the scripts, images and sound) and packages them in an optimized format for distribution.
To build your application in Unity:
1. In the top menu, select File > Build Settings.
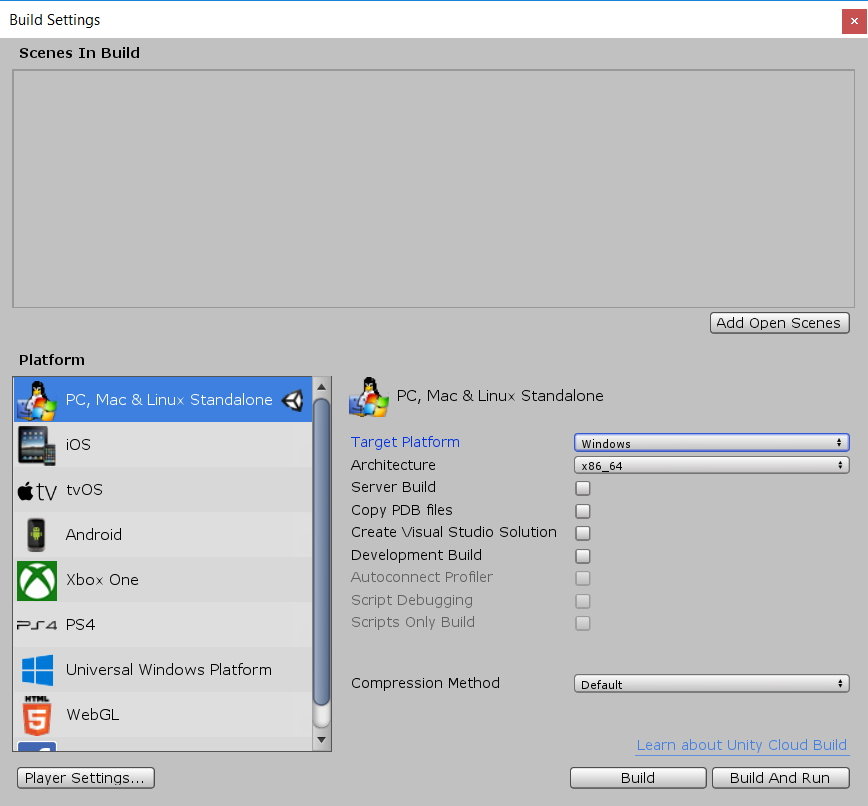
2. The Scenes In Build section at the top lists all the Scenes that will be included in your game. You can have Scenes in your Project that you only use to test features or to debug, so Unity needs to know which ones to include in the final product.
If your MainScene is still open, click Add Open Scenes to add it to the list. Alternatively, you can drag and drop your Scenes from the Project Window to the Scenes In Build section of the Build Settings window.
3. The Platform section at the bottom left allows you to choose which platforms you want your game to run on. By default, the Editor only supports the platform that it is installed on.
To install more platforms:
- Open the Unity Hub
- Click Installs
- Click the ... next to the relevant Unity version
- Click Add Component and select the platforms you want to install
4. In the bottom right there are settings related to the current selected Platform. These settings are mostly for debugging or special builds, so you can ignore them for now.
5. For now, let’s run a build for the platform you have installed the Editor on. Click Build to trigger a build.
6. Unity will open a file explorer and ask you to select a folder to store you built game. The file explorer should show the folder than contains your Project (which contains Assets, ProjectSettings and Library folders).
Create a new folder called Build and select that folder.
4. What does Unity produce?
Unity will now build you game! You can’t do anything else with the Unity Editor during this time, because it is:
- Compressing and packing all your Assets
- Detecting and ignoring the ones that aren’t used
- Compiling your scripts in an optimized form
When it’s finished, Unity opens the folder in which the Project was built and you will find the built executable for your platform (.exe on windows, .app on mac OSX and so on).
Run the executable to try your game!
5. Summary
You’ve finished this Project and created a build of John Lemon’s Haunted Jaunt! You can now send all the files in that Build folder to your friends so that they can try your game.
You’ve now created a complete game in Unity. But your journey into game development is only just starting — have a look on the Unity Learn website to find other tutorials and delve further into some areas. You can also develop your understanding by exploring in the manual and the script reference to learn more about anything we introduced in this Project.
Good luck - we can’t wait to see what you produce next.