
Challenge — Creating Interaction with a MiniMap
Tutorial
Beginner
+10XP
30 mins
(9)
Unity Technologies
In this challenge, you will reinforce what you learned about using an Interaction Script to rotate, scale, and translate objects. Additionally, we'll walk you through the process of adding and configuring a MiniMap.
Resources
Languages available:
1. Overview
This challenge will reinforce what you learned in the tutorial about using an interaction script to rotate, scale, and translate objects. Additionally, we'll walk you through the process of adding and configuring a MiniMap. As a review, this simple interaction is a best-practice for 3DOF headsets, such as an Oculus Go, since it provides interaction functionality within the limitations inherent to 3DOF.
Using the same process as you learned in the tutorial, you will link the interaction script to the Scene’s MiniMap so you can rotate, scale, and translate an object.
MiniMaps are important tools to use when giving a site tour. Users tend to get lost in larger environments, and the MiniMap provides a reference. If the user can orient themselves in the environment, they will have an easier time thinking about design and development decisions — and spend less time thinking about how to navigate through the application.
To complete this challenge, you’ll need to:
- Replace the Camera with a VR Camera
- Drag the VR Camera under the Site GameObject
- Add and configure the MiniMap Prefab
- Drag the VR camera into the User Inspector slot and the UserBeacon GameObject into the User Beacon Inspector slot
- Link up the Interaction script
- Use the touchpad to scale, rotate, and reposition the new MiniMap
2. Add a VR Camera
Swap out the Scene’s Camera with the VR Camera Prefab, OVRCameraRig, so we can use our controller at runtime.
- Swap out the Camera GameObject for OVRInteractCameraRig (Assets > External > OVR > Prefabs > OVRInteractCameraRig).
- Rename the OVRInteractCameraRig to User. We will refer to it as "User" in this challenge, but feel free to name it anything you would like.
- Adjust User’s Position so it's somewhere in the site. We started at x = 35, y = 1.5, z = -20, but feel free to use any position values you would like as long as User is somewhere in the site.
- Drag User onto the Environment GameObject in the Hierarchy.
What is the OVRInteractCameraRig?
Similar to the OVRCameraRig, the OVRInteractCameraRig is a VR camera with the necessary scripts required for Oculus input. The difference between the OVRInteractCameraRig and the OVRCameraRig is the controller. The OVRInteractCameraRig comes with the Oculus Go controller, while the OVRCameraRig comes with Oculus Rift controllers.
3. Add the MiniMap to the Scene
Add the MiniMap Prefab to the Scene so we can reference the GameObject in our Interaction script.
- Add the MiniMap Prefab to the Scene and position it in front of the user. We used the Position x = 1, y = -.5, z = 1, but any position within view of User will suffice.
- Drag the MiniMap Prefab into User so the map moves as the user moves around the Scene.
Tip — Nesting Objects
By making the MiniMap a child of User, it will move with User around the Scene (see the Locomotion tutorial to learn how to move around).
4. Add the User Locator Script
Add the UserLocator script, which locates the position of the user and displays it on the MiniMap.
- Add the script that locates the position of the user — the User Locator script — to the User GameObject.
- Drag User into the Player slot.
- With the User GameObject selected, open up MiniMap and drag the PlayerBeacon GameObject into the Player Beacon Inspector slot.
Explore — How does the UserLocator Script Work?
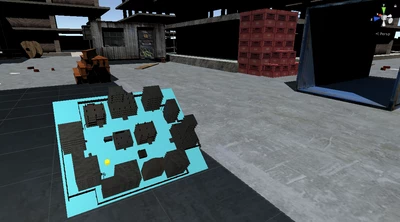
This script finds the user’s location at all times and adjusts the beacon on the user’s MiniMap accordingly. Open up the MiniMap Prefab and you will find the Player Beacon. This represents the user. As you navigate around the site, the beacon follows you on the MiniMap.
5. Set Up the Interaction Script
Add the Interaction script and set the MiniMap as the Selected GameObject so we can manipulate the map.
- Add the Interaction script, called Interaction.cs, onto User (Assets > Scripts > Interaction).
- Select User and drag the MiniMap into the Interaction component's Mini Model slot in the Inspector (Inspector > Interaction > Selected Object).
- Adjust the Rotate Speed value to greater than 0. We recommend 100, as the value makes for efficient prototyping.
- Add the User Locator script to the User GameObject. With the User GameObject selected, drag it into the Player Inspector slot.
6. Key Takeaways
By setting up the MiniMap with the Interaction and Locator scripts, you can now manipulate the rotation and scale of your MiniMap and track your current location. MiniMaps are very helpful for keeping track of your orientation and position in larger areas. You can now take these scripts and apply them to any of your projects.
By completing this challenge, you’re now able to:
- Build a MiniMap that tracks your current location
- Manipulate the scale and rotation of GameObjects with the interaction script.