Challenge — Deploying to HoloLens
Tutorial
Beginner
+10XP
30 mins
8
Unity Technologies
In this tutorial, you will set up instructions to remove the rear wheel on a bicycle.
Materials
Languages available:
1. Overview
In this tutorial, you will set up instructions to remove the rear wheel of a bicycle.
To do so, you’ll need to:
- Create the Instruction Manager
- Create three Instructional Steps for removing several bike parts
- Configure the Instruction Manager with your newly created steps and test it out
2. Create the Instruction Manager
Create an empty GameObject and add the Instruction Manager component to it.

- Create an empty GameObject.
- In the Inspector window, add an Instruction Manager component.
3. Create the First Instructional Step
Create an Instructional Step GameObject, toggle on the correct UI, and create an animation that shows the chain being removed to create the instructional step illustrating the removal of the chain.

- Create an empty GameObject. Name it Instructional Step (Chain) and add an Instructional Step component.
- Locate the Chain in the Hierarchy and create an Animation Clip that removes the chain.
- In the Inspector, assign the newly created animation to the Instructional Step as well as the Chain’s animator by dragging it into the Animation Clip parameter. (Note: Don’t forget to disable the animator on the Chain.)
- In the Inspector, check the Using Animation checkbox in the Instructional Step component.
- Check the Enable GameObjects checkbox and add the Instruction_1 (Chain) to the list as an object that is EnabledForStep.
(Hint: To create an animation, first, open the Animation window, select the object for which you want to create an animation, and click Create.)
--------------------
Explore: Animation Clip
The Chain model is rigid, which only allows us to show the chain being moved off the bike in a direct fashion. Given this constraint, create an Animation Clip that moves the chain in a realistic (or as close to realistic as possible) way to remove it. Remember to use the objects, size, scale, and rotation.
4. Create the Thru Bolt Removal Instructional Step
Create an Instructional Step GameObject, toggle on the correct UI, and create an animation that shows the thru bolt being removed to create the second Instructional Step: Removing the Thru Bolt.
- Create an empty GameObject, name it Instructional Step (Thru Bolt), and add an Instructional Step component to it.
- Locate the Thrubolt in the Hierarchy and create an Animation Clip showing the thru bolt being removed.
- Assign the newly created animation to the Instructional Step as well as the Thrubolt’s Animator. (Don’t forget to disable the Animator on the Chain).
- Check the Using Animation checkbox on the Instructional Step component.
- Check the Enabling GameObjects checkbox and increase the list size to 2. One element should enable the Instruction_2 (Thru bolt) UI. Another should disable the Chain GameObject (since it was already removed in the first step, and it would be strange if it persisted).
5. Create the Final Instructional Step that Removes the Rear Wheel
Create an Instructional Step GameObject, toggle on the correct UI, and create an animation that shows the rear wheel being removed to create the third Instructional Step, demonstrating the removal of the rear wheel.

- Create an empty GameObject, name it Instructional Step (Rearwheel) and add an Instructional Step component to it.
- Locate RearWheel in the Hierarchy and create an Animation Clip that removes it from the bicycle.
- Assign the newly created animation to the Instructional Step as well as RearWheel’s Animator.
- Check the Using Animation checkbox on the Instructional Step component.
- Check the Enabling GameObjects checkbox and increase the list size to 3. One element should enable the Instruction_3 (Rearwheel) UI. Another should disable the Chain GameObject (since it was already removed in the first step). The last should disable the Thrubolt, since it was already removed in prior step.
6. Configure the Instruction Manager
Demonstrate how to remove the rear wheel by creating a new Instructional Step GameObject, toggling on the correct UI, and creating an animation that shows the rear wheel being removed.
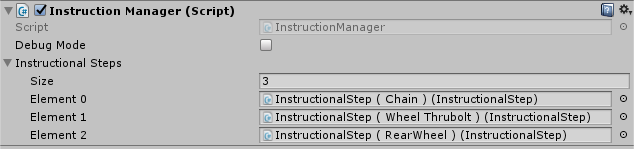
- On the Instruction Manager, increase the Instructional Steps size to 3.
- Add the three Instructional Steps you just created.
- Press play and try it out.
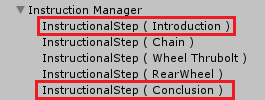
7. Bonus Challenge
Add Introduction and Conclusion steps to the list.
--------------------
- Create an Introduction UI.
- Create an Instructional Step and name it Instructional Step (Introduction).
- Use the Enable GameObjects list to toggle on the Introduction UI (don’t forget to enable the Enabling GameObjects Checkbox).
- Add it to the first slot in the list.
- Repeat steps 1-4 for the Conclusion Step (adjusting the name of the Instructional Step and positioning it last in the Instruction Manager List).
8. Key Takeaways
You've now created an instructional sequence to remove the bike wheel!
By completing this challenge, you’re now able to:
- Create Instructional Step sequences
- Add various functionality for each step (audio, enable / disable GameObjects, animations)
