
Challenge — Labeling Objects with Text and Images (Intro to UI)
Tutorial
Beginner
+10XP
30 mins
(57)
Unity Technologies
In this challenge, you will be creating a welcome sign using mobile UI.
Resources
Languages available:
1. Mobile UI
This challenge will be the first part of our mobile UI system. You will make a welcome sign on a door by adding four images representing buttons.
You will add multiple Image and Text Components around the Scene. In the Interactive UI tutorial, you will learn how to use these images as buttons and swap your surroundings, representing a world change.
This challenge will help you practice building UI in both the 3D world and on your screen.
To do so, you’ll need to:
- Make a sign and place it on the door in World Space
- Make four mobile UI images (representing your UI buttons) in Screen Space.
2. Add a UI Panel to the Scene
Add a Panel, convert its Canvas to World Space, and place it on your door.
1. Add a Panel GameObject and adjust its layout to stretch across the Canvas.
2. Convert the Canvas to World Space.
3. Resize the Canvas to a more appropriate size for a Label.
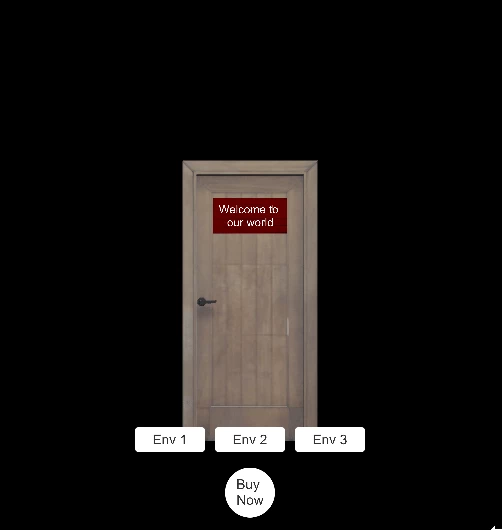
4. Re-position the Canvas on the door model. See the image below for a hint.
5. Change Panel Color to a color of your liking; we chose red for this example.
3. Add Text to the Panel
Add the text “Welcome to our world!” so the user understands to walk through the portal.
1. Add a Text GameObject as a child of the Panel.
2. Change the text to Welcome to our world!
3. Change the Font Color to white.
4. Increase the Font Size to 100 and adjust its Overflow.
4. Confirm the Camera is Ready for AR
Make sure the Camera has the appropriate components to make it AR ready.
1. In the Hierarchy, select the AR Camera (AR Session Origin > AR Camera).
2. Ensure the components match the image above.
5. Add Your Mobile UI Screen Images
Add a new Canvas and add four new images. (These will eventually be converted to buttons in the Interactive UI tutorial.)
1. Add a new Canvas with a Screen Space - Overlay Render Mode.
2. Add a new Image as a child of that Canvas (this will eventually be converted into a button in the Intermediate UI tutorial).
3. Duplicate that image three times to create the other three buttons.
4. Rearrange the buttons so they fit well on the screen.
--------------------
Tip — Duplicate, don't Recreate
When creating multiple similar GameObjects in Unity, it's best practice to create a base version and duplicate it multiple times. In this example, we have created a basic label before duplicating it multiple times. Now the labels only need to have their text changed and lines positioned to point at the relevant objects. Aside from saving you valuable time in development, this process ensures consistency across similar GameObjects.
6. Make the UI Responsive to Different Screen Sizes
Select all of the images and set their anchor point to the bottom-middle of the screen.
1. In the Hierarchy, select all four images.
2. In the Inspector, click Anchor Presets and select the lower-middle dot so the images are all anchored to the lower-middle point of the Canvas.
--------------------
What is a Pivot Point?
The Pivot Point refers to the GameObject’s point of rotation. By default, the Pivot Point is centered in the middle of the 2D or 3D GameObject. However, by modifying the X and Y value, this Pivot Point translates to the new position that the GameObject will rotate around.
The GIF below illustrates this feature.
What is an Anchor Point?
The Anchor Point is a critical ingredient in responsive UI. It locks the UI to that specified area of the Canvas. If that area moves, so will the Anchor Point and, subsequently, the anchored UI GameObject.
7. Add Text to Your Images
Add Text objects as children of each button and format them accordingly.
1. Add a Text GameObject as a child of each image. These images will eventually be buttons swapping the environments, so we need to indicate each button type with text
2. Change the text of the first image to Env 1, the second to Env 2, and the third to Env 3.
3. Increase the font size to 100. Adjust its Overflow, and reduce its Scale to increase text clarity.
4. Make the fourth read Learn More. This image will eventually be our Call to Action button, so the user can purchase tickets or learn more while using the application.
5. Make any last adjustments needed to keep the text in the center of each image.
8. Add New Images to Your Button Placeholders
Convert the Asset images to Sprites so you can add them as the Source Image values.
1. Find and select the images in the Project Window (Project > Assets > Oval / Rectangle 2).
2. Add the Oval Sprite as the Source Image of the CTA (Call to Action) image.
3. Add the Rectangle Sprite as the Source image for all Environment images.
4. Make any last adjustments that you feel would enhance the UI or the Scene.
9. Bonus Challenge!
Mock-up and import your own images to act as the button backgrounds. Try adding a nice white rim around the outside and making the buttons a different color on the inside.
10. Key Takeaways
You've now added text and images in your Scene. You have all of the necessary tools to add labels, logos, and other graphics as needed.
By completing this challenge, you’re now able to:
- Add images and text to a 3D Scene (World Space)
- Add images and text to a 2D Scene (Screen Space)
- Customize the text and images to your liking